Page 86 of 276

84
Practical information
Mat fitting/removal
When removing the front mat, push the
seats as far back as possible and remove
the fixings.
When refitting, position the mat correctly
on the pins and clip the fixings. Check that
the mat is secured correctly.
Areas for toll cards/car park tickets
The athermic windscreen has two
non-reflective zones located either side
of the base of the interior mirror.
They are intended for affixing toll cards
and/or car park tickets.
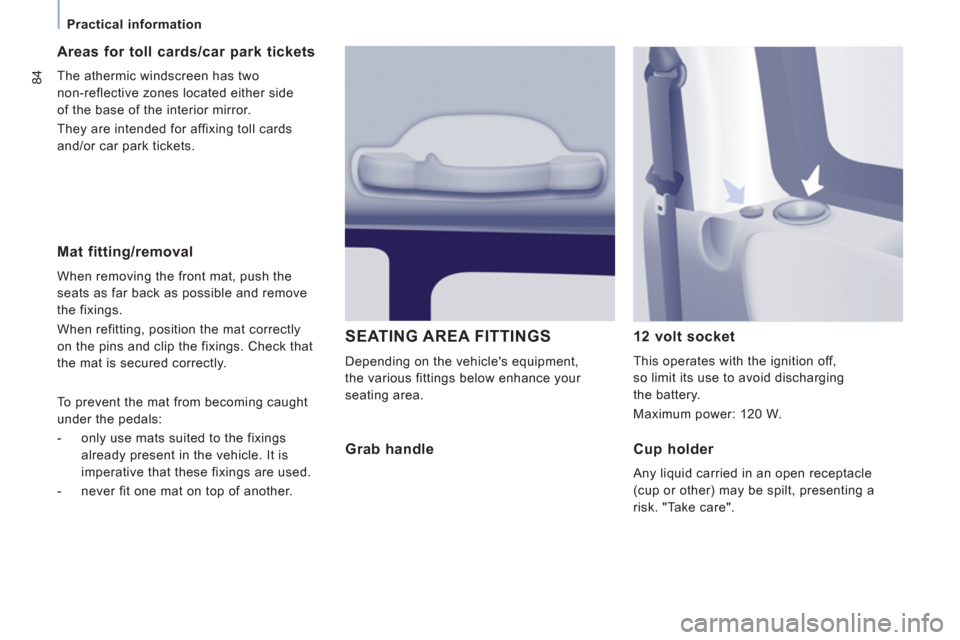
SEATING AREA FITTINGS
Depending on the vehicle's equipment,
the various fittings below enhance your
seating area.
12 volt socket
This operates with the ignition off,
so limit its use to avoid discharging
the battery.
Maximum power: 120 W. To prevent the mat from becoming caught
under the pedals:
- only use mats suited to the fixings
already present in the vehicle. It is
imperative that these fixings are used.
- never fit one mat on top of another.
Grab handle
Cup holder
Any liquid carried in an open receptacle
(cup or other) may be spilt, presenting a
risk. "Take care".
Page 92 of 276

90
Mirrors and windows
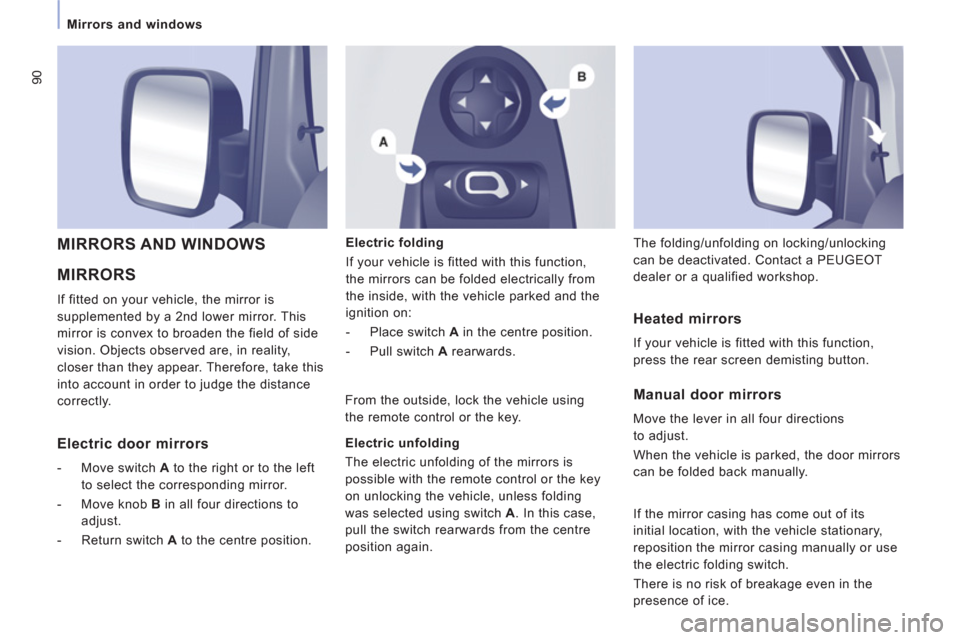
MIRRORS
If fitted on your vehicle, the mirror is
supplemented by a 2nd lower mirror. This
mirror is convex to broaden the field of side
vision. Objects observed are, in reality,
closer than they appear. Therefore, take this
into account in order to judge the distance
correctly.
MIRRORS AND WINDOWS
Electric folding
If your vehicle is fitted with this function,
the mirrors can be folded electrically from
the inside, with the vehicle parked and the
ignition on:
- Place switch A
in the centre position.
- Pull switch A
rearwards.
Heated mirrors
If your vehicle is fitted with this function,
press the rear screen demisting button. The folding/unfolding on locking/unlocking
can be deactivated. Contact a PEUGEOT
dealer or a qualified workshop.
Electric door mirrors
- Move switch A
to the right or to the left
to select the corresponding mirror.
- Move knob B
in all four directions to
adjust.
- Return switch A
to the centre position. From the outside, lock the vehicle using
the remote control or the key.
Electric unfolding
The electric unfolding of the mirrors is
possible with the remote control or the key
on unlocking the vehicle, unless folding
was selected using switch A
. In this case,
pull the switch rearwards from the centre
position again.
Manual door mirrors
Move the lever in all four directions
to adjust.
When the vehicle is parked, the door mirrors
can be folded back manually.
If the mirror casing has come out of its
initial location, with the vehicle stationary,
reposition the mirror casing manually or use
the electric folding switch.
There is no risk of breakage even in the
presence of ice.
Page 93 of 276
Mirrors and windows
EASE OF USE and COMFOR
T
3
Manual rear view mirror
The rear view mirror has two positions:
- day (normal),
- night (anti-dazzle).
To change from one to the other, push or
pull the lever on the lower edge of the mirror.
SURVEILLANCE MIRROR
This mirror, placed on top of the central
mirror, enables the driver or front passenger
to observe all the rear seats.
Fitted on its own ball joint, it’s manual
adjustment is simple and provides a view
of the rear interior of the vehicle.
It can also be adjusted for improved
visibility during manoeuvres or when
overtaking.
REAR WINDOWS
2nd row side windows
If fitted on your vehicle, the 2nd row side
windows can be opened.
Squeeze the two controls then move the
window sideways. 4 notches are available.
While driving, the window must be closed or
secured on one of the 4 notches.
3rd row rear quarter lights
These are fixed.
Page 94 of 276

92
Mirrors and windows
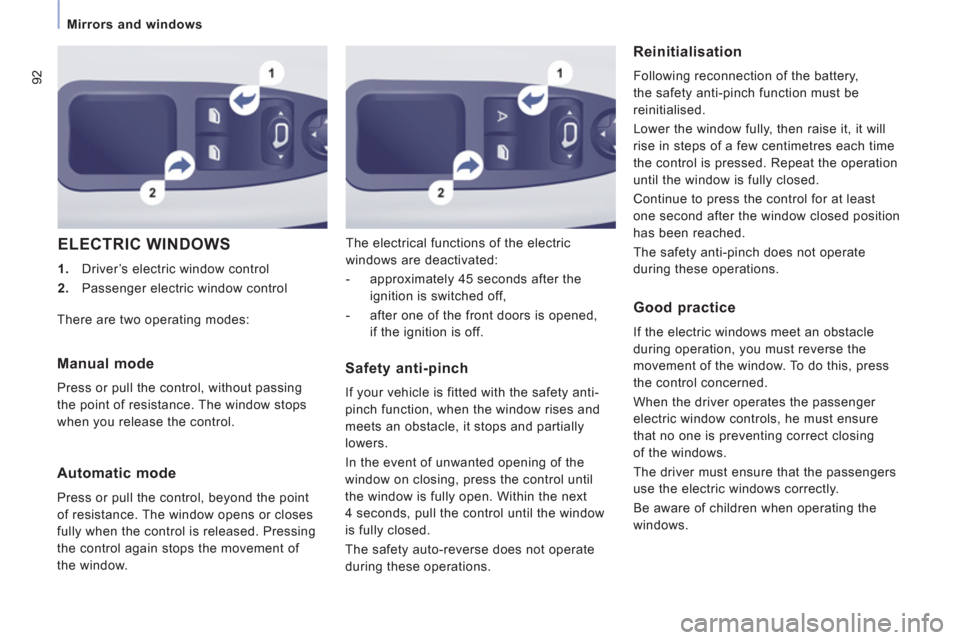
ELECTRIC WINDOWS
1.
Driver’s electric window control
2.
Passenger electric window control The electrical functions of the electric
windows are deactivated:
- approximately 45 seconds after the
ignition is switched off,
- after one of the front doors is opened,
if the ignition is off.
Reinitialisation
Following reconnection of the battery,
the safety anti-pinch function must be
reinitialised.
Lower the window fully, then raise it, it will
rise in steps of a few centimetres each time
the control is pressed. Repeat the operation
until the window is fully closed.
Continue to press the control for at least
one second after the window closed position
has been reached.
The safety anti-pinch does not operate
during these operations.
There are two operating modes:
Manual mode
Press or pull the control, without passing
the point of resistance. The window stops
when you release the control.
Automatic mode
Press or pull the control, beyond the point
of resistance. The window opens or closes
fully when the control is released. Pressing
the control again stops the movement of
the window.
Safety anti-pinch
If your vehicle is fitted with the safety anti-
pinch function, when the window rises and
meets an obstacle, it stops and partially
lowers.
In the event of unwanted opening of the
window on closing, press the control until
the window is fully open. Within the next
4 seconds, pull the control until the window
is fully closed.
The safety auto-reverse does not operate
during these operations.
Good practice
If the electric windows meet an obstacle
during operation, you must reverse the
movement of the window. To do this, press
the control concerned.
When the driver operates the passenger
electric window controls, he must ensure
that no one is preventing correct closing
of the windows.
The driver must ensure that the passengers
use the electric windows correctly.
Be aware of children when operating the
windows.
Page 145 of 276

143
Changing a fuse
QUICK HEL
P
7
RIGHT-HAND SIDE DASHBOARD
FUSES
- Tilt the storage compartment then pull it
firmly to access the fuses.
Fuses
A (amps)
Allocation
1
15
Rear wiper
2
-
Free
3
5
Airbag control unit
4
10
Steering wheel angle sensor, Diagnostic socket, ESP sensor,
Manual ventilation, Clutch switch, Headlamp beam height,
Particle emission filter pump
5
30
Electric mirrors, Passenger electric window motor
6
30
Front electric windows supply
7
5
Courtesy lamps and glove box lamp
8
20
Multifunction screen, Anti-theft alarm siren, Audio equipment,
Compact disc changer, Audio/telephone, Trailer fusebox
(accessory)
9
10
Row 2 accessory socket
10
30
Rear ride height corrector, Steering wheel switching,
Instrument panel
11
15
Diagnostic socket, Ignition switch
12
15
Hands-free kit, Airbag control unit, Parking sensors control
unit
13
5
Engine fusebox, Trailer fusebox
14
15
Rain sensor, Rear ventilation, Digital air conditioning,
Instrument panel
15
30
Locking/unlocking/deadlocking
16
-
Free
17
40
Heated rear screen, Heated mirrors
Page 146 of 276
144
Changing a fuse
PASSENGER COMPARTMENT
FUSES
- Unclip the battery compartment cover.
- Remove the red battery terminal (+).
When you have finished, close the cover
carefully.
Fuses
A (amps)
Allocation
1
30
Heated seats
2
20
Row 3 12 V socket
3
40/50
Trailer fusebox (accessory)
4
-
Free
36
15
Hinged door locks
37
10
Hinged door locks
38
20
Hinged door rear wiper
39
10
Rear ventilation
40
5
Folding mirrors
Page 153 of 276
151
Dimensions
TECHNICAL DAT
A
8
H1
L Overall length
4 805
5 135
H Overall height pneumatic / metal suspension
1 895/1 942
A Wheelbase
3 000
3 122
B Front overhang
975
C Rear overhang
830
1 038
Overall width:
on panel
1 870
D with mouldings
1 895
with mirrors folded
1 986
with mirrors unfolded
2 194
E Width of front tracks
1 574
F Width of rear tracks
1 574
Turning circle between kerbs (m)
12.18
12.59
Maximum loads (kg)
Payload
1 000
On roof
170
DIMENSIONS
The vehicle is available in 2 lengths (L1, L2) and 1 height (H1),
refer to the tables:
Page 267 of 276

15
7
Exterior
VISUAL SEARCH
10
EXTERIOR
Filler cap, fuel tank 125-126
Fuel cut-off, Diesel priming 126-127
Wiper blade 146
Door mirrors 90
Side repeater 139
Front lamps, foglamps, direction
indicators 45-47
Headlamp beam height adjustment 47
Changing front bulbs 137-139
Headlamp wash 48, 121
Snow shield 136
Front doors 24-25
Sliding side door 25-26
Key 22
Opening the bonnet 117
Electric child lock 26
Brakes, pads 93, 122
Emergency braking 95
ABS, EBFD 95
ASR, ESP 96
Tyres, pressures 156
Rear suspension 87-89
Doors, tailgate 24-27
Emergency control 27
Accessories 116
Number plate lamp 141
Dimensions 150-153
Temporary puncture repair kit 130
Spare wheel, jack,
changing a wheel, tools 132-136
Inflation, pressures 156
Remote control 21-22
Changing the battery,
reinitialisation 22
Key 22
Starting 44
Central locking / unlocking 21, 24-25
Alarm 23-24
Towing, lifting 147
Towbar 114-115
Parking sensors 94
Rear lamps,
direction indicators 45-46, 139
3rd brake lamp 141
Changing rear bulbs 137, 140