Page 41 of 304
.
39
Hybrid system
Consumption of your hybrid in the screen
Average consumption over the last 5 minutes.
Resetting the history
With the hybrid system active, when trip 2displayed, press the control for 2 seconds to
reset the history to zero.
For more information on the trip computer, refer to the corresponding section. "60 % H
ybrid Use" corresponds to 60 % of the cumulative running time of the electric motor in the various Modes (Auto,
ZEV, Sport or 4WD) and 40 % of the time with the Dieselengine only (with no contribution from the hybrid system).
Page 42 of 304
40
Hybrid system
200 V high voltage battery
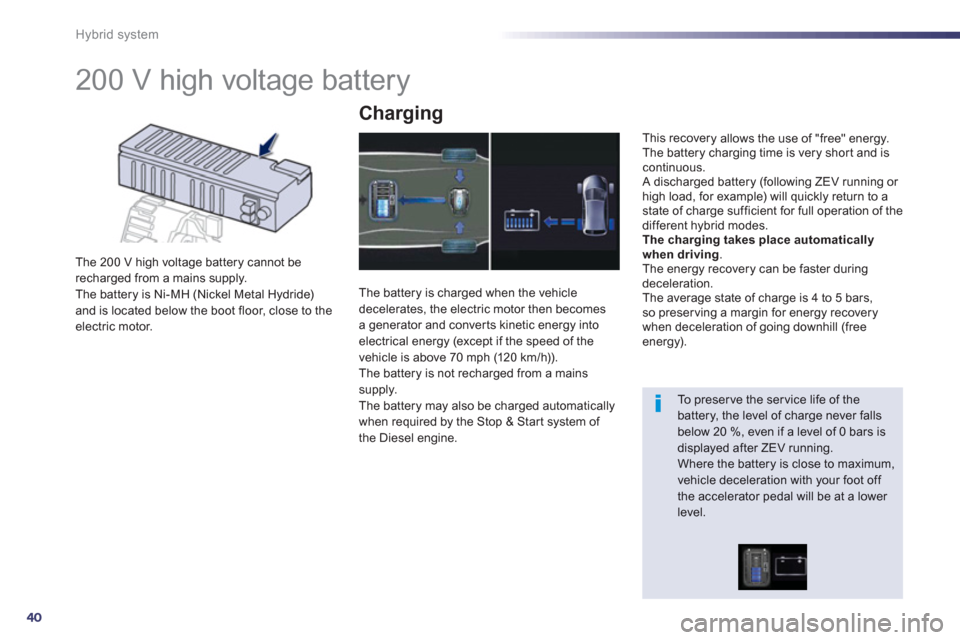
The 200 V high voltage battery cannot berecharged from a mains supply.
The battery is Ni-MH (Nickel Metal Hydride) and is located below the boot floor, close to the electric motor.
Charging
The battery is charged when the vehicledecelerates, the electric motor then becomes
a generator and converts kinetic energy intoelectrical energy (except if the speed of the
vehicle is above 70 mph (120 km/h)).
The battery is not recharged from a mains
supply.
The battery may also be charged automatically
when required by the Stop & Star t system of
the Diesel engine.
This recover
y allows the use of "free" energy.
The battery charging time is very shor t and iscontinuous.
A discharged battery (following ZEV running or high load, for example) will quickly return to astate of charge sufficient for full operation of the
different hybrid modes.Thecharging takes place automatically
when driving.
The energy recovery can be faster during deceleration.
The average state of charge is 4 to 5 bars, so preser ving a margin for energy recovery
when deceleration of going downhill (freeenergy).
To preser ve the ser vice life of the battery, the level of charge never falls below 20 %, even if a level of 0 bars is displayed after ZEV running. Where the battery is close to maximum, vehicle deceleration with your foot off the accelerator pedal will be at a lower level.
Page 48 of 304

46
Instruments and controls
Indicator and warning
lamps
Visual indicators informing the driver that a system is in operation, switched off or has a
fault.
When the ignition is switched on
Certain warning lamps come on for a few seconds in the instrument panel and/or
instrument panel screen when the vehicle's
ignition is switched on.
When the engine is started, these same
warning lamps should go off.
If they remain on, before moving off, refer to the
information on the warning lamp concerned.
Associated warnings
The switching on of cer tain warning lamps maybe accompanied by an audible signal and a message in the instrument panel screen.
The warning lamps may come on continuously(fixed) or flash.
Certain warning lamps may come on inone of two modes. Only by relating thetype of lighting to the operating status
of the vehicle can it be ascertainedwhether the situation is normal or whether a fault has occurred.
1
2
2
2
3
3
3
2
3
3
With the vehicle stationar y
, use the left handythumb wheel to move through the menus, so as to configure the vehicle settings (driving andcomfort systems, ...).
- Rotation (other than menu): scroll through
the list of active functions available,
- Press: main menu, confirm the selection,
- Rotation (in a menu): move up or down in
the menu.
Main menu
Vehicle parameters Screen settin
gs
Preheatin
g / Preventilation
Driving position setting
Unlocking boot only
Driving assistance
Speeds memorised
Rear wipe in reverse
gear
Automatic parkin
g brake
Lighting
Welcome lighting
Guide-me-home headlamps
Directional headlamps
Parameters
Language
Units
Fuel consumption
Te m p e r a t u r e
Colours
3
1
2
2
3
2
3
1
2
Page 90 of 304

88
Comfort
Electric adjustments
Switch on the ignition or star t the engine if the vehicle has gone into economy mode.
1.Adjustment of the seat cushion angleand height, and forwards-backwards
adjustment�)Raise or lower the front of the control
to adjust the seat cushion angle. �)Raise or lower the rear of the control
to raise or lower the seat.�)Simultaneously raise or lower the frontand rear of the control in order to raise or lower the entire seat. 2.Adjustment of the backrest angle Move the control forwards or backwards
to adjust the backrest angle. 3. Adjustment of lumbar support This function allows you to independentlyadjust the height and level of lumbar support.
The electric functions of the driver's seat are active for about a minute after opening the
front door. They are deactivated about a minute after switching off the ignition and in economy mode. To reactivate them, switch on the ignition.
M
ove the control:�)Forwards or backwards to increase or reduce the lumbar suppor t. �)Upwards or downwards to raise or lower
the lumbar suppor t zone.
Front seats
Page 110 of 304
108
Comfort
Dual-zone digital air conditioning
Automatic operation
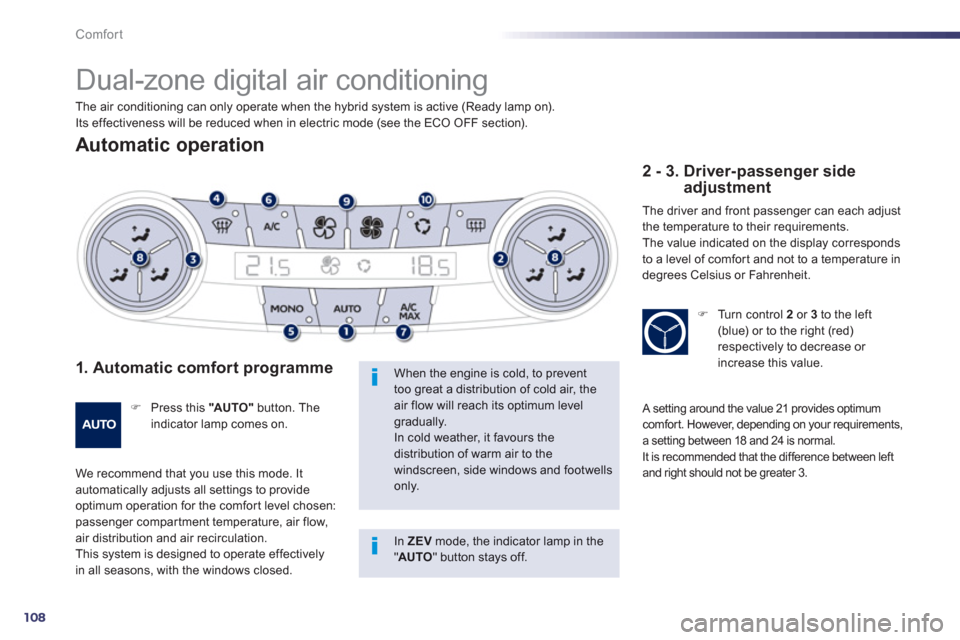
1. Automatic comfort programme
�)
Press this "AU TO "button. Theindicator lamp comes on.
We recommend that you use this mode. It automatically adjusts all settings to provide
optimum operation for the comfor t level chosen: passenger compar tment temperature, air flow, air distribution and air recirculation.
This system is designed to operate effectivelyin all seasons, with the windows closed.
When the engine is cold, to prevent too great a distribution of cold air, the air flow will reach its optimum levelgradually. In cold weather, it favours the distribution of warm air to the windscreen, side windows and footwells only.
2 - 3. Driver-passenger side adjustment
The driver and front passenger can each adjust
the temperature to their requirements.
The value indicated on the displa
y corresponds
to a level of comfor t and not to a temperature in
degrees Celsius or Fahrenheit.
�) Turn control 2 or 3
to the left(blue) or to the right (red) respectively to decrease or increase this value.
A setting around the value 21 provides optimum comfort. However, depending on your requirements, a setting between 18 and 24 is normal.
It is recommended that the difference between left and right should not be greater 3.
The air conditioning can only operate when the hybrid system is active (Ready lamp on).
Its effectiveness will be reduced when in electric mode (see the ECO OFF section).
In ZEV mode, the indicator lamp in the" AUTO
" button stays off.
Page 113 of 304
3
111
Comfort
Quad-zone digital air conditioning
Automatic operation
1. Automatic comfort programme
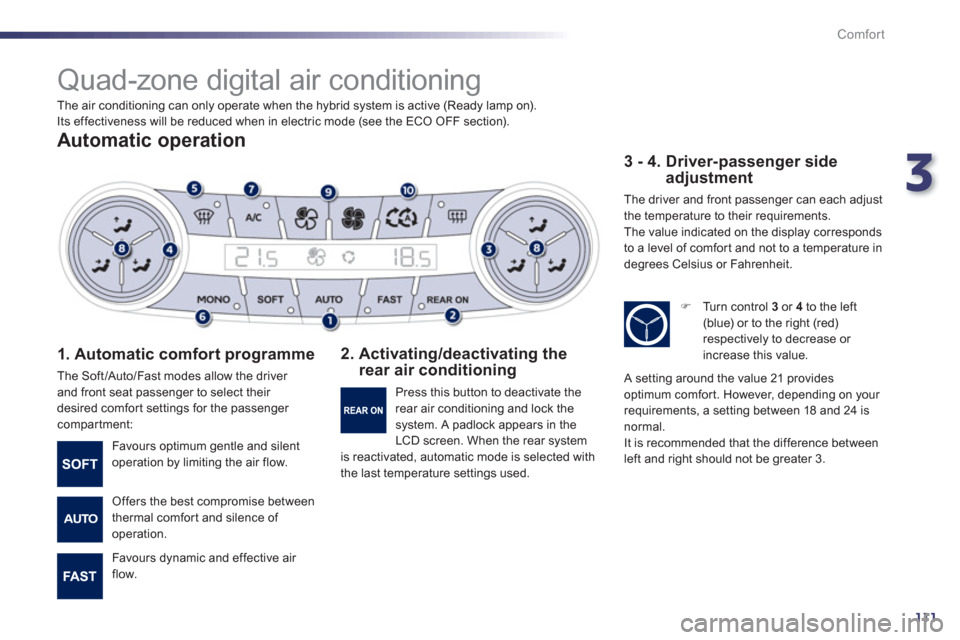
The Soft/Auto/Fast modes allow the driver
and front seat passenger to select their
desired comfort settings for the passenger compartment:
2. Activating/deactivating the rear air conditioning
3 - 4. Driver-passenger side adjustment
The driver and front passenger can each adjust
the temperature to their requirements.
The value indicated on the display corresponds
to a level of comfor t and not to a temperature in
degrees Celsius or Fahrenheit.
Favours optimum gentle and silent
operation by limiting the air flow.
Offers the best compromise between
thermal comfort and silence of
operation.
Favours d
ynamic and effective air
flow. Pr
ess this button to deactivate the
rear air conditioning and lock thesystem. A padlock appears in the
LCD screen. When the rear system is reactivated, automatic mode is selected with
the last temperature settings used.
�)
Turn control 3or 4to the left (blue) or to the right (red)respectively to decrease or
increase this value.
A setting around the value 21 providesoptimum comfort. However, depending on your
requirements, a setting between 18 and 24 is
normal.
It is recommended that the difference between
left and right should not be greater 3. The air conditionin
g can only operate when the hybrid system is active (Ready lamp on).
Its effectiveness will be reduced when in electric mode (see the ECO OFF section).
Page 116 of 304
114
Comfort
Adjusting the rear passenger comfort level
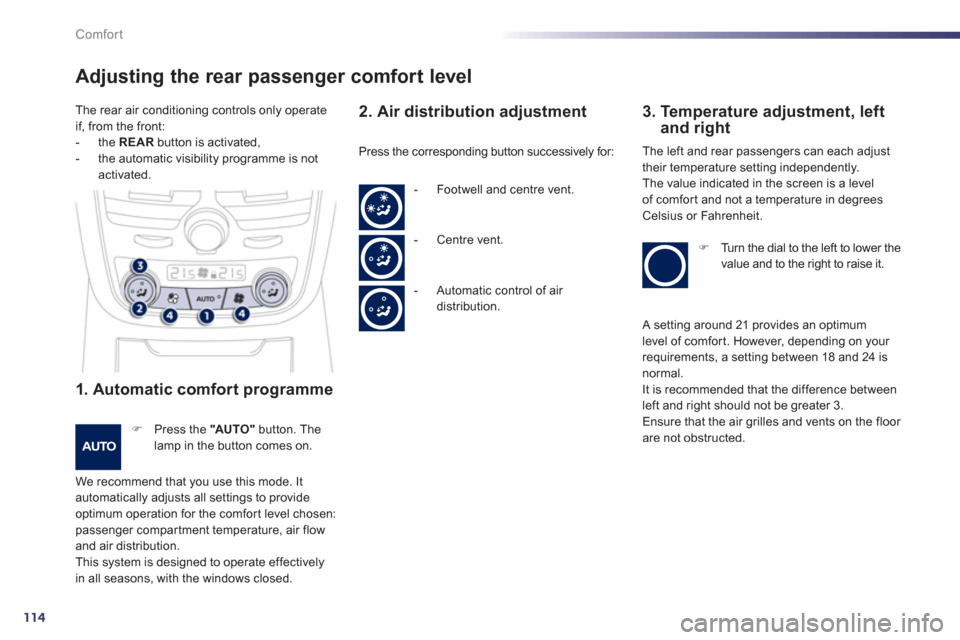
1. Automatic comfort programme
�) Press the "AUTO"
button. The lamp in the button comes on.
We recommend that you use this mode. It automatically adjusts all settings to provide
optimum operation for the comfor t level chosen: passenger compar tment temperature, air flowand air distribution.
This system is designed to operate effectivelyin all seasons, with the windows closed.
2. Air distribution adjustment
3. Temperature adjustment, leftand right
Press the corresponding button successively for: The left and rear passengers can each adjust
their temperature setting independently.
Th
e value indicated in the screen is a level
of comfor t and not a temperature in degreesCelsius or Fahrenheit.
�) Turn the dial to the left to lower the
value and to the right to raise it. - F
ootwell and centre vent.
-
Centre vent.
- A
utomatic control of air distribution. The rear air conditionin
g controls only operate
if, from the front:
- th
e REARbutton is activated,- the automatic visibility programme is notactivated.
A setting around 21 provides an optimum
level of comfor t. However, depending on your
requirements, a setting between 18 and 24 isnormal.
It is recommended that the difference between
left and right should not be greater 3.
Ensure that the air grilles and vents on the floor are not obstructed.
Page 120 of 304
118
Comfort
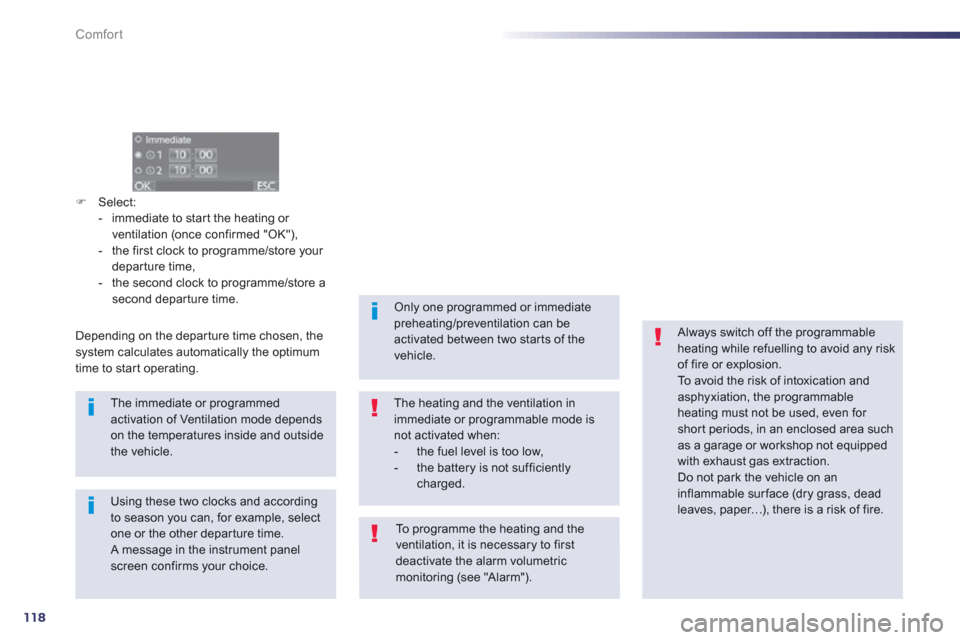
�)Select:
- immediate to star t the heating or
ventilation
(once confirmed "OK"),
- the first clock to programme/store your departure time,
- the second clock to programme/store a
second depar ture time.
The immediate or programmedactivation of Ventilation mode depends on the temperatures inside and outsidethe vehicle.
Depending on the departure time chosen, the system calculates automatically the optimum
time to star t operating.
Using these two clocks and according to season you can, for example, select one or the other depar ture time. A message in the instrument panel screen confirms your choice.
Only one programmed or immediatepreheating/preventilation can beactivated between two starts of thevehicle.
The heating and the ventilation inimmediate or programmable mode isnot activated when: - the fuel level is too low,- the battery is not sufficientlycharged.
To p r ogramme the heating and the
ventilation, it is necessary to firstdeactivate the alarm volumetricmonitoring (see "Alarm").
Always switch off the programmableheating while refuelling to avoid any riskof fire or explosion.
To avoid the risk of intoxication andasphyxiation, the programmable heating must not be used, even for short periods, in an enclosed area such as a garage or workshop not equipped with exhaust gas extraction.
Do not park the vehicle on an inflammable sur face (dry grass, dead leaves, paper…), there is a risk of fire.