2012 Peugeot 3008 Hybrid 4 display
[x] Cancel search: displayPage 37 of 284

HYBRID SYSTEM
35
Examples of displays
On starting and when stationary
there is no fl ow of energy (the Stop & Start system
stops and restarts the Diesel engine automatically).
Energy recovery
During this phase (deceleration, braking, foot off the
accelerator, … all modes), the battery is recharged by
the electric motor/generator, itself driven by the rear
wheels.
100 % electric
In all electric running (AUTO or ZEV modes), only the
electric motor, powered by the battery, drives the rear
wheels.
The display of "Zero Emissions" indicates that the
Diesel engine is off and the vehicle is producing no CO
2.
Page 41 of 284

HYBRID SYSTEM
39
CONSUMPTION OF YOUR HYBRID IN THE SCREEN
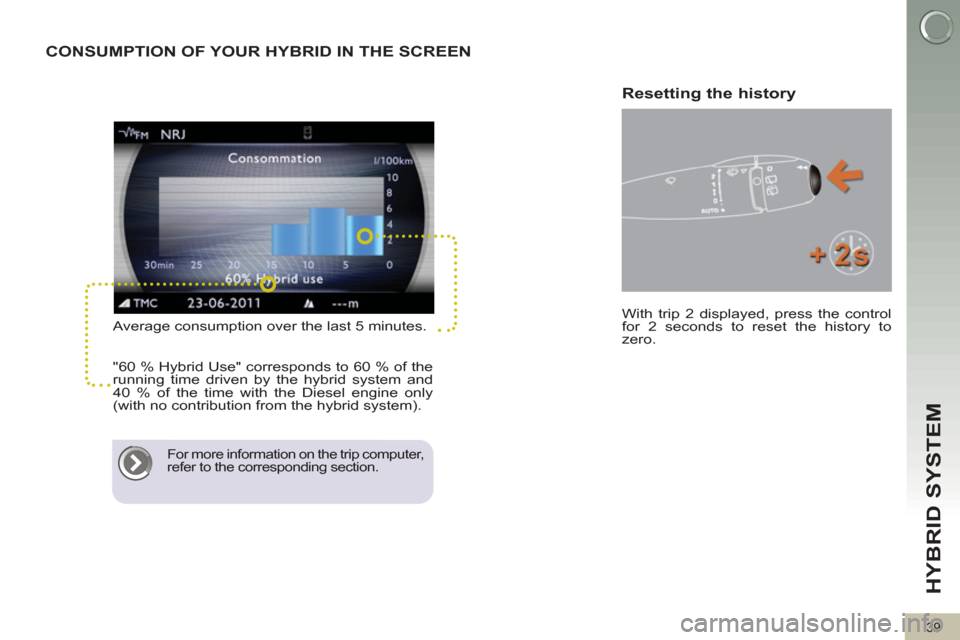
Average consumption over the last 5 minutes.
"60 % Hybrid Use" corresponds to 60 % of the
running time driven by the hybrid system and
40 % of the time with the Diesel engine only
(with no contribution from the hybrid system).
For more information on the trip computer,
refer to the corresponding section.
Resetting the history
With trip 2 displayed, press the control
for 2 seconds to reset the history to
zero.
Page 42 of 284

HYBRID SYSTEM
40
200 V HIGH VOLTAGE
BATTERY
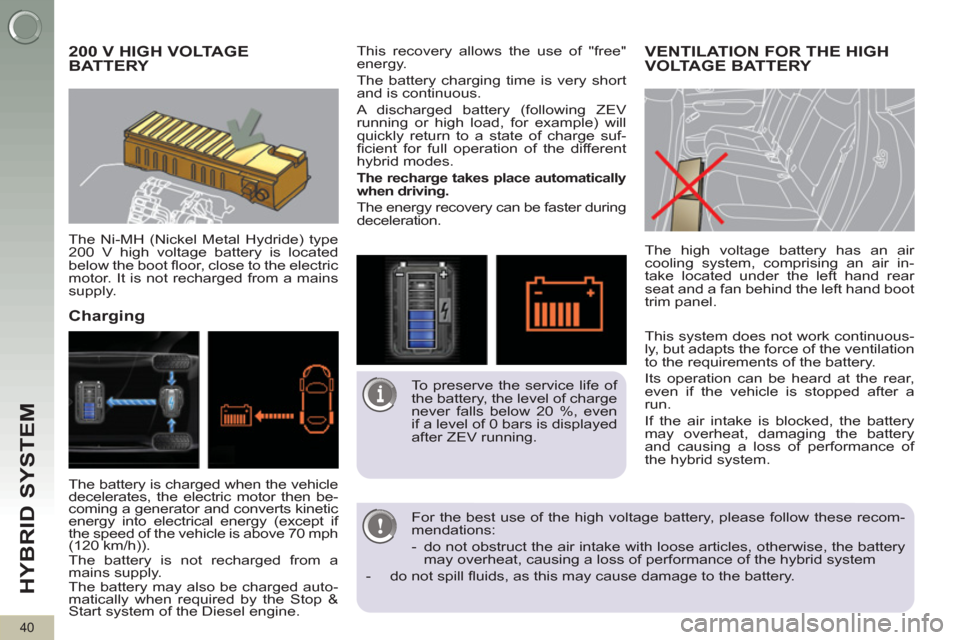
The Ni-MH (Nickel Metal Hydride) type
200 V high voltage battery is located
below the boot fl oor, close to the electric
motor. It is not recharged from a mains
supply.
Charging
This recovery allows the use of "free"
energy.
The battery charging time is very short
and is continuous.
A discharged battery (following ZEV
running or high load, for example) will
quickly return to a state of charge suf-
fi cient for full operation of the different
hybrid modes.
The recharge takes place automatically
when driving .
The energy recovery can be faster during
deceleration.
This system does not work continuous-
ly, but adapts the force of the ventilation
to the requirements of the battery.
Its operation can be heard at the rear,
even if the vehicle is stopped after a
run.
If the air intake is blocked, the battery
may overheat, damaging the battery
and causing a loss of performance of
the hybrid system.
VENTILATION FOR THE HIGH
VOLTAGE BATTERY
For the best use of the high voltage battery, please follow these recom-
mendations:
- do not obstruct the air intake with loose articles, otherwise, the battery
may overheat, causing a loss of performance of the hybrid system
- do not spill fl uids, as this may cause damage to the battery.
The battery is charged when the vehicle
decelerates, the electric motor then be-
coming a generator and converts kinetic
energy into electrical energy (except if
the speed of the vehicle is above 70 mph
(120 km/h)).
The battery is not recharged from a
mains supply.
The battery may also be charged auto-
matically when required by the Stop &
Start system of the Diesel engine.
To preserve the service life of
the battery, the level of charge
never falls below 20 %, even
if a level of 0 bars is displayed
after ZEV running.
The high voltage battery has an air
cooling system, comprising an air in-
take located under the left hand rear
seat and a fan behind the left hand boot
trim panel.
Page 46 of 284

44
INSTRUMENTS and CONTROLS
Panel grouping together the vehicle operation indication dials and warning lamps.
INSTRUMENT PANELS
For more information, refer to
the paragraph relating to the
button or function and its as-
sociated display.
Dials
6.
Display zero reset or service indi-
cator re-display button.
Resets the selected function to zero
(trip distance recorder or service in-
dicator) or displays the service indi-
cator again.
7.
Instrument panel lighting dimmer.
Adjusts the brightness of the lighting
of the instruments and controls, if the
vehicle lighting is on.
8.
Ready lamp
Indicates that the vehicle is ready to
move off.
1.
Power meter
Indicates the power available as a
percentage .
For more information refer to the
"Hybrid" section.
2.
Coolant temperature gauge.
Indicates the temperature of the
engine coolant (° Celsius).
3.
Fuel gauge.
Indicates the quantity of fuel remaining
in the tank.
4.
Speedometer.
Indicates the current speed of the
moving vehicle (mph or km/h).
5.
Screen.
Screen(s)
A.
Speed limiter
or
Cruise control.
(mph or km/h)
B.
Trip distance recorder.
(miles or km)
C.
Service indicator.
(miles or km) or,
Engine oil level indicator.
or
Distance recorder.
(miles or km)
D.
6-speed electronic gear control
gearbox.
E. - Electrical fl ow or
- Warning messages and function
status messages or
- Trip computer or
- Satellite navigation information or
-
Menus (with Peugeot Connect
Media Navigation (NG4 3D)).
Page 47 of 284

45
INSTRUMENTS and CONTROLS
The main menu and its asso-
ciated functions can only be
accessed when stationary, via
buttons 1
to 4
.
A message appears on the screen,
above a certain speed threshold, in-
dicating that the main menu cannot
be displayed.
The trip computer displays can only
be accessed while driving, via but-
tons 2
and 3
(refer to the "Trip com-
puter" paragraph).
Main menu
�)
Press button 1
for access to the
main menu and select one of the
following functions:
- "Vehicle parameters",
- "Choice of language",
- "Choice of units".
�)
Press button 2
or 3
to move in the
screen.
�)
Press button 1
again to confi rm the
selection.
Instrument panel navigator associated
with the Peugeot Connect Media
This group of buttons permits:
- when stationary
, confi guration
of the vehicle's equipment and
the screen settings (languages,
units...),
- while driving
, scrolling of the active
functions (trip computer, naviga-
tion...).
Controls
There are four buttons to control the
large 16/9 screen in the instrument
panel:
1.
access the main menu, confi rm the
selection,
2.
move up through the menu,
3.
move down through the menu,
4.
return to the previous display, exit
from the menu.
Page 48 of 284

46
INSTRUMENTS and CONTROLS
Vehicle parameters
This menu allows you to activate or
deactivate certain driving and comfort
equipment (according to country):
- wiper linked with reverse gear (refer
to the "Visibility" section),
- selective unlocking (refer to the "Ac-
cess" section),
- guide-me-home and welcome lighting
(refer to the "Visibility" section),
- interior mood lighting (refer to the
"Visibility" section),
- daytime running lamps (refer to the
"Visibility" section),
- directional headlamps (refer to the
"Visibility" section),
- automatic or manual parking brake
(refer to the "Driving" section).
Choice of units
This menu allows you to select the
units: temperature (°Celsius or °Fahr-
enheit) and fuel consumption (l/100 km,
mpg or km/l).
Choice of language
This menu allows you to select the
display language: Deutsch, English,
Espanol, Français, Italiano, Nederlands,
Portugues, Türkçe * .
*
According to country.
Indicator and warning lamps
Visual indicators informing the driver
that a system is in operation (operation
or deactivation indicator lamps) or of the
occurrence of a fault (warning lamp).
When the ignition is switched on
Certain warning lamps come on for a
few seconds when the vehicle's ignition
is switched on.
When the engine is started, these same
warning lamps should go off.
If they remain on, before moving off,
refer to the information on the warning
lamp concerned.
Associated warnings
The illumination of certain warning
lamps may be accompanied by an au-
dible signal and a message in the multi-
function screen.
The warning lamps may come
on continuously (fi xed) or fl ash.
Certain warning lamps may
come on in two different modes. Only
by relating the type of illumination to
the operating status of the vehicle
can it be ascertained whether the
situation is normal or whether a fault
has occurred.
Page 57 of 284

55
INSTRUMENTS and CONTROLS
Service indicator
System which informs the driver when
the next service is due, in accordance
with the manufacturer's servicing
schedule.
The point at which the service is due
is calculated from the last indicator zero
reset. It is determined by two parameters:
- the distance travelled,
-
the time elapsed since the last service.
Between 600 miles (1 000 km) and
1 800 miles (3 000 km) remain before
the next service is due
For 5 seconds after the ignition is switched
on, the spanner symbolising the service
operations comes on. The distance recorder
display line indicates the distance remaining
before the next service is due.
Example:
1 700 miles (2 800 km) remain
before the next service is due.
For 5 seconds after the ignition is switched
on, the screen indicates:
5 seconds after the ignition is switched
on, the spanner goes off
; the distance
recorder resumes its normal operation.
The screen then indicates the total and
trip distances.
Less than 600 miles (1 000 km)
remain before the next service is
due
Example:
400 miles (900 km) remain
before the next service is due.
For 5 seconds after the ignition is
switched on, the screen indicates:
5 seconds after the ignition is switched
on, the distance recorder resumes its
normal operation. The spanner re-
mains on
to indicate that a service
must be carried out soon.
More than 1 800 miles (3 000 km)
remain before the next service is due
When the ignition is switched on, no ser-
vice information appears in the screen.
Page 58 of 284

56
INSTRUMENTS and CONTROLS
Following this operation, if you
wish to disconnect the battery,
lock the vehicle and wait at
least fi ve minutes for the zero reset
to be taken into account.
Service indicator zero reset
After each service, the service indicator
must be reset to zero.
The procedure for resetting to zero is as
follows:
�)
switch off the ignition,
�)
press and hold the trip distance
recorder zero reset button,
�)
switch on the ignition; the distance
recorder display begins a count-
down,
�)
when the display indicates "=0"
,
release the button; the spanner dis-
appears.
The distance remaining may
be weighted by the time factor,
depending on the driving condi-
tions.
Therefore, the spanner may also
come on if you have exceeded the
two year service interval.
Service overdue
For 5 seconds after the ignition is
switched on, the spanner fl ashes
to
indicate that the service must be carried
out as soon as possible.
Example:
the service is overdue by
300 miles (300 km).
For 5 seconds after the ignition is
switched on, the screen indicates:
5 seconds after the ignition is switched
on, the distance recorder resumes its
normal operation. The spanner re-
mains on
.
Retrieving the service information
You can access the service information
at any time.
�)
Press the trip distance recorder zero
reset button.
The service information is displayed
for a few seconds, then disappears.