2012 Peugeot 207 CC Replace head
[x] Cancel search: Replace headPage 120 of 224

8CHECKS
118
PETROL ENGINES
The caps and covers provide access for checking the levels of the various fl uids and to replace certain components.
1.
Coolant reservoir.
2.
Passenger compartment fi lter.
3.
Screenwash and headlamp wash
reservoir.
4.
Air fi lter.
5.
Brake fl uid reservoir.
6.
Fusebox.
7.
Battery.
8.
Engine oil dipstick.
9.
Engine oil fi ller cap.
Page 121 of 224

8CHECKS
119
DIESEL ENGINE
The caps and covers provide access for checking the levels of the various fl uids, to replace certain components and to prime
the fuel system.
1.
Coolant reservoir.
2.
Passenger compartment fi lter.
3.
Screenwash and headlamp wash
reservoir.
4.
Priming pump.
5.
Brake fl uid reservoir.
6.
Fusebox.
7.
Battery.
8.
Engine oil dipstick.
9.
Engine oil fi ller cap.
10.
Air fi lter.
Page 122 of 224

8CHECKS
120
CHECKING LEVELS
Check all of these levels regularly and
top them up if necessary, unless other-
wise indicated.
If a level drops signifi cantly, have the
corresponding system checked by a
PEUGEOT dealer or a qualifi ed work-
shop.
Take care when working under the bon-
net, as some parts of the engine can be
extremely hot (risk of burns).
Brake fluid level
To avoid any risk of scalding, unscrew
the cap by two turns to allow the pres-
sure to drop. When the pressure has
dropped, remove the cap and top up
the level.
Oil level
The reading will only be correct
if the vehicle is on level ground
and the engine has been off for
more than 30 minutes.
The check is carried out either when
the ignition is switched on using the oil
level indicator on the instrument panel,
or using the dipstick.
It is normal to top up the engine oil between
two services. The manufacturer recom-
mends a check of the oil level, and top up
if necessary, every 3 000 miles (5 000 km).
The brake fl uid level should be
close to the "MAX" mark. If it is
not, check the brake pad wear.
Changing the brake fl uid
Refer to the Warranty and Maintenance
Record for details of the interval for this
operation.
Coolant level
The coolant level should be
close to the "MAX" mark but
should never exceed it.
When the engine is warm, the
temperature of the coolant is regulated
by the fan. This can operate with the ig-
nition off.
On vehicles which are fi tted with a par-
ticle emission fi lter, the fan may oper-
ate after the vehicle has been switched
off, even if the engine is cold.
In addition, as the cooling system is
pressurised, wait at least one hour after
switching off the engine before carrying
out any work.
Screenwash and headlamp
wash * fluid
The minimum level of this fl uid
is indicated by an audible sig-
nal and a message on the mul-
tifunction screen.
Top up the level when you stop the ve-
hicle.
* According to country.
Changing the engine oil
Refer to the Warranty and Maintenance
Record for details of the interval for this
operation.
In order to maintain the reliability of the
engine and emission control system,
the use of additives in the engine oil is
prohibited.
Oil specifi cation
The oil must correspond to your engine
and conform to the manufacturer's rec-
ommendations.
Fluid specifi cation
The brake fl uid must conform to the
manufacturer's recommendations and
fulfi l the DOT4 standards.
Changing the coolant
The coolant does not have to be
changed.
Fluid specifi cation
The coolant must conform to the manu-
facturer's recommendations.
Fluid specifi cation
To guarantee optimum cleaning and
avoid freezing, plain water should not
be used to top up or replace this fl uid.
Page 134 of 224

9
i
i
PRACTICAL INFORMATION
132
CHANGING A BULB
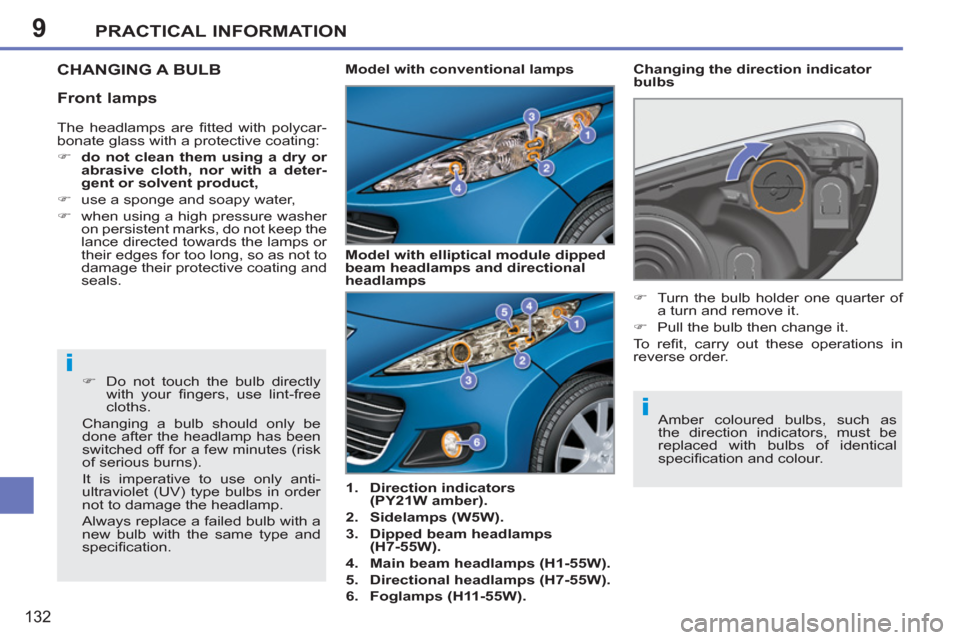
1.
Direction indicators
(PY21W amber).
2.
Sidelamps (W5W).
3.
Dipped beam headlamps
(H7-55W).
4.
Main beam headlamps (H1-55W).
5.
Directional headlamps (H7-55W).
6.
Foglamps (H11-55W).
Changing the direction indicator
bulbs
�)
Do not touch the bulb directly
with your fi ngers, use lint-free
cloths.
Changing a bulb should only be
done after the headlamp has been
switched off for a few minutes (risk
of serious burns).
It is imperative to use only anti-
ultraviolet (UV) type bulbs in order
not to damage the headlamp.
Always replace a failed bulb with a
new bulb with the same type and
specifi cation.
Model with conventional lamps
Amber coloured bulbs, such as
the direction indicators, must be
replaced with bulbs of identical
specifi cation and colour.
�)
Turn the bulb holder one quarter of
a turn and remove it.
�)
Pull the bulb then change it.
To r efi t, carry out these operations in
reverse order. The headlamps are fi tted with polycar-
bonate glass with a protective coating:
�)
do not clean them using a dry or
abrasive cloth, nor with a deter-
gent or solvent product,
�)
use a sponge and soapy water,
�)
when using a high pressure washer
on persistent marks, do not keep the
lance directed towards the lamps or
their edges for too long, so as not to
damage their protective coating and
seals. Model with elliptical module dipped
beam headlamps and directional
headlamps
Front lamps
Page 135 of 224

9PRACTICAL INFORMATION
133
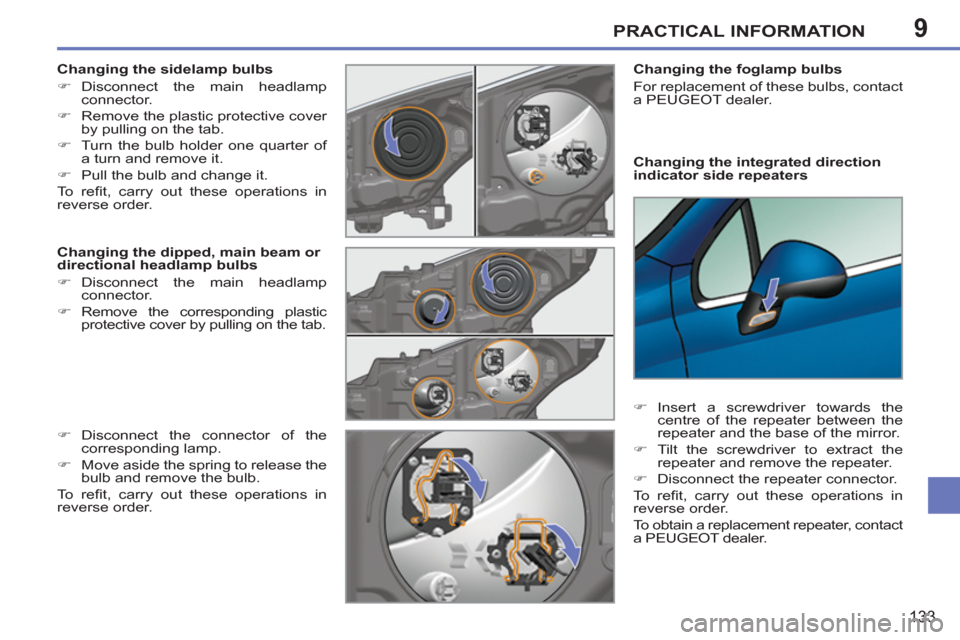
Changing the integrated direction
indicator side repeaters
Changing the foglamp bulbs
For replacement of these bulbs, contact
a PEUGEOT dealer.
�)
Insert a screwdriver towards the
centre of the repeater between the
repeater and the base of the mirror.
�)
Tilt the screwdriver to extract the
repeater and remove the repeater.
�)
Disconnect the repeater connector.
To r efi t, carry out these operations in
reverse order.
To obtain a replacement repeater, contact
a PEUGEOT dealer.
Changing the sidelamp bulbs
�)
Disconnect the main headlamp
connector.
�)
Remove the plastic protective cover
by pulling on the tab.
�)
Turn the bulb holder one quarter of
a turn and remove it.
�)
Pull the bulb and change it.
To r efi t, carry out these operations in
reverse order.
Changing the dipped, main beam or
directional headlamp bulbs
�)
Disconnect the main headlamp
connector.
�)
Remove the corresponding plastic
protective cover by pulling on the tab.
�)
Disconnect the connector of the
corresponding lamp.
�)
Move aside the spring to release the
bulb and remove the bulb.
To r efi t, carry out these operations in
reverse order.
Page 137 of 224

9
!
PRACTICAL INFORMATION
135
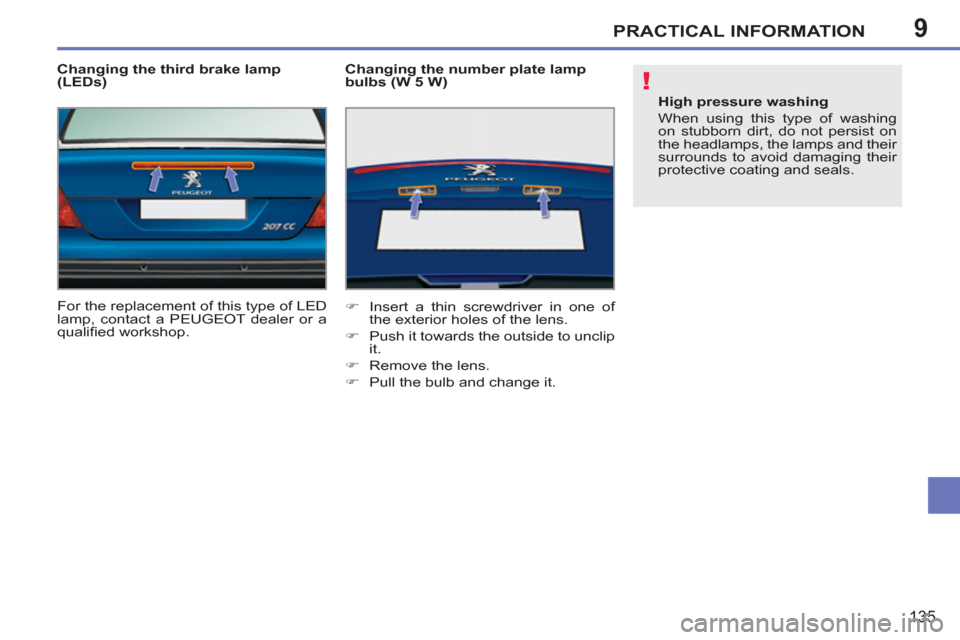
Changing the third brake lamp
(LEDs)
For the replacement of this type of LED
lamp, contact a PEUGEOT dealer or a
qualifi ed workshop.
Changing the number plate lamp
bulbs (W 5 W)
�)
Insert a thin screwdriver in one of
the exterior holes of the lens.
�)
Push it towards the outside to unclip
it.
�)
Remove the lens.
�)
Pull the bulb and change it.
High pressure washing
When using this type of washing
on stubborn dirt, do not persist on
the headlamps, the lamps and their
surrounds to avoid damaging their
protective coating and seals.
Page 141 of 224

9PRACTICAL INFORMATION
139
Engine compartment fuses
The fusebox is placed in the engine
compartment, near the battery (left-
hand side).
Access to the fuses
�)
Unclip the cover.
�)
Replace the fuse (refer to the cor-
responding paragraph).
�)
When you have fi nished, close the
cover carefully to ensure correct
sealing of the fuse box.
Fuse table
Fuse N°
Rating
Functions
F1
20 A
Engine control unit and fan assembly control relay
supply, timing and canister electrovalves (1.6 l 16V
THP), air fl ow sensor (Diesel), injection pump
(Diesel), water in Diesel sensor (Diesel), EGR
electrovalves, air heating (Diesel).
F2
15 A
Horn.
F3
10 A
Front wash-wipe.
F4
20 A
Headlamp wash.
F5
15 A
Fuel pump (petrol), Turbo electrovalves
(1.6 l 16V THP).
F6
10 A
Vehicle speed sensor, automatic gearbox.
F7
10 A
Electric power steering, directional headlamps,
directional headlamps control relay, switching and
protection unit (Diesel).
F8
20 A
Starter motor control.
F9
10 A
ABS/ESP control unit, brake pedal switch.
F10
30 A
Engine control unit actuators (petrol: ignition coils,
electrovalves, oxygen sensors, injectors, heaters,
electronic thermostat) (Diesel: electrovalves,
heaters).
F11
40 A
Air conditioning blower.
F12
30 A
Windscreen wipers Low/High speed.
F13
40 A
Built-in systems interface supply (ignition positive).
Page 219 of 224

217
ALPHABETICAL INDEX
Level, headlamp wash....................120Lighting .............................................80Lighting, guide-me home............80,82Lighting, interior................................r85Lighting bulbs (replacement)..........132Lighting control stalk.........................80Lighting dimmer................................r32Lighting on reminder.........................80Loading .....................................18,146Load reduction mode......................143Locating your vehicle........................66Locking from the inside....................74Locking the boot ...............................76Locking the doors.............................65Luggage retaining strap....................60
Main beam ................................80,132Maintenance.....................................18Map reading lamps ...........................85Markings, identification ...................153Mat....................................................57Menu, main.....................................192Mini fuel level....................................77Mirror, rear view................................56Mirrors, door.....................................r55Misfuel prevention............................79Motorway function(direction indicators) ......................93Mountings for ISOFIX seats .............90MP3 CD..................................175,195Music media players.......................174
Oil change......................................120Oil filter...........................................r121Oil level.....................................30, 120Opening the bonnet........................117Opening the boot..............................76Opening the doors......................73, 75Opening the fuel filler flap................77Opening the retractable roof..............f4Openin g the windows......................71Operation indicator lamps..........21, 23
Navigation.......................................163Net ....................................................61Number plate lamps.......................134
Paint colour code............................153Parking brake.........................105, 121Parking sensors..............................114Parking sensors, audible and visual...114Particle emission filter....................r121Passenger compartment filter........r121PEUGEOT CONNECT ASSISTA NCE...156Peugeot Connect Navigation(RNEG)..................40,158,160, 181PEUGEOT CONNECT SOS..........156Peugeot Connect Sound (RD5)...........................189,204, 206Peugeot Connect USB.....................59Player, CD MP3......................175, 195Port, USB.................................59, 196
Radio......................................173,193Rear screen (demisting)...................49Recharging the battery...................141Reduction of electrical load............143Regeneration of the particle emissions filter............................r121Reinitialising partial opening of the windows..............................71Reinitialising the electric windows....71Reinitialising the remote control.......67Remote control...........................65,68Removing a wheel..........................128Removing the mat............................57Repair kit, puncture........................123Replacing bulbs......................132,134Replacing fuses..............................136Replacing the air filter....................r121Replacing the oil filter.....................r121Replacing the passenger compartment filter.......................r121Replacing wiper blades..................143Resetting the service indicator.........r29Resetting the trip recorder................r32Retractable roof..................................f4Rev counter......................................r20Reversing lamps.............................134Risk areas (update)........................170Roll-over bars...................................98Routine checks...............................121Running out of fuel (Diesel)............117
P
M
N
OR
Priming the fuel system ..................117Protecting children .................86, 88-92Puncture .................................123,128