Page 9 of 16

01 fan s
PEED Control D ial
Turn the fan speed control dial to the left (low) or right (high) to control fan speed.
02 tE
mPE ratur E C")
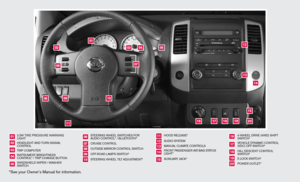
01
07
02
08
04
03
0506
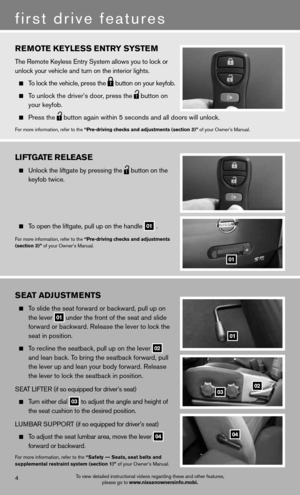
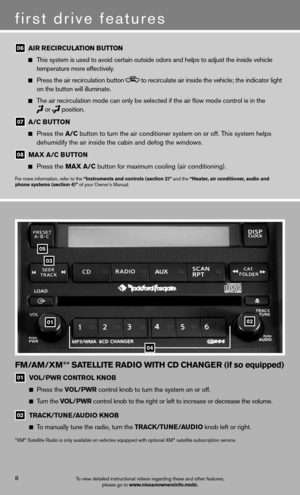
ClimatE Controls (if so equipped)
01 fan s
PEED Control D ial
Turn the fan speed control dial to the left (low) or right (high) to control fan speed.
02 tE
mPE ratur E Control D ial
Turn the temperature control dial left for cooler air or right for warmer\
air.
03 air flo
W Control B uttons
Select the air flow outlets by pressing the corresponding air flow control button:
Air flows from the center and side vents.
Air flows from the defroster and foot vents.
Air flows mainly from the foot vents.
Air flows from the center, side and foot vents.
04 DE
frostin G/DEfoGG inG front an D siDE Win Do Ws
Press the front window defroster button to turn the system on. The A/c automatically
turns on when the defroster mode is selected. This feature removes humidity from the air.
Set the fan speed control dial
01 and the temperature control dial 02 to their maximum
settings.
05 r
Ear Win Do W an D outsi DE mirror (if so equipped) DE frostEr sWitCH
Push the rear window defroster switch to turn the system on or off.
The rear window defroster automatically turns off after approximately 15 minutes.
7To view detailed instructional videos regarding these and other features,
please go to www.nissanownersinfo.mobi.
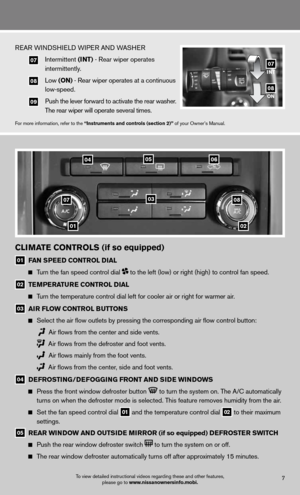
ReAR W indSHieL d W iPeR A nd WASHeR
07 intermittent (int) - Rear wiper operates
intermittently.
08 Low (on) - Rear wiper operates at a continuous
low-speed.
09 Push the lever forward to activate the rear washer.
The rear wiper will operate several times.
for more information, refer to the “instruments and controls (section 2)” of your Owner’s Manual.
int
on07
08
Page 10 of 16

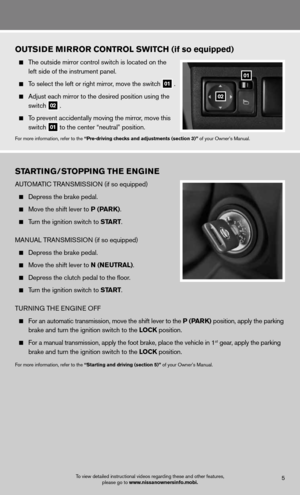
01 vol/PWr Control K
noB
Press the vol/PWr control knob to turn the system on or off.
Turn the vol/PWr control")
01
03
05
02
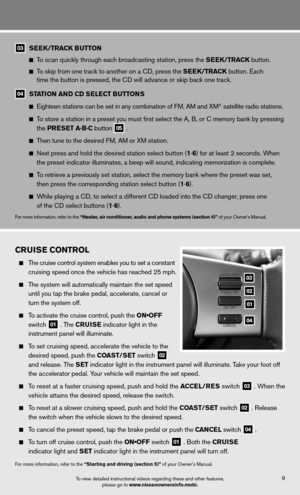
fm/am /Xm®* satE llitE raD io WitH CD CHan GEr (if so equipped)
01 vol/PWr Control K
noB
Press the vol/PWr control knob to turn the system on or off.
Turn the vol/PWr control knob to the right or left to increase or decrease the volume.
02 tra
CK/tun E/au Dio K noB
To manually tune the radio, turn the tra CK/tunE/au Dio knob left or right.
*XM® Satellite Radio is only available on vehicles equipped with optional XM® satellite subscription service.
04
first drive features
To view detailed instructional videos regarding these and other features,
please go to www.nissanownersinfo.mobi.
06 air r
ECirCulation B utton
This system is used to avoid certain outside odors and helps to adjust the inside vehicle
temperature more effectively.
Press the air recirculation button to recirculate air inside the vehicle; the indicator light
on the button will illuminate.
The air recirculation mode can only be selected if the air flow mode control is in the
or position.
07 a/C B
utton
Press the a/C button to turn the air conditioner system on or off. This system helps
dehumidify the air inside the cabin and defog the windows.
08 maX a/C B
utton
Press the maX a/C button for maximum cooling (air conditioning).
for more information, refer to the “instruments and controls (section 2)” and the “Heater, air conditioner, audio and
phone systems (section 4)” of your Owner’s Manual.
8
Page 11 of 16

CruisE Control
The cruise control system enables you to set a constant
cruising speed once the vehicle has reached 25 mph.
The system will automatically maintain the set speed
until you tap the brake pedal, accelerate, cancel or
turn the system off.
To activate the cruise control, push the ON•OFF
switch
01 . The C
ruisE indicator light in the
instrument panel will illuminate.
To set cruising speed, accelerate the vehicle to the
desired speed, push the Coast/ sEt switch
02
and release. The s
Et indicator light in the instrument panel will illuminate. Take your foot off
the accelerator pedal. Your vehicle will maintain the set speed.
To reset at a faster cruising speed, push and hold the a CCEl/rEs switch
03 . When the
vehicle attains the desired speed, release the switch.
To reset at a slower cruising speed, push and hold the Coast/ sEt switch
02 . Release
the switch when the vehicle slows to the desired speed.
To cancel the preset speed, tap the brake pedal or push the C anCEl switch
04 .
To turn off cruise control, push the ON•OFF switch
01 . Both the C
ruisE
indicator light and s Et indicator light in the instrument panel will turn off.
for more information, refer to the “starting and driving (section 5)” of your Owner’s Manual.
To view detailed instructional videos regarding these and other features,
please go to www.nissanownersinfo.mobi.
03 s
EEK/tra CK Button
To scan quickly through each broadcasting station, press the s EEK/traCK button.
To skip from one track to another on a cd, press the s EEK/traCK button. Each
time the button is pressed, the CD will advance or skip back one track.
04 station an
D CD sElEC t Buttons
Eighteen stations can be set in any combination of FM, AM and XM® satellite radio stations.
To store a station in a preset you must first select the A, B, or C memory bank by pressing
the PrEs Et a·B·C button
05 .
Then tune to the desired f M, AM or XM station.
Next press and hold the desired station select button (1 -6 ) for at least 2 seconds. When
the preset indicator illuminates, a beep will sound, indicating memorization is complete.
To retrieve a previously set station, select the memory bank where the preset was set,
then press the corresponding station select button (1 -6 ).
While playing a cd, to select a different cd loaded into the cd changer, press one
of the CD select buttons (1 -6 ).
for more information, refer to the “Heater, air conditioner, audio and phone systems (section 4)” of your Owner’s Manual.
03
02
04
01
9
Page 12 of 16
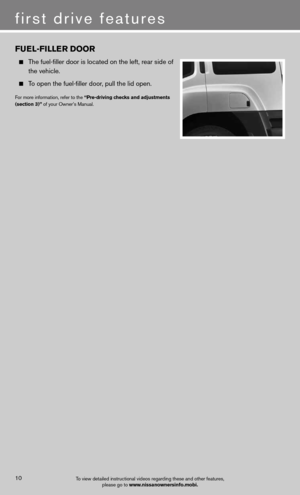
fuEl-fillE r Door
The fuel-filler door is located on the left, rear side of
the vehicle.
To open the fuel-filler door, pull the lid open.
for more information, refer to the “Pre-driving checks and adjustments
(section 3)” of your Owner’s Manual.
To view detailed instructional videos regarding these and other features, please go to www.nissanownersinfo.mobi.
first drive features
10
Page 13 of 16

With the ignition switch in the on position, modes
of the trip computer
01 can be selected by pressing
the trip computer change button
02 on the
ins")
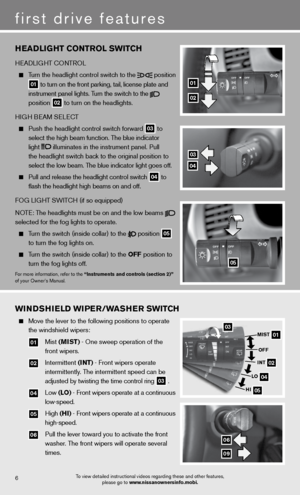
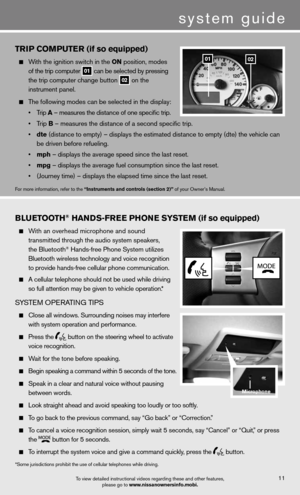
triP Com PutEr (if so equipped)
With the ignition switch in the on position, modes
of the trip computer
01 can be selected by pressing
the trip computer change button
02 on the
instrument panel.
The following modes can be selected in the display:
• Trip a – measures the distance of one specific trip.
• Trip B – measures the distance of a second specific trip.
• dte (distance to empty) – displays the estimated distance to empty (dte) the vehicle can
be driven before refueling.
• mph – displays the average speed since the last reset.
• mpg – displays the average fuel consumption since the last reset.
• (Journey time) – displays the elapsed time since the last reset.
for more information, refer to the “instruments and controls (section 2)” of your Owner’s Manual.
0201
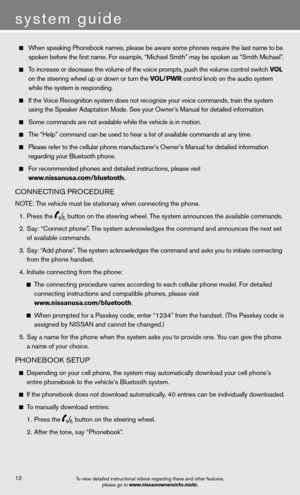
Blu EtootH® Han Ds-fr EE PH onE systE m (if so equipped)
With an overhead microphone and sound
transmitted through the audio system speakers,
the Bluetooth
® Hands-free Phone System utilizes
Bluetooth wireless technology and voice recognition
to provide hands-free cellular phone communication.
A cellular telephone should not be used while driving
so full attention may be given to vehicle operation.*
SYSTe M OPeRATin G TiPS
close all windows. Surrounding noises may interfere
with system operation and performance.
Press the
button on the steering wheel to activate
voice recognition.
Wait for the tone before speaking.
Begin speaking a command within 5 seconds of the tone.
Speak in a clear and natural voice without pausing
between words.
Look straight ahead and avoid speaking too loudly or too softly.
To go back to the previous command, say “Go back” or “Correction.”
To cancel a voice recognition session, simply wait 5 seconds, say “cancel” or “Quit,” or press
the
button for 5 seconds.
To interrupt the system voice and give a command quickly, press the
button.
To view detailed instructional videos regarding these and other features,
please go to www.nissanownersinfo.mobi.11
*Some jurisdictions prohibit the use of cellular telephones while driving.
system guide
microphone
Page 14 of 16

When speaking Phonebook names, please be aware some phones require the last name to be
spoken before the first name. For example, “Michael Smith” may be spoken as “Smith Michael”.
To increase or decrease the volume of the voice prompts, push the volume \
control switch vol
on the steering wheel up or down or turn the vol/PWr control knob on the audio system
while the system is responding.
If the Voice Recognition system does not recognize your voice commands, train the system
using the Speaker Adaptation Mode. See your Owner’s Manual for detailed information.
Some commands are not available while the vehicle is in motion.
The “Help” command can be used to hear a list of available commands at any time.
Please refer to the cellular phone manufacturer’s Owner’s Manual f\
or detailed information
regarding your Bluetooth phone.
for recommended phones and detailed instructions, please visit
www.nissanusa.com/bluetooth.
cOnnec TinG PROcedu Re
NOTE: The vehicle must be stationary when connecting the phone.
1. Press the
button on the steering wheel. The system announces the available commands.
2. Say: “connect phone”. The system acknowledges the command and announces the next set
of available commands.
3. Say: “Add phone”. The system acknowledges the command and asks you to initiate connecting
from the phone handset.
4. initiate connecting from the phone:
The connecting procedure varies according to each cellular phone model. f or detailed
connecting instructions and compatible phones, please visit
www.nissanusa.com/bluetooth.
When prompted for a Passkey code, enter “1234” from the handset. (The Passkey code is
assigned by NISSAN and cannot be changed.)
5. Say a name for the phone when the system asks you to provide one. You can give the phone
a name of your choice.
PHOne BOOk SeTu P
depending on your cell phone, the system may automatically download your \
cell phone’s
entire phonebook to the vehicle’s Bluetooth system.
If the phonebook does not download automatically, 40 entries can be individually downloaded.
To manually download entries:
1. Press the
button on the steering wheel.
2. After the tone, say “Phonebook”.
To view detailed instructional videos regarding these and other features,
please go to www.nissanownersinfo.mobi.
system guide
12
Page 15 of 16

To view detailed instructional videos regarding these and other features, please go to www.nissanownersinfo.mobi.13
3. After the next tone, say “Transfer entry”. The system acknowledges the command and
asks you to initiate the transfer from the phone handset. The new contact phone number
will be transferred from the cellular phone to the vehicle.
The transfer procedure varies according to each cellular phone. See your cellular phone’s
owner’s manual for details. You can also visit www.nissanusa.com/bluetooth for
instructions on transferring phone numbers from NISSAN recommended cellular phones.
4. The system repeats the number and prompts you for the next command. When you have
finished entering numbers or transferring an entry, choose “Store.”
5. The system confirms the name, location and number.
MAkin G A cALL fROM TH e PHOneBOO k
1. Press the
button.
2. After waiting for the tone, say “call”.
3. After the next tone, speak a name of a phonebook entry. For example “Michael Smith”.
4. Confirm the correct name is recognized by saying “Dial” after the tone.
NOTE: In some cases, names stored in all UPPERCASE letters may not be recognized by the
voice recognition system.
MAkin G A cALL BY PHO ne nuMBeR
1. Press the
button. A tone will sound.
2. Say: “call”. The system acknowledges the command and announces the next set of
available commands.
3. Say: “Phone Number”. The system acknowledges the command and announces the next
set of available commands.
4. Say the number you wish to call starting with the area code in single digit format.
5. When you have finished speaking the phone number, the system repeats it back and
announces the available commands.
6. Say: “dial”. The system acknowledges the command and makes the call.
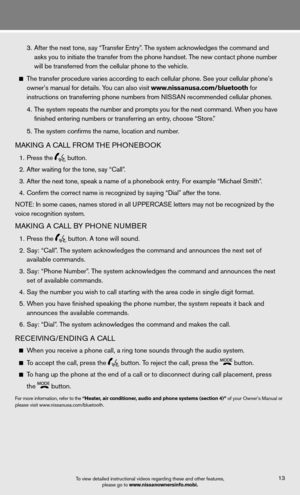
Recei Vin G/endin G A cALL
When you receive a phone call, a ring tone sounds through the audio syste\
m.
To accept the call, press the
button. To reject the call, press the button.
To hang up the phone at the end of a call or to disconnect during call pl\
acement, press
the
button.
for more information, refer to the “Heater, air conditioner, audio and phone systems (section 4)” of your Owner’s Manual or
please visit www.nissanusa.com/bluetooth.
Page 16 of 16

To view detailed instructional videos,")
Nissan, the Nissan Brand Symbol, Z and
nissan model names are nissan trademarks.
© 2011 nissan north America, inc.
QR
2e 0n50u1
Printing: November 2011 (16)
To view detailed instructional videos,
go to www.nissanownersinfo.mobi/2012/xterra
or snap this barcode with an appropriate barcode reader.
This Quick Reference Guide is intended to provide an overview of some of the uniq\
ue features of your new vehicle. See your
Owner’s Manual, which contains important safety warnings and information about the operation and maintenance of your vehicle,
for complete details. nissan north America, inc. reserves the right to make changes, at anytime, without prior notice, in prices,
colors, materials, equipment, specifications, and models and to discon\
tinue models or equipment. due to continuous product
development and other pre- and post-production factors, actual vehicle, \
materials and specifications may vary. Some vehicles are
shown with optional equipment. See the actual vehicle for complete accur\
acy. Specifications, options and accessories may differ
in Hawaii, U.S. territories and other countries. For additional information on availability, options or accessories, see your NISSAN
dealer or contact nissan north America, inc.