Page 81 of 341
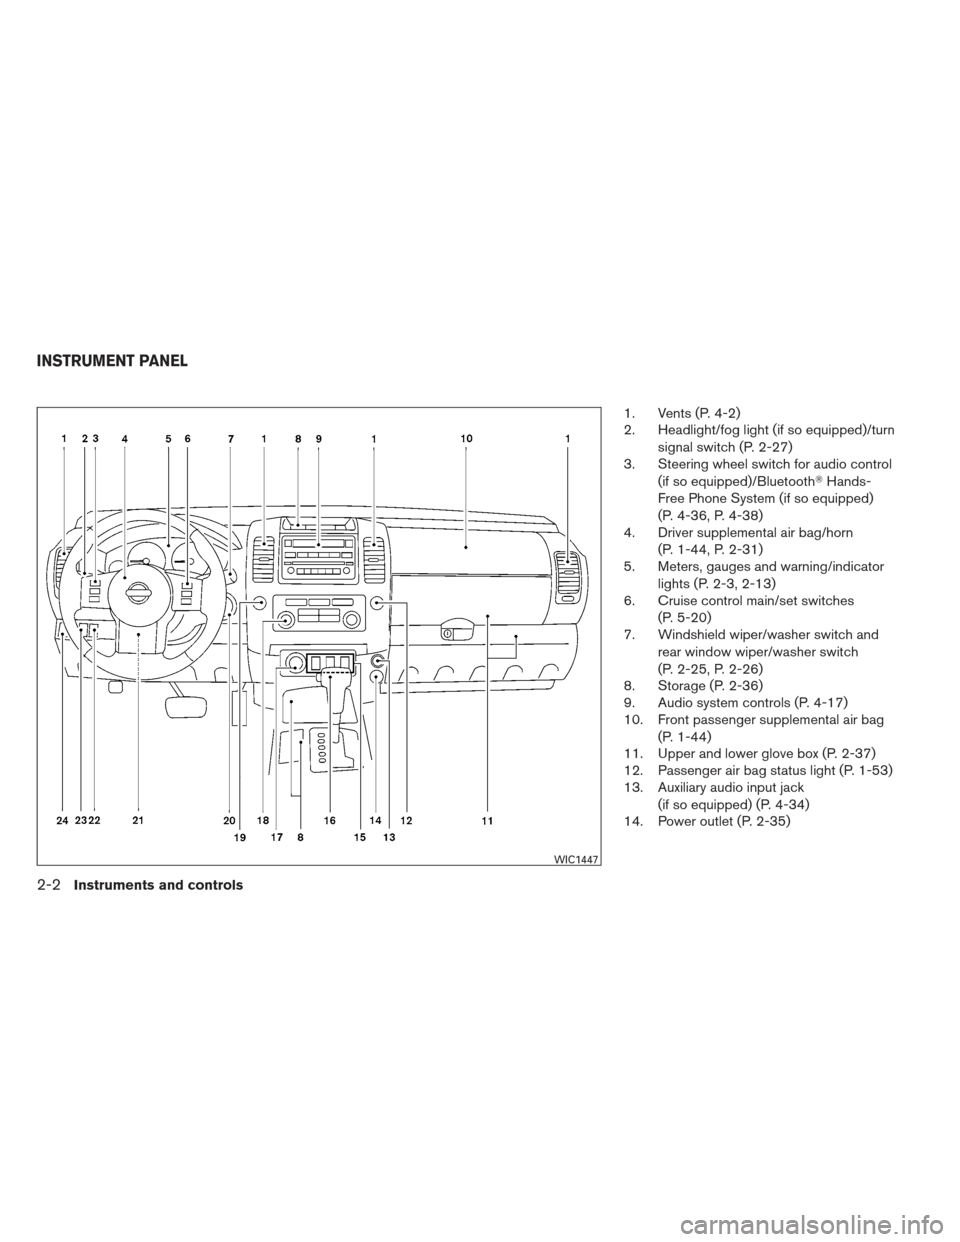
1. Vents (P. 4-2)
2. Headlight/fog light (if so equipped)/turnsignal switch (P. 2-27)
3. Steering wheel switch for audio control
(if so equipped)/Bluetooth �Hands-
Free Phone System (if so equipped)
(P. 4-36, P. 4-38)
4. Driver supplemental air bag/horn
(P. 1-44, P. 2-31)
5. Meters, gauges and warning/indicator
lights (P. 2-3, 2-13)
6. Cruise control main/set switches
(P. 5-20)
7. Windshield wiper/washer switch and
rear window wiper/washer switch
(P. 2-25, P. 2-26)
8. Storage (P. 2-36)
9. Audio system controls (P. 4-17)
10. Front passenger supplemental air bag
(P. 1-44)
11. Upper and lower glove box (P. 2-37)
12. Passenger air bag status light (P. 1-53)
13. Auxiliary audio input jack
(if so equipped) (P. 4-34)
14. Power outlet (P. 2-35)
WIC1447
INSTRUMENT PANEL
2-2Instruments and controls
Page 82 of 341
15. Electronic locking rear differential(E-Lock) system switch
(if so equipped) (P. 2-33)
Hill descent control switch
(if so equipped) (P. 2-32)
Vehicle Dynamic Control (VDC) OFF
switch (P. 2-32)
16. Shift selector (P. 5-13)
17. 4WD shift switch (P. 5-27)
18. Climate controls (P.4-3, 4-10)
19. Hazard warning flasher switch (P. 2-31)
20. Ignition switch (P. 5-10)
21. Tilt steering wheel control (P. 3-12)
22. Off road lamps switch (if so equipped)
(P. 2-30)
23. Clutch interlock (clutch start) switch
(if so equipped) (P. 2-34)
24. Power outside mirror controls
(if so equipped) (P. 3-15)
See the page number indicated in paren-
theses for operating details.
1. Warning/indicator lights
2. Tachometer
3. Speedometer
4. Fuel gauge
5. Voltmeter 6. Odometer/Twin trip odometer/Trip
computer (if so equipped)
7. Engine oil pressure gauge
8. Engine coolant temperature gauge
WIC0911
METERS AND GAUGES
Instruments and controls2-3
Page 84 of 341

For vehicles equipped with trip computer, press-
ing the change button changes the display as
follows:
Trip
→Trip→Distance to Empty →
Average speed →Average fuel consumption →
Journey time →Trip
For additional information, refer to “Trip com-
puter” later in this section.
Resetting the trip odometer:
Pushing the change button for more than 1 sec-
ond resets the currently displayed trip odometer
to zero.
Loose fuel cap warning message
Press the reset button�Afor more than 1 second
to reset the LOOSE FUEL CAP warning mes-
sage after the fuel cap has been tightened. For
additional information see “Fuel-filler cap” in the
“Pre-driving checks and adjustments” section.
Check tire pressure warning message
The CHECK TIRE PRES (pressure) warning
message is displayed when the low tire pressure
warning light is illuminated and low tire pressure
is detected. Check and adjust the tire pressure to
the recommended COLD tire pressure shown on
the Tire and Loading Information label. The
CHECK TIRE PRES warning message turns off
when the low tire pressure warning light turns off.
Push the reset button
�Afor more than 1 second
to turn off the CHECK TIRE PRES warning mes-
sage. The low tire pressure warning light remains
illuminated until the tires are inflated to the rec-
ommended COLD tire pressure. The CHECK
With trip computer
WIC0922LRS2004LIC2017
Instruments and controls2-5
Page 85 of 341

TIRE PRES warning message is displayed each
time the ignition switch is placed in the ON
position as long as the low tire pressure warning
light remains illuminated. For more information
see “Low tire pressure warning light” in the “In-
struments and controls” section, “Tire Pressure
Monitoring System (TPMS)” in the “Starting and
driving” and “Wheels and tires” section in the
“Maintenance and do-it-yourself” section of this
Owner’s Manual.
TACHOMETER
The tachometer indicates engine speed in revo-
lutions per minute (rpm) . Do not rev the engine
into the red zone
�1.
CAUTION
When engine speed approaches the red
zone, shift to a higher gear or reduce en-
gine speed. Operating the engine in the
red zone may cause serious engine
damage.
ENGINE COOLANT TEMPERATURE
GAUGE
The gauge indicates the engine coolant tempera-
ture. The engine coolant temperature is within the
normal range
�1when the gauge needle points
within the zone shown in the illustration.
The engine coolant temperature varies with the
outside air temperature and driving conditions.
LIC0738LIC0739
2-6Instruments and controls
Page 86 of 341
 end of the normal
range, reduce vehicle speed to decrease
temperature. If the gauge is over the nor-
mal range, stop the vehicle a")
CAUTION
If the gauge indicates coolant tempera-
ture near the hot (H) end of the normal
range, reduce vehicle speed to decrease
temperature. If the gauge is over the nor-
mal range, stop the vehicle as soon as
safely possible. If the engine is over-
heated, continued operation of the ve-
hicle may seriously damage the engine.
See “If your vehicle overheats” in the “In
case of emergency” section for immediate
action required.
FUEL GAUGE
The gauge indicates theapproximatefuel level
in the tank.
The gauge may move slightly during braking,
turning, acceleration, or going up or down hills.
The gauge needle returns to E (Empty) after the
ignition key is turned to OFF.
The low fuel warning light comes on when the
amount of fuel in the tank is getting low.
Refill the fuel tank before the gauge regis-
ters E (Empty) . The
indicates that the fuel-filler door is
located on the driver’s side of the vehicle.
CAUTION
● If the vehicle runs out of fuel, theMalfunction Indicator Light (MIL) may
come on. Refuel as soon as possible.
After a few driving trips. the
light
should turn off. If the light remains on
after a few driving trips, have the ve-
hicle inspected by a NISSAN dealer.
● For additional information, see “Mal-
function Indicator Light (MIL)” later in
this section.
LIC0740
Instruments and controls2-7
Page 89 of 341

This unit measures terrestrial magnetism and in-
dicates heading direction of vehicle.
With the ignition switch in the ON position, press
the
button as described in the fallowing
chart to activate various features of the automatic
anti-glare rearview mirror.
Push and hold
the
button for about: Feature:
(Push button again for about 1 sec-
ond to change settings)
1 second Compass display toggles on/off
8 seconds Automatic anti-glare/indicator light
toggles on/off
11 seconds Compass zone can be changed to
correct false compass readings
13 seconds Compass enters calibration mode
For more information about the automatic anti-
glare feature, refer to “Automatic anti-glare rear-
view mirror” in the “Pre-driving checks and ad-
justments” section.
COMPASS DISPLAY
Push thebutton for about 1 second when
the ignition key is in the ON position to toggle the
compass direction display
�1on or off. The dis-
play will indicate the direction of the vehicle’s
heading.
N: North
E: East
S: South
W: West
If the “CAL” or “C” icon is illuminated in the
compass display, calibrate the compass by driv-
ing the vehicle in three complete circles at less
than 5 MPH (8 km/h) . You can also calibrate the compass by driving
your vehicle on your everyday route. The com-
pass will be calibrated once it has tracked three
complete circles.
WIC0904
COMPASS DISPLAY (if so equipped)
2-10Instruments and controls
Page 92 of 341

warning lightLow windshield-washer fluid warning light
(if so equipped)Hill descent control system on indicator light
(if so equipped)
Automatic transmission oil tempe")
orAnti-lock Braking System (ABS)
warning lightLow windshield-washer fluid warning light
(if so equipped)Hill descent control system on indicator light
(if so equipped)
Automatic transmission oil temperature warning
light (if so equipped)Seat belt warning light and chimeMalfunction Indicator Light (MIL)
Automatic transmission park warning light
(model)Supplemental air bag warning lightOverdrive off indicator light (A/T models only)
orBrake warning lightAutomatic transmission position indicator light
(A/T models only)Security indicator light
Charge warning lightCruise main switch indicator lightSlip indicator light
Door open warning lightCruise set switch indicator lightTransfer 4LO position indicator light
(model)
Engine oil pressure warning lightElectronic locking rear differential (E-Lock)
system on indicator light (if so equipped)Turn signal/hazard indicator lights
4WD warning light (model)4WD shift indicator light (model)Vehicle Dynamic Control (VDC) OFF indicator
light
Low fuel warning lightFront passenger air bag status light
Low tire pressure warning lightHigh beam indicator light (Blue)
WARNING/INDICATOR LIGHTS AND
AUDIBLE REMINDERS
Instruments and controls2-13
Page 93 of 341

CHECKING BULBS
With all doors closed, apply the parking brake
and place the ignition switch in the ON position
without starting the engine. The following lights
will come on:
,or,,,,
The following lights come on briefly and then go
off:
or,,,,,,
,
If any light fails to come on, it may indicate
an open circuit in the electrical system.
Have the system repaired promptly.
WARNING LIGHTS
orAnti-lock BrakingSystem (ABS)
warning light
When the ignition switch is placed in the ON
position, the Anti-lock Braking System (ABS)
warning light illuminates and then turns off. This
indicates the ABS is operational. If the ABS warning light illuminates while the
engine is running, or while driving, it may indicate
the ABS is not functioning properly. Have the
system checked by a NISSAN dealer.
If an ABS malfunction occurs, the anti-lock func-
tion is turned off. The brake system then operates
normally, but without anti-lock assistance. See
“Brake system” in the “Starting and driving” sec-
tion.
Automatic transmission oil
temperature warning light (if so
equipped)
This light comes on when the automatic transmis-
sion oil temperature is too high. If the light comes
on while driving, reduce the vehicle speed as
soon as safely possible until the light turns off.
CAUTION
Continued vehicle operation when the A/T
oil temperature warning light is on may
damage the automatic transmission.
Automatic transmission parkwarning light (
model)
WARNING
● If the ATP light is ON, this indicates that
the automatic transmission P (Park) po-
sition will not function and the transfer
case is in neutral.
● When parking, always make sure that
the 4WD shift indicator light illuminates
and the parking brake is set. Failure to
engage the transfer position in 2WD, 4H
or 4LO could result in the vehicle mov-
ing unexpectedly, resulting in serious
personal injury or property damage.
● Shift the 4WD switch into the 2WD, 4H
or 4LO position again to turn off the ATP
warning light when the shift selector is
in the P position and the ATP warning
light is ON. (Before shifting the 4WD
switch into the 4LO position, move the
shift selector into the N position once,
shift the shift selector into P again and
make sure the ATP warning light is
OFF.)
2-14Instruments and controls
 system switch
(if so equipped) (P. 2-33)
Hill descent control switch
(if so equipped) (P. 2-32)
Vehicle Dynamic Control (VDC) OFF
switch (P. 2-32)
16.")