Page 279 of 341
REPLACING
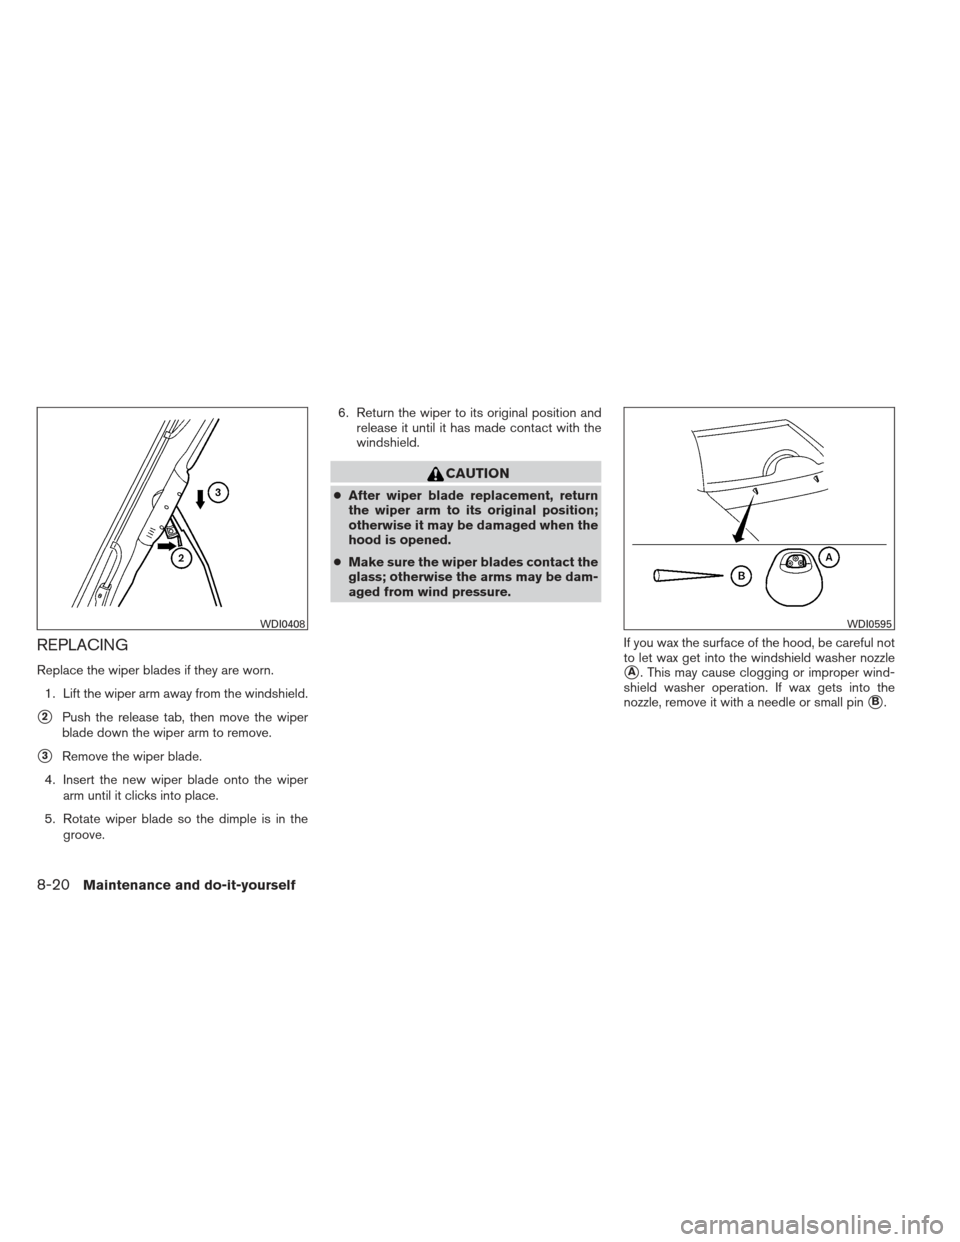
Replace the wiper blades if they are worn.1. Lift the wiper arm away from the windshield.
�2Push the release tab, then move the wiper
blade down the wiper arm to remove.
�3Remove the wiper blade.
4. Insert the new wiper blade onto the wiper arm until it clicks into place.
5. Rotate wiper blade so the dimple is in the groove. 6. Return the wiper to its original position and
release it until it has made contact with the
windshield.
CAUTION
●After wiper blade replacement, return
the wiper arm to its original position;
otherwise it may be damaged when the
hood is opened.
● Make sure the wiper blades contact the
glass; otherwise the arms may be dam-
aged from wind pressure.
If you wax the surface of the hood, be careful not
to let wax get into the windshield washer nozzle
�A. This may cause clogging or improper wind-
shield washer operation. If wax gets into the
nozzle, remove it with a needle or small pin
�B.
WDI0408WDI0595
8-20Maintenance and do-it-yourself
Page 282 of 341
If a type A fuse is used to replace a type B fuse,
the type A fuse will not be level with the fuse
pocket as shown in the illustration. This will not
affect the performance of the fuse. Make sure the
fuse is installed in the fuse box securely.
Type B fuses cannot be installed in the under-
hood fuse boxes. Only use type A fuses in the
underhood fuse boxes.ENGINE COMPARTMENT
CAUTION
Never use a fuse of a higher or lower
amperage rating than specified on the
fuse box cover. This could damage the
electrical system or cause a fire.
If any electrical equipment does not come on,
check for an open fuse. 1. Be sure the ignition switch and the headlight switch are OFF.
2. Open the engine hood. 3. Remove the fuse box cover by pushing the
tab and lifting the cover up.
4. Remove the fuse with the fuse puller. The fuse puller is located in the center of the fuse
block in the passenger compartment.
LDI0457LDI0444
Maintenance and do-it-yourself8-23
Page 287 of 341

Fog may temporarily form inside the lens of the
exterior lights in the rain or in a car wash. A
temperature difference between the inside and
the outside of the lens causes the fog. This is not
a malfunction. If large drops of water collect
inside the lens, contact a NISSAN dealer.
Removing the headlight bulb
1. Open the hood.
2. Disconnect the negative (-) battery cable.
3. Disconnect the electrical connector from therear end of the bulb. 4. Turn the bulb retaining ring counterclock-
wise until it is free from the headlight reflec-
tor and then remove it
�A.
5. Carefully remove the headlight bulb. Do not shake or rotate the bulb when removing it
�B.
Replacing the headlight bulb
1. Insert the bulb.
DO NOT TOUCH THE BULB WITH BARE
HANDS.
2. Install and tighten the bulb retainer. ●Be sure the lip of the bulb socket con-
tacts the headlight body.
3. Push the electrical connector into the bulb plastic base until it snaps and stops.
4. Connect the negative (-) battery cable.
5. Close the hood.
WDI0294
8-28Maintenance and do-it-yourself