Page 10 of 406
1. Engine hood (P. 3-11)
2. Windshield wiper and washer switch(P. 2-27)
3. Windshield (P. 8-19)
4. Moonroof (if so equipped) (P. 2-52)
5. Power windows (P. 2-48)
6. Door locks, keyfob, keys
(P. 3-3, 3-7, 3-2)
7. Mirrors (P. 3-17)
8. Tire pressure (P. 9-12)
9. Flat tire (P. 6-2)
10. Tire chains (P. 8-40)
11. Replacing bulbs (P. 8-30)
12. Headlight and turn signal switch
(P. 2-29)
13. Fog light switch (if so equipped)
(P. 2-33)
14. Tow hooks (if so equipped) (P. 6-13)
See the page number indicated in paren-
theses for operating details.
WII0116
EXTERIOR FRONT
Illustrated table of contents0-3
ProCarManuals.com
Page 11 of 406
1. Rear sliding window (if so equipped)(P. 2-51)
2. Vehicle loading (P. 9-13)
3. Tailgate/Truckbox (P. 3-22)
4. Trailer hitch/Towing (if so equipped)
(P. 9-24)
5. Replacing bulbs (P. 8-30)
6. Bedside storage compartment
(if so equipped) (P. 2-48)
7. Fuel-filler cap, fuel recommendation
(P. 3-12, P. 9-3, 9-4)
8. Fuel-filler door (P. 3-12)
9. Child safety rear door lock (Crew Cab
models only) (P. 3-7)
See the page number indicated in paren-
theses for operating details.
LII0027
EXTERIOR REAR
0-4Illustrated table of contents
ProCarManuals.com
Page 14 of 406
 (P. 4-52)
17. Power outlet (P. 2-38)
18. Heated seat switch (if so equipped)(P. 2-35)
19. Cup holder (P. 2-45)
20. Vehicle Dynamic Control (VDC) off
switch (P. 2-36)
21.")
16. Aux jack (if so equipped) (P. 4-52)
17. Power outlet (P. 2-38)
18. Heated seat switch (if so equipped)(P. 2-35)
19. Cup holder (P. 2-45)
20. Vehicle Dynamic Control (VDC) off
switch (P. 2-36)
21. Tow mode switch (P. 2-38)
22. Electronic locking rear differential
(E-Lock) system switch
(if so equipped) (P.2-36)
23. Shift selector (console)
(if so equipped) (P. 5-16)
24. Hazard warning flasher switch (P. 2-33)
25. Front passenger air bag status light
(P. 1-56)
26. Power outlet (P. 2-38)
27. 4WD shift switch (if so equipped)
(P. 5-27)
28. Windshield wiper/washer switch
(P. 2-27)
29. Tilt steering wheel control (P. 3-14)
30. Cargo lamp switch (if so equipped)
(P. 2-34)
31. Rear sonar system off switch
(if so equipped) (P. 2-37) 32. Pedal position adjustment switch
(if so equipped) (P. 3-14)
33. Rear power window switch
(if so equipped) (P. 2-51)
*: Refer to the separate Navigation System Own-
er’s Manual (if so equipped) .
See the page number indicated in paren-
theses for operating details.
Illustrated table of contents0-7
ProCarManuals.com
Page 23 of 406

To use the armrests on the captain’s chairs (type
A, if so equipped) , pull them down to the resting
position.
To use the center armrest on the bench seat (type
B, if so eq")
ARMRESTS (if so equipped)
To use the armrests on the captain’s chairs (type
A, if so equipped) , pull them down to the resting
position.
To use the center armrest on the bench seat (type
B, if so equipped) , pull on the tab in the center of
the seat and fold it down to the resting position.
HEAD RESTRAINTS (1st row only)
WARNING
Head restraints supplement the other ve-
hicle safety systems. They may provide
additional protection against injury in cer-
tain rear end collisions. Adjust the head
restraints properly, as specified in this
section. Check the adjustment after
someone else uses the seat. Do not attach
anything to the head restraint stalks or
remove the head restraint. Do not use the
seat if the head restraint has been re-
moved. If the head restraint was removed,
reinstall and properly adjust the head re-
straint before an occupant uses the seat-
ing position. Failure to follow these in-
structions can reduce the effectiveness of
the head restraints. This may increase the
risk of serious injury or death in a
collision.
Type A
�AStowed position
�BResting position
WRS0368
Type B
LRS0425
1-6Safety—Seats, seat belts and supplemental restraint system
ProCarManuals.com
Page 29 of 406

To fold the front passenger’s seatback flat for
extra storage length when transporting long
items:
�1Slide the seat to the rear most po")
Folding the front passenger’s seatback
flat (if so equipped)
To fold the front passenger’s seatback flat for
extra storage length when transporting long
items:
�1Slide the seat to the rear most position. Then
lift up on the recline lever, located on the
outside of the seat, and fold the seatback
forward as far as it will go.
�2Lift up on the latch located on the upper
corner of the seatback to release the back of
the seat. This will enable you to fold the front
passenger seatback flat over the seat cush-
ion.
3. To return the front passenger’s seat to a seating position, lift up on the seatback and
push it up to an upright position. Then pull up
on the recline lever and lean the seatback to
a proper seating position. Release the lever
to lock the seatback in position.
WARNING
●If you fold the front passenger’s seat-
back flat forward to carry longer ob-
jects, be sure this cargo is properly se-
cured and not near an air bag. In a
crash, an inflating air bag might force
that object toward a person. This could
cause severe injury or even death. Se-
cure objects away from the area in
which an air bag would inflate. See
“Precautions on supplemental restraint
system” later in this section.
● When returning the seatbacks to the
upright position, be certain they are
completely secured in the latched posi-
tion. If they are not completely secured,
passengers may be injured in an acci-
dent or sudden stop.
LRS0341LRS0342
1-12Safety—Seats, seat belts and supplemental restraint system
ProCarManuals.com
Page 30 of 406
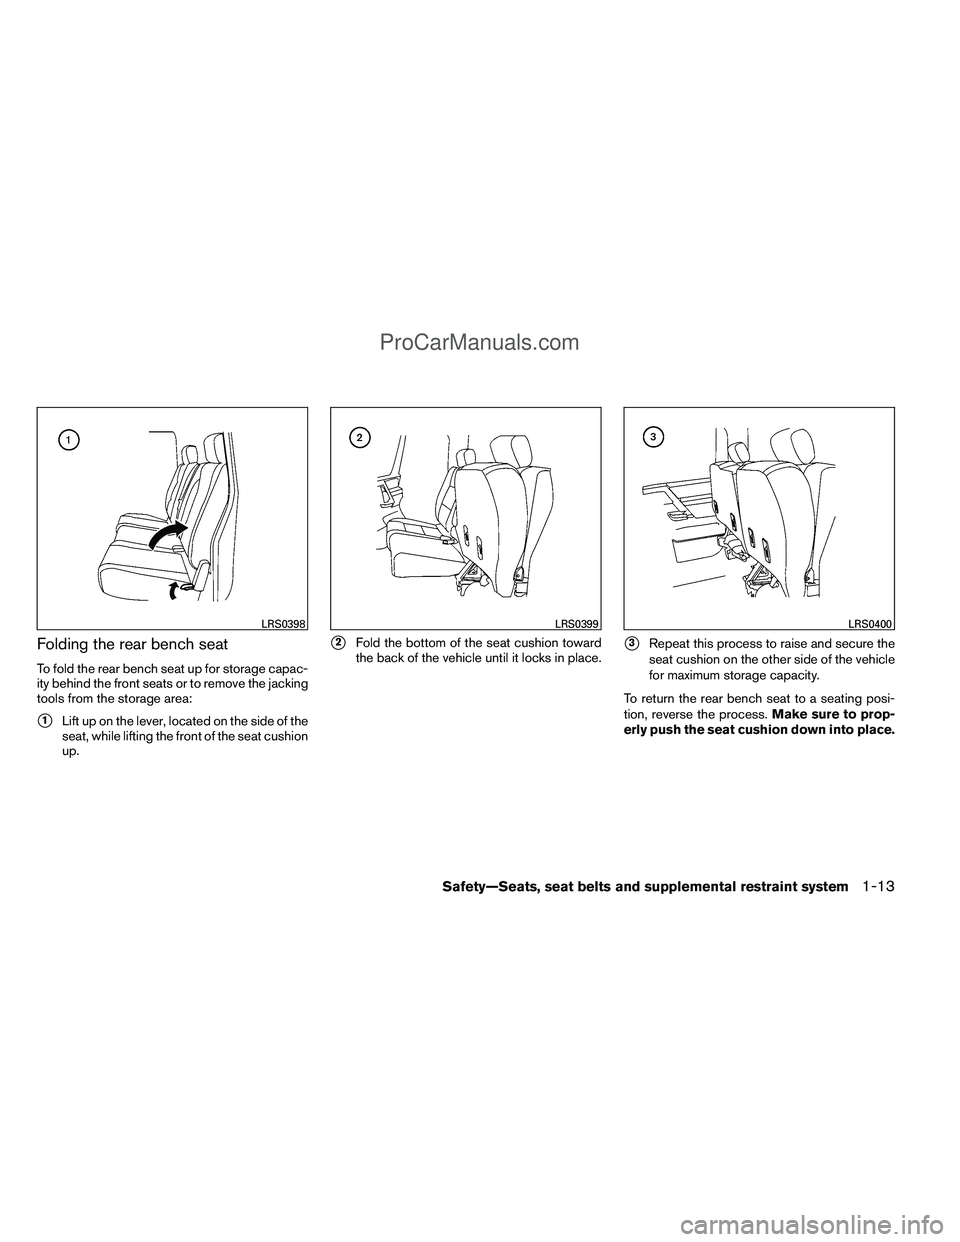
Folding the rear bench seat
To fold the rear bench seat up for storage capac-
ity behind the front seats or to remove the jacking
tools from the storage area:
�1Lift up on the lever, located on the side of the
seat, while lifting the front of the seat cushion
up.
�2Fold the bottom of the seat cushion toward
the back of the vehicle until it locks in place.�3Repeat this process to raise and secure the
seat cushion on the other side of the vehicle
for maximum storage capacity.
To return the rear bench seat to a seating posi-
tion, reverse the process. Make sure to prop-
erly push the seat cushion down into place.
LRS0398LRS0399LRS0400
Safety—Seats, seat belts and supplemental restraint system1-13
ProCarManuals.com
Page 36 of 406

�2Slowly pull the seat belt out of the retractor
and insert the tongue into the buckle until
you hear and feel the latch engage.
● The retractor is designed to lock dur-
ing a sudden stop or on impact. A
slow pulling motion permits the seat
belt to move, and allows you some
freedom of movement in the seat.
● If the seat belt cannot be pulled from
its fully retracted position, firmly pull
the belt and release it. Then
smoothly pull the belt out of the re-
tractor.�3Position the lap belt portion low and snug
on the hips as shown.
�4Pull the shoulder belt portion toward the
retractor to take up extra slack. Be sure the
shoulder belt is routed over your shoulder
and across your chest.
The front passenger seat and the rear seating
positions three-point seat belts have two modes
of operation: ● Emergency Locking Retractor (ELR)
● Automatic Locking Retractor (ALR) The Emergency Locking Retractor (ELR) mode
allows the seat belt to extend and retract to allow
the driver and passengers some freedom of
movement in the seat. The ELR locks the seat belt
when the vehicle slows down rapidly or during
certain impacts.
The Automatic Locking Retractor (ALR) mode
(child restraint mode) locks the seat belt for child
restraint installation.
When the ALR mode is activated, the seat belt
cannot be extended again until the seat belt
tongue is detached from the buckle and fully
retracted. The seat belt returns to the ELR mode
after the seat belt fully retracts. See “Child re-
straints” later in this section for more information.
The ALR mode should be used only for
child restraint installation. During normal
seat belt use by a passenger, the ALR mode
should not be activated. If it is activated it
may cause uncomfortable seat belt ten-
sion. It can also change the operation of
the front passenger air bag. See “Front
passenger air bag and status light” later in
this section.
WRS0137WRS0138
Safety—Seats, seat belts and supplemental restraint system1-19
ProCarManuals.com
Page 63 of 406

1.If you must install a booster seat in the
front seat, move the seat to the rear-
most position.
2. Position the booster seat on the seat. Only place it in a front-facing direction. Always
follow the booster seat manufacturer’s in-
structions. 3. The booster seat should be positioned on
the vehicle seat so that it is stable.
If necessary, adjust or remove the head re-
straint to obtain the correct booster seat fit. If
the head restraint is removed, store it in a
secure place. Be sure to reinstall the
head restraint when the booster seat is
removed. See “Head restraints” in this sec-
tion for head restraint adjustment, removal
and installation information. If the seating position does not have an
adjustable head restraint and it is interfering
with the proper booster seat fit, try another
seating position or a different booster seat.
4. Position the lap portion of the seat belt low and snug on the child’s hips. Be sure to
follow the booster seat manufacturer’s in-
structions for adjusting the seat belt routing.
5. Pull the shoulder belt portion of the seat belt toward the retractor to take up extra slack.
Be sure the shoulder belt is positioned
across the top, middle portion of the child’s
shoulder. Be sure to follow the booster seat
manufacturer’s instructions for adjusting the
seat belt routing.
6. Follow the warnings, cautions and instruc- tions for properly fastening a seat belt
shown in “Three-point type seat belt with
retractor” earlier in this section.
WRS0699
Front passenger position
LRS0454
1-46Safety—Seats, seat belts and supplemental restraint system
ProCarManuals.com

2. Windshield wiper and washer switch(P. 2-27)
3. Windshield (P. 8-19)
4. Moonroof (if so equipped) (P. 2-52)
5. Power windows (P. 2-48)
6. Door locks, keyfob, keys
(P. 3-3, 3")
(P. 2-51)
2. Vehicle loading (P. 9-13)
3. Tailgate/Truckbox (P. 3-22)
4. Trailer hitch/Towing (if so equipped)
(P. 9-24)
5. Replacing bulbs (P. 8-30)
6. Bedside")