2012 NISSAN QASHQAI ECO mode
[x] Cancel search: ECO modePage 208 of 297
Downloaded from www.Manualslib.com manuals search engine 6In case of emergency
In case of emergency
Spare tyre................................................................ 6-2
Temporary-use spare tyre ................................... 6-2
Flat tyre ................................................................... 6-2 Stopping the vehicle ........................................... 6-2
Changing flat tyre (Models with spare wheel,
where fitted) ....................................................... 6-3
Repairing flat tyre (Models with emergency
tyre puncture repair kit, where fitted) ................... 6-7
Jump-starting ........................................................... 6-10
Push-starting ........................................................... 6-12 Engine overheat ....................................................... 6-12
Tow truck towing ..................................................... 6-13
Towing precautions ............................................ 6-13
Recommended towing for two-wheel drive
(2WD) models .................................................... 6-14
Recommended towing for four-wheel drive
(4WD) models .................................................... 6-14
Towing eye ......................................................... 6-15
Freeing the vehicle from sand, snow or mud ....... 6-15
Page 212 of 297

Downloaded from www.Manualslib.com manuals search engine Never allow passengers to stay in the vehicle
while it is on the jack.
Remove all loads before lifting the vehicle with
the jack.
Make sure to block the wheel diagonally op-
posite the flat tyre as described earlier in this
section.
CAUTION
The jack should be used on firm, level ground.
1. Place the jack directly under the jack-up point as illustrated so that the top of the jack contacts the
vehicle at the jack-up point.
2. Align the centre of both the jack head and the notches at the jack-up point as shown.
3. Fit the groove of the jack head between the two notches as shown. 4. Loosen each wheel nut by one or two turns
anticlockwise with the wheel wrench.
Do not remove the wheel nuts until the tyre is
off the ground.
Models with wheel lock nuts (where fitted):
If the wheel is equipped with a wheel lock nut,
insert the wheel lock key
j1 and loosen it as pre-
viously described.
The wheel lock nut can only be removed with the
wheel lock key. A key number is necessary if you
need to duplicate the wheel lock key.
Record the key number as shown on the key
code card on the “Security information” page at
the end of this manual and keep it in a safe place,
not in the vehicle. If you loose the wheel lock key,
see your NISSAN dealer for a duplicate with the
original wheel lock key code. Make sure to keep the lock key in the vehicle.
Otherwise, wheels cannot be removed and the
service cannot be performed.
5. To lift the vehicle, securely hold and turn the handle clockwise as shown.
6. Carefully raise the vehicle until the tyre clears the ground.
7. Remove the wheel nuts, then remove the wheel with the flat tyre.NCE256Z
Jack-up points
NCE143Z
NCE309
5–seater
NCE308
7–seater
In case of emergency6-5
Page 213 of 297
Downloaded from www.Manualslib.com manuals search engine CAUTION
The wheel is heavy. Be sure that your feet are
clear of the wheel and use gloves as necessary
to avoid injury.
Installing the wheel
WARNING
The temporary use spare tyre is designed for
emergency use. See “Spare tyre” earlier in
this section.
Never use wheel nuts other than those pro-
vided with your vehicle. Incorrect wheel nuts
or improperly tightened wheel nuts may cause
the wheel to become loose or come off. This
could cause an accident.
Never use oil or grease on the wheel studs or
nuts. This may cause the wheel nuts to be-
come loose.
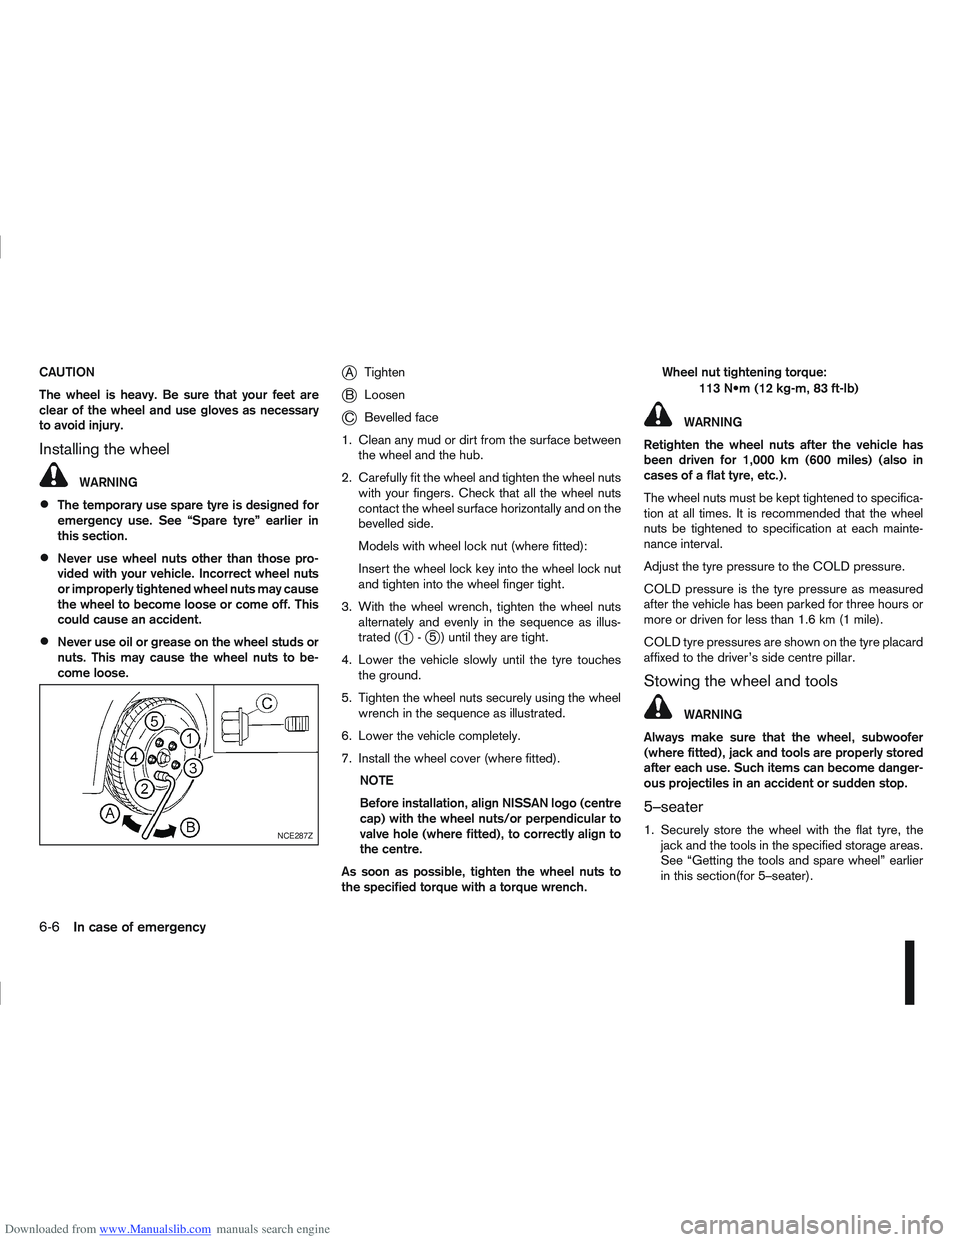
jATighten
jB Loosen
jC Bevelled face
1. Clean any mud or dirt from the surface between the wheel and the hub.
2. Carefully fit the wheel and tighten the wheel nuts with your fingers. Check that all the wheel nuts
contact the wheel surface horizontally and on the
bevelled side.
Models with wheel lock nut (where fitted):
Insert the wheel lock key into the wheel lock nut
and tighten into the wheel finger tight.
3. With the wheel wrench, tighten the wheel nuts alternately and evenly in the sequence as illus-
trated (
j1-j5 ) until they are tight.
4. Lower the vehicle slowly until the tyre touches the ground.
5. Tighten the wheel nuts securely using the wheel wrench in the sequence as illustrated.
6. Lower the vehicle completely.
7. Install the wheel cover (where fitted). NOTE
Before installation, align NISSAN logo (centre
cap) with the wheel nuts/or perpendicular to
valve hole (where fitted), to correctly align to
the centre.
As soon as possible, tighten the wheel nuts to
the specified torque with a torque wrench. Wheel nut tightening torque:
113 (12 kg-m, 83 ft-lb)
WARNING
Retighten the wheel nuts after the vehicle has
been driven for 1,000 km (600 miles) (also in
cases of a flat tyre, etc.).
The wheel nuts must be kept tightened to specifica-
tion at all times. It is recommended that the wheel
nuts be tightened to specification at each mainte-
nance interval.
Adjust the tyre pressure to the COLD pressure.
COLD pressure is the tyre pressure as measured
after the vehicle has been parked for three hours or
more or driven for less than 1.6 km (1 mile).
COLD tyre pressures are shown on the tyre placard
affixed to the driver’s side centre pillar.
Stowing the wheel and tools
WARNING
Always make sure that the wheel, subwoofer
(where fitted), jack and tools are properly stored
after each use. Such items can become danger-
ous projectiles in an accident or sudden stop.
5–seater
1. Securely store the wheel with the flat tyre, the jack and the tools in the specified storage areas.
See “Getting the tools and spare wheel” earlier
in this section(for 5–seater).NCE287Z
6-6In case of emergency
Page 214 of 297
Downloaded from www.Manualslib.com manuals search engine 2. Store the subwoofer (where fitted) as it was origi-nally installed.
3. Install the retainer and replace the floor cover.
7–seater
1. Store the tools in the specified areas.
2. Firmly pull down the third row seat and make sure it locks into the locking latches on both sides
under the seat.
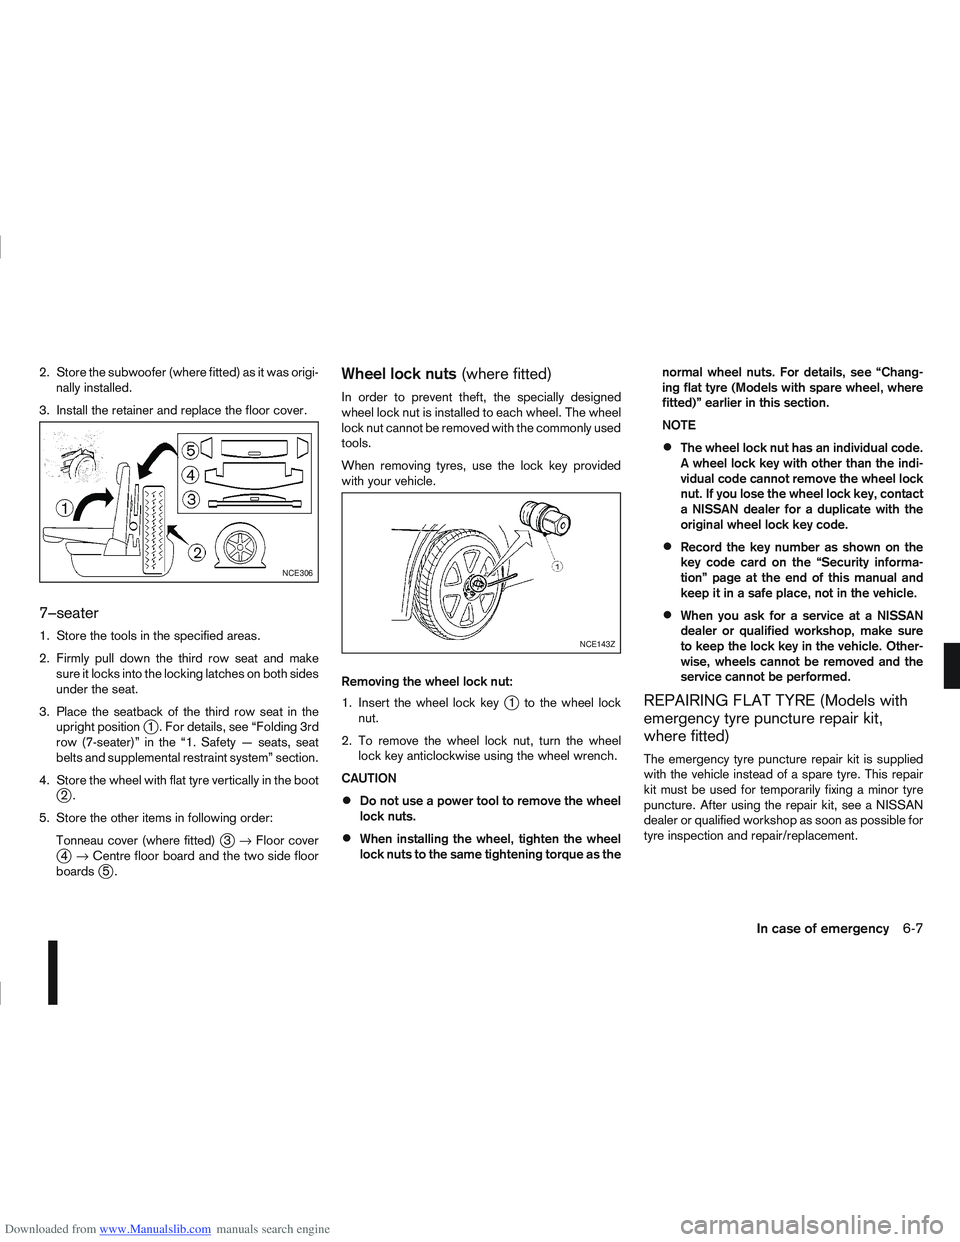
3. Place the seatback of the third row seat in the upright position
j1 . For details, see “Folding 3rd
row (7-seater)” in the “1. Safety — seats, seat
belts and supplemental restraint system” section.
4. Store the wheel with flat tyre vertically in the boot
j2.
5. Store the other items in following order: Tonneau cover (where fitted)
j3→ Floor coverj4→ Centre floor board and the two side floor
boardsj5.
Wheel lock nuts (where fitted)
In order to prevent theft, the specially designed
wheel lock nut is installed to each wheel. The wheel
lock nut cannot be removed with the commonly used
tools.
When removing tyres, use the lock key provided
with your vehicle.
Removing the wheel lock nut:
1. Insert the wheel lock key
j1 to the wheel lock
nut.
2. To remove the wheel lock nut, turn the wheel lock key anticlockwise using the wheel wrench.
CAUTION
Do not use a power tool to remove the wheel
lock nuts.
When installing the wheel, tighten the wheel
lock nuts to the same tightening torque as the normal wheel nuts. For details, see “Chang-
ing flat tyre (Models with spare wheel, where
fitted)” earlier in this section.
NOTE
The wheel lock nut has an individual code.
A wheel lock key with other than the indi-
vidual code cannot remove the wheel lock
nut. If you lose the wheel lock key, contact
a NISSAN dealer for a duplicate with the
original wheel lock key code.
Record the key number as shown on the
key code card on the “Security informa-
tion” page at the end of this manual and
keep it in a safe place, not in the vehicle.
When you ask for a service at a NISSAN
dealer or qualified workshop, make sure
to keep the lock key in the vehicle. Other-
wise, wheels cannot be removed and the
service cannot be performed.
REPAIRING FLAT TYRE (Models with
emergency tyre puncture repair kit,
where fitted)
The emergency tyre puncture repair kit is supplied
with the vehicle instead of a spare tyre. This repair
kit must be used for temporarily fixing a minor tyre
puncture. After using the repair kit, see a NISSAN
dealer or qualified workshop as soon as possible for
tyre inspection and repair/replacement.
NCE306
NCE143Z
In case of emergency6-7
Page 218 of 297

Downloaded from www.Manualslib.com manuals search engine 6. Open the bonnet. For details, see “Bonnetrelease” in the “3. Pre-driving checks and
adjustments” section.
7. Remove the vent caps (where fitted) on the bat- tery and cover the battery with an old cloth.
8. Connect the jump leads in the sequence (
j1 →j2→j3→j4 ) as illustrated.
CAUTION
Always connect positivej+ to positivej+
and negativej- to body ground (for ex-
ample, engine lift bracket, etc.) – not to
the battery’s negative
j-.
An incorrect connection could damage the
charging system.
Be sure that the jumper cables do not
touch moving parts in the engine compart-
ment.
Be careful not to allow contact between
the positive jump lead connector and the
vehicle or the negative lead during con-
nection and disconnection.
9. Start the engine of the other vehicle
jA and let it
run for a few minutes. Keep the engine speed at
about 2,000 rpm.
10. Start the engine of your vehicle
jB in the nor-
mal way. CAUTION
Do not keep the starter motor engaged for
more than 10 seconds. If the engine does not
start immediately, turn the ignition switch to
“OFF” and wait 10 seconds before trying
again.
11. After starting the engine of your vehicle, care- fully disconnect the negative lead and then the
positive lead (
j4→j3→j2→j1).
12. Remove and dispose of the cloth that was used to cover the vent holes as it may be contami-
nated with corrosive acid.
13. Install the vent caps (where fitted).
14. Close the bonnet.
NOTE
For models which incorporate the Stop/Start
System:
Ensure that the battery fitted is the special
battery that is enhanced with regard to the
charge-discharge capacity and life perfor-
mance. Avoid using any other battery for the
Stop/Start System, as this may cause early
deterioration of the battery or a malfunction
of the Stop/Start System. It is recommended
that a Genuine NISSAN battery is fitted. For
more information, contact a NISSAN dealer or
qualified workshop
If the battery terminal is disconnected (for bat-
tery replacement, etc.) and then reconnected,
there may be some delay before the Stop/
Start System reactivates.
In case of emergency6-11
Page 220 of 297
Downloaded from www.Manualslib.com manuals search engine 14. If the level is low, remove the engine coolantreservoir cap and add coolant slowly into the
reservoir. After refilling the reservoir to the MAX
level, install the reservoir cap.
WARNING
Before removing the engine coolant reservoir
cap and to avoid the danger of being scalded,
cover the reservoir cap with a rag and loosen
the reservoir cap to the first notch to allow the
steam to escape.
15. Close the bonnet.
Have your vehicle inspected or repaired by a
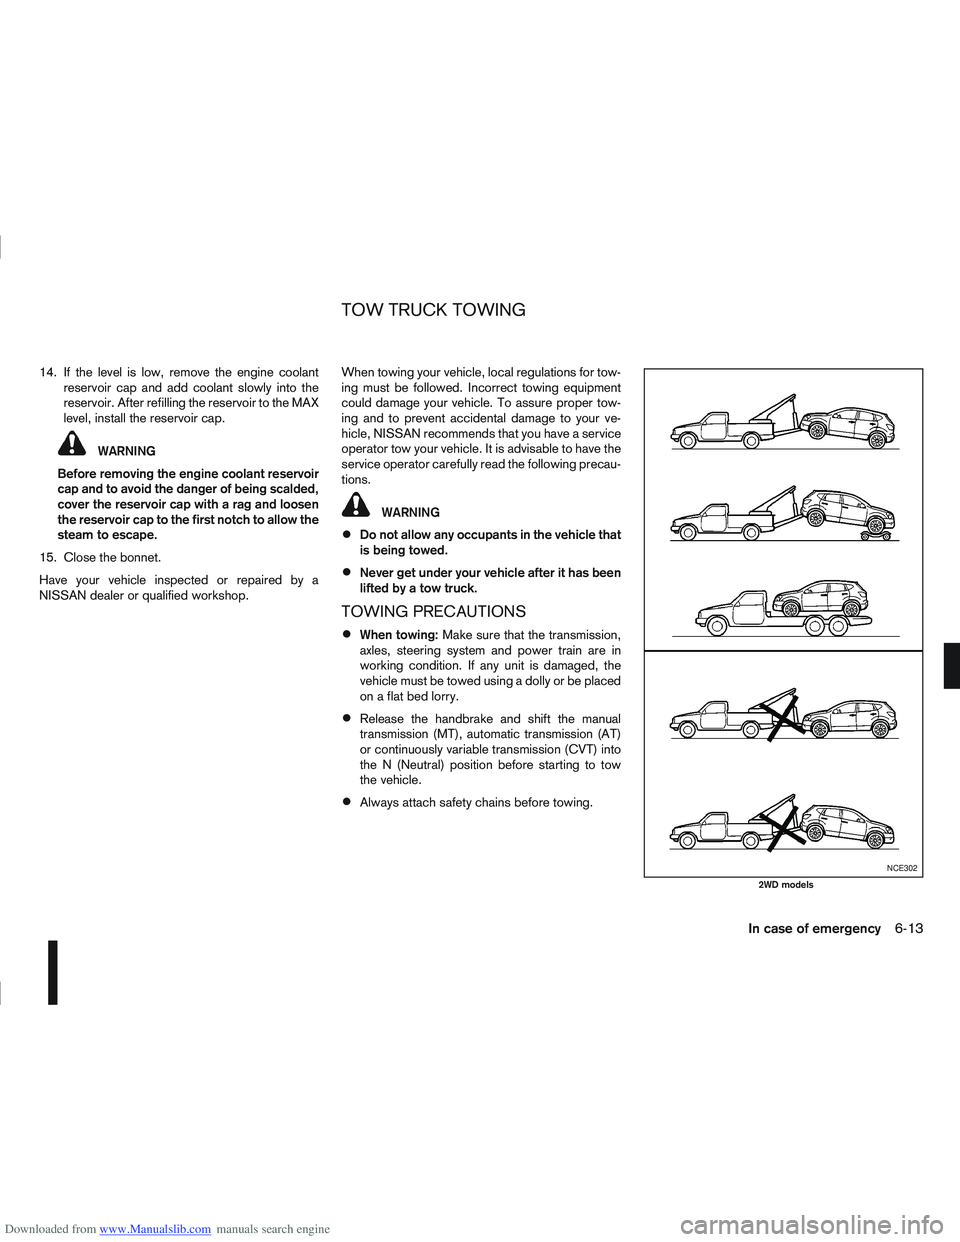
NISSAN dealer or qualified workshop. When towing your vehicle, local regulations for tow-
ing must be followed. Incorrect towing equipment
could damage your vehicle. To assure proper tow-
ing and to prevent accidental damage to your ve-
hicle, NISSAN recommends that you have a service
operator tow your vehicle. It is advisable to have the
service operator carefully read the following precau-
tions.
WARNING
Do not allow any occupants in the vehicle that
is being towed.
Never get under your vehicle after it has been
lifted by a tow truck.
TOWING PRECAUTIONS
When towing:
Make sure that the transmission,
axles, steering system and power train are in
working condition. If any unit is damaged, the
vehicle must be towed using a dolly or be placed
on a flat bed lorry.
Release the handbrake and shift the manual
transmission (MT), automatic transmission (AT)
or continuously variable transmission (CVT) into
the N (Neutral) position before starting to tow
the vehicle.
Always attach safety chains before towing.
NCE302
2WD models
TOW TRUCK TOWING
In case of emergency6-13
Page 221 of 297
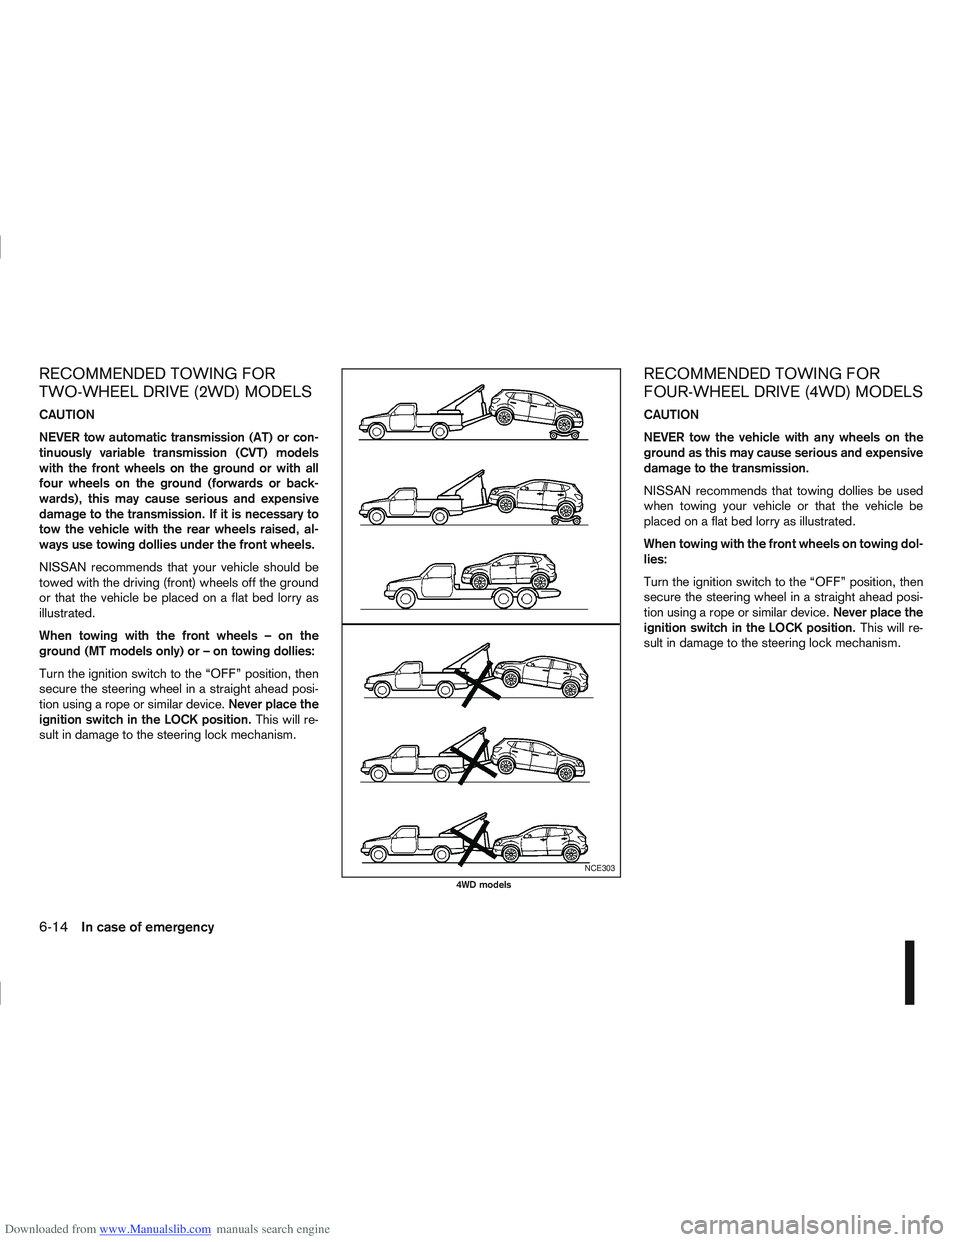
Downloaded from www.Manualslib.com manuals search engine RECOMMENDED TOWING FOR
TWO-WHEEL DRIVE (2WD) MODELS
CAUTION
NEVER tow automatic transmission (AT) or con-
tinuously variable transmission (CVT) models
with the front wheels on the ground or with all
four wheels on the ground (forwards or back-
wards), this may cause serious and expensive
damage to the transmission. If it is necessary to
tow the vehicle with the rear wheels raised, al-
ways use towing dollies under the front wheels.
NISSAN recommends that your vehicle should be
towed with the driving (front) wheels off the ground
or that the vehicle be placed on a flat bed lorry as
illustrated.
When towing with the front wheels – on the
ground (MT models only) or – on towing dollies:
Turn the ignition switch to the “OFF” position, then
secure the steering wheel in a straight ahead posi-
tion using a rope or similar device.Never place the
ignition switch in the LOCK position. This will re-
sult in damage to the steering lock mechanism.
RECOMMENDED TOWING FOR
FOUR-WHEEL DRIVE (4WD) MODELS
CAUTION
NEVER tow the vehicle with any wheels on the
ground as this may cause serious and expensive
damage to the transmission.
NISSAN recommends that towing dollies be used
when towing your vehicle or that the vehicle be
placed on a flat bed lorry as illustrated.
When towing with the front wheels on towing dol-
lies:
Turn the ignition switch to the “OFF” position, then
secure the steering wheel in a straight ahead posi-
tion using a rope or similar device. Never place the
ignition switch in the LOCK position. This will re-
sult in damage to the steering lock mechanism.
NCE303
4WD models
6-14In case of emergency
Page 240 of 297
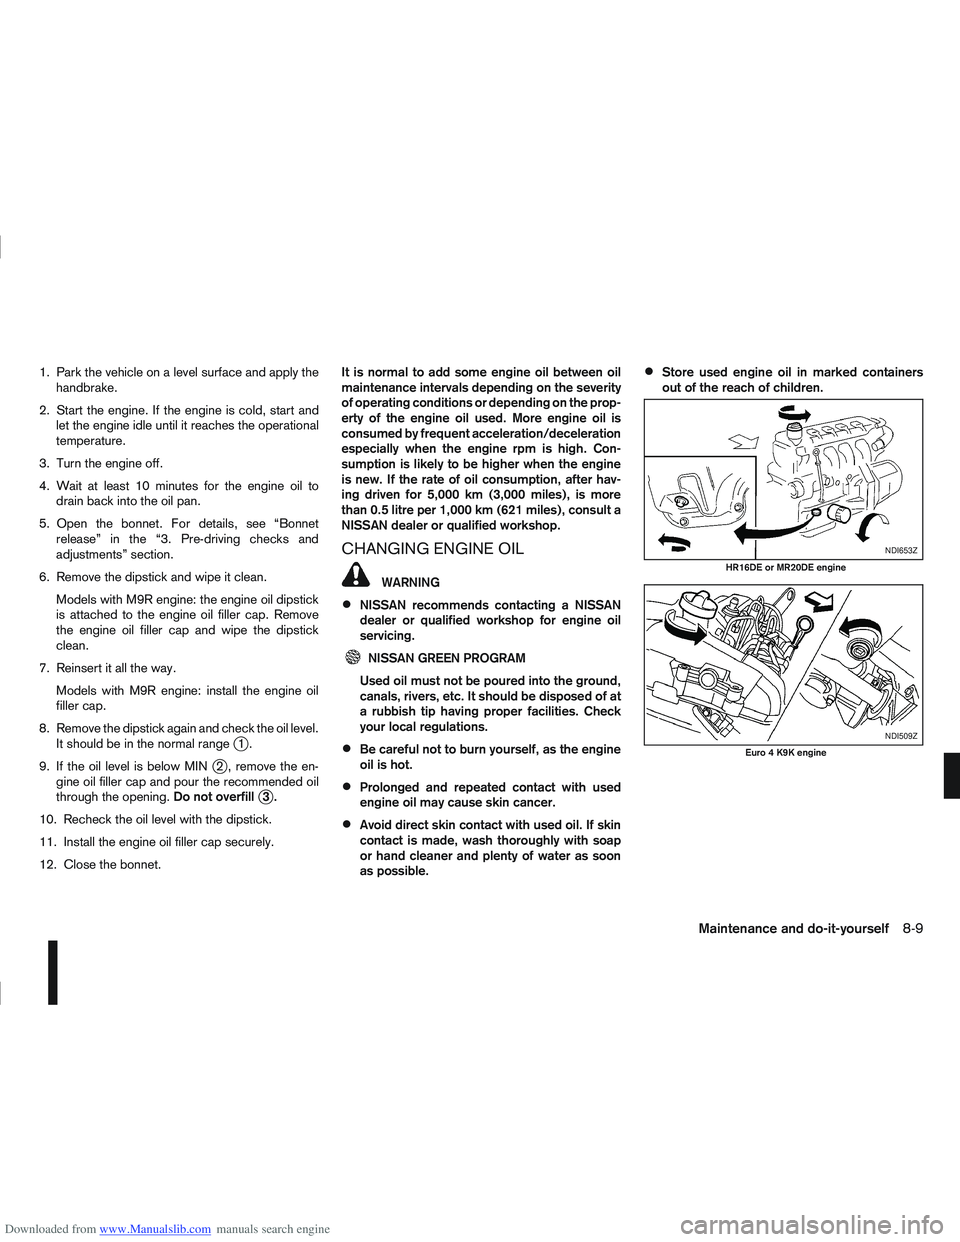
Downloaded from www.Manualslib.com manuals search engine 1. Park the vehicle on a level surface and apply thehandbrake.
2. Start the engine. If the engine is cold, start and let the engine idle until it reaches the operational
temperature.
3. Turn the engine off.
4. Wait at least 10 minutes for the engine oil to drain back into the oil pan.
5. Open the bonnet. For details, see “Bonnet release” in the “3. Pre-driving checks and
adjustments” section.
6. Remove the dipstick and wipe it clean. Models with M9R engine: the engine oil dipstick
is attached to the engine oil filler cap. Remove
the engine oil filler cap and wipe the dipstick
clean.
7. Reinsert it all the way. Models with M9R engine: install the engine oil
filler cap.
8. Remove the dipstick again and check the oil level. It should be in the normal range
j1.
9. If the oil level is below MIN
j2 , remove the en-
gine oil filler cap and pour the recommended oil
through the opening. Do not overfill
j3.
10. Recheck the oil level with the dipstick.
11. Install the engine oil filler cap securely.
12. Close the bonnet. It is normal to add some engine oil between oil
maintenance intervals depending on the severity
of operating conditions or depending on the prop-
erty of the engine oil used. More engine oil is
consumed by frequent acceleration/deceleration
especially when the engine rpm is high. Con-
sumption is likely to be higher when the engine
is new. If the rate of oil consumption, after hav-
ing driven for 5,000 km (3,000 miles), is more
than 0.5 litre per 1,000 km (621 miles), consult a
NISSAN dealer or qualified workshop.
CHANGING ENGINE OIL
WARNING
NISSAN recommends contacting a NISSAN
dealer or qualified workshop for engine oil
servicing.
NISSAN GREEN PROGRAM
Used oil must not be poured into the ground,
canals, rivers, etc. It should be disposed of at
a rubbish tip having proper facilities. Check
your local regulations.
Be careful not to burn yourself, as the engine
oil is hot.
Prolonged and repeated contact with used
engine oil may cause skin cancer.
Avoid direct skin contact with used oil. If skin
contact is made, wash thoroughly with soap
or hand cleaner and plenty of water as soon
as possible.
Store used engine oil in marked containers
out of the reach of children.
NDI653Z
HR16DE or MR20DE engine
NDI509Z
Euro 4 K9K engine
Maintenance and do-it-yourself8-9