2012 NISSAN QASHQAI ECO mode
[x] Cancel search: ECO modePage 167 of 297

Downloaded from www.Manualslib.com manuals search engine Utility vehicles have a significantly higher rollover
rate than other types of vehicles.
They have higher ground clearance than passenger
cars to make them capable of performing in a wide
variety of on-pavement and off-road applications.
This gives them a higher centre of gravity than ordi-
nary cars. An advantage of higher ground clearance
is a better view of the road, allowing you to antici-
pate problems. However, they are not designed for
cornering at the same speeds as conventional two-
wheel drive (2WD) vehicles any more than low-slung
sports cars are designed to perform satisfactorily
under off-road conditions. If possible, avoid sharp
turns or abrupt manoeuvres, particularly at high
speeds. As with other vehicles of this type, failure to
operate this vehicle correctly may result in loss of
control or vehicle rollover. In a rollover accident an
unbelted person is significantly more likely to be
injured than a person who is wearing a seat belt.NISSAN GREEN PROGRAM
The three-way catalyst is an emission control device
installed in the exhaust system. In the converter,
exhaust gases are burned at high temperatures to
help reduce pollutants.
CAUTION
The exhaust gas and the exhaust system are
very hot. While the engine is running, keep
people or flammable materials away from the
exhaust pipe.
Do not stop or park the vehicle over flam-
mable materials such as dry grass, waste pa-
per or rags, as they may burn easily.
When parking, ensure that people or flam-
mable materials are kept away from the ex-
haust pipe.
TO HELP PREVENT DAMAGE
CAUTION
Use UNLEADED PETROL ONLY, specifically
the recommended type. For details, see “Ca-
pacities and recommended fuel/lubricants” in
the “9. Technical information” section.
Do not use leaded petrol. Leaded petrol will
seriously damage three-way catalyst.
Deposits from leaded petrol will seriously re-
duce the three-way catalyst’s ability to help
reduce exhaust pollutants.
Keep your engine tuned up. Malfunctions in
the ignition, fuel injection, or electrical sys-
tems can cause over-rich fuel flow into the
converter, causing it to overheat.
Avoid driving with an extremely low fuel level.
Running out of fuel could cause the engine to
misfire, damaging the three-way catalyst.
Do not keep driving if the engine misfires, or
if noticeable loss of performance or other un-
usual operating conditions are detected. Have
the vehicle inspected promptly by a NISSAN
dealer or qualified workshop.
Do not race the engine while warming it up.
Do not push or tow your vehicle to start the
engine.
ON-PAVEMENT AND OFF-ROAD
DRIVING PRECAUTIONS THREE-WAY CATALYST (Petrol
engine models)
5-4Starting and driving
Page 168 of 297

Downloaded from www.Manualslib.com manuals search engine The turbocharger system uses engine oil for lubrica-
tion and cooling of its rotating components. The tur-
bocharger turbine turns at extremely high speeds
and it can reach an extremely high temperature. It is
essential to maintain a flow of clean oil through the
turbocharger system. A sudden interruption to the
oil supply may cause a malfunction in the turbo-
charger.
To ensure prolonged life and performance of the
turbocharger, it is essential to comply with the fol-
lowing maintenance procedure:
CAUTION
Change the engine oil of the turbo-charged
diesel engine as prescribed. See the sepa-
rately provided Warranty Information & Main-
tenance Booklet for additional information.
Use only the recommended engine oil. See
“Capacities and recommended
fuel/lubricants” in the “9. Technical
information” section.
If the engine has been operating at high rpm
for an extended period of time, let it idle for a
few minutes prior to shutdown.
Do not accelerate the engine to high rpm im-
mediately after starting it.
WARNING
Be careful not to burn yourself with exhaust
gases.
Do not park the vehicle over flammable mate-
rials such as dry grass, waste paper or rags,
as they may burn easily.
If the vehicle continues to be driven at a low
speed with the DPF warning light illuminated,
the fail-safe will limit engine revolutions and/
or torque. In this case, the engine oil must be
replaced and the process of burning accumu-
lated particulate matter must be carried out
by a NISSAN dealer or qualified workshop.
Service regeneration is a maintenance item
and is not covered by the NISSAN warranty.
Use engine oil for DPF equipped models. For
details, see “Capacities and recommended
fuel/lubricants” in the “9. Technical
information” section.
CAUTION
The DPF becomes extremely hot after burning
particulate matter.
NISSAN GREEN PROGRAM
Some diesel engine models are fitted with a Diesel
Particulate Filter (DPF), which is a device that re-
moves carbon (soot) from the exhaust gas. To oper-
ate effectively, the DPF system must routinely con-
duct a cleaning operation, called regeneration, that burns-off the accumulated carbon. This regenera-
tion process is normally automatic and not visible to
the driver.
REGENERATION RESTRICTIONS
Driving conditions such as frequent short journeys
or stop/start driving can result in excessive build up
of carbon in the filter. When this happens the DPF
warning light
will illuminate (and a message
will appear in the vehicle information display, see
“Vehicle information display” later in this section) to
inform you that the vehicle must be driven in a par-
ticular manner to begin regeneration.
When the DPF warning light is illuminated, provided
that legal and safety conditions allow, the vehicle
should be driven at a speed of over 60 km/h (37.5
MPH) until the DPF warning light turns off. This pro-
cess can take up to 30 minutes to complete.
IF REGENERATION FAILS
Failure to react to the DPF warning lightmay
lead to saturation of the DPF system. If this hap-
pens, the Malfunction Indicator (MI)
will also
illuminate to indicate that a Service Regeneration by
a NISSAN dealer or qualified workshop is required.
The engine speed may also be limited to 3,000 rpm
to protect the DPF system.
NOTE
Contact a NISSAN dealer or qualified workshop
to perform a forced regeneration.
TURBOCHARGER SYSTEM
(Diesel engine models) DIESEL PARTICULATE FILTER
(DPF) (where fitted)
Starting and driving5-5
Page 170 of 297
Downloaded from www.Manualslib.com manuals search engine unlock the steering wheel, insert the ignition key and
turn it gently while rotating the steering wheel slightly
right and left.
The ignition key can only be removed when the
switch is in the LOCK position (Normal parking po-
sition) (0).
AUTOMATIC TRANSMISSION OR
CONTINUOUSLY VARIABLE
TRANSMISSION
On Automatic Transmission (AT) or Continuously
Variable Transmission (CVT) models, the ignition
lock is designed so that the key cannot be turned to
LOCK and removed until the selector lever is moved
to the P (Park) position.
When removing the key from the LOCK position of
the ignition switch, make sure that the selector lever
is in the P (Park) position.
The selector lever can only be moved from the P
(Park) position when the ignition switch is in the ON
position and the footbrake pedal is depressed.
To remove the key from the ignition switch:
1. Move the selector lever into the P (Park) posi-tion.
2. Turn the key to the LOCK position.
3. Remove the key from the ignition switch.
If the key is removed from the ignition switch, the
selector lever cannot be moved from the P (Park)
position. When the key cannot be turned toward the LOCK
position, proceed as follows to remove the key:
1. Move the selector lever into the P (Park) posi-
tion.
2. Turn the key slightly in the ON direction.
3. Turn the key towards the LOCK position.
4. Remove the key.
STEERING LOCK
To lock the steering wheel
1. Turn the key to the LOCK position.
2. Remove the key from the ignition switch.
3. Turn the steering wheel 1/6 of a turn clockwise from the straight up position.
To unlock the steering wheel
1. Insert the key into the ignition switch.
2. Gently turn the key while rotating the steeringwheel slightly right and left.
KEY POSITIONS
LOCK (Normal parking position) (0)
The ignition key can only be removed when in this
position.
The steering lock can only be locked in this position.
“OFF” (1)
The engine is turned off without locking the steering
wheel.
Acc (Accessories) (2)
This position activates electrical accessories, such
as the radio, when the engine is not running.
ON (Normal operating position) (3)
This position turns on the ignition system and elec-
trical accessories.
START (4)
The engine starter activates and the engine will start.
As soon as the engine has started, release the key
immediately. It will return to the ON position.
NOTE
For vehicles fitted with Stop/Start System:
When the engine is automatically stopped by the
Stop/Start System the ignition switch can still be
operated as usual.
At the end of a journey turn the ignition OFF to
avoid a flat battery. The Stop/Start System does
not automatically turn ignition off.
NISSAN ANTI-THEFT SYSTEM (NATS)
The NISSAN Anti Theft System (NATS)* will stop
the engine if someone tries to start the engine with-
out using the registered NATS key.
* Immobilizer
If you failed to start the engine using the NATS Key,
turn the ignition knob to the LOCK position, wait for
5 seconds and turn the key to the START position
again to start the engine.
Starting and driving5-7
Page 174 of 297
Downloaded from www.Manualslib.com manuals search engine If you failed to start the engine using the NATS Intel-
ligent Key, turn the ignition knob to the LOCK posi-
tion, wait for 5 seconds and turn the knob to the
START position again to start the engine.
For additional information, see “NISSAN Anti-Theft
System (NATS)” in the “3. Pre-driving checks and
adjustments” section.1. Apply the handbrake.
2.
Manual transmission models:
Move the gear lever to N (Neutral) position, and
depress the clutch pedal to the floor while start-
ing the engine.
Automatic transmission or Continuously vari-
able transmission models:
Depress the brake pedal and move the selector
lever to the P (Park) or N (Neutral) position.
(P position is preferred). NOTE
The starter is designed not to operate if the
selector lever is out of the P (Park) or N (Neu-
tral) position.
3. Models without Intelligent Key: Rotate the steering wheel left to right to release
the ignition lock whilst turning the ignition switch
to the ON position.
Models with Intelligent key:
MT models – keep the clutch pedal
depressed and/or depress the brake pedal
then:
AT or CVT models – depress the brake pedal
then:
1) Push the ignition knob.
2) Rotate the steering wheel left to right to release the ignition lock whilst turning the
ignition knob to the ON position. CAUTION
Make sure you carry the Intelligent Key with
you when operating the vehicle.
If the Intelligent Key is too far away from
the driver, the vehicle may not start.
4. For diesel engine models: Wait until the glow indicator light
goes out.
5. Crank the engine with your foot on the brake pedal, not on the accelerator pedal , by turning
the ignition switch to START.
6. Release the ignition switch when the engine starts. If the engine starts, but fails to run, repeat
the above procedure.
For petrol engine models:
NOTE
Models with HR16DE engine:
If the engine is very hard to start because it is
flooded, depress the accelerator pedal all the
way to the floor and hold it. Crank the engine
for 5-6 seconds and stop. After cranking the
engine, release the accelerator pedal. Then
crank the engine with your foot off the accel-
erator pedal. Release the ignition switch when
the engine starts. If the engine starts, but fails
to run, repeat the above procedure.
Models with MR20DE engine:
If the engine is very hard to start in extremely
cold or hot weather, or when restarting, de-
press the accelerator pedal a little (approxi-
STARTING THE ENGINE
Starting and driving5-11
Page 175 of 297
Downloaded from www.Manualslib.com manuals search engine mately 1/3 to the floor) and hold it then crank
the engine. Release the ignition switch and
the accelerator pedal when the engine starts.
CAUTION
Do not operate the starter for more than 15
seconds at a time. If the engine does not start,
turn the ignition switch to the “OFF” position
and wait 10 seconds (Petrol engine models)
or 20 seconds (Diesel engine models) before
cranking again, otherwise the starter could be
damaged.
If it becomes necessary to start the engine
with a booster battery and jumper leads, the
instructions and cautions contained in the
“Jump-starting” in the “6. In case of
emergency” section should be carefully fol-
lowed.
7. Warm-up
Allow the engine to idle for at least 30 seconds
after starting. Drive at moderate speed for a short
distance first, especially in cold weather.
WARNING
Do not leave the vehicle unattended while the
engine is warming up.
DRIVING WITH MANUAL
TRANSMISSION
CAUTION
Do not rest your foot on the clutch pedal while
driving. This may cause clutch damage.
Stop your vehicle completely before shifting
into the R (Reverse) position.
When you are shifting from one gear to an-
other, be certain to depress the clutch pedal
all the way to the floor to avoid clashing or
chipping the gears.
Avoid abrupt starts and acceleration for your
safety.
When quick acceleration is required for some
reason, shift to a lower gear and accelerate
until the vehicle reaches the maximum speed
in each gear. Do not exceed the speed limit of
any gear. Pay special attention when acceler-
ating or when shifting into a lower gear on
slippery surfaces. Sudden acceleration or
down shifting could cause the wheels to skid
and result in loss of control.
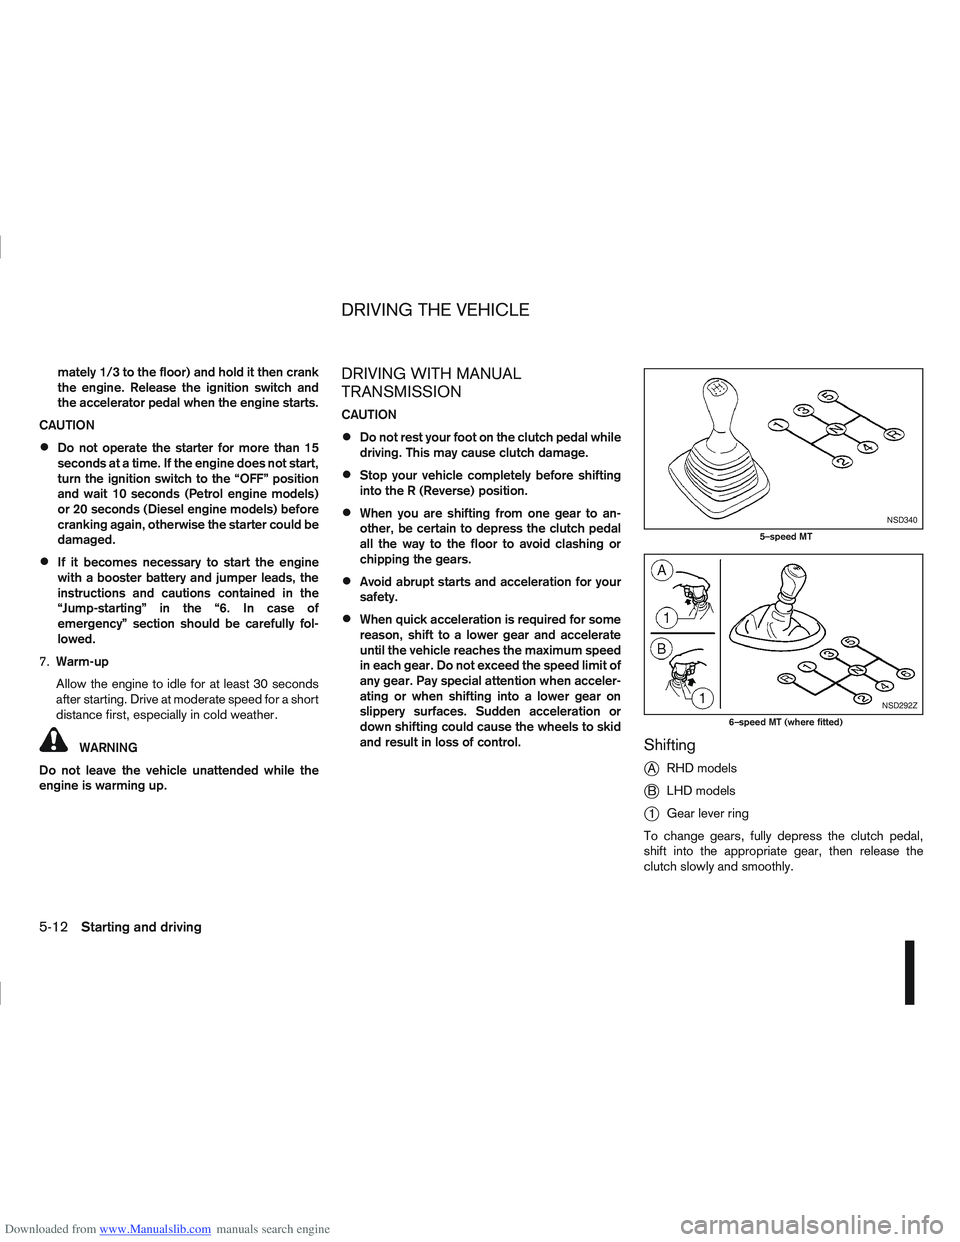
Shifting
j
A RHD models
jB LHD models
j1Gear lever ring
To change gears, fully depress the clutch pedal,
shift into the appropriate gear, then release the
clutch slowly and smoothly.
NSD340
5–speed MT
NSD292Z
6–speed MT (where fitted)
DRIVING THE VEHICLE
5-12Starting and driving
Page 176 of 297
Downloaded from www.Manualslib.com manuals search engine To ensure smooth gear changes, fully depress the
clutch pedal before operating the gear lever. If the
clutch pedal is not fully depressed before the trans-
mission is shifted, a gear noise may be heard. This
could result in damage to the transmission.
Start the vehicle in 1st gear and shift through the
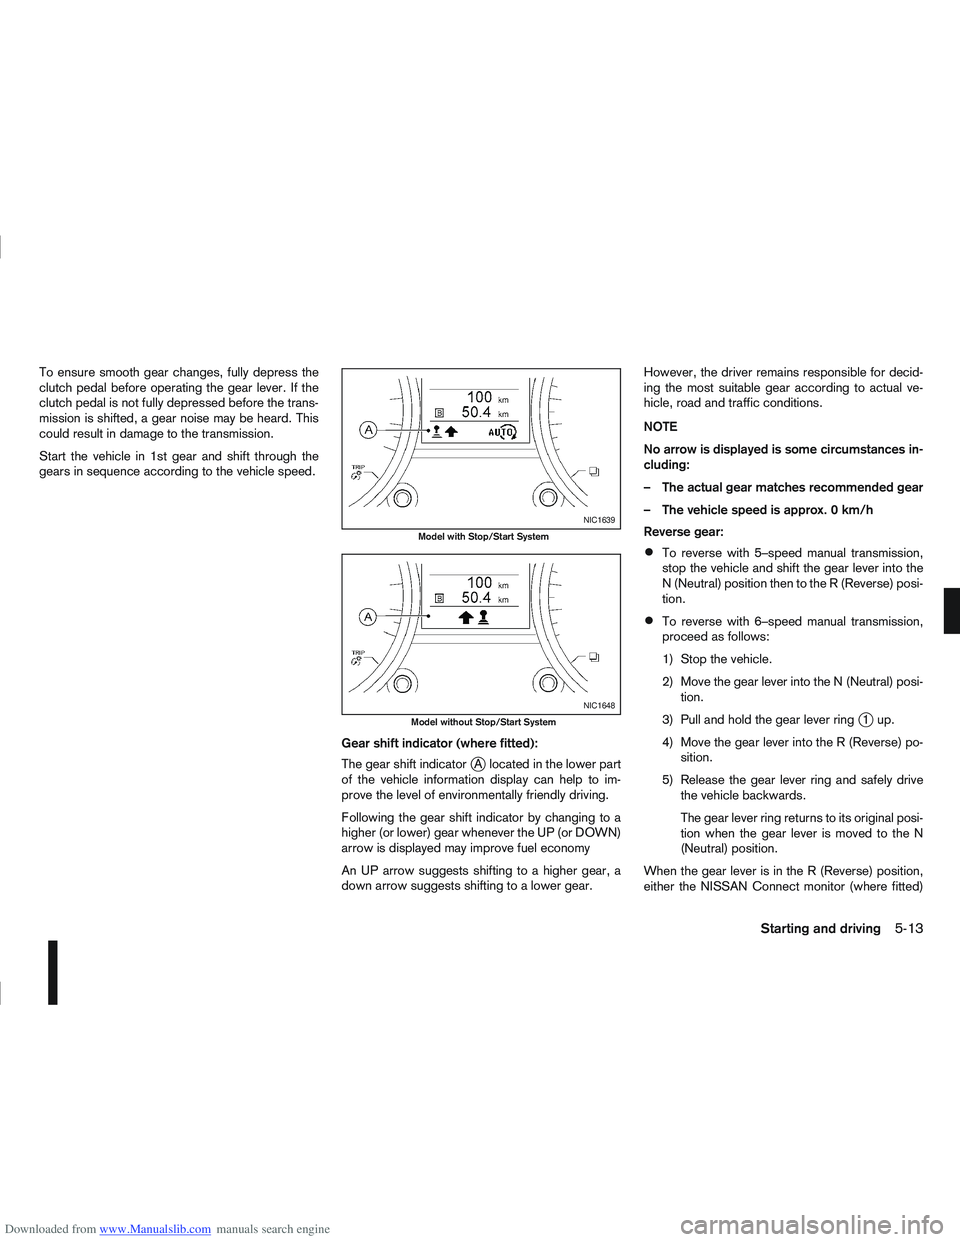
gears in sequence according to the vehicle speed.Gear shift indicator (where fitted):
The gear shift indicator
jA located in the lower part
of the vehicle information display can help to im-
prove the level of environmentally friendly driving.
Following the gear shift indicator by changing to a
higher (or lower) gear whenever the UP (or DOWN)
arrow is displayed may improve fuel economy
An UP arrow suggests shifting to a higher gear, a
down arrow suggests shifting to a lower gear. However, the driver remains responsible for decid-
ing the most suitable gear according to actual ve-
hicle, road and traffic conditions.
NOTE
No arrow is displayed is some circumstances in-
cluding:
– The actual gear matches recommended gear
– The vehicle speed is approx. 0 km/h
Reverse gear:
To reverse with 5–speed manual transmission,
stop the vehicle and shift the gear lever into the
N (Neutral) position then to the R (Reverse) posi-
tion.
To reverse with 6–speed manual transmission,
proceed as follows:
1) Stop the vehicle.
2) Move the gear lever into the N (Neutral) posi-
tion.
3) Pull and hold the gear lever ring
j1up.
4) Move the gear lever into the R (Reverse) po- sition.
5) Release the gear lever ring and safely drive the vehicle backwards.
The gear lever ring returns to its original posi-
tion when the gear lever is moved to the N
(Neutral) position.
When the gear lever is in the R (Reverse) position,
either the NISSAN Connect monitor (where fitted)
NIC1639
Model with Stop/Start System
NIC1648
Model without Stop/Start System
Starting and driving5-13
Page 180 of 297
Downloaded from www.Manualslib.com manuals search engine Fail-safe
AT models:
When the fail-safe operation occurs, the AT CHECK
indicator light comes on for 2 seconds and the auto-
matic transmission will be locked in the third gear.
Have a NISSAN dealer or qualified workshop check
and repair the transmission.
CVT models:
When the fail-safe operation occurs, the vehicle
speed will be decreased automatically to reduce the
chance of transmission damage. Vehicle speed can
be controlled with the accelerator pedal, but the
engine power may be limited. Have a NISSAN dealer
or qualified workshop check and repair the trans-
mission.
AT or CVT models:
If the vehicle is driven under extreme conditions,
such as excessive wheel spinning and subse-
quent hard braking, the Fail-safe system may be
activated. This will occur even if all electrical cir-
cuits are functioning properly. In this case, turn
the ignition switch “OFF” and wait for 10 sec-
onds. Then turn the key back to the ON position.
The vehicle should return to its normal operating
condition. If it does not return to its normal oper-
ating condition have your NISSAN dealer or quali-
fied workshop check the transmission and have
the transmission repaired by a NISSAN dealer or
qualified workshop, if necessary.WARNING
When the fail safe operation occurs, the vehicle
speed may be lower than other traffic, which
could increase the chance of a collision. Be es-
pecially careful when driving. If necessary, drive
to the side of the road at a safe place and away
from traffic, to allow the transmission to return to
normal operation, or have the transmission re-
paired by a NISSAN dealer or qualified workshop,
if necessary.
DRIVING WITH CONTINUOUSLY
VARIABLE TRANSMISSION (CVT)
(Models without manual shift)
The Continuously Variable Transmission (CVT) in
your vehicle is electronically controlled to produce
maximum power and smooth operation.
The recommended operating procedures for this
transmission are shown on the following pages. Fol-
low these procedures for maximum vehicle perfor-
mance and driving enjoyment.
WARNING
Do not downshift abruptly on slippery roads. This
may cause a loss of control.
CAUTION
The cold engine idle speed is high, so use
caution when shifting the transmission into a
forward or reverse position before the engine
has warmed up.
Avoid revving up the engine while the vehicle
is stopped. This could cause unexpected ve-
hicle movement.
Never shift to either the P (Park) or R (Re-
verse) position while the vehicle is moving.
This could cause serious damage to the trans-
mission.
Start the engine in either the P (Park) or N
(Neutral) position. The engine will not start in
any other position. If it does, have your ve-
hicle checked by a NISSAN dealer or qualified
workshop.
Shift into the P (Park) position and apply the
handbrake when at a standstill for longer than
a short waiting period.
Keep the engine at idling speed while shifting
from the N (Neutral) position to any driving
position.
When stopping the vehicle on an uphill grade,
do not hold the vehicle by depressing the ac-
celerator pedal. The footbrake pedal should
be depressed in this situation.
Starting vehicle
1. After starting the engine, fully depress the foot- brake pedal before moving the selector lever out
of the P (Park) position.
2. Keep the footbrake pedal depressed and move the selector lever to a driving position.
3. Release the handbrake, the footbrake pedal, and then gradually start the vehicle in motion.
Starting and driving5-17
Page 182 of 297

Downloaded from www.Manualslib.com manuals search engine Place the ignition switch in the “OFF” position.
Models without Intelligent Key system:
Place the ignition switch in the LOCK position.
P (Park):
Use this position when the vehicle is parked or when
starting the engine. Make sure that the vehicle is
completely stopped and move the selector lever
into the P (Park) position. Apply the handbrake.
When parking on a hill, first depress the footbrake
pedal, apply the handbrake, and then move the se-
lector lever into the P (Park) position.
R (Reverse):
Use this position to reverse. Make sure that the
vehicle is completely stopped before selecting the R
(Reverse) position.
When the selector lever is in the R (Reverse) posi-
tion, either the NISSAN Connect monitor (where fit-
ted) or the ultra sonic parking sensor (where fitted)
will be activated. For details, see “Rear-view moni-
tor (where fitted)” or “Around view monitor (where
fitted)” earlier in this section or “Ultrasonic Parking
Sensor (where fitted)” later in this section
N (Neutral):
Neither the forward nor reverse gear is engaged.
The engine can be started in this position. You may
shift to the N (Neutral) position and restart a stalled
engine while the vehicle is moving.
D (Drive):
Use this position for all normal forward driving. L (Low):
Use this position when climbing steep hills slowly or
driving slowly through deep snow, sand or mud, or
for maximum engine braking on steep downhill
grades.
SPORT mode switch
To select the SPORT mode, push the SPORT mode
switch with the selector lever in the D (Drive) posi-
tion. The SPORT mode indicator light
in the
meter panel illuminates. To turn off the SPORT
mode, push the SPORT mode switch again. The
SPORT mode indicator light will turn off. When the
selector lever is shifted to any position other than D,
the SPORT mode will be automatically turned off.
OFF position:
For normal driving and fuel economy, use the OFF
position. ON position:
For driving up or down long slopes where engine
braking is necessary, or for powerful acceleration,
use the ON position. The transmission will automati-
cally select a different gear ratio, allowing the en-
gine to provide high output.
When driving conditions change, push the switch to
turn the SPORT mode off.
Remember not to drive at high speeds for extended
periods of time with the SPORT mode in the ON
position. This reduces fuel economy.
Accelerator downshift
- in the D position -
For passing or climbing hills, depress the accelera-
tor pedal to the floor. This shifts the transmission
down into a lower gear, depending on the vehicle
speed.NSD399
Left-Hand Drive (LHD) model
NSD400
Starting and driving5-19