2012 NISSAN QASHQAI warning light
[x] Cancel search: warning lightPage 103 of 297

Downloaded from www.Manualslib.com manuals search engine the fuel system and emission control system.
An incorrect cap can result in a serious mal-
function and possible injury.
CAUTION
If fuel is spilled on the vehicle body, flush it away
with water to avoid paint damage.
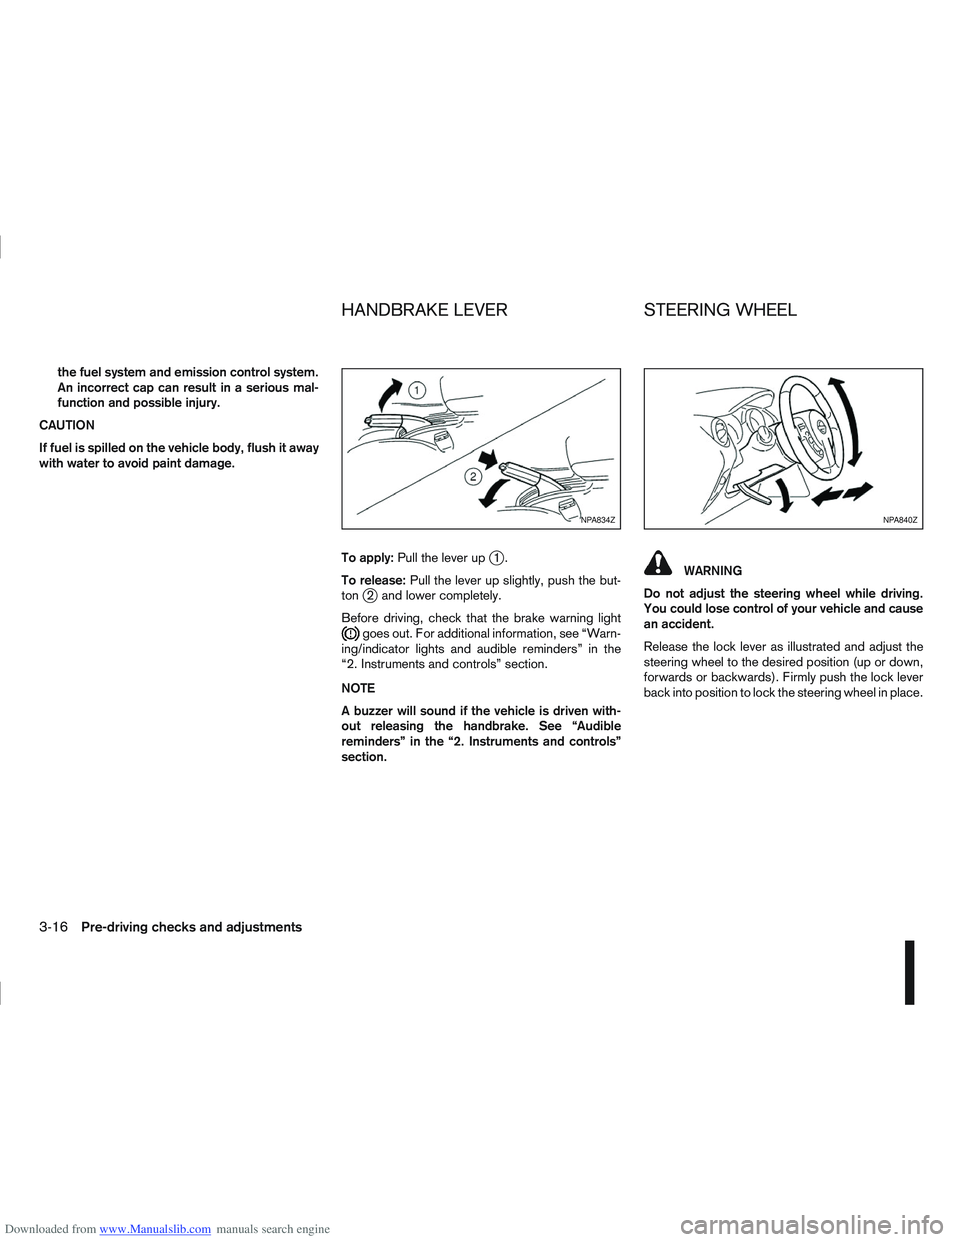
To apply:Pull the lever up
j1.
To release: Pull the lever up slightly, push the but-
ton
j2 and lower completely.
Before driving, check that the brake warning light
goes out. For additional information, see “Warn-
ing/indicator lights and audible reminders” in the
“2. Instruments and controls” section.
NOTE
A buzzer will sound if the vehicle is driven with-
out releasing the handbrake. See “Audible
reminders” in the “2. Instruments and controls”
section.
WARNING
Do not adjust the steering wheel while driving.
You could lose control of your vehicle and cause
an accident.
Release the lock lever as illustrated and adjust the
steering wheel to the desired position (up or down,
forwards or backwards). Firmly push the lock lever
back into position to lock the steering wheel in place.
NPA834ZNPA840Z
HANDBRAKE LEVER STEERING WHEEL
3-16Pre-driving checks and adjustments
Page 104 of 297

Downloaded from www.Manualslib.com manuals search engine CAUTION
Do not store the sun visor before returning it to
its original position.
1. To block out glare from the front, move the mainsun visor downwards.
2. To block glare from the side, remove the main sun visor from the centre mount and move it to
the side.
INSIDE REAR-VIEW MIRROR
j
1 Night position
j2Day position
jA Front of the vehicle
The night position
j1 will reduce glare from the
headlights of vehicles behind you at night.
WARNING
Only use the night position
j1 when necessary,
as it reduces rear-view clarity.
AUTOMATIC ANTI-DAZZLING INSIDE
MIRROR (where fitted)
The inside mirror is designed so that it automatically
adjusts the reflection according to the intensity of
the following vehicle’s headlights.
CAUTION
Do not hang any object on the mirror or spray
glass cleaner directly on the mirror. Doing so will
reduce the sensitivity of the sensor, resulting in
improper operation.
OUTSIDE REAR-VIEW MIRRORS
WARNING
Check the position of all mirrors before driv-
ing. Altering their position while driving could
distract your attention from the driving opera-
tion.
Objects viewed in the outside mirrors are
closer than they appear.
NPA839Z
NPA862Z
NPA829Z
SUN VISORS MIRRORS
Pre-driving checks and adjustments3-17
Page 111 of 297

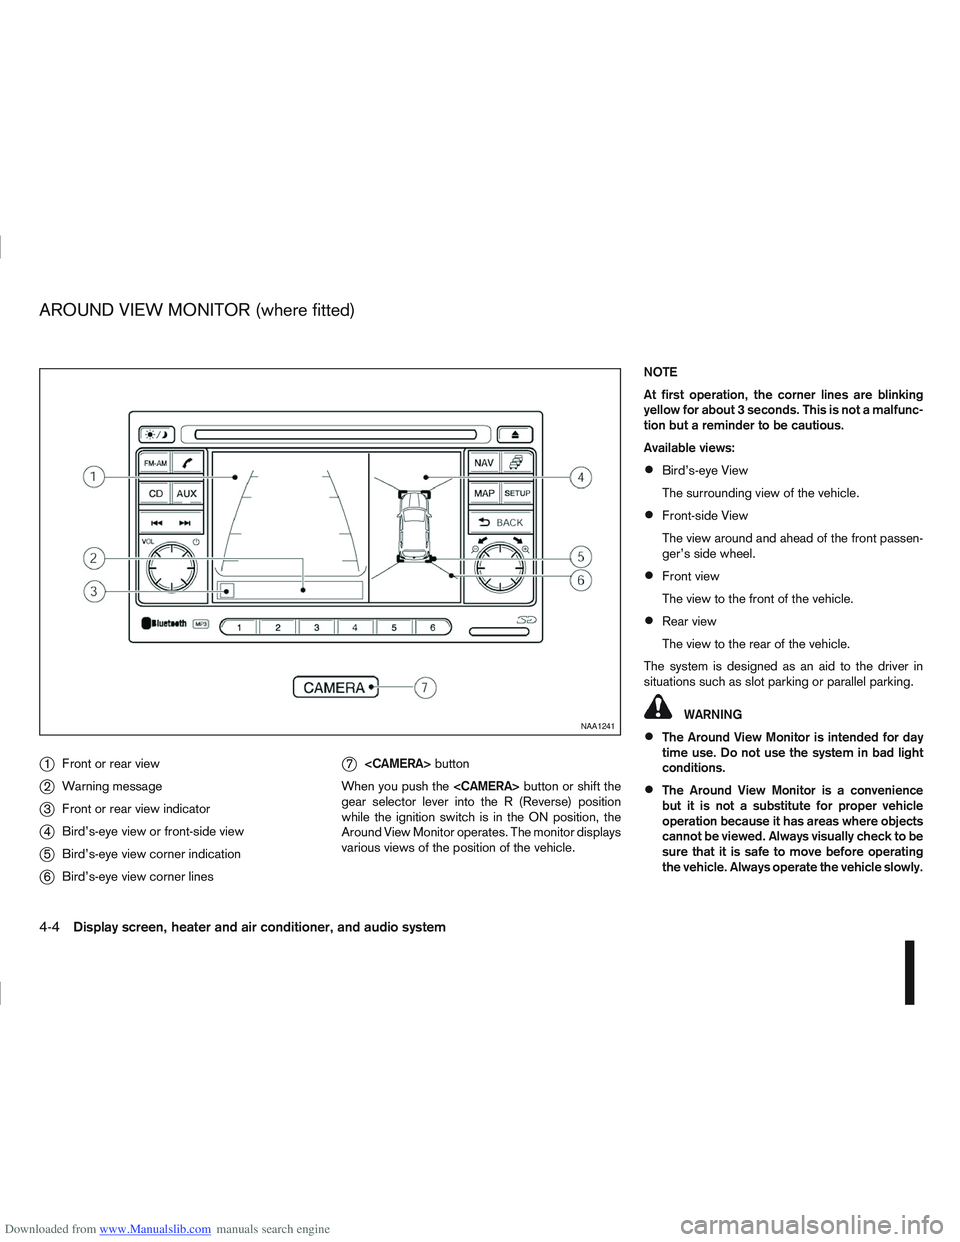
Downloaded from www.Manualslib.com manuals search engine j1Front or rear view
j2Warning message
j3Front or rear view indicator
j4Bird’s-eye view or front-side view
j5Bird’s-eye view corner indication
j6Bird’s-eye view corner lines
j7
button
When you push the
gear selector lever into the R (Reverse) position
while the ignition switch is in the ON position, the
Around View Monitor operates. The monitor displays
various views of the position of the vehicle. NOTE
At first operation, the corner lines are blinking
yellow for about 3 seconds. This is not a malfunc-
tion but a reminder to be cautious.
Available views:
Bird’s-eye View
The surrounding view of the vehicle.
Front-side View
The view around and ahead of the front passen-
ger’s side wheel.
Front view
The view to the front of the vehicle.
Rear view
The view to the rear of the vehicle.
The system is designed as an aid to the driver in
situations such as slot parking or parallel parking.
WARNING
The Around View Monitor is intended for day
time use. Do not use the system in bad light
conditions.
The Around View Monitor is a convenience
but it is not a substitute for proper vehicle
operation because it has areas where objects
cannot be viewed. Always visually check to be
sure that it is safe to move before operating
the vehicle. Always operate the vehicle slowly.
NAA1241
AROUND VIEW MONITOR (where fitted)
4-4Display screen, heater and air conditioner, and audio system
Page 115 of 297

Downloaded from www.Manualslib.com manuals search engine Yellow linej2 :approx.1m(3ft)
Green linej3 :approx.2m(7ft)
Green linej4 :approx.3m(10ft)
Vehicle width guide lines
j5:
Indicate the vehicle width when reversing.
Predictive course lines
j6:
Indicate the predictive course when operating the
vehicle. The predictive course lines will be displayed
on the monitor when the steering wheel is turned.
The predictive course lines will move depending on
how much the steering wheel is turned and will not
be displayed while the steering wheel is in the neu-
tral position.
The front view will not be displayed when the vehicle
speed is above 10 km/h (6 MPH).
WARNING
The distance between objects viewed in the
rear view differs from actual distance because
a wide-angle lens is used. Objects in the rear
view will appear visually opposite than when
viewed in the rear view and outside mirrors.
On a snow-covered or slippery road, there
may be a difference between the predictive
course line and the actual course line.
If the battery is disconnected or becomes dis-
charged, the predictive course lines may be
displayed incorrectly. If this occurs visit a
NISSAN dealer or qualified workshop.
If predictive course lines are displayed incor-
rectly visit a NISSAN dealer or qualified work-
shop.
The displayed lines on the rear view will ap-
pear slightly off to the right because the rear
view camera is not installed in the rear centre
of the vehicle.
NOTE
When the monitor displays the front view and the
steering wheel turns about 90 degrees or less
from the neutral position, both the right and left
predictive course lines
j6 are displayed. When
the steering wheel turns about 90 degrees or
more, a line is displayed only on the opposite
side of the turn.
Bird’s-eye view
The bird’s-eye view shows the overhead view of the
vehicle which helps to confirm the vehicle position.
The vehicle icon
j1 shows the position of the ve-
hicle.
NOTE
The size of the vehicle icon on the bird’s-eye
view may differ somewhat from the actual ve-
hicle.
The areas that the cameras cannot cover are indi-
cated in black.
At first operation, the corner lines
j2 on all four cor-
ners of the vehicle icon are blinking yellow for about
3 seconds. The four corners
j3 of the vehicle are
displayed in red.
NOTE
Corner lines
j2 blink (yellow) on all four corners
of the vehicle icon as a reminder to be cautious.
This is not a malfunction.
WARNING
Objects in the bird’s-eye view will appear fur-
ther than the actual distance because the
bird’s-eye view is a pseudo view that is pro-
cessed by combining the views from the cam-
eras on the outside mirrors, the front and the
rear of the vehicle.NAA1236
Bird’s-eye view
4-8Display screen, heater and air conditioner, and audio system
Page 139 of 297

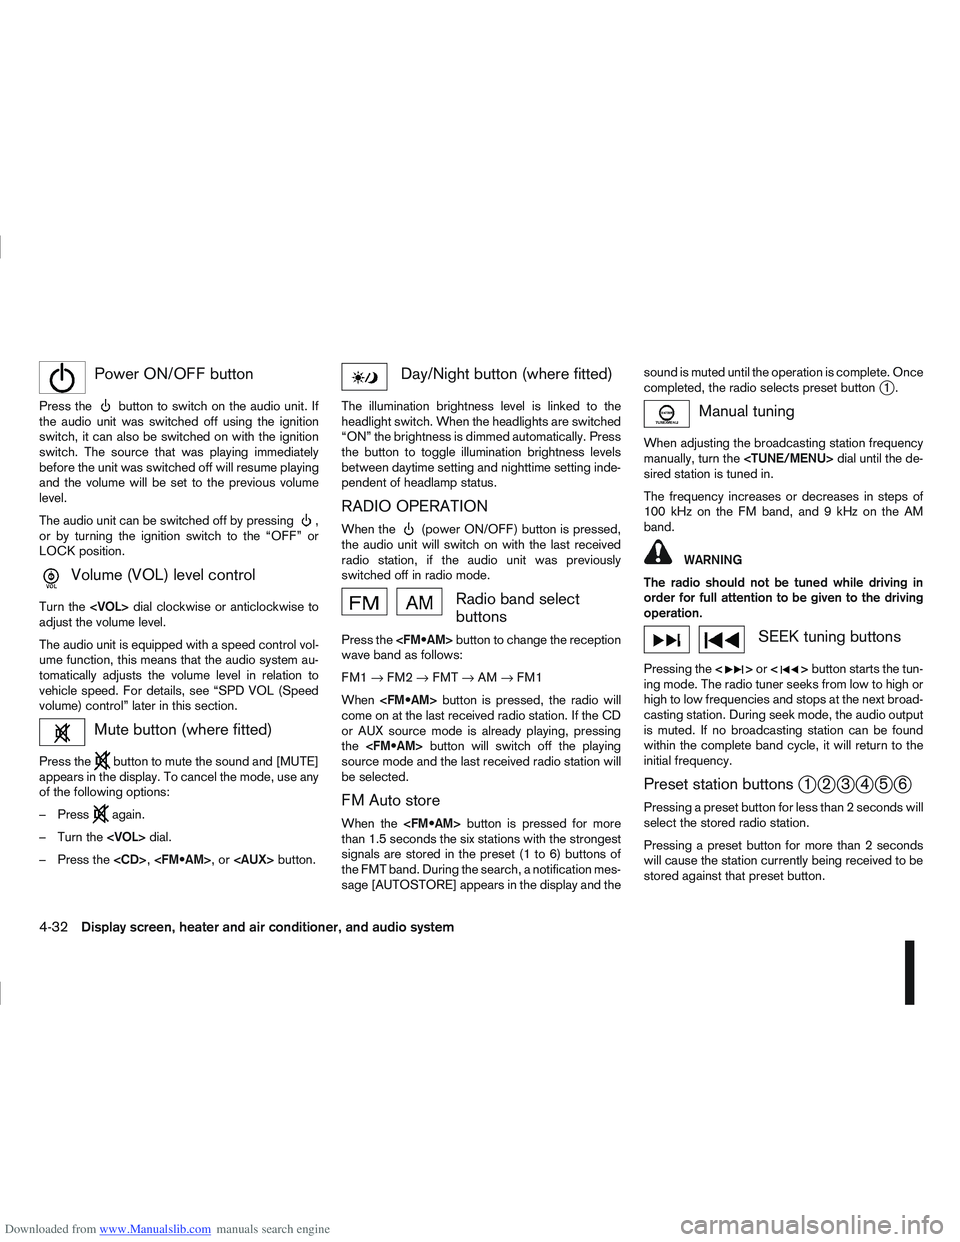
Downloaded from www.Manualslib.com manuals search engine mPower ON/OFF button
Press thebutton to switch on the audio unit. If
the audio unit was switched off using the ignition
switch, it can also be switched on with the ignition
switch. The source that was playing immediately
before the unit was switched off will resume playing
and the volume will be set to the previous volume
level.
The audio unit can be switched off by pressing
,
or by turning the ignition switch to the “OFF” or
LOCK position.
mVolume (VOL) level control
Turn the
adjust the volume level.
The audio unit is equipped with a speed control vol-
ume function, this means that the audio system au-
tomatically adjusts the volume level in relation to
vehicle speed. For details, see “SPD VOL (Speed
volume) control” later in this section.
Mute button (where fitted)
Press thebutton to mute the sound and [MUTE]
appears in the display. To cancel the mode, use any
of the following options:
– Press
again.
– Turn the
– Press the
Day/Night button (where fitted)
The illumination brightness level is linked to the
headlight switch. When the headlights are switched
“ON” the brightness is dimmed automatically. Press
the button to toggle illumination brightness levels
between daytime setting and nighttime setting inde-
pendent of headlamp status.
RADIO OPERATION
When the(power ON/OFF) button is pressed,
the audio unit will switch on with the last received
radio station, if the audio unit was previously
switched off in radio mode.
Radio band select
buttons
Press the button to change the reception
wave band as follows:
FM1 →FM2 →FMT →AM →FM1
When button is pressed, the radio will
come on at the last received radio station. If the CD
or AUX source mode is already playing, pressing
the button will switch off the playing
source mode and the last received radio station will
be selected.
FM Auto store
When the button is pressed for more
than 1.5 seconds the six stations with the strongest
signals are stored in the preset (1 to 6) buttons of
the FMT band. During the search, a notification mes-
sage [AUTOSTORE] appears in the display and the sound is muted until the operation is complete. Once
completed, the radio selects preset button
j1.
Manual tuning
When adjusting the broadcasting station frequency
manually, turn the
sired station is tuned in.
The frequency increases or decreases in steps of
100 kHz on the FM band, and 9 kHz on the AM
band.
WARNING
The radio should not be tuned while driving in
order for full attention to be given to the driving
operation.
SEEK tuning buttons
Pressing the <>or <>button starts the tun-
ing mode. The radio tuner seeks from low to high or
high to low frequencies and stops at the next broad-
casting station. During seek mode, the audio output
is muted. If no broadcasting station can be found
within the complete band cycle, it will return to the
initial frequency.
Preset station buttonsj1j2j3j4j5j6
Pressing a preset button for less than 2 seconds will
select the stored radio station.
Pressing a preset button for more than 2 seconds
will cause the station currently being received to be
stored against that preset button.
4-32Display screen, heater and air conditioner, and audio system
Page 161 of 297
![NISSAN QASHQAI 2012 Owners Manual Downloaded from www.Manualslib.com manuals search engine 2. Turn the<TUNE/MENU> dial and scroll down to
[Phone Book] then press <ENTER>.
3. Scroll down through the list, select the appropri- ate conta NISSAN QASHQAI 2012 Owners Manual Downloaded from www.Manualslib.com manuals search engine 2. Turn the<TUNE/MENU> dial and scroll down to
[Phone Book] then press <ENTER>.
3. Scroll down through the list, select the appropri- ate conta](/manual-img/5/56764/w960_56764-160.png)
Downloaded from www.Manualslib.com manuals search engine 2. Turn the
[Phone Book] then press
3. Scroll down through the list, select the appropri- ate contact name (highlighted), and press
4. A following screen will show the number to be dialled. If correct, press
the number.
If the contact has more numbers assigned for
(home),(mobile), or(office), scroll,
and select the appropriate number to dial.
Alternatively, the quick search mode can be used as
follows:
1. Press
2. Turn the
betic or numerical letter of the contact name.
Once highlighted, press
letter.
3. The display will show the corresponding contact name(s). Where necessary, use the
priate contact name to call.
4. A following screen will show the number to be dialled. If correct, press
the number. Manually dialling a phone number:
WARNING
Park the vehicle in a safe location, and apply the
handbrake before making a call.
To dial a phone number manually use the audio sys-
tem display (virtual keyboard pad) as follows:
1. Press <
>, and turn the
highlight [Call Number].
2. Press
3. Turn the
select each number of the phone number. Once
highlighted, press
selection.
To delete the last number entered scroll to the
[←] (Backspace) symbol, and once highlighted
press
leted. Pressing
each subsequent number. 4. After entering the last number, scroll to the [
]
symbol, and press
dial the number.
Call Lists:
A number from the dialled, received, or missed call
lists can also be used to make a call.
Dialled call
Use the dialled call mode to make a call which is
based on the list of outgoing (dialled) calls.
Received call
Use the received call mode to make a call which
is based on the list of received calls.
Missed call
Use the missed call mode to make a call which
is based on the list of missed calls.
1. Press <
>, and select [Call Lists].
2. Turn the
and press
3. Scroll to the preferred phone number then press
>to dial the number.
NAA1198
4-54Display screen, heater and air conditioner, and audio system
Page 163 of 297

Downloaded from www.Manualslib.com manuals search engine 5Starting and driving
Starting and driving
Running-in schedule ................................................ 5-2
Before starting the engine ........................................ 5-2
Precautions when starting and driving ...................... 5-3
Exhaust gas (Carbon Monoxide) ......................... 5-3
On-pavement and off-road driving precautions ......... 5-4
Three-way catalyst (Petrol engine models)................ 5-4 To help prevent damage ..................................... 5-4
Turbocharger system (Diesel engine models) ........... 5-5
Diesel Particulate Filter (DPF) (where fitted) ............. 5-5 Regeneration restrictions .................................... 5-5
If regeneration fails ............................................. 5-5
Care when driving ................................................... 5-6 Engine cold start period ...................................... 5-6
Loading luggage ................................................. 5-6
Driving on wet roads ........................................... 5-6
Driving under winter conditions ........................... 5-6
Ignition switch.......................................................... 5-6 Manual transmission ........................................... 5-6
Automatic transmission or Continuously
variable transmission........................................... 5-7
Steering lock ...................................................... 5-7
Key positions ...................................................... 5-7
NISSAN Anti-Theft System (NATS)..................... 5-7
Ignition knob (where fitted)....................................... 5-8 Manual transmission ........................................... 5-8
Automatic transmission or Continuously
variable transmission........................................... 5-9
Steering lock ...................................................... 5-9
Ignition knob position .......................................... 5-9 Emergency key – Intelligent Key dead battery
situation .............................................................. 5-10
NISSAN Anti-Theft System (NATS)..................... 5-10
Starting the engine................................................... 5-11
Driving the vehicle.................................................... 5-12 Driving with manual transmission......................... 5-12
Driving with automatic transmission or with
continuously variable transmission (Models
with manual shift) ................................................ 5-14
Driving with Continuously Variable Transmis-
sion (CVT) (Models without manual shift) ............ 5-17
Stop/Start System (where fitted) .............................. 5-21 Normal operation ................................................ 5-21
Precautions ........................................................ 5-22
Stop/Start System OFF switch ........................... 5-23
Environmental savings ........................................ 5-23
Ultrasonic Parking Sensor (where fitted) .................. 5-24
Four-wheel Drive (4WD) (where fitted)..................... 5-24 4WD mode operations........................................ 5-25
4WD shift tips .................................................... 5-25
4WD Warning light ............................................. 5-26
4WD Mode indicator lights ................................. 5-27
Driving four-wheel drive (4WD) safely ................. 5-27
Cruise control (where fitted) .................................... 5-29 Precautions on cruise control .............................. 5-29
Cruise control system operations ........................ 5-30
Speed limiter ........................................................... 5-31 Speed limiter operations ..................................... 5-32
Parking .................................................................... 5-33
Trailer towing ........................................................... 5-35
Page 165 of 297

Downloaded from www.Manualslib.com manuals search engine During the first 1,600 km (1,000 miles), follow these
recommendations for the future reliability and
economy of your new vehicle. Failure to follow the
recommendations may result in shortened engine
life and reduced engine performance.
Avoid driving for long periods at a constant
speed, either fast or slow.
Do not accelerate at full throttle in any gear.
Avoid quick starts.
Avoid hard braking as much as possible.
Do not tow a trailer during the first 800 km (500
miles).
NOTE
Models with K9K diesel engine will achieve top
performance only after approximately 5,000 km
(3,000 miles).
WARNING
The driving characteristics of your vehicle can be
changed remarkably by any additional load and
its distribution as well as by adding optional
equipment (trailer couplings, roof racks, etc.).
Your driving style and speed have to be adjusted
accordingly. Especially when carrying heavy
loads, your speed must be reduced adequately.
Make sure the area around the vehicle is free of
obstacles.
Check fluid levels such as engine oil, coolant,
brake and clutch fluid, and window washer fluid
as frequently as possible, at least whenever you
refuel.
Visually inspect tyres for their appearance and
condition. Also check the tyre pressure for
proper inflation.
Maintenance items in the “8. Maintenance and
do-it-yourself” section should be checked peri-
odically.
Check that all windows and light lenses are
clean.
Check that all doors are closed.
Position the seat and adjust the head restraints.
Adjust the inside and outside mirrors.
Fasten your seat belt and ask all passengers to
do likewise.
Check the operation of the warning/indicator
lights when the ignition switch is turned to the
ON position.
Do not place hard or heavy objects on the dash-
board or rear parcel shelf in order to prevent
injury in the event of a sudden stop.
RUNNING-IN SCHEDULE BEFORE STARTING THE ENGINE
5-2Starting and driving