2012 NISSAN QASHQAI pressure
[x] Cancel search: pressurePage 226 of 297

Downloaded from www.Manualslib.com manuals search engine Always follow the manufacturer’s instructions
supplied with the wax.
Do not use a wax containing any abrasives,
cutting compounds or cleaners that may dam-
age the vehicle finish.
If the vehicle surface cannot polish easily, ap-
ply a road tar remover prior to waxing the ve-
hicle.
Machine compounding or aggressive polish-
ing on a base coat/clear coat paint finish may
dull the finish or leave swirl marks.
CLEANING GLASS
Use glass cleaner to remove smoke and dust film
from the glass surfaces. It is normal for glass to
become coated with a film after the vehicle is parked
in the hot sun. Glass cleaner and a soft cloth will
easily remove this film.
CLEANING REAR-VIEW CAMERA
(where fitted)
Clean the transparent camera cover regularly. If dirt,
rain or snow attaches to the cover, the monitor may
not display objects clearly.
CAUTION
Do not use alcohol, benzine or thinner to clean
the transparent camera cover. This will cause
discoloration. To clean the cover, first use a
cloth dampened with diluted mild cleaning
agent and then wipe with a dry cloth.
Do not use body wax on the transparent cam-
era cover.
When washing the vehicle with a high pres-
sure water spray, make sure not to spray it
around the transparent camera cover. Other-
wise, water may enter the camera unit caus-
ing water condensation on the lens and it may
result in a malfunction or an electric shock.
UNDERBODY
In areas where road salt is used in the winter, the
vehicle’s underbody must be cleaned regularly. This
will prevent dirt and salt from building up and caus-
ing underbody and suspension corrosion.
Before the winter period and again in the spring, the
underseal must be checked and, if necessary, re-
treated.
CARE OF WHEELS
Wash the wheels when washing the vehicle to
maintain their appearance.
Clean the inner side of the wheels when the
wheel is changed or the underside of the vehicle
is washed.
Do not use abrasive cleaners when washing the
wheels.
Inspect wheel rims regularly for dents or corro-
sion. This may cause loss of pressure or damage
the tyre bead.
NISSAN recommends that the road wheels be
waxed to protect against road salt in areas where
it is used during winter.
CLEANING ALLOY WHEELS
Wash the wheels regularly with a sponge damp-
ened in a mild soap solution, especially during win-
ter in areas where road salt is used. The salt residue
from road salt could discolour the wheels if it is not
washed off regularly.
CAUTION
Follow the directions as described below in order
to avoid staining or discolouring of the wheels.
Do not use a cleaner that contains strong con-
tents of acid or alkali to clean the wheels.
Do not apply wheel cleaner when the wheels
are hot. The wheel temperature should be the
same as ambient temperature.
Rinse the wheel to completely remove the
cleaner within 15 minutes after the cleaner
has been applied.
CHROME PARTS
Clean all chrome parts regularly with a nonabrasive
chrome polish to maintain the finish.
Appearance and care7-3
Page 231 of 297

Downloaded from www.Manualslib.com manuals search engine 8Maintenance and do-it-yourself
Maintenance and do-it-yourself
Maintenance requirements ....................................... 8-2
Scheduled maintenance...................................... 8-2
General maintenance .......................................... 8-2
Where to go for service ...................................... 8-2
General maintenance ............................................... 8-2 Explanation of general maintenance items ........... 8-2
Maintenance precautions ......................................... 8-4
Engine compartment ................................................ 8-5
Engine cooling system ............................................. 8-6 Checking engine coolant level............................. 8-6
Changing engine coolant .................................... 8-6
Engine oil................................................................. 8-8 Checking engine oil level .................................... 8-8
Changing engine oil ............................................ 8-9
Changing engine oil filter .................................... 8-11
Protect the environment ...................................... 8-13
Fuel filter (Diesel engine models) ............................. 8-13 Draining water .................................................... 8-13
Bleeding the fuel system ..................................... 8-14
Automatic transmission fluid (ATF) ........................... 8-14
Continuously variable transmission (CVT) fluid ......... 8-14
Brakes ..................................................................... 8-15 Checking brake pedal......................................... 8-15
Checking handbrake........................................... 8-15
Brake and clutch fluid .............................................. 8-15
Window washer fluid/headlight cleaner fluid
(where fitted) ........................................................... 8-16
Battery..................................................................... 8-17 Vehicle battery .................................................... 8-17
Jump-starting ...................................................... 8-19 Integrated keyfob/Intelligent Key battery
replacement........................................................ 8-19
Drive belts ............................................................... 8-21
Spark plugs (Petrol engine models).......................... 8-21
Air cleaner filter........................................................ 8-21 Viscous paper type ............................................. 8-22
Dry paper type (where fitted) .............................. 8-22
Wiper blades ........................................................... 8-22 Cleaning ............................................................. 8-22
Front window wiper replacement ........................ 8-22
Back door window wiper replacement ................ 8-23
Windscreen washer nozzle ................................. 8-23
Fuses ...................................................................... 8-23 Passenger compartment ..................................... 8-23
Engine compartment ........................................... 8-24
Lights ...................................................................... 8-25 Headlights .......................................................... 8-25
Exterior lights ...................................................... 8-27
Interior lights....................................................... 8-27
Light locations .................................................... 8-27
Wheels and tyres ..................................................... 8-31 Tyre inflation pressure......................................... 8-31
Types of tyres ..................................................... 8-31
Snow chains....................................................... 8-32
Tyre rotation ....................................................... 8-32
Tyre wear and damage ....................................... 8-33
Tyre age ............................................................. 8-33
Changing tyres and wheels ................................. 8-33
Four-wheel drive (4WD) models ......................... 8-33
Wheel balance.................................................... 8-33
Page 234 of 297

Downloaded from www.Manualslib.com manuals search engine Lights*:
Clean the headlights on a regular basis. Make sure
that the headlights, stop lights, tail lights, turn signal
lights, and other lights are all operating properly and
installed securely. Also check headlight aim.
Tyres*:
Check the pressure with a gauge periodically when
at a service station (including the spare) and adjust
to the specified pressure if necessary. Check care-
fully for damage, cuts or excessive wear.
Tyre rotation*:
Tyres should be rotated every 10,000 km (6,000
miles) for Two-Wheel Drive (2WD) models and
5,000 km (3,000 miles) for Four-Wheel Drive (4WD)
models. However, the timing for tyre rotation may
vary according to your driving habits and road sur-
face conditions.
Wheel alignment and balance:
If the vehicle pull to either side while driving on a
straight and level road, or if you detect uneven or
abnormal tyre wear, there may be a need for wheel
alignment. If the steering wheel or seat vibrates at
normal highway speeds, wheel balancing may be
needed.
Wheel nuts:
When checking the tyres, make sure no wheel nuts
are missing, and check for any loose wheel nuts.
Tighten if necessary.Windscreen:
Clean the windscreen on a regular basis. Check the
windscreen at least every six months for cracks or
other damage. Have a damaged windscreen re-
paired by a qualified repair facility.
Wiper blades*:
Check for cracks or wear if they do not wipe prop-
erly.
Under the bonnet and vehicle
The maintenance items listed here should be
checked periodically, e.g. each time you check the
engine oil or refuel.
Battery*:
Check if the green indicator on the top of the main-
tenance free battery is visible. If it is not visible,
replace the battery as soon as possible.
Vehicles operated in high temperatures or under
severe conditions, check the fluid level frequently.
Brake and clutch fluid level*:
Make sure that the brake and clutch fluid level is
between the MAX and MIN lines on the reservoir.
Engine coolant level*:
Check the coolant level when the engine is cold.
Engine drive belts*:
Make sure that the drive belts are not frayed, worn,
cracked or oily.Engine oil level*:
Check the level after parking the vehicle on a level
surface and turning off the engine.
Fluid leaks:
Check under the vehicle for fuel, oil, water or other
fluid leaks after the vehicle has been parked for a
while. Water dripping from the air conditioner after
use is normal. If you should notice any leaks or if
petrol fumes are evident, check for the cause and
have it corrected immediately.
Window washer fluid*:
Check that there is adequate fluid in the tank.
Inside the vehicle
The maintenance items listed here should be
checked on a regular basis, such as when perform-
ing periodic maintenance, cleaning the vehicle, etc.
Accelerator pedal:
Check the pedal for smooth operation and make
sure that the pedal does not catch or require uneven
effort. Keep the floor mats away from the pedal.
Brake pedal*:
Check the pedal for smooth operation. If the brake
pedal suddenly goes down further than normal, the
pedal feels spongy or the vehicle seems to take
longer to stop, contact a NISSAN dealer or qualified
workshop immediately. Keep the floor mat away
from the pedal.
Maintenance and do-it-yourself8-3
Page 236 of 297

Downloaded from www.Manualslib.com manuals search engine If you must run the engine in an enclosed
space such as a garage, be sure there is
proper ventilation for exhaust gases.
Do not get under a vehicle that is supported
only by a jack: Use vehicle support stands.
Keep smoking materials, flame and sparks
away from fuel and battery.
Never connect or disconnect either the bat-
tery or any transistorised component connec-
tor while the ignition switch is in the ON posi-
tion.
Never leave the engine or transmission re-
lated component harness connector discon-
nected while the ignition switch is in the ON
position.
On petrol engine models with the multiport
fuel injection (MFI) system, the fuel filter or
fuel lines should be serviced by a NISSAN
dealer or qualified workshop because the fuel
lines are under high pressure even when the
engine is off.
Always wear eye protection whenever you
work on your vehicle.
Failure to follow these or other common sense
guidelines may lead to serious injury or ve-
hicle damage.
NISSAN GREEN PROGRAMImproperly disposed engine oil and/or other
vehicle fluids can pollute the environment. Al-
ways conform to local regulations for disposal
of vehicle fluid.
This section gives instructions regarding only those
items which are relatively easy for an owner to per-
form.
You should be aware that incomplete or improper
servicing may result in operating difficulties or ex-
cessive emissions, and could affect your warranty
coverage. If in doubt about any servicing, have it
done by your NISSAN dealer or qualified work-
shop. For an overview of the engine compartment, see
“Instrument and control layout” in the “0. Illus-
trated table of contents” section
.
ENGINE COMPARTMENT
Maintenance and do-it-yourself8-5
Page 237 of 297

Downloaded from www.Manualslib.com manuals search engine WARNING
Never remove the engine coolant reservoir
cap when the engine is hot. Serious burns
could be caused by high pressure fluid es-
caping from the engine coolant reservoir. Wait
until the engine and radiator have cooled
down.
Engine coolant is poisonous and should be
stored carefully in marked containers out of
the reach of children.
The engine cooling system is filled at the factory
with a high-quality, year-round and extended life en-
gine coolant. The high quality engine coolant con-
tains the specific solutions effective for the anti-cor-
rosion and the anti-freeze function. Therefore, addi-
tional cooling system additives are not necessary.
CAUTION
When adding or replacing engine coolant, be
sure to use Genuine NISSAN engine coolant
or equivalent.
The use of other types of engine coolant may
damage the engine cooling system.
The engine coolant reservoir tank is equipped
with a pressure cap, use a Genuine NISSAN
cap or its equivalent when replacement is re-
quired.
CHECKING ENGINE COOLANT
LEVEL
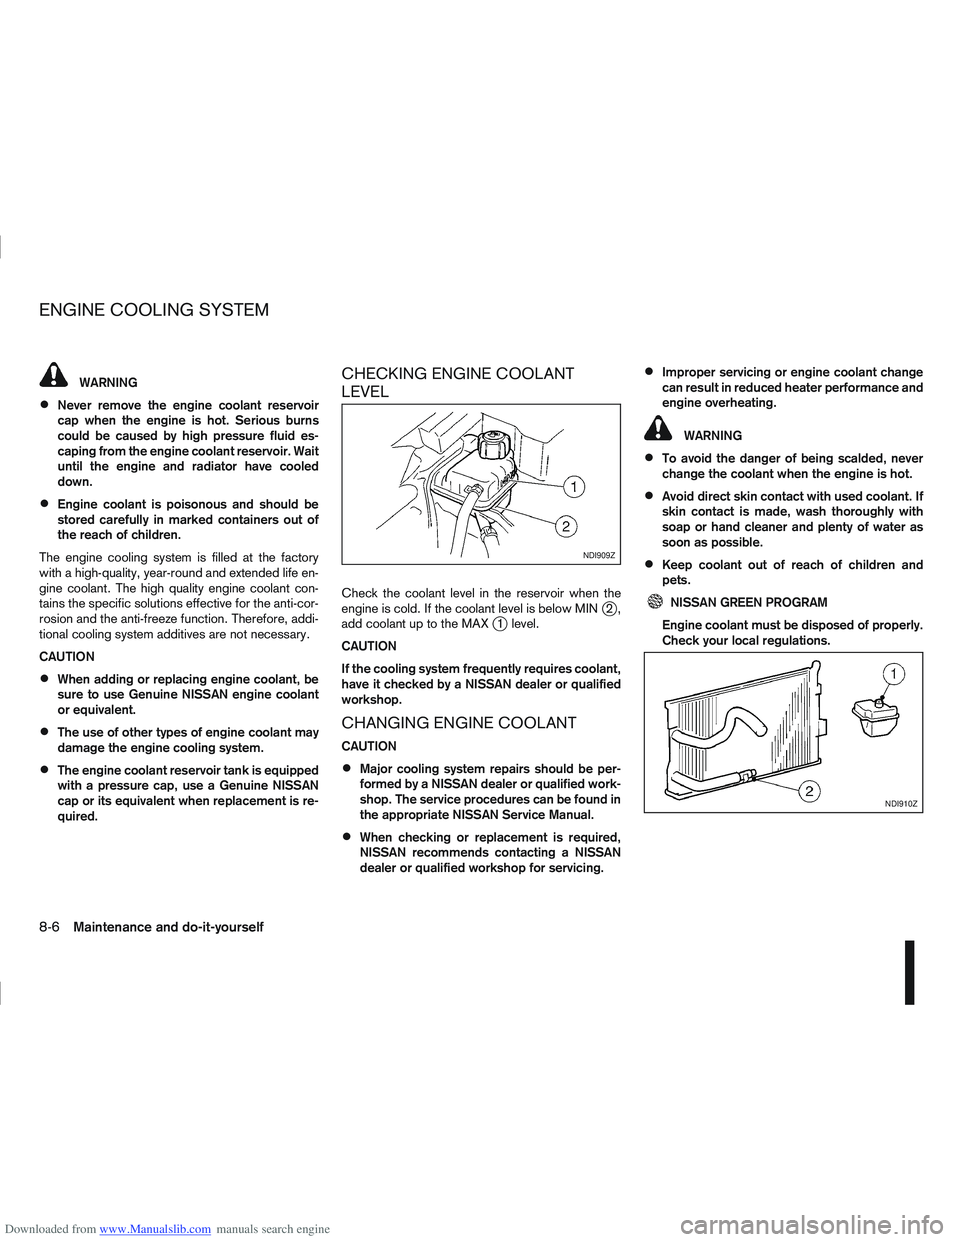
Check the coolant level in the reservoir when the
engine is cold. If the coolant level is below MINj2,
add coolant up to the MAXj1 level.
CAUTION
If the cooling system frequently requires coolant,
have it checked by a NISSAN dealer or qualified
workshop.
CHANGING ENGINE COOLANT
CAUTION
Major cooling system repairs should be per-
formed by a NISSAN dealer or qualified work-
shop. The service procedures can be found in
the appropriate NISSAN Service Manual.
When checking or replacement is required,
NISSAN recommends contacting a NISSAN
dealer or qualified workshop for servicing.
Improper servicing or engine coolant change
can result in reduced heater performance and
engine overheating.
WARNING
To avoid the danger of being scalded, never
change the coolant when the engine is hot.
Avoid direct skin contact with used coolant. If
skin contact is made, wash thoroughly with
soap or hand cleaner and plenty of water as
soon as possible.
Keep coolant out of reach of children and
pets.
NISSAN GREEN PROGRAM
Engine coolant must be disposed of properly.
Check your local regulations.
NDI909Z
NDI910Z
ENGINE COOLING SYSTEM
8-6Maintenance and do-it-yourself
Page 245 of 297

Downloaded from www.Manualslib.com manuals search engine BLEEDING THE FUEL SYSTEM
Except for models with R9M diesel engine:
Bleed the air out of the fuel system after refilling
an empty fuel tank by the following procedure:
1. Squeeze the priming bulb
jA several times until
there is a sudden resistance felt in the pressure,
then stop.
2. Crank the engine until the engine starts. CAUTION
Do not crank the engine for more than 30 sec-
onds.
NOTE
If the engine does not start, stop cranking
and repeat step 1 of the procedure.
If the engine does not operate smoothly
after it has started, race it two or three
times.
For models with R9M diesel engine:
Contact a NISSAN dealer or qualified workshop. When checking or replacement is required, NISSAN
recommends contacting a NISSAN dealer or quali-
fied workshop for servicing.
CAUTION
Use only Genuine NISSAN ATF Matic Fluid J
(or S) or equivalent. Do not mix with other flu-
ids.
Using automatic transmission fluid other than
Genuine NISSAN ATF Matic Fluid J (or S) or
equivalent will cause deterioration in drive-
ability and automatic transmission durability,
and may damage the automatic transmission,
which is not covered by the warranty.
The specified AT fluid is also described on the cau-
tion label located under the bonnet. For details, see
“Air conditioner specification label (where fitted) and
Automatic transmission fluid label (where fitted)” in
the “9. Technical information” section When checking or replacement is required, NISSAN
recommends contacting a NISSAN dealer or quali-
fied workshop for servicing.
CAUTION
Use only Genuine NISSAN CVT Fluid NS2. Do
not mix with other fluids.
Using transmission fluid other than Genuine
NISSAN CVT Fluid NS2 will damage the CVT
transmission, which is not covered by the war-
ranty.
NDI917Z
Except for models with R9M engine
AUTOMATIC TRANSMISSION
FLUID (ATF)
CONTINUOUSLY VARIABLE
TRANSMISSION (CVT) FLUID
8-14Maintenance and do-it-yourself
Page 253 of 297

Downloaded from www.Manualslib.com manuals search engine Be careful when working on the engine with-
out the air cleaner filter.
VISCOUS PAPER TYPE
The filter elementjA should not be cleaned and
reused.
Replace it according to the maintenance schedule
shown in the separately provided Warranty Informa-
tion & Maintenance Booklet. When replacing the fil-
ter, wipe the inside of the air cleaner housing and
the cover with a damp cloth.
DRY PAPER TYPE (where fitted)
Check the filter elementjA to see if it is dirty. If it is
dirty, shake the element to remove dust.
Clean or replace it according to the maintenance
schedule shown in the separately provided War-
ranty Information & Maintenance Booklet. When
cleaning or replacing the filter, wipe the inside of the
air cleaner housing and the cover with a damp cloth.
CLEANING
If the windscreen or back door window is not clear
after using the window washer or if a wiper blade
chatters when running, wax or other material may be
on the blade or windscreen.
Clean the outside of the windscreen or back door
window with a washer solution or a mild detergent.
The windscreen or back door window is clean if
beads do not form when rinsing with clear water.
Clean the blade by wiping it with a cloth soaked in a
washer solution or a mild detergent. Then rinse the
blade with clear water. If the windscreen or back
door window is still not clear after cleaning the
blades and using the wiper, replace the blades.
CAUTION
After wiper blade replacement, return the
wiper arm to its original position. Otherwise it
may be damaged when the bonnet is opened.
Make sure the wiper blade contacts the glass.
Otherwise, the arm may be damaged from
wind pressure.
Do not open the bonnet when the front wiper
is in the servicing position other wise it can
damage the paint surface of the bonnet.
FRONT WINDOW WIPER
REPLACEMENT
1. Pull up the wiper arm.
2. Press the two side lock pins
j1 , then remove the
wiper blade as illustrated.
3. Install the new wiper blade in the reverse order of removal.
4. Return the wiper arm to its original position.
NDI923Z
WIPER BLADES
8-22Maintenance and do-it-yourself
Page 256 of 297

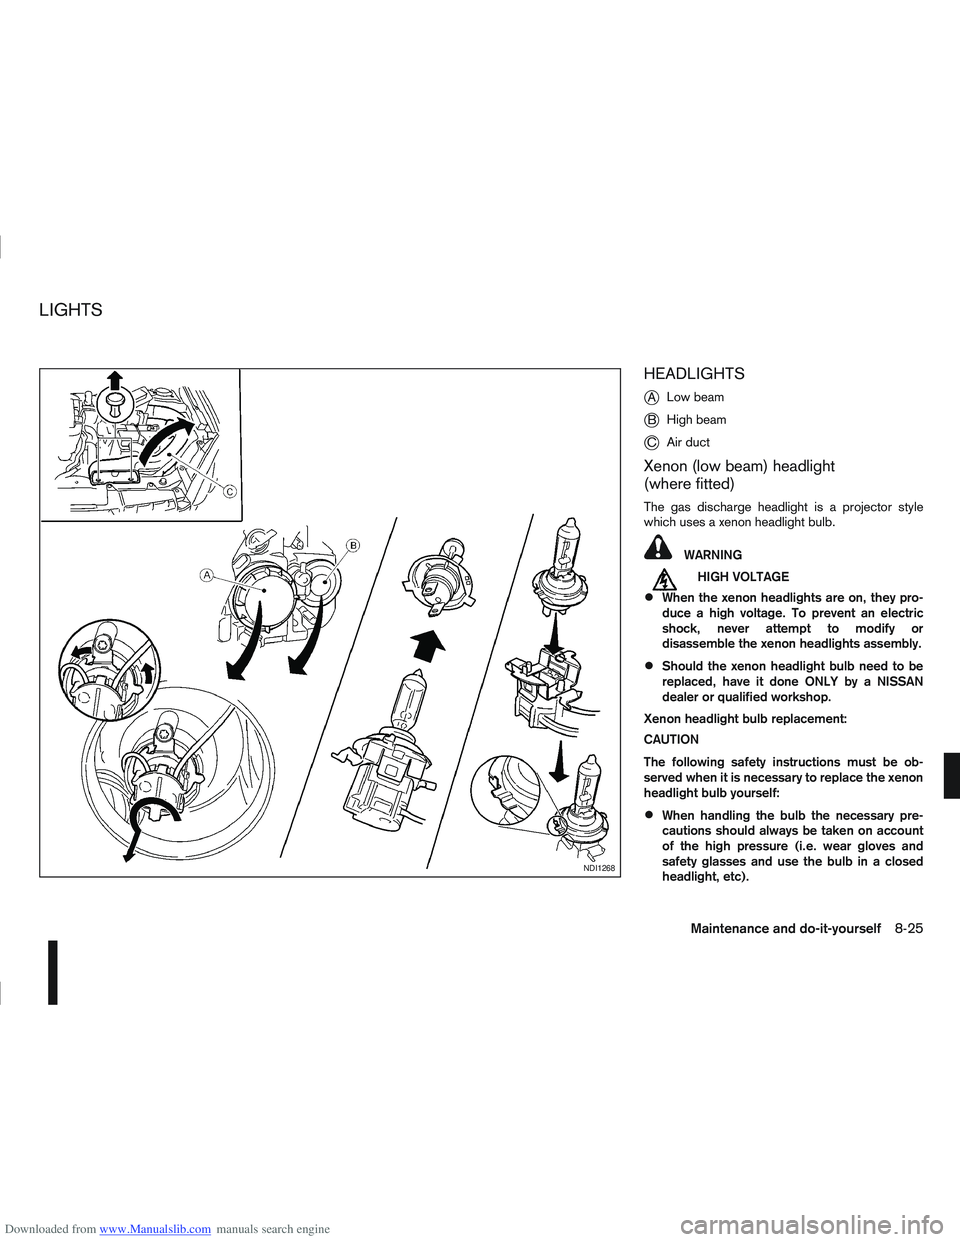
Downloaded from www.Manualslib.com manuals search engine HEADLIGHTS
j
ALow beam
jB High beam
jC Air duct
Xenon (low beam) headlight
(where fitted)
The gas discharge headlight is a projector style
which uses a xenon headlight bulb.
WARNING
mHIGH VOLTAGE
When the xenon headlights are on, they pro-
duce a high voltage. To prevent an electric
shock, never attempt to modify or
disassemble the xenon headlights assembly.
Should the xenon headlight bulb need to be
replaced, have it done ONLY by a NISSAN
dealer or qualified workshop.
Xenon headlight bulb replacement:
CAUTION
The following safety instructions must be ob-
served when it is necessary to replace the xenon
headlight bulb yourself:
When handling the bulb the necessary pre-
cautions should always be taken on account
of the high pressure (i.e. wear gloves and
safety glasses and use the bulb in a closed
headlight, etc).
NDI1268
LIGHTS
Maintenance and do-it-yourself8-25