2012 NISSAN QASHQAI doors
[x] Cancel search: doorsPage 99 of 297
Downloaded from www.Manualslib.com manuals search engine BACK DOOR LOCK
WARNING
Always check that the back door has been
properly closed to prevent it from opening
while driving.
Do not drive with the back door opened. This
could allow dangerous exhaust gases to be
drawn into the vehicle.
Closely supervise children when they are
around the vehicle to prevent them from play-
ing and being locked in the luggage compart-
ment where they could be seriously injured.
Keep the vehicle locked, with the back door
closed, when not in use, and prevent chil-
dren’s access to the vehicle’s keys.
The power door lock system allows you to lock or
unlock all doors including the back door.
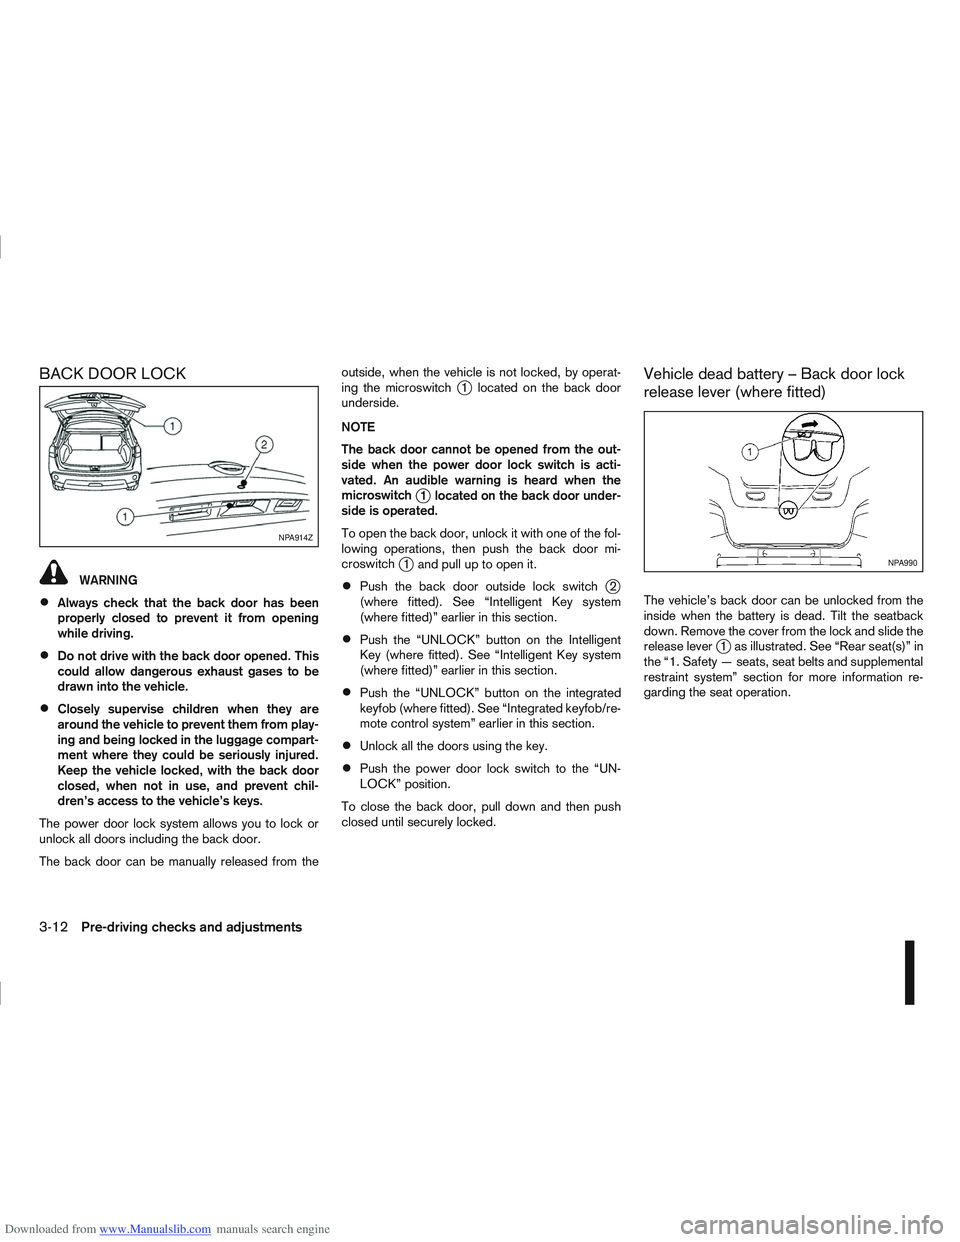
The back door can be manually released from the outside, when the vehicle is not locked, by operat-
ing the microswitch
j1 located on the back door
underside.
NOTE
The back door cannot be opened from the out-
side when the power door lock switch is acti-
vated. An audible warning is heard when the
microswitch
j1 located on the back door under-
side is operated.
To open the back door, unlock it with one of the fol-
lowing operations, then push the back door mi-
croswitch
j1 and pull up to open it.
Push the back door outside lock switchj2
(where fitted). See “Intelligent Key system
(where fitted)” earlier in this section.
Push the “UNLOCK” button on the Intelligent
Key (where fitted). See “Intelligent Key system
(where fitted)” earlier in this section.
Push the “UNLOCK” button on the integrated
keyfob (where fitted). See “Integrated keyfob/re-
mote control system” earlier in this section.
Unlock all the doors using the key.
Push the power door lock switch to the “UN-
LOCK” position.
To close the back door, pull down and then push
closed until securely locked.
Vehicle dead battery – Back door lock
release lever (where fitted)
The vehicle’s back door can be unlocked from the
inside when the battery is dead. Tilt the seatback
down. Remove the cover from the lock and slide the
release lever
j1 as illustrated. See “Rear seat(s)” in
the “1. Safety — seats, seat belts and supplemental
restraint system” section for more information re-
garding the seat operation.
NPA914Z
NPA990
3-12Pre-driving checks and adjustments
Page 100 of 297

Downloaded from www.Manualslib.com manuals search engine ALARM SYSTEM (where fitted)
The alarm system provides visual and audible alarm
signals if parts of the vehicle are disturbed.
How to arm the alarm system
1. Close all doors, windows, back door and bon-net.
2. Lock the vehicle using the keyfob (lock button), for additional information, see “Integrated key-
fob/remote control system” in the “3. Pre-driving
checks and adjustments” section.
NOTE
If the vehicle is not fully locked, a door/bonnet/
back door is open, or the ignition switch is in the
ON position (after arming the system), the buzzer
will sound. After correctly closing, the buzzer will
stop.
Alarm system operation
The system will give the following alarm:
The siren sounds intermittently and all direction
indicators will flash.
The alarm automatically turns off after 28 sec-
onds.
The alarm is activated when:
The volumetric sensing system (ultrasonic sen-
sors) is triggered.
Any door/the back door is opened.
The bonnet is opened.
The ignition circuit is turned on without the own-
er’s key being used.
The alarm system will stop when:
The vehicle is unlocked using the keyfob unlock
button.
The ignition switch or ignition knob is turned to
the ON position with a registered NATS key.
If the system does not operate as described
above, have it checked by your NISSAN dealer or
qualified workshop.
Ultrasonic sensors (where fitted)
The ultrasonic sensors (volumetric sensing) detect
movements in the passenger’s compartment. When
the alarm system is set to the armed position, it will
automatically switch on the ultrasonic sensors.
It is possible to exclude the ultrasonic sensors (e.g.
when leaving pets inside the car).
To exclude the ultrasonic sensors:
1. Turn the ignition switch 3 times within 7 seconds from the “OFF” to the ON position.
2. Close the door(s)/bonnet/back door and press the lock button
on the keyfob to lock all doors/
back door.
The ultrasonic sensors are now excluded from the
alarm system. All other functions of the system re-
main activated until the alarm system is disarmed
again.
NISSAN ANTI-THEFT SYSTEM (NATS)
The NISSAN Anti-Theft System (NATS)* will not
allow the engine to start without the use of the reg-
istered NATS key.
* Immobilizer
If the engine fails to start using the registered NATS
key, it may be due to interference from another
NATS key, an automated toll road device or an auto-
mated payment device on the key ring. Restart the
engine using the following procedure:
1. Leave the ignition switch in the ON position for approximately 5 seconds.
2. Turn the ignition switch to the “OFF” or LOCK position and wait approximately 5 seconds.
3. Repeat steps 1 and 2.
4. Restart the engine while holding the device (which may have caused the interference) sepa-
rated from the registered NATS key or NATS
Intelligent Key (where fitted).
If this procedure allows the engine to start,
NISSAN recommends placing the registered
NATS key or NATS Intelligent Key (where fitted)
on a separate key-ring to avoid interference from
other devices.
SECURITY SYSTEM
Pre-driving checks and adjustments3-13
Page 165 of 297

Downloaded from www.Manualslib.com manuals search engine During the first 1,600 km (1,000 miles), follow these
recommendations for the future reliability and
economy of your new vehicle. Failure to follow the
recommendations may result in shortened engine
life and reduced engine performance.
Avoid driving for long periods at a constant
speed, either fast or slow.
Do not accelerate at full throttle in any gear.
Avoid quick starts.
Avoid hard braking as much as possible.
Do not tow a trailer during the first 800 km (500
miles).
NOTE
Models with K9K diesel engine will achieve top
performance only after approximately 5,000 km
(3,000 miles).
WARNING
The driving characteristics of your vehicle can be
changed remarkably by any additional load and
its distribution as well as by adding optional
equipment (trailer couplings, roof racks, etc.).
Your driving style and speed have to be adjusted
accordingly. Especially when carrying heavy
loads, your speed must be reduced adequately.
Make sure the area around the vehicle is free of
obstacles.
Check fluid levels such as engine oil, coolant,
brake and clutch fluid, and window washer fluid
as frequently as possible, at least whenever you
refuel.
Visually inspect tyres for their appearance and
condition. Also check the tyre pressure for
proper inflation.
Maintenance items in the “8. Maintenance and
do-it-yourself” section should be checked peri-
odically.
Check that all windows and light lenses are
clean.
Check that all doors are closed.
Position the seat and adjust the head restraints.
Adjust the inside and outside mirrors.
Fasten your seat belt and ask all passengers to
do likewise.
Check the operation of the warning/indicator
lights when the ignition switch is turned to the
ON position.
Do not place hard or heavy objects on the dash-
board or rear parcel shelf in order to prevent
injury in the event of a sudden stop.
RUNNING-IN SCHEDULE BEFORE STARTING THE ENGINE
5-2Starting and driving
Page 201 of 297
Downloaded from www.Manualslib.com manuals search engine When leaving your vehicle unoccupied:
Always remove the ignition key or Intelligent Key
(where fitted) and take it with you – even in your
own garage.
Close all windows completely and lock all doors.
Always park your vehicle where it can be seen.
At night, park in a well lit area.
If the vehicle is equipped with an alarm or immo-
bilization device, use it – even for short periods.
Do not leave children and pets in the vehicle
unattended.
Do not leave valuables on view to tempt a thief.
Always take your valuables with you. If you must
leave something in your vehicle, lock it in the lug-
gage compartment or hide it out of sight.
Do not leave the vehicle documents in your ve-
hicle. In the unfortunate event of your vehicle
being stolen, the documents will only help a thief
to sell the vehicle.
Do not leave articles on a roof rack as they are
particularly vulnerable. If possible, remove them
from the rack and lock them inside the vehicle.
Do not leave the spare key or Intelligent Key in
the vehicle – keep it in a safe place at home.
Do not leave a note of your vehicle’s key number
in the vehicle. A thief may break into the vehicle,
note the key number and return with a new key
and drive the vehicle.
WARNING
If the Electrically Power Assisted Steering
warning light (EPAS) illuminates while driv-
ing, the power assist for steering will be dis-
abled. Greater steering efforts are required to
operate the steering wheel, especially in
sharp turns and at low speed. Stop the ve-
hicle as soon as safely possible and contact a
NISSAN dealer or qualified workshop for fur-
ther assistance.
In certain circumstances, factors external to
the EPAS system may contribute to the illumi-
nation of the warning light. If the warning light
illuminates, stop the vehicle as soon as safely
possible if driving. Turn the ignition switch to
the “OFF” position and wait for approximately
20 seconds, then turn the ignition switch to
the ON position again. If the light remains illu-
minated, we recommend you to contact a
NISSAN dealer or qualified workshop. See
“Warning/indicator lights and audible
reminders” in the “2. Instruments and
controls” section for further details regarding
the EPAS warning light.
The EPAS (Electrically Power Assisted Steering)
system is designed to assist steering.
The steering may appear to feel slightly stiff follow-
ing parking manoeuvres including a great deal of
steering. This is not a malfunction; it is caused by a
control system designed to prevent the motor from overheating. No servicing is required. The EPAS
system will return to normal operation the next time
the vehicle is driven.
Similarly, the EPAS system may not provide full as-
sistance during periods of reduced battery voltage
but will recover once normal battery voltage is re-
stored.
If the EPAS warning light comes on while the engine
is running, it may indicate that the EPAS system is
not working properly. As result greater steering ef-
forts are required to steer the steering wheel, espe-
cially in sharp turns and at low speeds. Have the
system checked by a NISSAN dealer or qualified
workshop as soon as possible.
NOTE
Incorrectly inflated tyres can lead to poor steer-
ing ability and make the driver suspect a steering
problem: keep the vehicle’s tyres inflated to the
correct pressure at all times.
CAUTION
Any malfunction or accident that could have dam-
aged the steering components (including actual
or attempted theft damage) should be reported
to a NISSAN dealer or qualified workshop.
VEHICLE SECURITY
POWER STEERING SYSTEM
5-38Starting and driving
Page 225 of 297
Downloaded from www.Manualslib.com manuals search engine In order to maintain the appearance of your vehicle,
it is important to take proper care of it.
Whenever possible, park your vehicle inside a ga-
rage or in a covered area to minimise the chances
of damaging the paint surface of your vehicle.
When it is necessary to park outside, park in a shady
area or protect the vehicle with a body cover.Be
careful not to scratch the paint surface when put-
ting on or removing the body cover.
WASHING
In the following instances, wash your vehicle as soon
as possible to protect the paint surface:
After a rainfall, to prevent possible damage from
acid rain.
After driving on coastal roads.
When contaminants such as soot, bird drop-
pings, tree sap, metal particles or insects get on
the paint surface.
When dust or mud builds up on the paint sur-
face.
1. Wash the vehicle surface with a wet sponge and plenty of water.
2. Clean the vehicle surface gently and thoroughly using a mild soap or a special vehicle wash sham-
poo mixed with clean, lukewarm (never hot) wa-
ter. CAUTION
Do not wash the vehicle with strong house-
hold soap, strong chemical detergents, petrol
or solvents.
Do not wash the vehicle in direct sunlight or
while the vehicle body is hot, as the paint sur-
face may become water-spotted.
Avoid using tight-napped or rough cloths,
such as washing mitts. Care must be taken
when removing caked-on dirt or other foreign
substances so the paint surface is not
scratched or damaged.
3. Rinse the vehicle thoroughly with plenty of clean water.
4. Use a damp chamois to dry the paint surface to avoid leaving water spots.
When washing the vehicle, take care of the follow-
ing:
Inside flanges, joints and folds on the doors, back
door and bonnet are particularly vulnerable to
the effects of road salt. Therefore, these areas
must be cleaned regularly.
Be sure that the drain holes in the lower edge of
the doors are not clogged.
Spray water to the underbody and in the wheel
wells to loosen the dirt and/or wash away road
salt.
If using a high pressure washer always follow
the recommendations on the equipment (pres-
sure and spraying distance).
CAUTION
Do not spray directly into the engine compart-
ment with a high-pressure washer/hose this
could damage the engine.
If there are damaged areas on the vehicle (e.g.
painted bumpers or headlamp assembly), it is
not recommended to direct the high pressure jet
on to them. Carefully wash these areas by hand.
Avoid the entry of water into the locks.
REMOVING SPOTS
Remove tar and oil spots, industrial dust, insects,
and tree sap as quickly as possible from the paint
surface to avoid lasting damage or staining. Special
cleaning products are available at a NISSAN dealer
or any automotive accessory store.
WAXING
Regular waxing protects the paint surface and helps
to retain a new vehicle appearance.
After waxing, polishing is recommended to remove
built-up residue.
A NISSAN dealer or qualified workshop can assist
you in choosing the appropriate waxing products.
CAUTION
Wash your vehicle thoroughly and completely
before applying wax to the paint surface.
CLEANING EXTERIOR
7-2Appearance and care
Page 228 of 297
Downloaded from www.Manualslib.com manuals search engine The seat belts can be cleaned by wiping them with
a sponge dampened in a mild soap solution.
Allow the belts to dry completely in the shade before
using them.MOST COMMON FACTORS
CONTRIBUTING TO VEHICLE
CORROSION
The accumulation of moisture-retaining dirt and
debris in body panel sections, cavities, and other
areas.
Damage to the paint surface and other protec-
tive coatings caused by gravel and stone chips
or minor traffic accidents.
ENVIRONMENTAL FACTORS
INFLUENCE THE RATE OF
CORROSION
Moisture
Accumulation of sand, dirt and water on the vehicle
body underside can accelerate corrosion. Wet floor
coverings will not dry completely inside the vehicle,
and should be removed for drying to avoid floor pan-
els corrosion.
Relative humidity
Corrosion will be accelerated in areas of high rela-
tive humidity, especially those areas where the tem-
peratures stay above freezing, where atmospheric
pollution exists and road salt is used.
Temperature
A temperature increase will accelerate the rate of
corrosion to those parts which are not well venti-
lated.Corrosion will also accelerate in areas where the
temperatures stay above freezing.
Air pollution
Industrial pollution, the presence of salt in the air in
coastal areas, or heavy road salt use will accelerate
the corrosion process. Road salt will also acceler-
ate the disintegration of paint surfaces.
TO PROTECT YOUR VEHICLE FROM
CORROSION
Wash and wax your vehicle often to keep the
vehicle clean.
Always check for minor damage to the paint sur-
face and if any exists, repair it as soon as pos-
sible.
Keep the drain holes at the bottom of the doors
and back door opened to avoid water accumula-
tion.
Check the vehicle underbody for accumulation
of sand, dirt or salt. If present, wash with water
as soon as possible.
CAUTION
Never remove dirt, sand or other debris from
the passenger compartment by washing it out
with a hose. Remove dirt with a vacuum
cleaner or broom.
Never allow water or other liquids to come in
contact with electronic components inside the
vehicle as this may damage them.
CORROSION PROTECTION
Appearance and care7-5
Page 233 of 297

Downloaded from www.Manualslib.com manuals search engine Your new NISSAN has been designed to have mini-
mum maintenance requirements with longer service
intervals, to save you both time and money. How-
ever, some day-to-day and regular maintenance is
essential to maintain your NISSAN’s good mechani-
cal condition, as well as its emission and engine
performance.
It is the owner’s responsibility to make sure that the
specified maintenance, as well as general mainte-
nance, is performed.
As the vehicle owner, you are the only one who can
ensure that your vehicle receives the proper mainte-
nance care.
SCHEDULED MAINTENANCE
For your convenience, the required scheduled main-
tenance items are described and listed in the sepa-
rate Warranty Information and Maintenance book-
let. You must refer to that booklet to ensure that
necessary maintenance is performed on your
NISSAN vehicle at regular intervals.
GENERAL MAINTENANCE
General maintenance includes those items which
should be checked during normal day-to-day opera-
tion of the vehicle. They are essential if your vehicle
is to continue to operate properly. It is your respon-
sibility to perform these procedures regularly as pre-
scribed.
Performing general maintenance checks requires
minimal mechanical skill and a few general automo-
tive tools.These checks or inspections can be done by your-
self, a qualified technician or, if you prefer, your
NISSAN dealer or qualified workshop.
WHERE TO GO FOR SERVICE
If maintenance service is required or your vehicle
appears to malfunction, have the systems checked
and tuned by an authorised NISSAN dealer or quali-
fied workshop.
During the normal day-to-day operation of the ve-
hicle, general maintenance should be performed
regularly as prescribed in this section. If you detect
any unusual sounds, vibrations or smell, be sure to
check for the cause or have a NISSAN dealer or
qualified workshop do it promptly. In addition, you
should notify a NISSAN dealer or qualified work-
shop if repairs are required.
When performing any checks or maintenance work,
closely observe the “Maintenance precautions” later
in this section.
EXPLANATION OF GENERAL
MAINTENANCE ITEMS
Additional information on the following items with
an asterisk (*) is found later in this section.
The maintenance items listed here should be per-
formed from time to time, unless otherwise speci-
fied.
Outside the vehicle
Back door, doors and bonnet:
Check that the back door, all doors and the bonnet
operate properly. Also ensure that all latches lock
securely. Lubricate hinges and latches if necessary.
Make sure that the secondary latch keeps the bon-
net from opening when the primary latch is released.
When driving in areas using road salt or other cor-
rosive materials, check for lubrication frequently.
MAINTENANCE REQUIREMENTS
GENERAL MAINTENANCE
8-2Maintenance and do-it-yourself
Page 285 of 297

Downloaded from www.Manualslib.com manuals search engine Four-wheel drive (4WD) ...................................................... 5-24
– Driving four-wheel drive (4WD) safely ............................ 5-27
– Four-wheel drive (4WD) model (Tyres) .......................... 8-33
– Four-wheel drive mode indicator light ............................. 5-27
– Four-wheel drive warning light ....................................... 5-26
Front passenger air bag deactivation system ....................... 1-17
Front passenger air bag indicator light ................................. 1-17
Fuel
– Bleeding the fuel system ................................................ 8-14
– Capacities and recommended fuel/lubricants ................... 9-2
– Draining water (Fuel filter) .............................................. 8-13
– Fuel filter (Diesel engine models) ................................... 8-13
– Fuel gauge ...................................................................... 2-2
– Fuel recommendation ...................................................... 9-5
Fuel filler lid
– Cap ........................................................................\
....... 3-15
– Opener lever ................................................................. 3-15
Fuses ........................................................................\
.......... 8-23
– Engine compartment ...................................................... 8-24
– Passenger compartment ................................................ 8-23G
Gauges
– Engine coolant temperature gauge ................................... 2-2
– Fuel gauge ...................................................................... 2-2
– Meters and gauges .......................................................... 2-2
Glove box ........................................................................\
.... 2-31
Guide lines ........................................................................\
.... 4-7
H
Handbrake lever .................................................................. 3-16
Hazard warning flasher switch ............................................. 2-28 Head restraint
– Active head restraints ...................................................... 1-6
– Adjustment ...................................................................... 1-5
Headlight
– Headlight aiming control switch ..................................... 2-27
– Headlight and turn signal switch .................................... 2-24
– Headlight cleaner .......................................................... 2-28
– Headlight switch ............................................................ 2-24
– Headlights (bulb replacement) ....................................... 8-26
– Replacement (bulb) ....................................................... 8-25
– Turn signal switch .......................................................... 2-26
– Xenon ........................................................................\
... 2-24
Heated seats ....................................................................... 2-29
Heater and air conditioner ................................................... 4-12
Horn ........................................................................\
........... 2-29
How to adjust the screen view ............................................. 4-11
I
Ignition
– Ignition knob (Intelligent Key equipped models) ................ 5-8
– Ignition switch ................................................................. 5-6
Immobilizer
– NATS immobilizer radio approval number ....................... 9-10
– NISSAN Anti-Theft System (NATS) ............................... 3-13
Indicator lights ....................................................................... 2-3
Injured persons ..................................................................... 1-9
Inside rear-view mirror ......................................................... 3-17
Instrument and control layout
– LHD and RHD models ..................................................... 0-5
Integrated keyfob (remote control system) ............................. 3-3
– Battery replacement ...................................................... 8-19
– Ignition switch ................................................................. 5-6
– Keyfob operation failure ................................................... 3-6
– Locking the doors ............................................................ 3-5
– Setting the unlock mode .................................................. 3-4
10-4Index