2012 NISSAN QASHQAI ESP
[x] Cancel search: ESPPage 161 of 297
![NISSAN QASHQAI 2012 Owners Manual Downloaded from www.Manualslib.com manuals search engine 2. Turn the<TUNE/MENU> dial and scroll down to
[Phone Book] then press <ENTER>.
3. Scroll down through the list, select the appropri- ate conta NISSAN QASHQAI 2012 Owners Manual Downloaded from www.Manualslib.com manuals search engine 2. Turn the<TUNE/MENU> dial and scroll down to
[Phone Book] then press <ENTER>.
3. Scroll down through the list, select the appropri- ate conta](/manual-img/5/56764/w960_56764-160.png)
Downloaded from www.Manualslib.com manuals search engine 2. Turn the
[Phone Book] then press
3. Scroll down through the list, select the appropri- ate contact name (highlighted), and press
4. A following screen will show the number to be dialled. If correct, press
the number.
If the contact has more numbers assigned for
(home),(mobile), or(office), scroll,
and select the appropriate number to dial.
Alternatively, the quick search mode can be used as
follows:
1. Press
2. Turn the
betic or numerical letter of the contact name.
Once highlighted, press
letter.
3. The display will show the corresponding contact name(s). Where necessary, use the
priate contact name to call.
4. A following screen will show the number to be dialled. If correct, press
the number. Manually dialling a phone number:
WARNING
Park the vehicle in a safe location, and apply the
handbrake before making a call.
To dial a phone number manually use the audio sys-
tem display (virtual keyboard pad) as follows:
1. Press <
>, and turn the
highlight [Call Number].
2. Press
3. Turn the
select each number of the phone number. Once
highlighted, press
selection.
To delete the last number entered scroll to the
[←] (Backspace) symbol, and once highlighted
press
leted. Pressing
each subsequent number. 4. After entering the last number, scroll to the [
]
symbol, and press
dial the number.
Call Lists:
A number from the dialled, received, or missed call
lists can also be used to make a call.
Dialled call
Use the dialled call mode to make a call which is
based on the list of outgoing (dialled) calls.
Received call
Use the received call mode to make a call which
is based on the list of received calls.
Missed call
Use the missed call mode to make a call which
is based on the list of missed calls.
1. Press <
>, and select [Call Lists].
2. Turn the
and press
3. Scroll to the preferred phone number then press
>to dial the number.
NAA1198
4-54Display screen, heater and air conditioner, and audio system
Page 164 of 297
Downloaded from www.Manualslib.com manuals search engine Operating precautions ........................................ 5-35
Tyre pressure ..................................................... 5-36
Safety chains ...................................................... 5-36
Trailer brakes...................................................... 5-36
Trailer detection (where fitted) ............................ 5-36
Installation of coupling device ............................. 5-36
Vehicle security........................................................ 5-38
Power steering system............................................. 5-38
Brake system ........................................................... 5-39 Brake precautions .............................................. 5-39
Anti-lock Braking System (ABS).......................... 5-39 Electronic Stability Programme (ESP) system
(where fitted) ........................................................... 5-40
Electronic Stability Programme (ESP) OFF
switch................................................................. 5-42
Cold weather driving................................................ 5-42 Battery ............................................................... 5-43
Engine coolant .................................................... 5-43
Tyre equipment ................................................... 5-43
Special winter equipment.................................... 5-43
Corrosion protection ........................................... 5-43
Page 165 of 297

Downloaded from www.Manualslib.com manuals search engine During the first 1,600 km (1,000 miles), follow these
recommendations for the future reliability and
economy of your new vehicle. Failure to follow the
recommendations may result in shortened engine
life and reduced engine performance.
Avoid driving for long periods at a constant
speed, either fast or slow.
Do not accelerate at full throttle in any gear.
Avoid quick starts.
Avoid hard braking as much as possible.
Do not tow a trailer during the first 800 km (500
miles).
NOTE
Models with K9K diesel engine will achieve top
performance only after approximately 5,000 km
(3,000 miles).
WARNING
The driving characteristics of your vehicle can be
changed remarkably by any additional load and
its distribution as well as by adding optional
equipment (trailer couplings, roof racks, etc.).
Your driving style and speed have to be adjusted
accordingly. Especially when carrying heavy
loads, your speed must be reduced adequately.
Make sure the area around the vehicle is free of
obstacles.
Check fluid levels such as engine oil, coolant,
brake and clutch fluid, and window washer fluid
as frequently as possible, at least whenever you
refuel.
Visually inspect tyres for their appearance and
condition. Also check the tyre pressure for
proper inflation.
Maintenance items in the “8. Maintenance and
do-it-yourself” section should be checked peri-
odically.
Check that all windows and light lenses are
clean.
Check that all doors are closed.
Position the seat and adjust the head restraints.
Adjust the inside and outside mirrors.
Fasten your seat belt and ask all passengers to
do likewise.
Check the operation of the warning/indicator
lights when the ignition switch is turned to the
ON position.
Do not place hard or heavy objects on the dash-
board or rear parcel shelf in order to prevent
injury in the event of a sudden stop.
RUNNING-IN SCHEDULE BEFORE STARTING THE ENGINE
5-2Starting and driving
Page 175 of 297
Downloaded from www.Manualslib.com manuals search engine mately 1/3 to the floor) and hold it then crank
the engine. Release the ignition switch and
the accelerator pedal when the engine starts.
CAUTION
Do not operate the starter for more than 15
seconds at a time. If the engine does not start,
turn the ignition switch to the “OFF” position
and wait 10 seconds (Petrol engine models)
or 20 seconds (Diesel engine models) before
cranking again, otherwise the starter could be
damaged.
If it becomes necessary to start the engine
with a booster battery and jumper leads, the
instructions and cautions contained in the
“Jump-starting” in the “6. In case of
emergency” section should be carefully fol-
lowed.
7. Warm-up
Allow the engine to idle for at least 30 seconds
after starting. Drive at moderate speed for a short
distance first, especially in cold weather.
WARNING
Do not leave the vehicle unattended while the
engine is warming up.
DRIVING WITH MANUAL
TRANSMISSION
CAUTION
Do not rest your foot on the clutch pedal while
driving. This may cause clutch damage.
Stop your vehicle completely before shifting
into the R (Reverse) position.
When you are shifting from one gear to an-
other, be certain to depress the clutch pedal
all the way to the floor to avoid clashing or
chipping the gears.
Avoid abrupt starts and acceleration for your
safety.
When quick acceleration is required for some
reason, shift to a lower gear and accelerate
until the vehicle reaches the maximum speed
in each gear. Do not exceed the speed limit of
any gear. Pay special attention when acceler-
ating or when shifting into a lower gear on
slippery surfaces. Sudden acceleration or
down shifting could cause the wheels to skid
and result in loss of control.
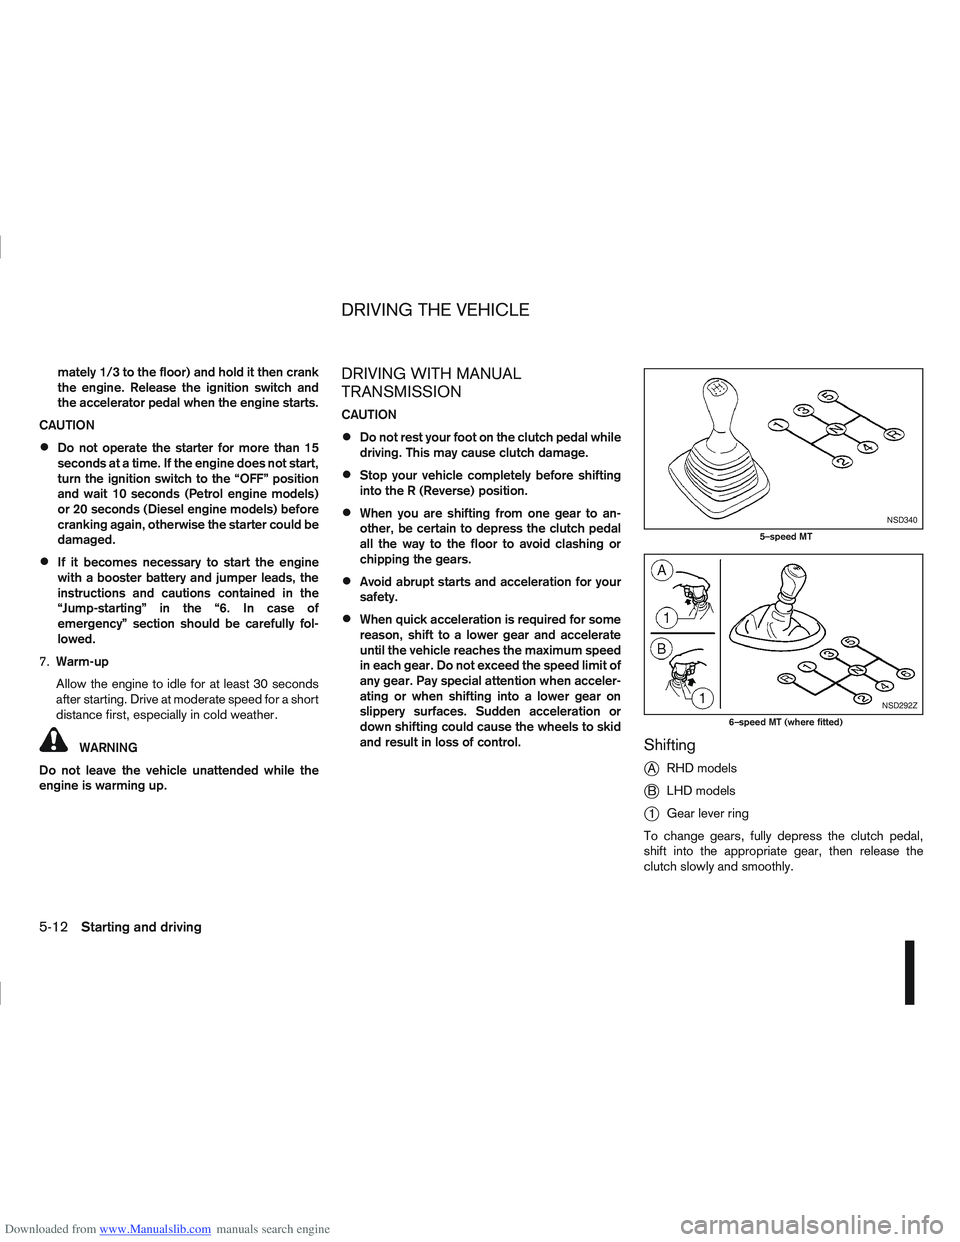
Shifting
j
A RHD models
jB LHD models
j1Gear lever ring
To change gears, fully depress the clutch pedal,
shift into the appropriate gear, then release the
clutch slowly and smoothly.
NSD340
5–speed MT
NSD292Z
6–speed MT (where fitted)
DRIVING THE VEHICLE
5-12Starting and driving
Page 176 of 297
Downloaded from www.Manualslib.com manuals search engine To ensure smooth gear changes, fully depress the
clutch pedal before operating the gear lever. If the
clutch pedal is not fully depressed before the trans-
mission is shifted, a gear noise may be heard. This
could result in damage to the transmission.
Start the vehicle in 1st gear and shift through the
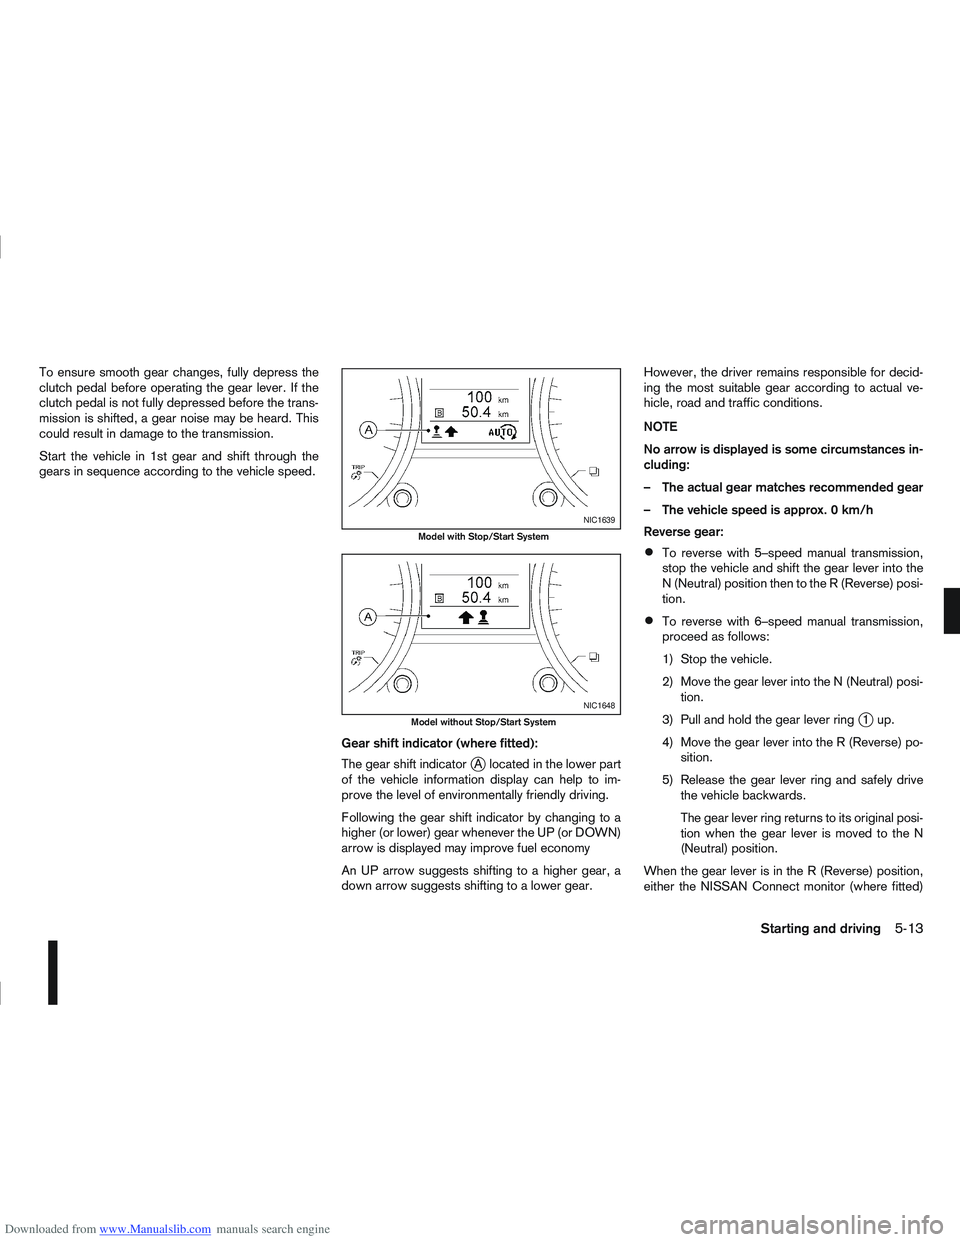
gears in sequence according to the vehicle speed.Gear shift indicator (where fitted):
The gear shift indicator
jA located in the lower part
of the vehicle information display can help to im-
prove the level of environmentally friendly driving.
Following the gear shift indicator by changing to a
higher (or lower) gear whenever the UP (or DOWN)
arrow is displayed may improve fuel economy
An UP arrow suggests shifting to a higher gear, a
down arrow suggests shifting to a lower gear. However, the driver remains responsible for decid-
ing the most suitable gear according to actual ve-
hicle, road and traffic conditions.
NOTE
No arrow is displayed is some circumstances in-
cluding:
– The actual gear matches recommended gear
– The vehicle speed is approx. 0 km/h
Reverse gear:
To reverse with 5–speed manual transmission,
stop the vehicle and shift the gear lever into the
N (Neutral) position then to the R (Reverse) posi-
tion.
To reverse with 6–speed manual transmission,
proceed as follows:
1) Stop the vehicle.
2) Move the gear lever into the N (Neutral) posi-
tion.
3) Pull and hold the gear lever ring
j1up.
4) Move the gear lever into the R (Reverse) po- sition.
5) Release the gear lever ring and safely drive the vehicle backwards.
The gear lever ring returns to its original posi-
tion when the gear lever is moved to the N
(Neutral) position.
When the gear lever is in the R (Reverse) position,
either the NISSAN Connect monitor (where fitted)
NIC1639
Model with Stop/Start System
NIC1648
Model without Stop/Start System
Starting and driving5-13
Page 189 of 297
Downloaded from www.Manualslib.com manuals search engine Even if the mode automatically changes to AUTO
mode, when driving in the LOCK mode, the indi-
cator light stays in the LOCK mode.
CAUTION
Only use the 4WD mode control when driving
in a straight direction (to select 2WD, AUTO or
LOCK).
Do not use the 4WD mode control when turn-
ing or reversing.
Do not use the 4WD mode control with the
front wheels spinning (to select 2WD, AUTO,
or LOCK).
Be especially careful when starting or driving
on slippery surfaces with the 4WD mode set
to AUTO.
Do not drive on dry, hard surfaced roads in
the LOCK position.
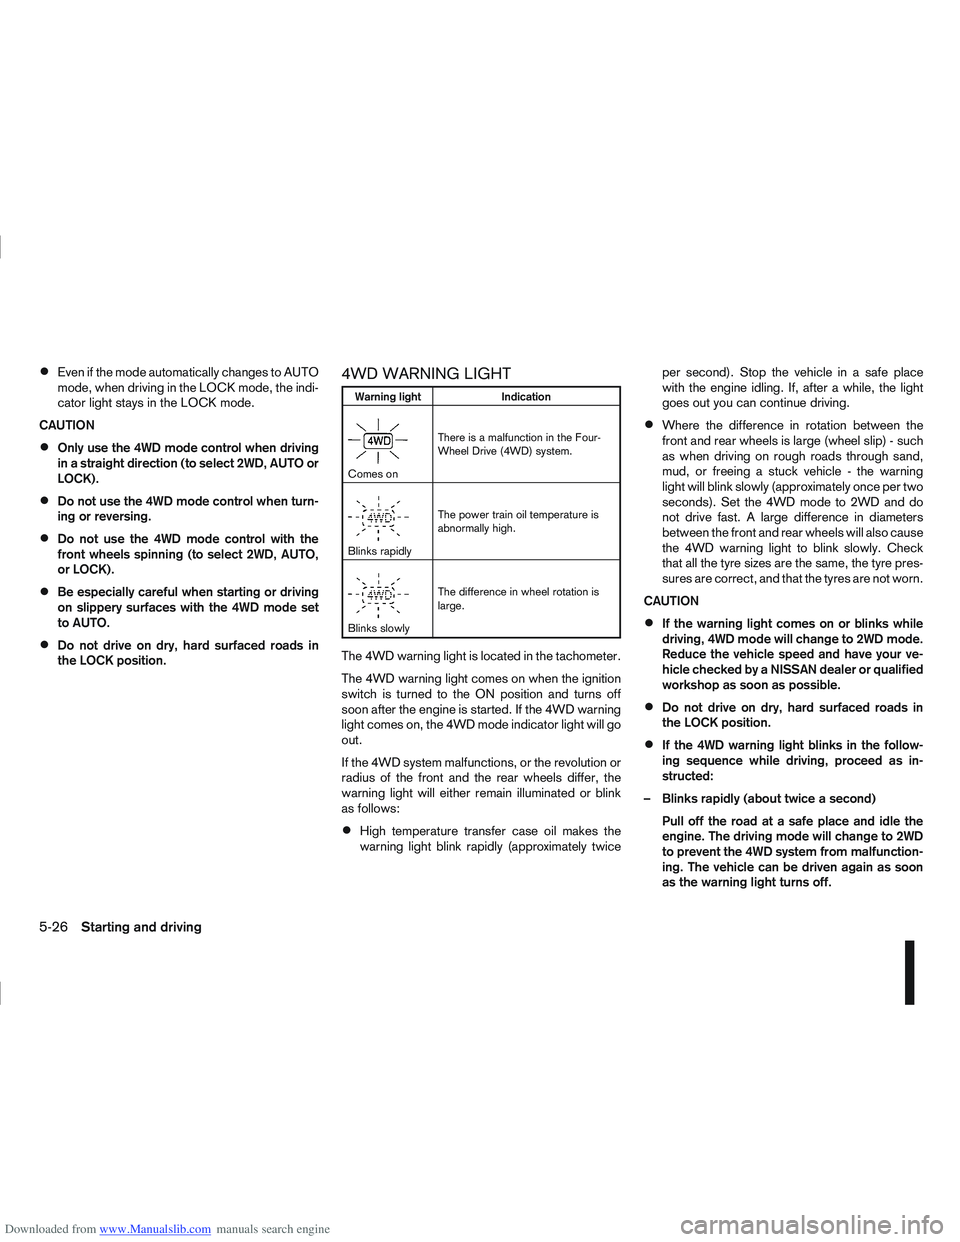
4WD WARNING LIGHT
Warning light Indication
mComes onThere is a malfunction in the Four-
Wheel Drive (4WD) system.
mBlinks rapidlyThe power train oil temperature is
abnormally high.
mBlinks slowlyThe difference in wheel rotation is
large.
The 4WD warning light is located in the tachometer.
The 4WD warning light comes on when the ignition
switch is turned to the ON position and turns off
soon after the engine is started. If the 4WD warning
light comes on, the 4WD mode indicator light will go
out.
If the 4WD system malfunctions, or the revolution or
radius of the front and the rear wheels differ, the
warning light will either remain illuminated or blink
as follows:
High temperature transfer case oil makes the
warning light blink rapidly (approximately twice per second). Stop the vehicle in a safe place
with the engine idling. If, after a while, the light
goes out you can continue driving.
Where the difference in rotation between the
front and rear wheels is large (wheel slip) - such
as when driving on rough roads through sand,
mud, or freeing a stuck vehicle - the warning
light will blink slowly (approximately once per two
seconds). Set the 4WD mode to 2WD and do
not drive fast. A large difference in diameters
between the front and rear wheels will also cause
the 4WD warning light to blink slowly. Check
that all the tyre sizes are the same, the tyre pres-
sures are correct, and that the tyres are not worn.
CAUTION
If the warning light comes on or blinks while
driving, 4WD mode will change to 2WD mode.
Reduce the vehicle speed and have your ve-
hicle checked by a NISSAN dealer or qualified
workshop as soon as possible.
Do not drive on dry, hard surfaced roads in
the LOCK position.
If the 4WD warning light blinks in the follow-
ing sequence while driving, proceed as in-
structed:
– Blinks rapidly (about twice a second) Pull off the road at a safe place and idle the
engine. The driving mode will change to 2WD
to prevent the 4WD system from malfunction-
ing. The vehicle can be driven again as soon
as the warning light turns off.
5-26Starting and driving
Page 201 of 297
Downloaded from www.Manualslib.com manuals search engine When leaving your vehicle unoccupied:
Always remove the ignition key or Intelligent Key
(where fitted) and take it with you – even in your
own garage.
Close all windows completely and lock all doors.
Always park your vehicle where it can be seen.
At night, park in a well lit area.
If the vehicle is equipped with an alarm or immo-
bilization device, use it – even for short periods.
Do not leave children and pets in the vehicle
unattended.
Do not leave valuables on view to tempt a thief.
Always take your valuables with you. If you must
leave something in your vehicle, lock it in the lug-
gage compartment or hide it out of sight.
Do not leave the vehicle documents in your ve-
hicle. In the unfortunate event of your vehicle
being stolen, the documents will only help a thief
to sell the vehicle.
Do not leave articles on a roof rack as they are
particularly vulnerable. If possible, remove them
from the rack and lock them inside the vehicle.
Do not leave the spare key or Intelligent Key in
the vehicle – keep it in a safe place at home.
Do not leave a note of your vehicle’s key number
in the vehicle. A thief may break into the vehicle,
note the key number and return with a new key
and drive the vehicle.
WARNING
If the Electrically Power Assisted Steering
warning light (EPAS) illuminates while driv-
ing, the power assist for steering will be dis-
abled. Greater steering efforts are required to
operate the steering wheel, especially in
sharp turns and at low speed. Stop the ve-
hicle as soon as safely possible and contact a
NISSAN dealer or qualified workshop for fur-
ther assistance.
In certain circumstances, factors external to
the EPAS system may contribute to the illumi-
nation of the warning light. If the warning light
illuminates, stop the vehicle as soon as safely
possible if driving. Turn the ignition switch to
the “OFF” position and wait for approximately
20 seconds, then turn the ignition switch to
the ON position again. If the light remains illu-
minated, we recommend you to contact a
NISSAN dealer or qualified workshop. See
“Warning/indicator lights and audible
reminders” in the “2. Instruments and
controls” section for further details regarding
the EPAS warning light.
The EPAS (Electrically Power Assisted Steering)
system is designed to assist steering.
The steering may appear to feel slightly stiff follow-
ing parking manoeuvres including a great deal of
steering. This is not a malfunction; it is caused by a
control system designed to prevent the motor from overheating. No servicing is required. The EPAS
system will return to normal operation the next time
the vehicle is driven.
Similarly, the EPAS system may not provide full as-
sistance during periods of reduced battery voltage
but will recover once normal battery voltage is re-
stored.
If the EPAS warning light comes on while the engine
is running, it may indicate that the EPAS system is
not working properly. As result greater steering ef-
forts are required to steer the steering wheel, espe-
cially in sharp turns and at low speeds. Have the
system checked by a NISSAN dealer or qualified
workshop as soon as possible.
NOTE
Incorrectly inflated tyres can lead to poor steer-
ing ability and make the driver suspect a steering
problem: keep the vehicle’s tyres inflated to the
correct pressure at all times.
CAUTION
Any malfunction or accident that could have dam-
aged the steering components (including actual
or attempted theft damage) should be reported
to a NISSAN dealer or qualified workshop.
VEHICLE SECURITY
POWER STEERING SYSTEM
5-38Starting and driving
Page 202 of 297
Downloaded from www.Manualslib.com manuals search engine The brake system has two separate hydraulic cir-
cuits. If one circuit malfunctions, you will still have
braking ability with two wheels.
BRAKE PRECAUTIONS
Vacuum assisted brake
The brake booster aids braking by using engine
vacuum. If the engine stops or the drive belt is bro-
ken, you can stop the vehicle by depressing the
brake pedal. However, greater foot pressure on the
brake pedal will be required to stop the vehicle and
the stopping distance will be longer.
Wet brakes
When the vehicle is washed or driven through wa-
ter, the brakes may get wet. As a result, your brak-
ing distance will be longer and the vehicle may pull
to one side during braking.
To dry brakes, drive the vehicle at a safe speed
while lightly pressing the brake pedal to heat up the
brakes. Do this until the brakes return to normal.
Avoid driving the vehicle at high speeds until the
brakes function correctly.
Using the brakes
Avoid resting your foot on the brake pedal while
driving. This will overheat the brakes, wear out the
brake linings and pads faster and reduce fuel
economy performance.
To help reduce brake wear and to prevent the brakes
from overheating, reduce speed and downshift to a
lower gear before going down a slope or long down-hill gradient. Overheated brakes may reduce brak-
ing performance and could result in loss of vehicle
control.
CAUTION
While driving on a slippery surface, be careful
when braking, accelerating or downshifting.
Abrupt braking actions or sudden acceleration
could cause the wheels to skid and result in an
accident.
Be aware that brakes will fade if repeated heavy
brake applications are made.
Driving uphill
When starting on a steep gradient, it is sometimes
difficult to operate the brake (AT or CVT models) or
both the brake and clutch (MT models). Use the
handbrake to hold the vehicle. Do not slip the clutch
(MT models). When ready to start, slowly release
the handbrake while depressing the accelerator
pedal and releasing the clutch (MT models) or de-
pressing the accelerator pedal (AT or CVT models).
Driving downhill
The engine braking action is effective for controlling
the vehicle while descending hills.
The gear lever (MT models) should be placed in a
gear position low enough to obtain sufficient engine
braking.
For the AT or CVT models, a low gear position in
the manual shift mode, low enough to obtain suffi-
cient engine braking, should be selected.
ANTI-LOCK BRAKING SYSTEM (ABS)
WARNING
The Anti-lock Braking System (ABS) is a so-
phisticated device, but it cannot prevent acci-
dents resulting from careless or dangerous
driving techniques. It can help maintain ve-
hicle control during braking on slippery sur-
faces. Remember that stopping distances
may also be longer on rough, gravel or snow
covered roads, or if you are using snow
chains. Always maintain a safe distance from
the vehicle in front of you. Ultimately, the
driver is responsible for safety.
Tyre type and condition may also affect brak-
ing effectiveness.
– When replacing tyres, install the specified
size of tyres on all four wheels.
– When installing a spare tyre, make sure it is the proper size and type as specified on
the tyre placard. See “Vehicle
identification” in the “9. Technical
information” section for the tyre placard
location.
– For detailed information, see “Wheels and tyres” in the “8. Maintenance and
do-it-yourself” section.
The Anti-lock Braking System (ABS) controls the
brakes so that the wheels do not lock during hard
braking or when braking on slippery surfaces. The
system detects the rotation speed at each wheel
BRAKE SYSTEM
Starting and driving5-39