2012 NISSAN QASHQAI ECO mode
[x] Cancel search: ECO modePage 59 of 297

Downloaded from www.Manualslib.com manuals search engine Seat belt reminder chime
A chime will sound for approximately 90 seconds if
the vehicle’s speed exceeds 15 km/h (9 MPH) and
the driver’s seat belt or front passenger’s seat belt,
if occupied is not securely fastened. See “Ignition
knob warning (Intelligent Key models)” later in this
section.
Key reminder buzzer (Intelligent Key
models)
The external buzzer will beep 3 times if:
The Intelligent Key is removed from the vehicle
while the ignition is not in the LOCK position.
The vehicle is being locked remotely or using an
outside door lock switch and the Intelligent Key
has been left inside the vehicle.
Park reminder chime (AT or CVT
models)
A chime will sound if the ignition switch is turned to
LOCK and the gear selector lever is not in the P
(Park) position.
2-10Instruments and controls
Page 61 of 297

Downloaded from www.Manualslib.com manuals search engine WARNINGS AND ALERTS
The design of the warnings and alerts may differ
depending on the model.
j1 Door open warning
This warning appears if any of the doors are open or
not closed securely. The vehicle icon indicates
which door is open on the display.
j2 Back door open warning
This warning appears if the back door is open or not
closed securely. When the door is to be left open,
e.g. when you transport a long load, push the
switch or the steering wheel switchji (where fit-
ted) to confirm.
j3 Seat belt warning (Rear seat or 2nd
row)
The seat belt warning indicates the seating position
when the ignition switch is turned to the ON position
and disappears when:
All related seat belts have been securely fas-
tened.
Theswitch or the steering wheel switchji
(where fitted) is pushed.
Approximately 35 seconds after engine start.
WARNING
Seat belts for 3rd row seats (where fitted) are not
part of the seat belt warning light monitoring sys-
tem.
NIC1644
2-12Instruments and controls
Page 62 of 297

Downloaded from www.Manualslib.com manuals search engine For more information, see “Seat belts” in the
“1. Safety — seats, seat belts and supplemental
restraint system” section
j4 Ignition knob warning (Intelligent Key
models)
The warning appears when the ignition knob is left
in the Acc or “OFF” position instead of completely
being turned to the LOCK position.
If this warning appears, turn the ignition knob to the
LOCK position.
When the ignition knob is in the ON position, a
buzzer will sound twice and the ignition knob warn-
ing shows when the ignition knob is turned to the
Acc or “OFF” position. This is to warn the driver that
the ignition knob is not in the LOCK position.
MT models:
Depress the ignition PUSH release button and turn
the ignition knob to the LOCK position.
AT or CVT models:
Make sure the gear selector lever is in the P (Park)
position and then turn the ignition switch to the
LOCK position.
See “Ignition knob (where fitted)” in the “5. Starting
and driving” section for further details.
CAUTION
The steering wheel can only be locked when
the ignition knob is in the LOCK position. Make
sure the ignition knob is in the LOCK position
before leaving the vehicle.
The emergency key can only be removed at
the LOCK position. Make sure the ignition
knob is in the LOCK position before removing
the emergency key.
See “Steering lock” in the “5. Starting and driving”
section for further details.
j5 Steering wheel lock warning
The warning appears when the ignition knob is
pressed, but not turned to the Acc or “OFF” posi-
tion within a short period. Move the steering wheel
to release the lock and turn the ignition knob to Acc
or ON. The warning will turn off in approximately 5
seconds.
See “Steering lock” in the “5. Starting and driving”
section for further details.
j6 Brake/Clutch warning (where fitted)
When starting your vehicle, it is necessary to oper-
ate the brake (CVT and AT models) or clutch pedal
(MT models).
For more information, see “Starting the engine” in
the “5. Starting and driving” section.
j7 Handbrake reminder
The reminder will come on if the handbrake is on
whilst the vehicle is being driven.
A buzzer will also sound.
j8 Intelligent Key detection warning
If the Intelligent Key is taken outside of the vehicle
ID recognition zone while the ignition knob is in the
Acc or ON position, the Intelligent Key detection
warning will be displayed and a buzzer will sound.
The Intelligent Key detection warning disappears
when the Intelligent Key is placed back in the pas-
senger compartment.
The message also appears when you try to start the
vehicle if the Intelligent Key is not detected within
the vehicle.
For more information, see “Integrated keyfob/re-
mote control system” in the “3. Pre-driving checks
and adjustments” section.
j9 Intelligent Key low battery warning
The Intelligent Key low battery warning may show if
a low battery voltage is detected when the ignition
knob is turned from “OFF” to the ON position.
For more information, see “Integrated keyfob/Intel-
ligent Key battery replacement” in the “8. Mainte-
nance and do-it-yourself” section.
j10Intelligent Key system fault warning
CAUTION
If the Intelligent Key system fault warning comes
on, it may indicate a system malfunction. We rec-
ommend that you contact a NISSAN dealer or
qualified workshop for repair.
Instruments and controls2-13
Page 63 of 297

Downloaded from www.Manualslib.com manuals search engine For more information, see “Integrated keyfob/re-
mote control system” in the “3. Pre-driving checks
and adjustments” section.
j11Intelligent Key convenience mode alert
The Intelligent Key convenience mode alert shows
to confirm that convenience mode has been acti-
vated. See “Switching from Convenience mode to
Anti-hijack mode” in the “3. Pre-driving checks and
adjustments” section.
j12Intelligent Key anti–hijack alert
The Intelligent Key anti–hijack alert shows to con-
firm that anti-hijack mode has been activated. See
“Switching from Convenience mode to Anti-hijack
mode” in the “3. Pre-driving checks and
adjustments” section.
j13Engine oil level information
When turning the ignition to the ON position, the oil
message indicates the oil level.
The [Oil level OK] message indicates the oil level is
sufficient for driving. Push the
switch or the
steering wheel switchji (where fitted) when the
[Oil level OK] message shows to see a more de-
tailed oil level. (See Oil level
j14 )
NOTE
The [Oil level OK] message indication is dis-
played after the ignition switch has been turned
to the ON position and other warnings have been
shown. CAUTION
The engine oil level check is not designed to indi-
cate a low oil level. Use the dipstick to check the
oil level.
See “Engine oil” in the “8. Maintenance and
do-it-yourself” section.
j14Engine oil level
This display provides a visual representation of the
engine oil level.
j15Engine oil level low
If the oil level is not sufficient for driving, the [Oil
level low] message appears. Oil needs to be added
before driving.
CAUTION
The engine oil level should be checked regularly.
Operating with an insufficient amount of oil can
damage the engine and such damage is not cov-
ered by the warranty.
Park the vehicle at a safe location as soon as pos-
sible and fill the engine with the recommended en-
gine oil.
For checking the engine oil level and adding oil, see
“Engine oil” in the “8. Maintenance and
do-it-yourself” section.
j16Engine oil sensor warning
Please visit your local NISSAN dealer or qualified
workshop if this warning appears.
j17Diesel Particulate Filter warning
(where fitted)
See “Diesel Particulate Filter (DPF) (where fitted)”
in the “5. Starting and driving” section for further
details.
j18Setting menu operation alert
The alert shows when you try to operate the setting
menu while driving. The setting menu can only be
entered if the vehicle is stationary.
j19Maintenance due alert (where fitted)
This alert shows that maintenance is due. The mes-
sage is shown until the steering wheel switchji
(where fitted) is pressed. When the maintenance
due alert reaches 0 km (miles), the
symbol
flashes next to the odometer value.
CAUTION
The engine oil must be changed before the main-
tenance due alert is shown.
– Failure to do so risks causing damage to the engine.
– Continued driving after maintenance due alert reaches 0 km (miles) may result in reduced
engine performance. The engine malfunction
indicator light (orange) will illuminate.
– The DPF (where fitted) may also become satu- rated because regeneration is restricted once
the distance equals 0 km (miles)
Always visit a NISSAN dealer or qualified work-
shop to perform the maintenance and the reset.
2-14Instruments and controls
Page 65 of 297

Downloaded from www.Manualslib.com manuals search engine ODOMETER/TWIN TRIP ODOMETER
The odometer and twin trip odometer are displayed
when the ignition switch is in the ON position.
Odometer
The odometerjA records the total distance the ve-
hicle has been driven.
Twin trip odometer
The twin trip odometerjB records the distance of 2
individual trips (Trip A and Trip B).
Changing the display:
Briefly press the
switchjC to change the dis-
play as follows.
Trip A→ Trip B→ TripA
Resetting the trip odometer:
Press and hold the
switch for approximately 1
second to reset the selected trip (Trip Aor Trip B).
BRIGHTNESS CONTROL
Rotate theswitchjC anticlockwise to brighten
or clockwise to dim the instrument lighting level.
NOTE
Brightness cannot be set when the headlight
switch is in the OFF position.
TRIP COMPUTER
The trip computer is controlled using theswitch
or the steering wheel switchji (where fitted).
The trip computer contains the following items:
[Fuel Economy] →[Average speed] →[Driving dis-
tance] →[Elapsed time] →[Range] (km or MILES)
→ [Settings][→ CO2 Saved] (where fitted) →[Fuel
Economy]
Short press to change the information that is
being displayed.
Push and hold (up until 3 seconds) resets the
current item that is displayed (except [Settings]
and [Range]).
Push and hold over 3 seconds performs a global
reset. This resets all functions of the display (ex-
cept [Range] and Trip A).
j1 Fuel Economy (l (litre)/100 km or MPG)
The [Fuel Economy] mode shows the current fuel
consumption in a moving bar graph.
The average fuel consumption mode displays the
average fuel consumption since the last reset.
It is shown in 2 ways:
The Ø symbol (average) with the value on the
top right of the bar.
By the position of the ♦icon (diamond) inside
the bar.
NIC1542
NIC1650
2-16Instruments and controls
Page 69 of 297
![NISSAN QASHQAI 2012 Owners Manual Downloaded from www.Manualslib.com manuals search engine [Stop/Start] (where fitted)
The CO2 savings and the engine stop time using
the Stop/Start System are kept in a submenu.
[Trip Saving]
View the NISSAN QASHQAI 2012 Owners Manual Downloaded from www.Manualslib.com manuals search engine [Stop/Start] (where fitted)
The CO2 savings and the engine stop time using
the Stop/Start System are kept in a submenu.
[Trip Saving]
View the](/manual-img/5/56764/w960_56764-68.png)
Downloaded from www.Manualslib.com manuals search engine [Stop/Start] (where fitted)
The CO2 savings and the engine stop time using
the Stop/Start System are kept in a submenu.
[Trip Saving]
View the estimated CO2 exhaust emissions pre-
vented since last reset.
It is possible to reset using the [Reset CO2]
submenu then push the
switch to set to zero.
NOTE
The [Trip Saving] value is the same informa-
tion that is displayed when the engine is auto-
matically stopped by the Stop/Start System.
[Total Saving]
View:
– The estimated CO2 exhaust emissions pre- vented.
– The time that the engine has been stopped by the Stop/Start System.
NOTE
The [Total Saving] values cannot be reset
and show accumulated Stop/Start System
information since the vehicle was built.
For more information, see “Stop/Start System
(where fitted)” in the “5. Starting and driving” sec-
tion.
[Maintenance]
The maintenance intervals of the following remind-
ers can be set or reset:
[Service] for engine oil change service reminder
Select this submenu to view, or reset the dis-
tance driven information or to set an interval
(petrol models).
– View the distance driven information:
Select [Service].
– Set procedure (petrol models only
jA):
1) Select [Service].
2) Select the distance driven/interval informa- tion.
3) Turn the
switch and set the interval (mile-
age) accordingly. For interval (mileage) de-
tails, see the separately provided Warranty
Information and Maintenance booklet.
4) Short press the
switch to confirm the set
interval (mileage).
– Reset procedure after changing engine oil.
CAUTION
Do not perform the reset operation unless
the engine oil has been changed.
For Petrol models
jA:
1) Select [Service].
2) Select [Reset]. 3) Select [Confirm] to confirm the reset of the
distance driven information to zero.
For Diesel models
jB:
1) Select [Service].
2) Press the
switch for more than 2 sec-
onds, then release.
3) Select [Reset].
4) Select [Confirm] to confirm the reset proce- dure.
Alternatively while the oil service message is
displayed (where fitted):
After changing the engine oil: Turn the igni-
tion switch to ON and, while the oil service
message is displayed within 3 seconds, push
both the
andswitches at the same
time for more than 5 seconds.
The display goes blank for 1 second; the de-
fault interval is then displayed; and finally the
display returns to normal.
[Tyre]
Select this submenu to set or reset the distance
for replacing tyres.
[Other]
Select this submenu and set or reset the dis-
tance for replacing or checking other items.
To return to the previous page of the setting mode,
select [Back].
2-20Instruments and controls
Page 72 of 297

Downloaded from www.Manualslib.com manuals search engine REAR WINDOW
WARNING
In freezing temperatures the washer solution
may freeze on the rear window and obscure your
vision. Warm the rear window with the rear win-
dow defogger before you wash the rear window.
CAUTION
Do not operate the washer continuously for
more than 15 seconds.
Do not operate the washer if the reservoir
tank is empty or frozen.
The rear window wiper and washer can be oper-
ated when the ignition switch is in the ON position.
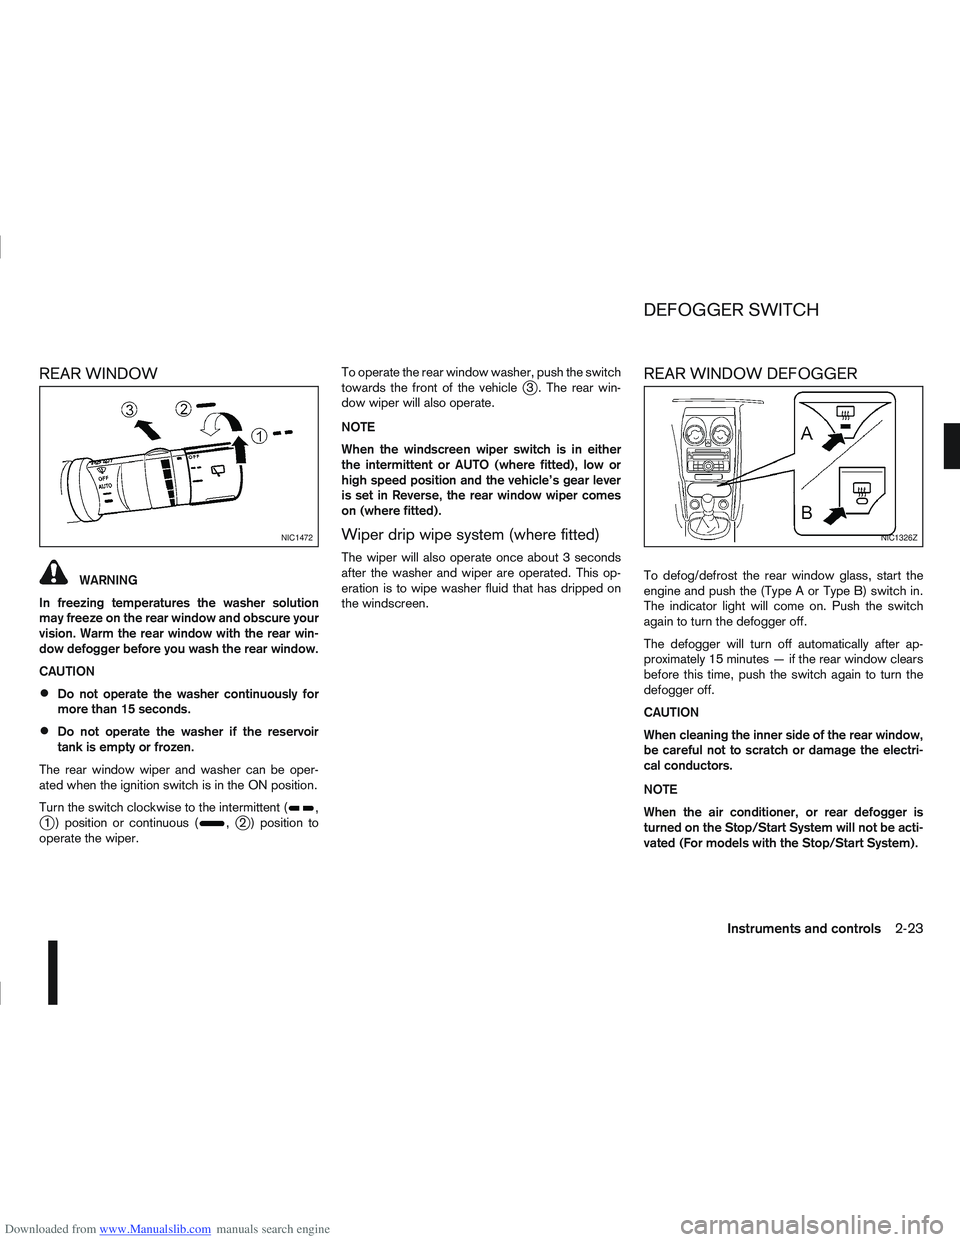
Turn the switch clockwise to the intermittent (
,j1 ) position or continuous (,j2 ) position to
operate the wiper. To operate the rear window washer, push the switch
towards the front of the vehicle
j3 . The rear win-
dow wiper will also operate.
NOTE
When the windscreen wiper switch is in either
the intermittent or AUTO (where fitted), low or
high speed position and the vehicle’s gear lever
is set in Reverse, the rear window wiper comes
on (where fitted).
Wiper drip wipe system (where fitted)
The wiper will also operate once about 3 seconds
after the washer and wiper are operated. This op-
eration is to wipe washer fluid that has dripped on
the windscreen.
REAR WINDOW DEFOGGER
To defog/defrost the rear window glass, start the
engine and push the (Type A or Type B) switch in.
The indicator light will come on. Push the switch
again to turn the defogger off.
The defogger will turn off automatically after ap-
proximately 15 minutes — if the rear window clears
before this time, push the switch again to turn the
defogger off.
CAUTION
When cleaning the inner side of the rear window,
be careful not to scratch or damage the electri-
cal conductors.
NOTE
When the air conditioner, or rear defogger is
turned on the Stop/Start System will not be acti-
vated (For models with the Stop/Start System).
NIC1472NIC1326Z
DEFOGGER SWITCH
Instruments and controls2-23
Page 83 of 297

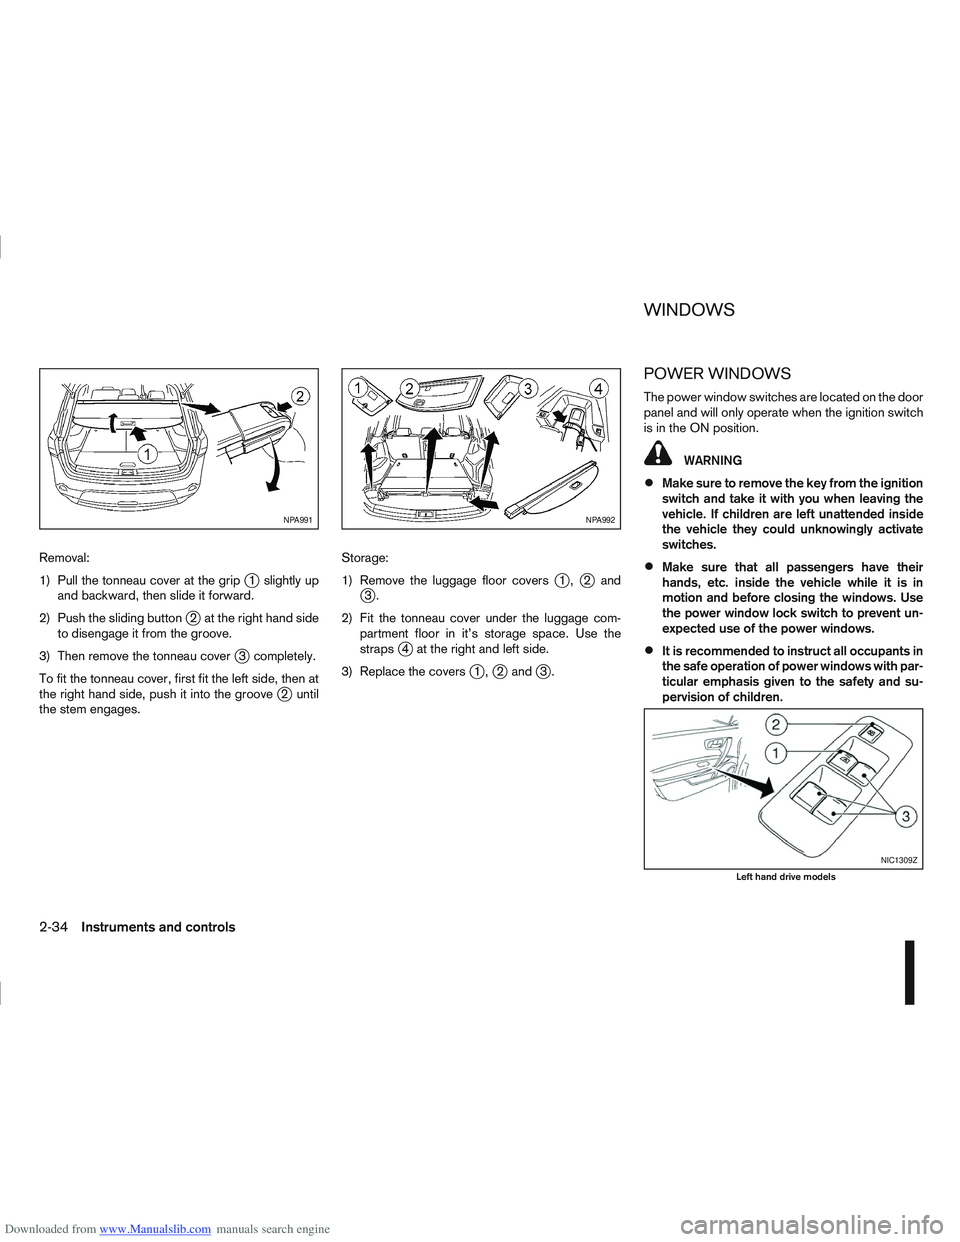
Downloaded from www.Manualslib.com manuals search engine Removal:
1) Pull the tonneau cover at the grip
j1 slightly up
and backward, then slide it forward.
2) Push the sliding button
j2 at the right hand side
to disengage it from the groove.
3) Then remove the tonneau cover
j3 completely.
To fit the tonneau cover, first fit the left side, then at
the right hand side, push it into the groove
j2 until
the stem engages. Storage:
1) Remove the luggage floor covers
j1,j2andj3.
2) Fit the tonneau cover under the luggage com- partment floor in it’s storage space. Use the
straps
j4 at the right and left side.
3) Replace the covers
j1,j2 andj3.
POWER WINDOWS
The power window switches are located on the door
panel and will only operate when the ignition switch
is in the ON position.
WARNING
Make sure to remove the key from the ignition
switch and take it with you when leaving the
vehicle. If children are left unattended inside
the vehicle they could unknowingly activate
switches.
Make sure that all passengers have their
hands, etc. inside the vehicle while it is in
motion and before closing the windows. Use
the power window lock switch to prevent un-
expected use of the power windows.
It is recommended to instruct all occupants in
the safe operation of power windows with par-
ticular emphasis given to the safety and su-
pervision of children.
NPA991NPA992
NIC1309Z
Left hand drive models
WINDOWS
2-34Instruments and controls