2012 NISSAN QASHQAI Camera
[x] Cancel search: CameraPage 116 of 297

Downloaded from www.Manualslib.com manuals search engine Tall objects, such as a kerb or vehicle, may be
misaligned or not displayed at the seam of
the views.
Objects that are above the camera cannot be
displayed.
The view for the bird’s-eye view may be mis-
aligned when the camera position alters.
A line on the ground may be misaligned and is
not seen as being straight at the seam of the
views. The misalignment will increase as the
line proceeds away from the vehicle.
*: For the Right-Hand Drive (RHD) models, the screen layout will be opposite.
Front-side view
CAUTION
The actual distance to objects may differ from
the distance shown. Guiding lines:
Guiding lines that indicate the approximate width
and the front end of the vehicle are displayed on the
monitor.
The front-of-vehicle line
j1 shows the front part of
the vehicle.
The side-of-vehicle line
j2 shows the vehicle width
including the outside mirror.
The extensions
j3 of both the frontj1 and sidej2
lines are shown with a green dotted line.
DIFFERENCE BETWEEN PREDICTIVE
AND ACTUAL DISTANCES
The distance guide line and the vehicle width guide
line on the front and the rear view should be used as
a reference only when the vehicle is on a level, paved
surface. The distance viewed on the monitor is for
reference only and may be different than the actual
distance between the vehicle and displayed objects.
Moving to a steep uphill
When moving the vehicle up a hill, the distance guide
lines and the vehicle width guide lines are shown
closer than the actual distance. For example, the
display shows 1 m (3 ft) to the place
jA , but the
actual1m(3ft)d istance on the hill is the placejB.
Note that any object on the hill is viewed in the moni-
tor further than it appears.
NAA1237
Front–side view, Left-Hand Drive (LHD) models*NAA1238
Display screen, heater and air conditioner, and audio system4-9
Page 118 of 297

Downloaded from www.Manualslib.com manuals search engine Moving closer to a projecting object
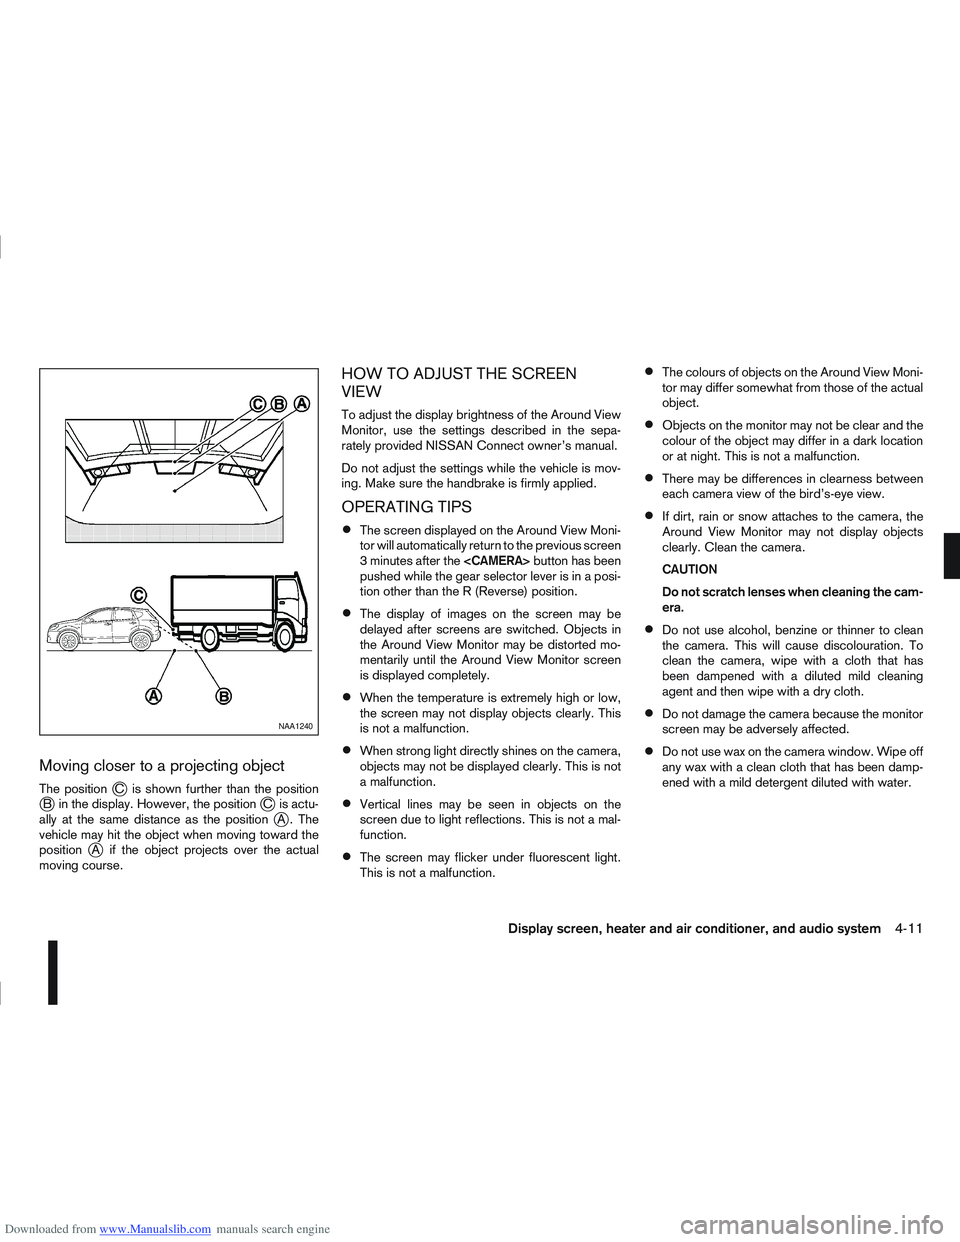
The positionjC is shown further than the positionjB in the display. However, the positionjC is actu-
ally at the same distance as the positionjA . The
vehicle may hit the object when moving toward the
position
jA if the object projects over the actual
moving course.
HOW TO ADJUST THE SCREEN
VIEW
To adjust the display brightness of the Around View
Monitor, use the settings described in the sepa-
rately provided NISSAN Connect owner’s manual.
Do not adjust the settings while the vehicle is mov-
ing. Make sure the handbrake is firmly applied.
OPERATING TIPS
The screen displayed on the Around View Moni-
tor will automatically return to the previous screen
3 minutes after the
pushed while the gear selector lever is in a posi-
tion other than the R (Reverse) position.
The display of images on the screen may be
delayed after screens are switched. Objects in
the Around View Monitor may be distorted mo-
mentarily until the Around View Monitor screen
is displayed completely.
When the temperature is extremely high or low,
the screen may not display objects clearly. This
is not a malfunction.
When strong light directly shines on the camera,
objects may not be displayed clearly. This is not
a malfunction.
Vertical lines may be seen in objects on the
screen due to light reflections. This is not a mal-
function.
The screen may flicker under fluorescent light.
This is not a malfunction.
The colours of objects on the Around View Moni-
tor may differ somewhat from those of the actual
object.
Objects on the monitor may not be clear and the
colour of the object may differ in a dark location
or at night. This is not a malfunction.
There may be differences in clearness between
each camera view of the bird’s-eye view.
If dirt, rain or snow attaches to the camera, the
Around View Monitor may not display objects
clearly. Clean the camera.
CAUTION
Do not scratch lenses when cleaning the cam-
era.
Do not use alcohol, benzine or thinner to clean
the camera. This will cause discolouration. To
clean the camera, wipe with a cloth that has
been dampened with a diluted mild cleaning
agent and then wipe with a dry cloth.
Do not damage the camera because the monitor
screen may be adversely affected.
Do not use wax on the camera window. Wipe off
any wax with a clean cloth that has been damp-
ened with a mild detergent diluted with water.
NAA1240
Display screen, heater and air conditioner, and audio system4-11
Page 224 of 297

Downloaded from www.Manualslib.com manuals search engine 7Appearance and care
Appearance and care
Cleaning exterior...................................................... 7-2
Washing ............................................................. 7-2
Removing spots .................................................. 7-2
Waxing ............................................................... 7-2
Cleaning glass .................................................... 7-3
Cleaning rear-view camera (where fitted) ............ 7-3
Underbody ......................................................... 7-3
Care of wheels ................................................... 7-3
Cleaning alloy wheels ......................................... 7-3
Chrome parts ..................................................... 7-3
Cleaning interior ...................................................... 7-4 Monitor display’s maintenance (where fitted) ....... 7-4
Floor mats .......................................................... 7-4
Cleaning Glass ................................................... 7-4
Plastic parts........................................................ 7-4
Seat belts ........................................................... 7-4
Corrosion protection ................................................ 7-5 Most common factors contributing to vehicle
corrosion ............................................................ 7-5
Environmental factors influence the rate of
corrosion ............................................................ 7-5
To protect your vehicle from corrosion ................ 7-5
Page 226 of 297

Downloaded from www.Manualslib.com manuals search engine Always follow the manufacturer’s instructions
supplied with the wax.
Do not use a wax containing any abrasives,
cutting compounds or cleaners that may dam-
age the vehicle finish.
If the vehicle surface cannot polish easily, ap-
ply a road tar remover prior to waxing the ve-
hicle.
Machine compounding or aggressive polish-
ing on a base coat/clear coat paint finish may
dull the finish or leave swirl marks.
CLEANING GLASS
Use glass cleaner to remove smoke and dust film
from the glass surfaces. It is normal for glass to
become coated with a film after the vehicle is parked
in the hot sun. Glass cleaner and a soft cloth will
easily remove this film.
CLEANING REAR-VIEW CAMERA
(where fitted)
Clean the transparent camera cover regularly. If dirt,
rain or snow attaches to the cover, the monitor may
not display objects clearly.
CAUTION
Do not use alcohol, benzine or thinner to clean
the transparent camera cover. This will cause
discoloration. To clean the cover, first use a
cloth dampened with diluted mild cleaning
agent and then wipe with a dry cloth.
Do not use body wax on the transparent cam-
era cover.
When washing the vehicle with a high pres-
sure water spray, make sure not to spray it
around the transparent camera cover. Other-
wise, water may enter the camera unit caus-
ing water condensation on the lens and it may
result in a malfunction or an electric shock.
UNDERBODY
In areas where road salt is used in the winter, the
vehicle’s underbody must be cleaned regularly. This
will prevent dirt and salt from building up and caus-
ing underbody and suspension corrosion.
Before the winter period and again in the spring, the
underseal must be checked and, if necessary, re-
treated.
CARE OF WHEELS
Wash the wheels when washing the vehicle to
maintain their appearance.
Clean the inner side of the wheels when the
wheel is changed or the underside of the vehicle
is washed.
Do not use abrasive cleaners when washing the
wheels.
Inspect wheel rims regularly for dents or corro-
sion. This may cause loss of pressure or damage
the tyre bead.
NISSAN recommends that the road wheels be
waxed to protect against road salt in areas where
it is used during winter.
CLEANING ALLOY WHEELS
Wash the wheels regularly with a sponge damp-
ened in a mild soap solution, especially during win-
ter in areas where road salt is used. The salt residue
from road salt could discolour the wheels if it is not
washed off regularly.
CAUTION
Follow the directions as described below in order
to avoid staining or discolouring of the wheels.
Do not use a cleaner that contains strong con-
tents of acid or alkali to clean the wheels.
Do not apply wheel cleaner when the wheels
are hot. The wheel temperature should be the
same as ambient temperature.
Rinse the wheel to completely remove the
cleaner within 15 minutes after the cleaner
has been applied.
CHROME PARTS
Clean all chrome parts regularly with a nonabrasive
chrome polish to maintain the finish.
Appearance and care7-3
Page 283 of 297

Downloaded from www.Manualslib.com manuals search engine – Checking handbrake ..................................................... 8-15
– Handbrake lever ............................................................ 3-16
– Trailer brakes ................................................................ 5-36
Brightness control ............................................................... 2-16C
C-View® ........................................................................\
..... 2-36
– Sunshade (Reinitialisation procedure) ............................ 2-37
– Sunshade operation ...................................................... 2-36
Capacities and recommended fuel/lubricants ......................... 9-2
– Fuel recommendation ...................................................... 9-5
Car phone or CB radio ........................................................ 4-44
Care when driving ................................................................. 5-6
Changing
– Changing engine coolant ................................................. 8-6
– Changing engine oil ......................................................... 8-9
– Changing engine oil filter ............................................... 8-11
– Changing tyres and wheels ........................................... 8-33
Checking
– Checking brake pedal ................................................... 8-15
– Checking engine coolant level ......................................... 8-6
– Checking engine oil level ................................................. 8-8
– Checking handbrake ..................................................... 8-15
Child restraints .................................................................... 1-18
– 5-seater ........................................................................\
. 1-20
– 7-seater ........................................................................\
. 1-20
– Anchor points ................................................................ 1-28
– Installation on front passenger seat ................................ 1-23
– Installation on rear seats ................................................ 1-24
– Top tether strap for child restraint .................................. 1-27
Child safety ........................................................................\
... 1-8
Cleaning
– Alloy wheels .................................................................... 7-3
– Chrome parts .................................................................. 7-3
– Exterior ........................................................................\
.... 7-2 – Glass ....................................................................... 7-3, 7-4
– Interior ........................................................................\
.... 7-4
– Plastic parts .................................................................... 7-4
– Rear-view camera lens .................................................... 7-3
– Removing spots ............................................................... 7-2
– Underbody ...................................................................... 7-3
Clutch fluid ........................................................................\
.. 8-15
Cold weather driving ........................................................... 5-42
Console box ........................................................................\
2-32
Continuously variable transmission
– Continuously variable transmission fluid ......................... 8-14
– Driving with continuously variable transmission (Models with
manual shift) .................................................................. 5-14
– Driving with continuously variable transmission (Models without manual shift) .................................................................. 5-17
Coolant
– Changing engine coolant ................................................. 8-6
– Checking engine coolant level ......................................... 8-6
– Engine coolant ............................................................... 5-43
– Engine coolant temperature gauge ................................... 2-2
– Engine cooling system ..................................................... 8-6
Corrosion protection .................................................... 5-43, 7-5
– Environmental factors ...................................................... 7-5
Cruise control ............................................................ 2-21, 5-29
Cruise control system operations ......................................... 5-30
D
Defogger switch
– Outside mirror defogger ................................................ 2-24
– Rear window defogger .................................................. 2-23
Diesel particulate filter (DPF) ................................................. 5-5
Diesel particulate filter (DPF) warning light ............................. 2-4
Difference between predictive and actual distances ............... 4-9
Dimensions ........................................................................\
... 9-8
10-2Index