2012 NISSAN NOTE air con
[x] Cancel search: air conPage 120 of 235

For details, see “FM AM radio with CD player
(where fitted)” earlier in this section.
When successfully paired, a notification message
will be displayed. During the connection the follow-
ing status icons will be displayed (top left of dis-
play): Signal strength (
), Battery status (), and
Bluetooth ().
*: If the low battery message comes on, the Blue-
tooth® device must be recharged soon.
HANDS-FREE TELEPHONE
CONTROL
The hands-free mode can be operated using the
telephone<>button on the audio system, or
(where fitted) on the steering wheel.
Initiating a call
A call can be initiated using one of the following
methods:
– Redial
– Phone book
– Manual dialling
– Missed calls
– Dialled calls
– Received callsRedial:
To redial or call the last number dialled, press<
>
for more than 2 seconds.
Making a call from the phone book:
Once the Bluetooth
®connection has been made,
between the registered mobile phone and the audio
system, phone book data will be transferred auto-
matically to the audio system. The transfer may take
a while before completion.
NOTE
Phone book data will be erased when:
•Switching to another registered mobile
phone.
•Mobile phone is disconnected.
•The registered mobile phone is deleted from
the audio system.
1. Press<
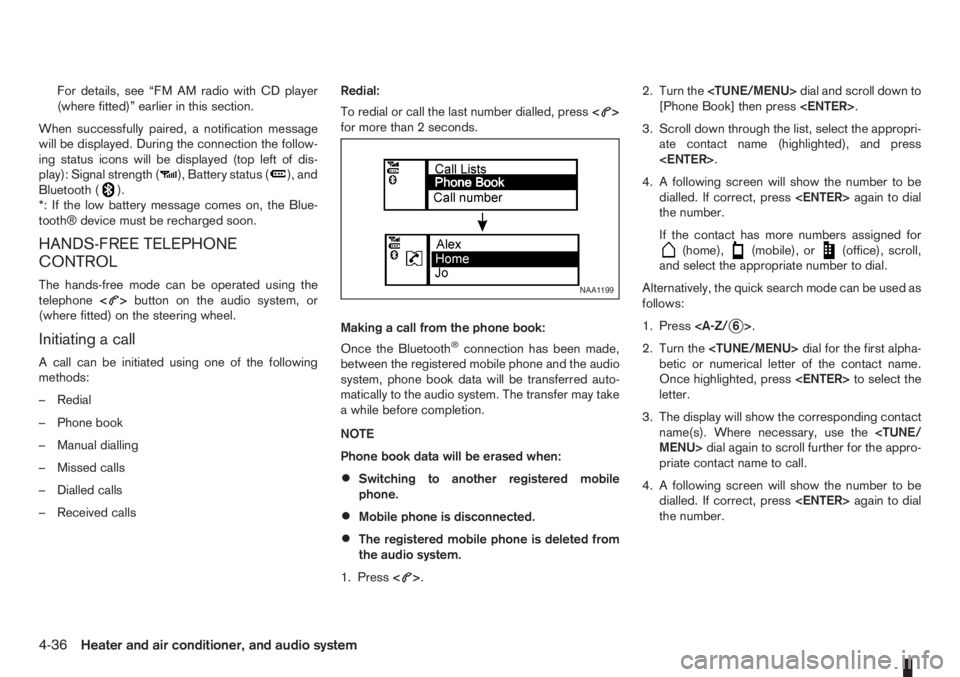
>.2. Turn the
[Phone Book] then press
3. Scroll down through the list, select the appropri-
ate contact name (highlighted), and press
4. A following screen will show the number to be
dialled. If correct, press
the number.
If the contact has more numbers assigned for
(home),(mobile), or(office), scroll,
and select the appropriate number to dial.
Alternatively, the quick search mode can be used as
follows:
1. Press
2. Turn the
betic or numerical letter of the contact name.
Once highlighted, press
letter.
3. The display will show the corresponding contact
name(s). Where necessary, use the
priate contact name to call.
4. A following screen will show the number to be
dialled. If correct, press
the number.
NAA1199
4-36Heater and air conditioner, and audio system
Page 121 of 235

Manually dialling a phone number:
WARNING
Park the vehicle in a safe location, and apply the
handbrake before making a call.
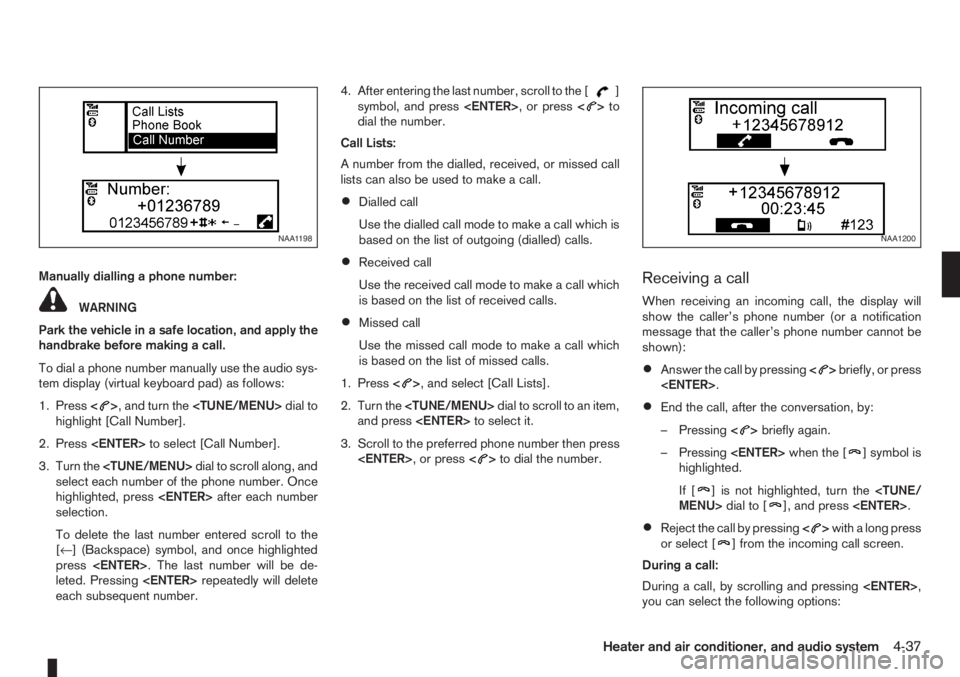
To dial a phone number manually use the audio sys-
tem display (virtual keyboard pad) as follows:
1. Press<
>, and turn the
highlight [Call Number].
2. Press
3. Turn the
select each number of the phone number. Once
highlighted, press
selection.
To delete the last number entered scroll to the
[←] (Backspace) symbol, and once highlighted
press
leted. Pressing
each subsequent number.4. After entering the last number, scroll to the [
]
symbol, and press
dial the number.
Call Lists:
A number from the dialled, received, or missed call
lists can also be used to make a call.
•Dialled call
Use the dialled call mode to make a call which is
based on the list of outgoing (dialled) calls.
•Received call
Use the received call mode to make a call which
is based on the list of received calls.
•Missed call
Use the missed call mode to make a call which
is based on the list of missed calls.
1. Press<
>, and select [Call Lists].
2. Turn the
and press
3. Scroll to the preferred phone number then press
>to dial the number.
Receiving a call
When receiving an incoming call, the display will
show the caller’s phone number (or a notification
message that the caller’s phone number cannot be
shown):
•Answer the call by pressing<>briefly, or press
•End the call, after the conversation, by:
– Pressing<
>briefly again.
– Pressing
] symbol is
highlighted.
If [
] is not highlighted, turn the
•Reject the call by pressing<>with a long press
or select [] from the incoming call screen.
During a call:
During a call, by scrolling and pressing
you can select the following options:
NAA1198NAA1200
Heater and air conditioner, and audio system4-37
Page 122 of 235
![NISSAN NOTE 2012 Owners Manual •[#123] — Use this item to enter numbers during
a call. For example, if directed by an automated
phone system to dial an extension number the
system will send the tone associated with the
selected NISSAN NOTE 2012 Owners Manual •[#123] — Use this item to enter numbers during
a call. For example, if directed by an automated
phone system to dial an extension number the
system will send the tone associated with the
selected](/manual-img/5/56792/w960_56792-121.png)
•[#123] — Use this item to enter numbers during
a call. For example, if directed by an automated
phone system to dial an extension number the
system will send the tone associated with the
selected number.
•[] — Use this item (the transfer handset com-
mand) to transfer the call from the audio system
to your mobile phone.
To transfer the call back to hands-free via the
audio system select [
].
STEERING WHEEL SWITCHES
(where fitted)
j
1Telephone button
j2Volume control buttons
The hands-free mode can be operated using the
steering wheel switches.
Volume control buttons
The volume control buttons allow you to adjust the
volume of the speakers by pressing the<+>or<
—>button.
Telephone button
The phone <> button allows you to:
•Accept an incoming call by pressing<>once.
•Reject an incoming call by pressing<>for
more than 2 seconds during the incoming call.
•End an active call by pressing the<>button
once.
•Redial the last outgoing call by pressing the<>
button for more than 2 seconds.
MAIN OPERATION
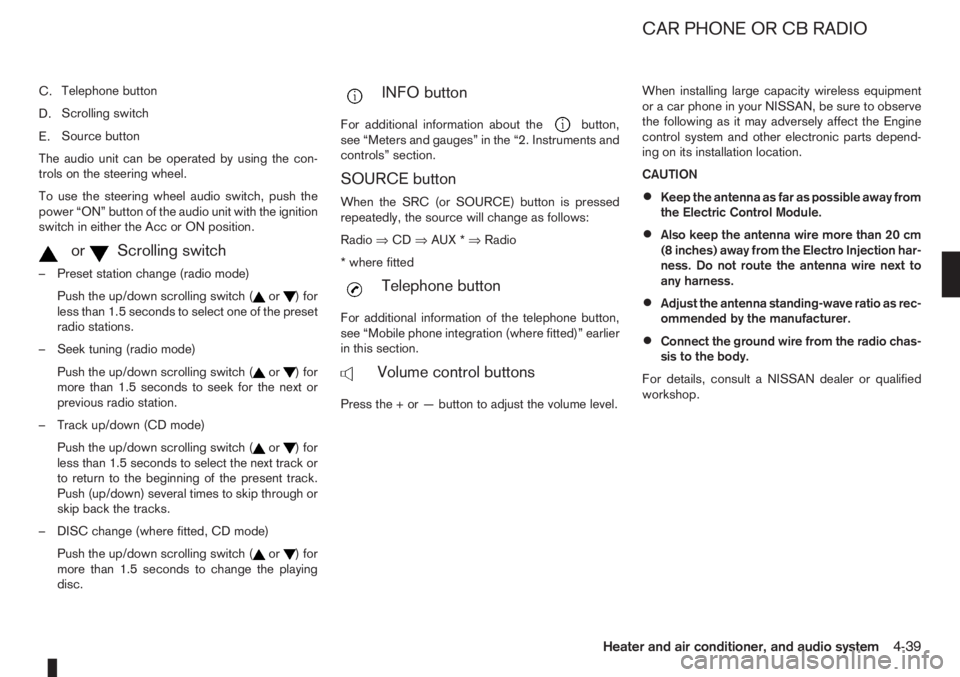
A.Source button
B.Volume control buttons
C.
(INFO) button
D.Scrolling switch
A.
(INFO) button
B.Volume control buttons
NAA1020Z
NAA898Z
Type A
NAA1010Z
Type B
STEERING WHEEL SWITCHES
FOR AUDIO CONTROL
(where fitted)
4-38Heater and air conditioner, and audio system
Page 123 of 235

C.Telephone button
D.Scrolling switch
E.Source button
The audio unit can be operated by using the con-
trols on the steering wheel.
To use the steering wheel audio switch, push the
power “ON” button of the audio unit with the ignition
switch in either the Acc or ON position.
mormScrolling switch
– Preset station change (radio mode)
Push the up/down scrolling switch (
or) for
less than 1.5 seconds to select one of the preset
radio stations.
– Seek tuning (radio mode)
Push the up/down scrolling switch (
or) for
more than 1.5 seconds to seek for the next or
previous radio station.
– Track up/down (CD mode)
Push the up/down scrolling switch (
or) for
less than 1.5 seconds to select the next track or
to return to the beginning of the present track.
Push (up/down) several times to skip through or
skip back the tracks.
– DISC change (where fitted, CD mode)
Push the up/down scrolling switch (
or) for
more than 1.5 seconds to change the playing
disc.
mINFO button
For additional information about thebutton,
see “Meters and gauges” in the “2. Instruments and
controls” section.
SOURCE button
When the SRC (or SOURCE) button is pressed
repeatedly, the source will change as follows:
Radio⇒CD⇒AUX *⇒Radio
* where fitted
mTelephone button
For additional information of the telephone button,
see “Mobile phone integration (where fitted)” earlier
in this section.
mVolume control buttons
Press the + or — button to adjust the volume level.When installing large capacity wireless equipment
or a car phone in your NISSAN, be sure to observe
the following as it may adversely affect the Engine
control system and other electronic parts depend-
ing on its installation location.
CAUTION
•Keep the antenna as far as possible away from
the Electric Control Module.
•Also keep the antenna wire more than 20 cm
(8 inches) away from the Electro Injection har-
ness. Do not route the antenna wire next to
any harness.
•Adjust the antenna standing-wave ratio as rec-
ommended by the manufacturer.
•Connect the ground wire from the radio chas-
sis to the body.
For details, consult a NISSAN dealer or qualified
workshop.
CAR PHONE OR CB RADIO
Heater and air conditioner, and audio system4-39
Page 124 of 235

NOTE
4-40Heater and air conditioner, and audio system
Page 127 of 235

WARNING
•Do not leave children or adults who would
normally require the support of others alone
in your vehicle. Pets should also not be left
alone. They could accidentally injure them-
selves or others through inadvertent opera-
tion of the vehicle. Also, on hot, sunny days,
temperatures in a closed vehicle could quickly
become high enough to cause severe or pos-
sibly fatal injuries to people or animals.
•To prevent luggage or packages from sliding
forward during braking, do not stack anything
in the cargo area higher than the seatbacks.
•Secure all cargo with ropes or straps to pre-
vent it from sliding or shifting.
•Failure to follow proper seating instructions
see “Seats” in the “1. Safety — seats, seat
belts and supplemental restraint system” sec-
tion, could result in serious personal injury in
an accident or sudden stop.
EXHAUST GAS (Carbon Monoxide)
WARNING
•Do not breathe exhaust gases; they contain
colourless and odourless carbon monoxide.
Carbon monoxide is a dangerous gas and can
cause unconsciousness or death.
•If you suspect that exhaust fumes are enter-
ing the vehicle, drive with all windows fully
open and have the vehicle inspected immedi-
ately.
•Do not run the engine in closed spaces, such
as a garage, for any longer than is absolutely
necessary.
•Do not park the vehicle with the engine run-
ning for any extended length of time.
•Keep the back door closed while driving, oth-
erwise exhaust gases could be drawn into the
passenger compartment. If you must drive in
this way for some reason, take the following
steps:
1) Open all the windows.
2) Manual air conditioner equipped models:
Move the air intake lever to the
posi-
tion.
Automatic air conditioner equipped mod-
els: Switch on the outside air mode.
3) Set the fan speed control to the maximum
position to circulate the air.
•If electrical wiring or other cable connections
must pass to a trailer through the seal of the
body, follow the manufacturer’s recommen-
dations to prevent carbon monoxide entry into
the vehicle.
•When a vehicle has been stopped in an open
area with its engine running for any significant
length of time, turn the fan on to force outside
air into the vehicle.
•The exhaust system and body should be in-
spected by a NISSAN dealer or qualified work-
shop whenever:
– the vehicle is raised for service.
– you suspect that exhaust fumes are enter-
ing into the passenger compartment.
– you notice a change in the sound of the
exhaust system.
– you have had an accident involving dam-
age to the exhaust system, underbody, or
rear of the vehicle.
PRECAUTIONS WHEN STARTING
AND DRIVING
Starting and driving5-3
Page 139 of 235

workshop check the transmission and have the
transmission repaired by a NISSAN dealer or
qualified workshop, if necessary.The speed limiter allows you to set the desired ve-
hicle speed limit. While the speed limiter is acti-
vated, you can perform normal braking and accel-
eration, but the vehicle will not exceed the set speed.
When the vehicle reaches the set speed limit or if
the set speed limit is lower than the actual vehicle
speed, the accelerator pedal will not work until the
vehicle speed drops below the set speed limit.
WARNING
•The speed limiter will not automatically brake
the vehicle to the set speed limit.
•Always observe posted speed limits. Do not
set the speed above them.
•Always confirm the setting status of the speed
limiter in the combination meter display.
•When the speed limiter is set, avoid hard ac-
celeration to reach the set limit to ensure that
the system can limit the speed of the vehicle
correctly.
•When additional floor mats are used, be sure
that they are correctly secured and that they
cannot interfere with the accelerator pedal.
Mats not adapted to the vehicle may prevent
proper operation of the speed limiter.
When the speed limiter is on the cruise control sys-
tem cannot be operated.The speed limiter operation switches are located on
the steering wheel (right hand side)
1.RES (Resume) switch
2.SET switch
3.CANCEL switch
4.Speed limiter main “ON/OFF” switch
5.Cruise control main “ON/OFF” switch (For
NSD359
Vehicles with petrol engine
NSD360
Vehicles with diesel engine
SPEED LIMITER
Starting and driving5-15
Page 163 of 235

NOTE
The flat tyre may not fit into the temporary use
spare tyre location. Have the flat tyre repaired
and fitted as soon as possible.
2. Reinstall the floor carpet then the “flexi-board”
system (where fitted).
3. Close the back door.
REPAIRING FLAT TYRE (Models with
emergency tyre puncture repair kit,
where fitted)
The emergency tyre puncture repair kit is supplied
with the vehicle instead of a spare tyre. This repair
kit must be used for temporarily fixing a minor tyre
puncture. After using the repair kit, see a NISSAN
dealer or qualified workshop as soon as possible for
tyre inspection and repair/replacement.
CAUTION
Do not use the emergency tyre puncture repair
kit under the following conditions. Contact a
NISSAN dealer or qualified workshop or profes-
sional road assistance.
•when the sealant has passed its expiration
date (shown on the label attached to the
bottle)
•when the cut or the puncture is approximately
4 mm (0.16 in) or longer
•when the side of the tyre is damaged
•when the vehicle has been driven with a con-
siderable loss of air from the tyre
•when the tyre is completely displaced inside
or outside the rim
•when the tyre rim is damaged
•when two or more tyres are flat
Getting emergency tyre puncture repair
kit
Take the emergency tyre puncture repair kit out of
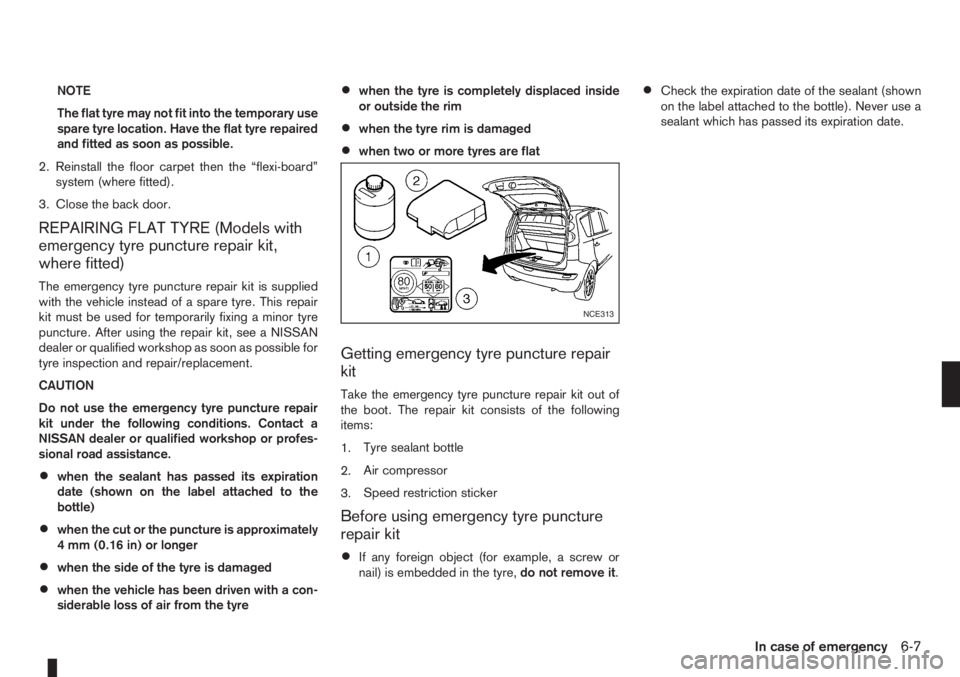
the boot. The repair kit consists of the following
items:
1.Tyre sealant bottle
2.Air compressor
3.Speed restriction sticker
Before using emergency tyre puncture
repair kit
•If any foreign object (for example, a screw or
nail) is embedded in the tyre,do not remove it.
•Check the expiration date of the sealant (shown
on the label attached to the bottle). Never use a
sealant which has passed its expiration date.
NCE313
In case of emergency6-7