2012 NISSAN NOTE driving
[x] Cancel search: drivingPage 53 of 235

Intelligent Key indicator light and
Intelligent Key warning light
(Intelligent Key system only)
Intelligent Key indicator light (green):
The Intelligent Key indicator light comes on when
the ignition knob is pushed in the LOCK position
while the brake pedal is depressed and the Intelli-
gent Key is in the vehicle. The Intelligent Key indica-
tor light goes out when the ignition switch is turned
to the Acc position.
NOTE
•The Intelligent Key indicator light may start
flashing when the ignition knob is turned from
the “OFF” position to the ON position if the
control unit detects a low battery voltage.
•The Intelligent Key indicator light comes on
as confirmation flash for anti-hijack mode set-
ting procedure. See “Integrated keyfob/re-
mote control system” in the “3. Pre-driving
checks and adjustments” section.
Intelligent Key warning light (red):
When the ignition knob is turned to the ON position,
the Intelligent Key warning light illuminates for a few
seconds and then goes off. This means the system
is operational.
NOTE
•If the Intelligent Key is taken outside of the
vehicle ID recognition zone through an
opened door (driver’s side door, passenger’s
side door, back door) while the ignition knobis in the Acc or ON position, the Intelligent
Key warning light starts flashing and the
buzzer sounds, warning the driver of the situ-
ation. The Intelligent Key warning light will
stop flashing as soon as the Intelligent Key is
placed again in the passenger’s compart-
ment.
•The Intelligent Key warning light comes on as
confirmation flash for convenience mode set-
ting procedure. See “Integrated keyfob/re-
mote control system” in the “3. Pre-driving
checks and adjustments” section.
WARNING
If the Intelligent Key warning light comes on
steady, it may indicate a system malfunction, we
recommend you to contact a NISSAN dealer or
qualified workshop for repair.
See “Ignition knob (where fitted)” in the “5. Starting
and driving” section for further details.
Anti-lock Braking System
warning light
After turning the ignition key to the ON position, the
light will illuminate. The Anti-lock Braking System
warning light will turn off after approximately 1 sec-
ond if the system is operational.
If the light comes on while the engine is running, it
may indicate something is wrong with the anti-lock
portion of the braking system. Have the system
checked by a NISSAN dealer or qualified workshop.Anti-lock Braking System:
The Anti-lock Braking System controls the wheels
so that they will not lock when braking abruptly or
when braking on a slippery road. This will prevent
difficult steering operation and swerving due to
locked wheels.
If an abnormality occurs in the system, the anti-lock
function will cease but the ordinary brakes will con-
tinue to operate normally.
CAUTION
If the light comes on while you are driving, con-
tact a NISSAN dealer or qualified workshop for
repair.
INDICATOR LIGHTS
Electronic Stability Programme
(ESP) OFF indicator light
(where fitted)
The light comes on when the Electronic Stability
Programme (ESP) OFF switch is pushed to the OFF
position. This indicates the Electronic Stability Pro-
gramme is not operating.
Push the Electronic Stability Programme OFF
switch again or restart the engine and the system
will operate normally. See “Electronic Stability Pro-
gramme (ESP) system (where fitted)” in the
“5. Starting and driving” section.
Instruments and controls2-11
Page 54 of 235

Diesel particulate filter warning
light (where fitted)
When the warning light illuminates, it indicates that
particulate matter has accumulated to the specified
amount of the limit in the diesel particulate filter.
Drive the vehicle at more than approximately 60 km/h
(37.5 MPH) as soon as safely possible until the
warning light turns off. Always conform to local regu-
lations. Particulate matter collected in the filter can-
not be burned under low speed driving conditions.
After having burned the particulate matter com-
pletely, the warning light will turn off.
See “Diesel particulate filter (where fitted)” in the
“5. Starting and driving” section for further details.
Glow plug indicator light (Diesel
engine)
This light comes on when the ignition switch is in the
ON position, and goes out when the glow plugs
have been pre-heated. When the engine is cold, the
glow plug warm-up time will be longer.
CAUTION
If the light remains on, this may indicate a prob-
lem in the glow system. Have the system checked
at a NISSAN dealer or qualified workshop.
Overdrive off indicator light
(automatic transmission)
The overdrive off indicator light illuminates when the
overdrive is turned OFF. See “Driving with auto-
matic transmission” in the “5. Starting and driving”
section.If the vehicle is driven under extreme conditions,
such as excessive wheel spinning and subse-
quent hard braking, the Fail-safe system may be
activated. This will occur even if all electrical cir-
cuits are functioning properly. In this case, turn
the ignition key to the “OFF” position and wait for
3 seconds. Then turn the key back to the ON
position. The vehicle should return to its normal
operating condition. If it does not return to its
normal operating condition have a NISSAN dealer
or qualified workshop check the transmission
and repair if necessary.
Rear fog light indicator light
The light comes on when the rear fog light switch is
turned on.
SLIP indicator light
(where fitted)
This indicator will blink when the ESP system is
operating, thus alerting the driver to the fact that the
road surface is slippery and the vehicle is nearing its
traction limits.
You may feel or hear the system working, this is nor-
mal.
The light will blink for a few seconds after the ESP
system stops limiting wheel spin.
The
indicator light also comes on when you
turn the ignition switch to the ON position. The light
will turn off after approximately 2 seconds if the sys-tem is operational. If the light does not come on
have the system checked by a NISSAN dealer or
qualified workshop.
Front fog light indicator light
(where fitted)
The light comes on when the front fog lights are
switched on.
Side light and headlight indicator
light
The side light and headlight indicator light illumi-
nates when the side light or headlight position is
selected. See “Headlight and turn signal switch”
later in this section for further details.
Turn signal/hazard indicator
lights
The light flashes when the turn signal switch lever or
hazard switch is turned on.
High beam indicator light
This light comes on when the headlight high beam
is on, and goes out when the low beam is selected.
AUDIBLE REMINDERS
Light reminder chime
A chime will sound when the driver’s side door is
opened if the headlight switch is turned on (ignition
switch in the “OFF” or LOCK position). Turn the
headlight switch to OFF or AUTO (where fitted),
2-12Instruments and controls
Page 55 of 235

when you leave the vehicle. See “Headlight and turn
signal switch” later in this section for further details
on the lighting operation.
Key reminder chime
The chime will sound if the driver’s side door is
opened while the key is left in the ignition switch and
an attempt is made to set the power door lock switch
to the LOCK position.
The chime will sound if the driver’s door is opened
while the Intelligent Key (where fitted) is left inside
the vehicle and the ignition knob is not in the LOCK
position.
Remove the key or Intelligent Key and take it with
you when leaving the vehicle.
Handbrake reminder buzzer
(where fitted)
The buzzer will sound if the vehicle is driven and the
handbrake has not previously been released.
First release the handbrake, then start driving.
See “Handbrake lever” in the “3. Pre-driving checks
and adjustments” section for further operating infor-
mation.
Trailer direction indicator buzzer
The electrical system of the vehicle will detect an
additional electrical load of the trailer lighting when
towing a trailer and the turn signal switch is used.
As a result, the direction indicator tone will be differ-
entFor additional information, see “Trailer towing” in
the “5. Starting and driving” section.
WINDSCREEN WIPER AND WASHER
SWITCH
WARNING
In freezing temperatures the washer fluid may
freeze on the windscreen and obscure your vi-
sion. Warm the windscreen with the defroster
before you wash it.
CAUTION
•Do not open/release the bonnet when the
front wiper arms are raised from their original
position.
•Do not operate the washer continuously for
more than 15 seconds.
•Do not operate the washer if the reservoir
tank is empty or frozen.
NIC1054Z
WIPER AND WASHER SWITCH
Instruments and controls2-13
Page 63 of 235

•Before inserting or disconnecting a plug, be
sure to turn off the power switch of the elec-
trical accessory being used or the Acc power
of the vehicle.
•Fully push the plug in. If insufficient contact is
made, the plug may overheat or the respec-
tive fuse may blow.
WARNING
Take care as the power outlet and plug may be
hot during or immediately after use.
GLOVE BOX
WARNING
•The glove box storage should not be used
while driving so that full attention may be given
to the driving operation.
•Keep the glove box lid closed while driving to
prevent injury in an accident or a sudden stop.
The under side storage pocket
jA provides an eas-
ily accessible storage space. To access the glove
box, press the lock release button
j1.
Glove box air flow control dial
(where fitted)
CAUTION
•Do not put any objects that can melt in the
glove box compartment as it may damage the
compartment inner side.
•Do not leave any plastic objects in the glove
box compartment. They may be deformed.
•Do not put jewellery such as rings, earrings,
etc. in the glove box compartment, as the heat
may deform them.
The glove box compartment provides an adjustable
air flow control dial in order to keep beverages
chilled or warm. Turn the vent anticlockwise
j2to
provide full heating/cooling and turn clockwisej1
to close the outlet. The heating/cooling function set-
ting is monitored by the heater and air conditioning
control panel. See “Heater and air conditioner
operation” in the “4. Heater and air conditioner, and
audio system” section for further details on passen-
ger compartment air control setting.
NIC1066Z
NIC1072Z
Glove box compartment
STORAGE
Instruments and controls2-21
Page 64 of 235

CENTRE CONSOLE STORAGE BOX
WARNING
The centre console storage box should not be
used while driving so that full attention may be
given to the driving operation.
CAUTION
Do not leave sunglasses, cigarette lighter, etc. in
the centre console storage box while parking in
direct sunlight. The heat may damage these
items.
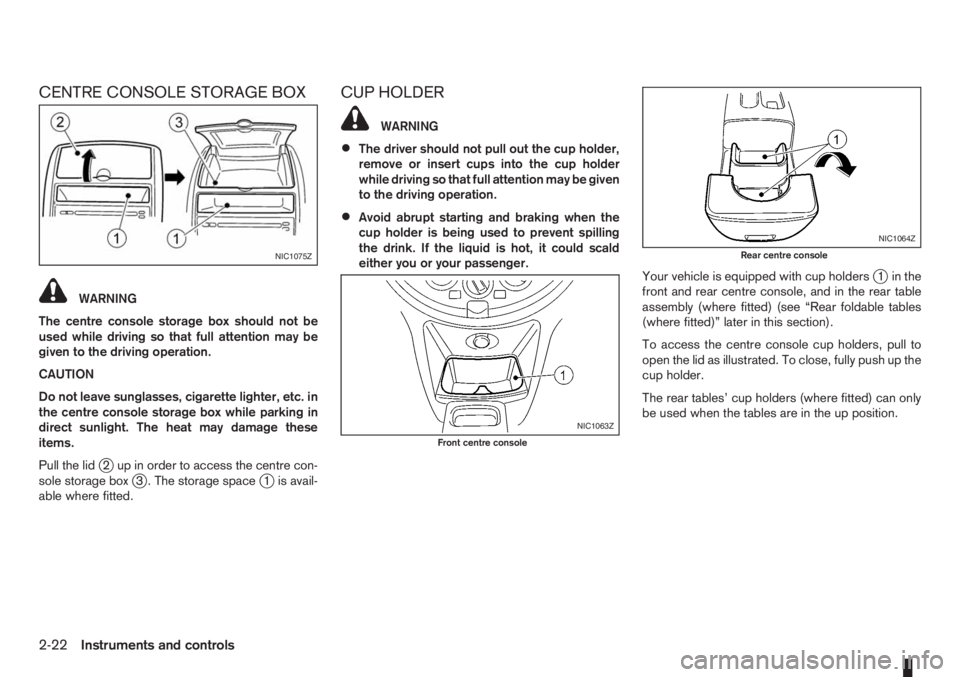
Pull the lid
j2 up in order to access the centre con-
sole storage boxj3 . The storage spacej1 is avail-
able where fitted.
CUP HOLDER
WARNING
•The driver should not pull out the cup holder,
remove or insert cups into the cup holder
while driving so that full attention may be given
to the driving operation.
•Avoid abrupt starting and braking when the
cup holder is being used to prevent spilling
the drink. If the liquid is hot, it could scald
either you or your passenger.
Your vehicle is equipped with cup holders
j1 in the
front and rear centre console, and in the rear table
assembly (where fitted) (see “Rear foldable tables
(where fitted)” later in this section).
To access the centre console cup holders, pull to
open the lid as illustrated. To close, fully push up the
cup holder.
The rear tables’ cup holders (where fitted) can only
be used when the tables are in the up position.
NIC1075Z
NIC1063Z
Front centre console
NIC1064Z
Rear centre console
2-22Instruments and controls
Page 65 of 235

REAR FOLDABLE TABLES
(where fitted)
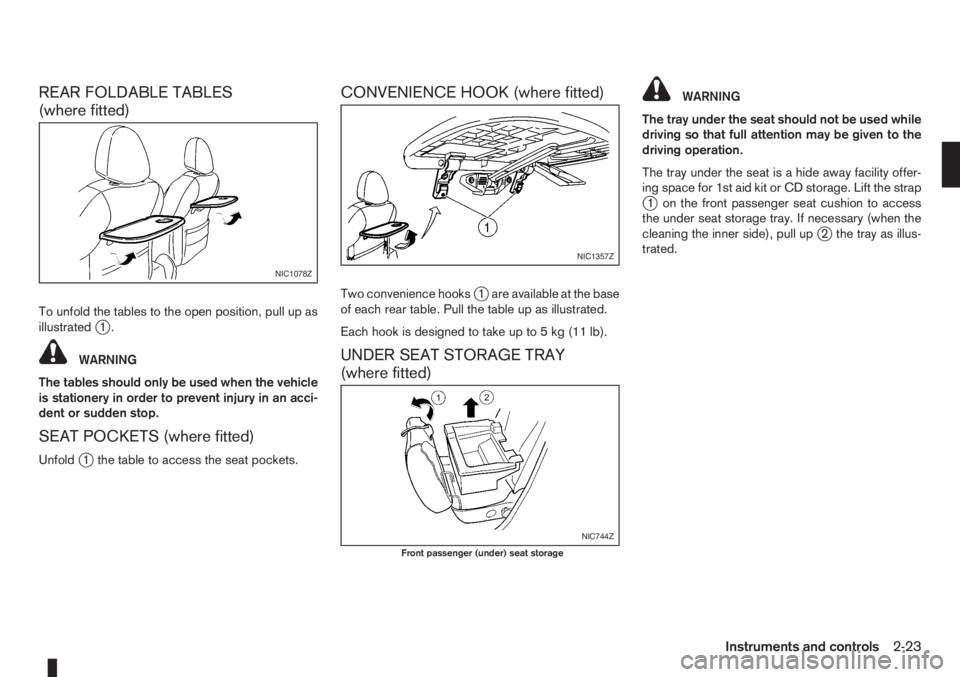
To unfold the tables to the open position, pull up as
illustratedj1.
WARNING
The tables should only be used when the vehicle
is stationery in order to prevent injury in an acci-
dent or sudden stop.
SEAT POCKETS (where fitted)
Unfoldj1 the table to access the seat pockets.
CONVENIENCE HOOK (where fitted)
Two convenience hooksj1 are available at the base
of each rear table. Pull the table up as illustrated.
Each hook is designed to take up to 5 kg (11 lb).
UNDER SEAT STORAGE TRAY
(where fitted)
WARNING
The tray under the seat should not be used while
driving so that full attention may be given to the
driving operation.
The tray under the seat is a hide away facility offer-
ing space for 1st aid kit or CD storage. Lift the strap
j1 on the front passenger seat cushion to access
the under seat storage tray. If necessary (when the
cleaning the inner side), pull up
j2 the tray as illus-
trated.
NIC1078Z
NIC1357Z
NIC744Z
Front passenger (under) seat storage
Instruments and controls2-23
Page 68 of 235

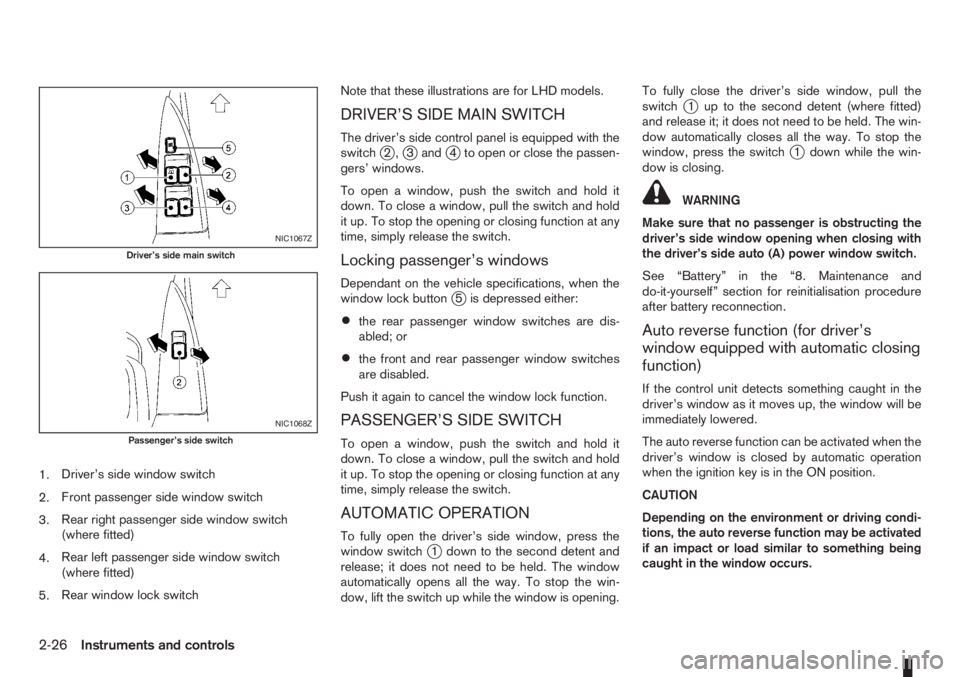
1.Driver’s side window switch
2.Front passenger side window switch
3.Rear right passenger side window switch
(where fitted)
4.Rear left passenger side window switch
(where fitted)
5.Rear window lock switchNote that these illustrations are for LHD models.
DRIVER’S SIDE MAIN SWITCH
The driver’s side control panel is equipped with the
switchj2,j3andj4 to open or close the passen-
gers’ windows.
To open a window, push the switch and hold it
down. To close a window, pull the switch and hold
it up. To stop the opening or closing function at any
time, simply release the switch.
Locking passenger’s windows
Dependant on the vehicle specifications, when the
window lock buttonj5 is depressed either:
•the rear passenger window switches are dis-
abled; or
•the front and rear passenger window switches
are disabled.
Push it again to cancel the window lock function.
PASSENGER’S SIDE SWITCH
To open a window, push the switch and hold it
down. To close a window, pull the switch and hold
it up. To stop the opening or closing function at any
time, simply release the switch.
AUTOMATIC OPERATION
To fully open the driver’s side window, press the
window switchj1 down to the second detent and
release; it does not need to be held. The window
automatically opens all the way. To stop the win-
dow, lift the switch up while the window is opening.To fully close the driver’s side window, pull the
switch
j1 up to the second detent (where fitted)
and release it; it does not need to be held. The win-
dow automatically closes all the way. To stop the
window, press the switch
j1 down while the win-
dow is closing.
WARNING
Make sure that no passenger is obstructing the
driver’s side window opening when closing with
the driver’s side auto (A) power window switch.
See “Battery” in the “8. Maintenance and
do-it-yourself” section for reinitialisation procedure
after battery reconnection.
Auto reverse function (for driver’s
window equipped with automatic closing
function)
If the control unit detects something caught in the
driver’s window as it moves up, the window will be
immediately lowered.
The auto reverse function can be activated when the
driver’s window is closed by automatic operation
when the ignition key is in the ON position.
CAUTION
Depending on the environment or driving condi-
tions, the auto reverse function may be activated
if an impact or load similar to something being
caught in the window occurs.
NIC1067Z
Driver’s side main switch
NIC1068Z
Passenger’s side switch
2-26Instruments and controls
Page 71 of 235

3Pre-driving checks and adjustmentsPre-driving checks and adjustments
Keys ........................................................................ 3-2
Integrated keyfob/remote control system .................. 3-3
Using the remote keyless entry system ................ 3-3
Locking the doors ............................................... 3-3
Unlocking the doors – convenience mode ........... 3-4
Unlocking the doors – anti-hijack mode ............... 3-4
Switching from convenience mode to
anti-hijack mode.................................................. 3-4
Keyfob operation failure ...................................... 3-4
Intelligent Key system (where fitted) ......................... 3-5
Locking/unlocking .............................................. 3-5
Starting the engine with the Intelligent Key .......... 3-6
Door locks ............................................................... 3-6
Super Lock System (Right-hand drive models) .... 3-6
Vehicle dead battery – left-hand side door
handle ................................................................ 3-7
Locking with power door lock switch .................. 3-7Child safety rear door lock .................................. 3-8
Back door lock ................................................... 3-8
Security system ....................................................... 3-9
NISSAN Anti-Theft System (NATS)..................... 3-9
Bonnet release ........................................................ 3-10
Fuel filler lid ............................................................. 3-11
Fuel filler lid opener lever .................................... 3-11
Fuel filler cap ...................................................... 3-11
Handbrake lever ...................................................... 3-11
Tilting steering wheel ............................................... 3-12
Mirrors..................................................................... 3-12
Inside rear-view mirror ........................................ 3-12
Outside rear-view mirrors.................................... 3-12
Vanity mirror ....................................................... 3-13
Rear parcel shelf...................................................... 3-14
Rear parcel shelf removal.................................... 3-14
Rear parcel shelf installation................................ 3-14