Page 3 of 293

This manual includes information for all features
and equipment available on this model. Features
and equipment in your vehicle may vary depend-
ing on model, trim level, options selected, order,
date of production, region or availability. There-
fore, you may find information about features or
equipment that are not included or installed on
your vehicle.
All information, specifications and illustrations in
this manual are those in effect at the time of
printing. NISSAN reserves the right to change
specifications, performance, design or compo-
nent suppliers without notice and without obliga-
tion. From time to time, NISSAN may update or
revise this manual to provide Owners with the
most accurate information currently available.
Please carefully read and retain with this manual
all revision updates sent to you by NISSAN to
ensure you have access to accurate and up-to-
date information regarding your vehicle. Current
versions of vehicle Owner’s Manuals and any
updates can also be found in the Owner section
of the NISSAN website at
https://owners.nissanusa.com/nowners/
navigation/manualsGuide. If you have ques-
tions concerning any information in your Owner’s
Manual, contact NISSAN Consumer Affairs. See
the NISSAN CUSTOMER CARE PROGRAM
page in this Owner’s Manual for contact informa-
tion.IMPORTANT INFORMATION ABOUT
THIS MANUAL
You will see various symbols in this manual. They
are used in the following ways:
Page 27 of 293
PRECAUTIONS ON SEAT BELT
USAGE
If you are wearing your seat belt properly ad-
justed and you are sitting upright and well back in
your seat with both feet on the floor, your chances
of being injured or killed in a collision and/or the
severity of injury may be greatly reduced.
NISSAN strongly encourages you and all of your
passengers to buckle up every time you drive,
even if your seating position includes a supple-
mental air bag.
Most Canadian provinces or territories
specify that seat belts be worn at all times
when a vehicle is being driven.
Page 37 of 293
 , you
may use either the LATCH anchors or the
seat belt to install the child restraint (not both
at the same ti")
●If the combined weight of the child and child
restraint is less than 65 lbs (29.5 kg) , you
may use either the LATCH anchors or the
seat belt to install the child restraint (not both
at the same time) .
● If the combined weight of the child and child
restraint is greater than 65 lbs, (29.5 kg) use
the vehicle’s seat belt (not the lower an-
chors) to install the child restraint.
● Be sure to follow the child restraint manufac-
turer’s instructions for installation.
All Canadian provinces or territories re-
quire that infants and small children be
restrained in an approved child restraint at
all times while the vehicle is being oper-
ated. Canadian law requires the top tether
strap on forward-facing child restraints be
secured to the designated anchor point on
the vehicle.
LATCH (Lower Anchors and Tethers
for CHildren) SYSTEM
Your vehicle is equipped with special anchor
points that are used with the LATCH system
compatible child restraints. This system may also
be referred to as the ISOFIX or ISOFIX compat-
ible system. With this system, you do not have to
use a vehicle seat belt to secure the child re-
straint unless the combined weight of the child
and child restraint exceeds 65 lbs (29.5 kg) . If the
combined weight of the child and child restraint is
greater than 65 lbs (29.5 kg) use the vehicles
seat belt (not the lower anchors) to install the child restraint. Be sure to follow the child restraint
manufacturer’s instructions for installation.
The LATCH anchor points are provided to install
child restraints in the rear outboard seating posi-
tions only. Do not attempt to install a child re-
straint in the center position using the LATCH
anchors.
LATCH lower anchor
Page 55 of 293
●Make sure the child’s head will be properly
supported by the booster seat or vehicle
seat. The seatback must be at or above the
center of the child’s ears. For example, if a
low back booster seat is chosen, the vehicle
seatback must be at or above the center of
the child’s ears. If the seatback is lower than
the center of the child’s ears, a high back
booster seat should be used.
● If the booster seat is compatible with your
vehicle, place the child in the booster seat
and check the various adjustments to be
sure the booster seat is compatible with the
child. Always follow all recommended pro-
cedures.
All Canadian provinces or territories re-
quire that infants and small children be
restrained in an approved child restraint at
all times while the vehicle is being oper-
ated.
The instructions in this section apply to booster
seat installation in the rear seats or the front
passenger seat.BOOSTER SEAT INSTALLATION
Page 88 of 293
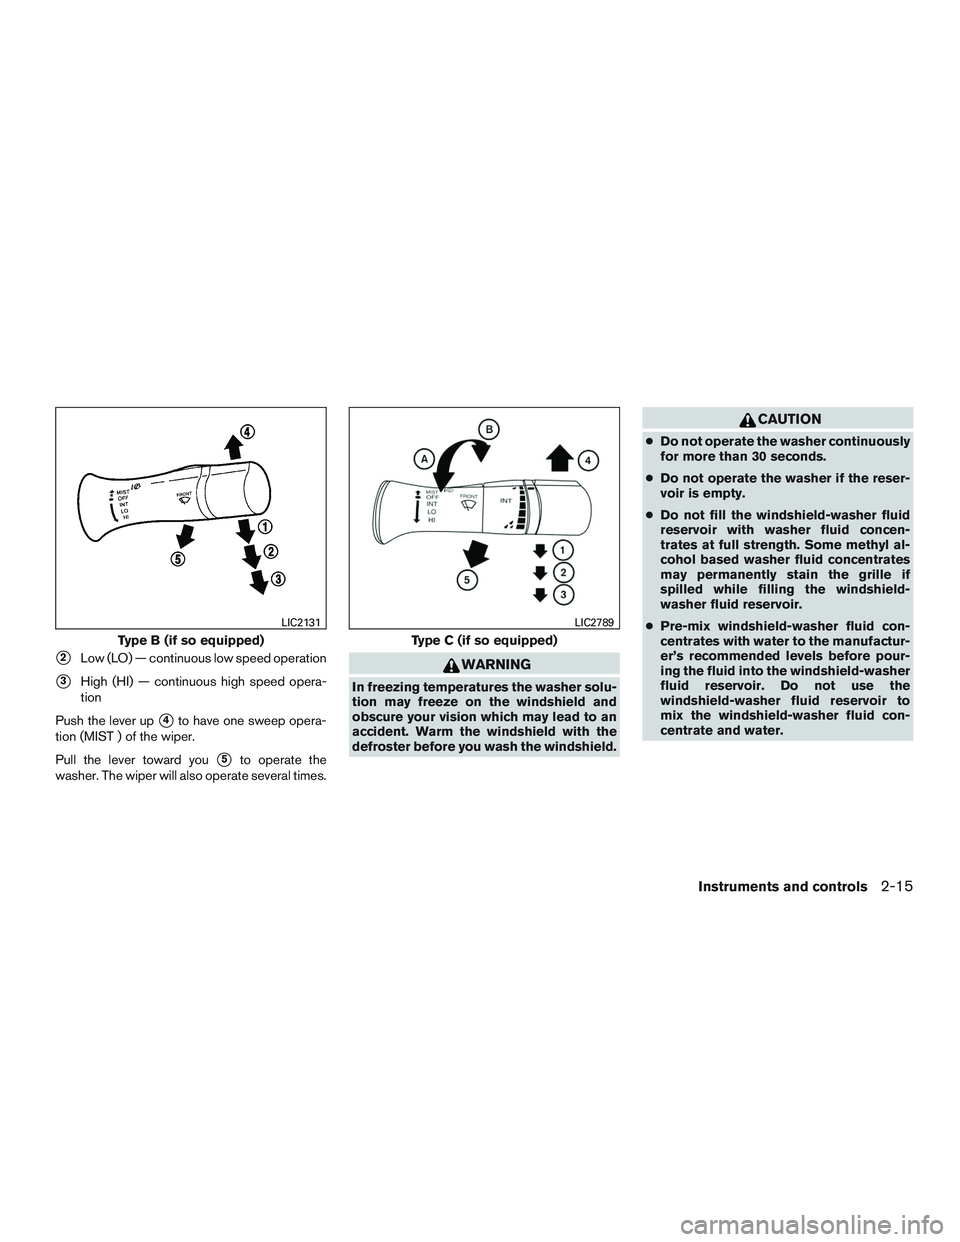
�2Low (LO) — continuous low speed operation
�3High (HI) — continuous high speed opera-
tion
Push the lever up
�4to have one sweep opera-
tion (MIST ) of the wiper.
Pull the lever toward you
�5to operate the
washer. The wiper will also operate several times.
Page 89 of 293
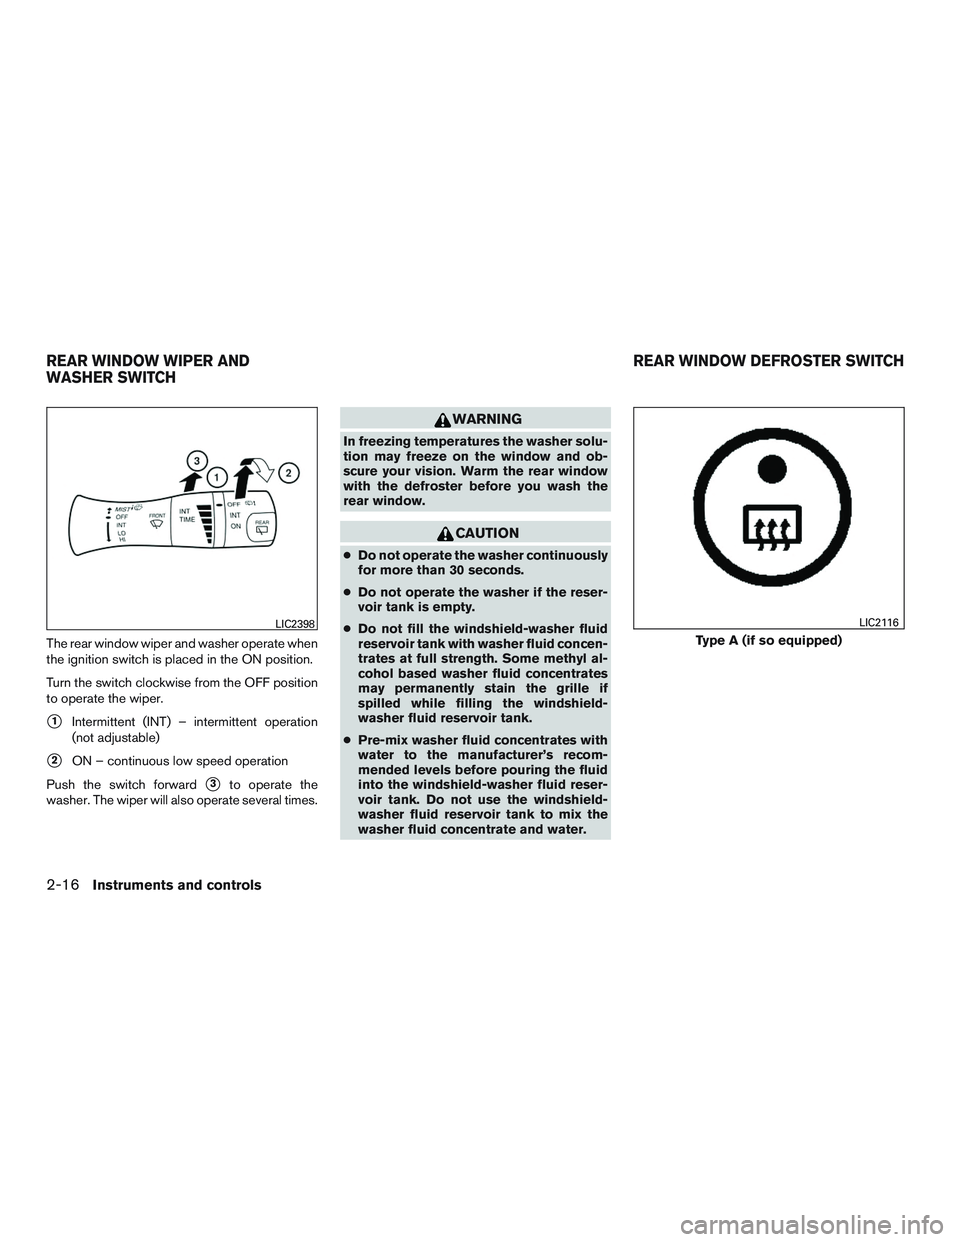
The rear window wiper and washer operate when
the ignition switch is placed in the ON position.
Turn the switch clockwise from the OFF position
to operate the wiper.
�1Intermittent (INT) – intermittent operation
(not adjustable)
�2ON – continuous low speed operation
Push the switch forward
�3to operate the
washer. The wiper will also operate several times.
Page 100 of 293

The interior light has a three-position switch and
operates regardless of ignition switch position.
When the switch is in the ON position
�3, the
interior lights illuminate, regardless of door posi-
tion. The lights will go off after a period of time
unless the ignition switch is placed in the ACC or
ON position (if so equipped) .
When the switch is in the DOOR position
�2, the
interior lights will stay on for a period of time
when:
● The doors are unlocked by the key fob, a key
or the power door lock switch while all doors
are closed and the ignition switch is placed
in the OFF position. ●
The driver’s door is opened and then closed
while the key is removed from the ignition
switch.
● The key is removed from the ignition switch
while all doors are closed.
The lights will turn off while the timer is activated
when: ● The driver’s door is locked by the key fob, a
key, or the power door lock switch.
● The ignition switch is placed in the ON po-
sition.
When the switch is in the OFF position
�1, the
interior lights do not illuminate, regardless of door
position.
The lights will turn off automatically after a period
of time while doors are open to prevent the bat-
tery from becoming discharged.
Page 104 of 293
will only recognize keys coded into the NISSAN
Vehicle Immobilizer System during registration.
Any key that is not given to your dealer at the time
of registration will no longer be able to start your
vehicle.