2012 NISSAN ARMADA transmission
[x] Cancel search: transmissionPage 352 of 489
WARNING
Overheating can result in reduced engine
power and vehicle speed. The reduced
speed may be lower than other traffic,
which could increase the chance of a col-
lision. Be especially careful when driving.
If the vehicle cannot maintain a safe driv-
ing speed, pull to the side of the road in a
safe area. Allow the engine to cool and
return to normal operation. See “If your
vehicle overheats” in the “In case of emer-
gency” section of this manual.
CAUTION
Running the engine with the engine oil
pressure warning light on could cause se-
rious damage to the engine almost imme-
diately. Such damage is not covered by
warranty. Turn off the engine as soon as it
is safe to do so.
AUTOMATIC TRANSMISSION
WARNING
●Do not depress the accelerator pedal
while shifting from P (Park) or N (Neu-
tral) to R (Reverse) , or L (Low) . Always
depress the brake pedal until shifting is
completed. Failure to do so could cause
you to lose control and have an
accident.
● Cold engine idle speed is high, so use
caution when shifting into a forward or
reverse gear before the engine has
warmed up.
● Never shift to P (Park) or R (Reverse)
while the vehicle is moving. This could
cause an accident.
● Except in an emergency, do not shift to
the N (Neutral) position while driving.
Doing so can cause a loss of engine
braking which may result in a collision,
serious personal injury or death. In ad-
dition, coasting with the transmission
in the N (Neutral) position may cause
serious damage to the transmission.
CAUTION
● When stopping the vehicle on an uphill
grade, do not hold the vehicle by de-
pressing the accelerator pedal. The foot
brake should be used for this purpose.
● Do not downshift abruptly on slippery
roads. This may cause a loss of control.
The automatic transmission in your vehicle is
electronically controlled to produce maximum
power and smooth operation.
The recommended operating procedures for this
transmission are shown on the following pages.
Follow these procedures for maximum vehicle
performance and driving enjoyment.
Starting the vehicle
1. After starting the engine, fully depress the foot brake pedal before moving the shift
selector out of the P (Park) position.
2. Keep the foot brake pedal depressed and move the shift selector into a driving gear.
3. Release the foot brake, then gradually start the vehicle in motion.
Starting and driving5-15
Page 353 of 489
The automatic transmission is designed so
the foot brake pedal MUST be depressed
before shifting from P (Park) to any drive
position while the ignition switch is in the
ON position.
The shift selector cannot be moved out of
the P (Park) position and into any of the
other gear positions if the ignition switch is
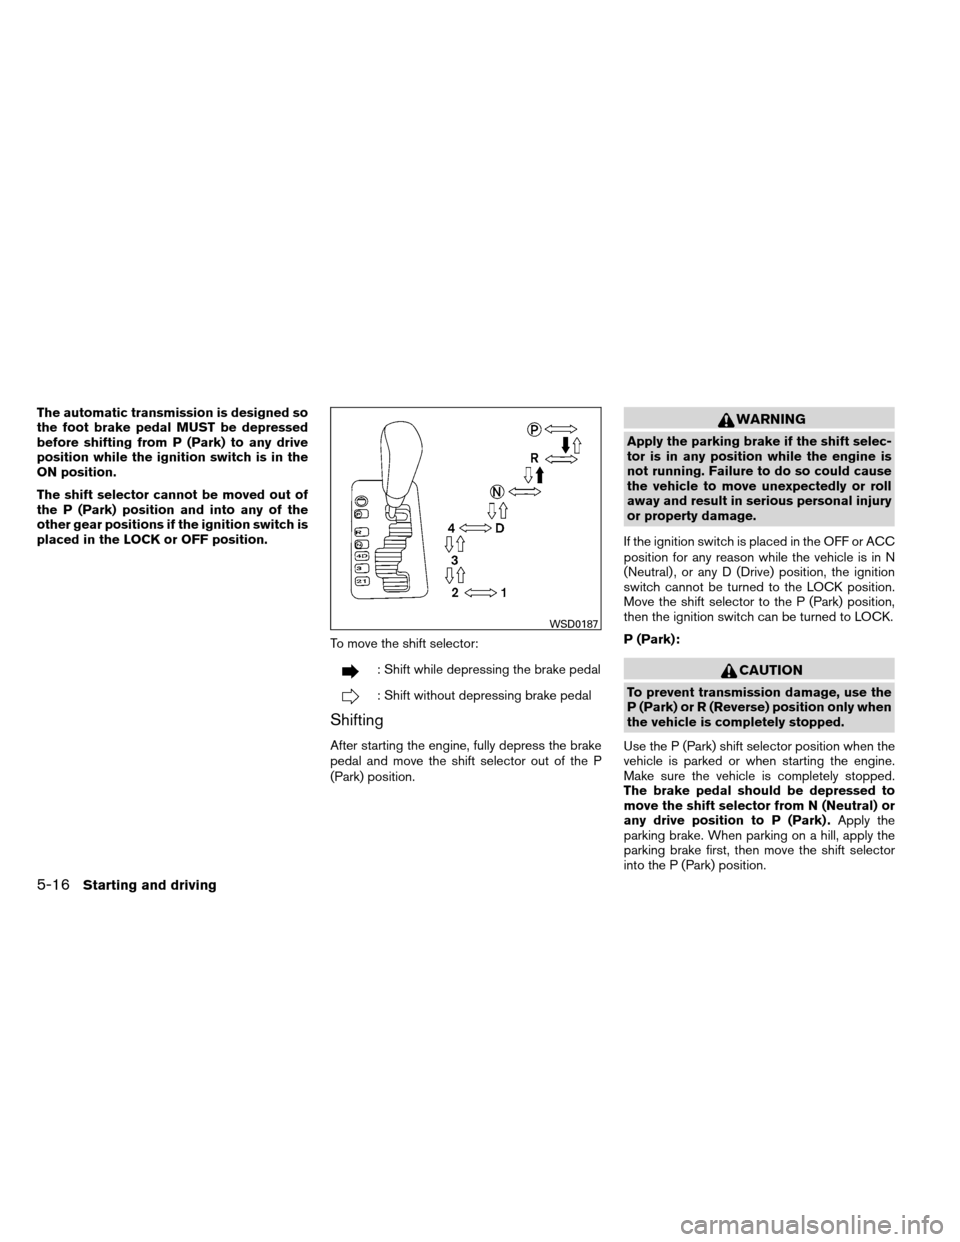
placed in the LOCK or OFF position.To move the shift selector:
: Shift while depressing the brake pedal
: Shift without depressing brake pedal
Shifting
After starting the engine, fully depress the brake
pedal and move the shift selector out of the P
(Park) position.
WARNING
Apply the parking brake if the shift selec-
tor is in any position while the engine is
not running. Failure to do so could cause
the vehicle to move unexpectedly or roll
away and result in serious personal injury
or property damage.
If the ignition switch is placed in the OFF or ACC
position for any reason while the vehicle is in N
(Neutral) , or any D (Drive) position, the ignition
switch cannot be turned to the LOCK position.
Move the shift selector to the P (Park) position,
then the ignition switch can be turned to LOCK.
P (Park):
CAUTION
To prevent transmission damage, use the
P (Park) or R (Reverse) position only when
the vehicle is completely stopped.
Use the P (Park) shift selector position when the
vehicle is parked or when starting the engine.
Make sure the vehicle is completely stopped.
The brake pedal should be depressed to
move the shift selector from N (Neutral) or
any drive position to P (Park) . Apply the
parking brake. When parking on a hill, apply the
parking brake first, then move the shift selector
into the P (Park) position.
WSD0187
5-16Starting and driving
Page 354 of 489
R (Reverse):
CAUTION
To prevent transmission damage, use the
P (Park) or R (Reverse) position only when
the vehicle is completely stopped.
Use the R (Reverse) position to back up. Make
sure the vehicle is completely stopped before
selecting the R (Reverse) position. The brake
pedal must be depressed to move the shift
selector from P (Park) , N (Neutral) or any
drive position to R (Reverse) .
N (Neutral):
Neither forward nor reverse gear is engaged. The
engine can be started in this position. You may
shift to N (Neutral) and restart a stalled engine
while the vehicle is moving.
D (Drive):
Use this position for all normal forward driving.
4 (Fourth gear):
Use this position for driving up and down long
slopes where engine braking would be advanta-
geous.
Do not downshift into the 4 position at speeds
over the following and do not exceed the follow-
ing speeds in the 4 position. 4H:
62 MPH (100 km/h)
4LO: 31 MPH (50 km/h)
3 (Third gear):
Use this position for driving up and down long
slopes where engine braking would be advanta-
geous.
2 (Second gear):
Use this position for hill climbing or engine brak-
ing on downhill grades.
Do not downshift into the 2 position at speeds
over the following and do not exceed the follow-
ing speeds in the 2 position. 2WD and AUTO:71 MPH (115 km/h) w/o tow mode
62 MPH (100 km/h) w/tow mode
4H: 62 MPH (100 km/h) w/o tow mode
62 MPH (100 km/h) w/tow mode 4LO:
31 MPH (50 km/h) w/o tow mode
27 MPH (44 km/h) w/tow mode
1 (Low gear):
Use this position when climbing steep hills slowly
or slow driving through deep snow, sand or mud,
or for maximum engine braking on steep downhill
grades.
Do not downshift into the 1 position at speeds
over the following and do not exceed the follow-
ing speeds in the 1 position. 2WD and AUTO:43 MPH (70 km/h) w/o tow mode
37 MPH (60 km/h) w/tow mode
4H: 43 MPH (70 km/h) w/o tow mode
37 MPH (60 km/h) w/tow mode
4LO: 19 MPH (30 km/h) w/o tow mode
16 MPH (27 km/h) w/tow mode
Starting and driving5-17
Page 355 of 489
Shift lock release
If the battery is discharged, the shift selector may
not be moved from the P (Park) position even with
the brake pedal depressed.
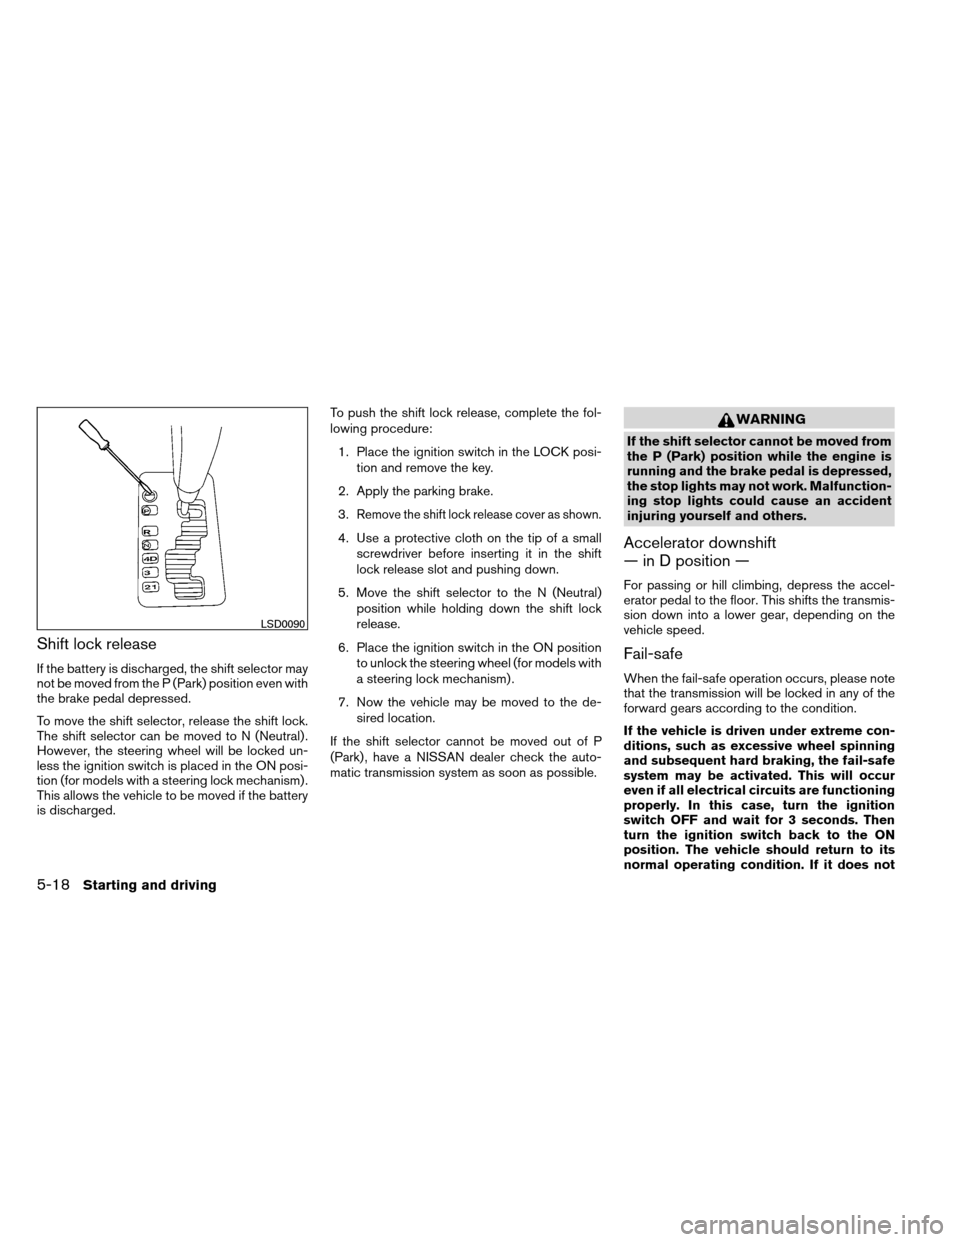
To move the shift selector, release the shift lock.
The shift selector can be moved to N (Neutral) .
However, the steering wheel will be locked un-
less the ignition switch is placed in the ON posi-
tion (for models with a steering lock mechanism) .
This allows the vehicle to be moved if the battery
is discharged.To push the shift lock release, complete the fol-
lowing procedure:
1. Place the ignition switch in the LOCK posi- tion and remove the key.
2. Apply the parking brake.
3.
Remove the shift lock release cover as shown.
4. Use a protective cloth on the tip of a small screwdriver before inserting it in the shift
lock release slot and pushing down.
5. Move the shift selector to the N (Neutral) position while holding down the shift lock
release.
6. Place the ignition switch in the ON position to unlock the steering wheel (for models with
a steering lock mechanism) .
7. Now the vehicle may be moved to the de- sired location.
If the shift selector cannot be moved out of P
(Park) , have a NISSAN dealer check the auto-
matic transmission system as soon as possible.
WARNING
If the shift selector cannot be moved from
the P (Park) position while the engine is
running and the brake pedal is depressed,
the stop lights may not work. Malfunction-
ing stop lights could cause an accident
injuring yourself and others.
Accelerator downshift
— in D position —
For passing or hill climbing, depress the accel-
erator pedal to the floor. This shifts the transmis-
sion down into a lower gear, depending on the
vehicle speed.
Fail-safe
When the fail-safe operation occurs, please note
that the transmission will be locked in any of the
forward gears according to the condition.
If the vehicle is driven under extreme con-
ditions, such as excessive wheel spinning
and subsequent hard braking, the fail-safe
system may be activated. This will occur
even if all electrical circuits are functioning
properly. In this case, turn the ignition
switch OFF and wait for 3 seconds. Then
turn the ignition switch back to the ON
position. The vehicle should return to its
normal operating condition. If it does not
LSD0090
5-18Starting and driving
Page 359 of 489
●Accelerate slowly and smoothly. Maintain
cruising speeds with a constant accelerator
position.
● Drive at moderate speeds on the highway.
Driving at high speed lowers fuel economy.
● Avoid unnecessary stopping and braking.
Maintain a safe distance behind other ve-
hicles.
● Use a proper gear range which suits road
conditions. On level roads, shift into high
gear as soon as possible.
● Avoid unnecessary engine idling.
● Keep your engine tuned up.
● Follow the recommended periodic mainte-
nance schedule.
● Keep the tires inflated to the correct pres-
sure. Low tire pressure increases tire wear
and lowers fuel economy.
● Keep the front wheels in correct alignment.
Improper alignment increases tire wear and
lowers fuel economy.
● Air conditioner operation lowers fuel
economy. Use the air conditioner only when
necessary. ●
When cruising at highway speeds, it is more
economical to use the air conditioner and
leave the windows closed to reduce drag.
● For vehicles equipped with
, use 4H
or 4L position only when necessary. Four-
wheel drive operation lowers fuel economy.
WARNING
● For 4WD equipped vehicles, do not at-
tempt to raise two wheels off the
ground and shift the transmission to
any drive or reverse position with the
engine running. Doing so may result in
drivetrain damage or unexpected ve-
hicle movement which could result in
serious vehicle damage or personal
injury.
● Do not attempt to test a 4WD equipped
vehicle on a 2-wheel dynamometer
(such as the dynamometers used by
some states, provinces or territories for
emissions testing) , or similar equip-
ment even if the other two wheels are
raised off the ground. Make sure you
inform test facility personnel that your
vehicle is equipped with 4WD before it
is placed on a dynamometer. Using the
wrong test equipment may result in
drivetrain damage or unexpected ve-
hicle movement which could result in
serious vehicle damage or personal
injury.
INCREASING FUEL ECONOMYUSING FOUR WHEEL DRIVE
(4WD)
5-22Starting and driving
Page 361 of 489
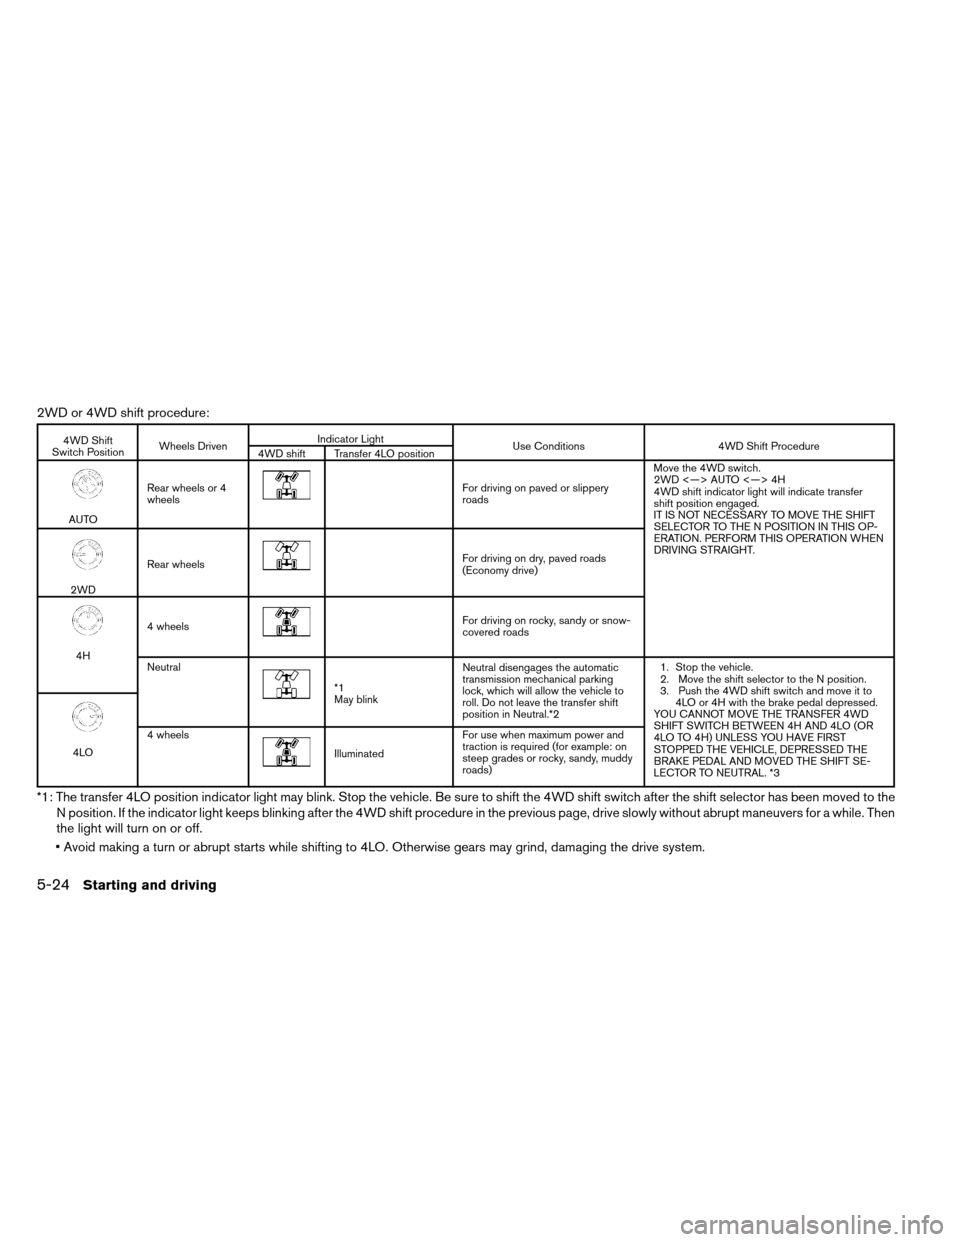
2WD or 4WD shift procedure:
4WD Shift
Switch Position Wheels Driven Indicator Light
Use Conditions 4WD Shift Procedure
4WD shift Transfer 4LO position
AUTO Rear wheels or 4
wheels
For driving on paved or slippery
roads Move the 4WD switch.
2WD <—> AUTO <—> 4H
4WD shift indicator light will indicate transfer
shift position engaged.
IT IS NOT NECESSARY TO MOVE THE SHIFT
SELECTOR TO THE N POSITION IN THIS OP-
ERATION. PERFORM THIS OPERATION WHEN
DRIVING STRAIGHT.
2WD
Rear wheels
For driving on dry, paved roads
(Economy drive)
4H4 wheels
For driving on rocky, sandy or snow-
covered roads
Neutral
*1
May blink Neutral disengages the automatic
transmission mechanical parking
lock, which will allow the vehicle to
roll. Do not leave the transfer shift
position in Neutral.*2 1. Stop the vehicle.
2. Move the shift selector to the N position.
3. Push the 4WD shift switch and move it to
4LO or 4H with the brake pedal depressed.
YOU CANNOT MOVE THE TRANSFER 4WD
SHIFT SWITCH BETWEEN 4H AND 4LO (OR
4LO TO 4H) UNLESS YOU HAVE FIRST
STOPPED THE VEHICLE, DEPRESSED THE
BRAKE PEDAL AND MOVED THE SHIFT SE-
LECTOR TO NEUTRAL. *3
4LO 4 wheelsIlluminated For use when maximum power and
traction is required (for example: on
steep grades or rocky, sandy, muddy
roads)
*1: The transfer 4LO position indicator light may blink. Stop the vehicle. Be sure to shift the 4WD shift switch after the shift selector has been moved to the
N position. If the indicator light keeps blinking after the 4WD shift procedure in the previous page, drive slowly without abrupt maneuvers for a while. Then
the light will turn on or off.
Avoid making a turn or abrupt starts while shifting to 4LO. Otherwise gears may grind, damaging the drive system.
5-24Starting and driving
Page 363 of 489
The transfer case 4WD shift switch is used to
select either 2WD or 4WD depending on the
driving conditions. There are four types of drive
modes available, AUTO, 2WD, 4H and 4LO.
The 4WD shift switch electronically controls the
transfer case operation. Rotate the switch to
move between each mode, 2WD, AUTO, 4H and
4LO.
You must push the switch in to select 4LO,
and the vehicle MUST be stationary and the
shift selector in the N position when chang-
ing into or out of 4LO.
WARNING
When parking, apply the parking brake
before stopping the engine and make sure
that the 4WD shift indicator light is on and
the ATP warning light goes off. Otherwise,
the vehicle could unexpectedly move even
if the automatic transmission is in the P
position.
CAUTION
●Never shift the 4WD shift switch be-
tween 4LO and 4H while driving.
● The 4H position provides greater trac-
tion. Avoid excessive speed, as it will
cause increased fuel consumption and
higher oil temperatures, and could
damage drivetrain components,
Speeds over 62 MPH (100 km/h) in 4H is
not recommended.
● The 4LO position provides maximum
power and traction. Avoid raising ve-
hicle speed excessively, as the maxi-
mum speed is approximately 31 MPH
(50 km/h) .
● When driving straight, shift the 4WD
shift switch to the 2WD, AUTO or 4H
position. Do not move the 4WD shift
switch when making a turn or reversing.
● Do not shift the 4WD shift switch (be-
tween 2WD, AUTO and 4H) while driving
on steep downhill grades. Use the en-
gine brake and low automatic transmis-
sion gears (D1 or D2) for engine
braking. ●
Do not operate the 4WD shift switch
(between 2WD, AUTO and 4H) with the
rear wheels spinning.
● Do not drive on dry hard surface roads
in the 4H or 4LO position. Driving on dry
hard surfaces in 4H or 4LO may cause
unnecessary noise and tire wear.
NISSAN recommends driving in the
2WD or AUTO position under these
conditions.
● The 4WD transfer case may not be
shifted between 4H and 4LO at low am-
bient temperatures and the transfer
4LO position indicator light may blink
even when the 4WD shift switch is
shifted. After driving for a while you can
change the 4WD transfer case between
4H and 4LO.
When driving on rough roads, ● Set the 4WD shift switch to AUTO, 4H or
4LO.
● Drive carefully according to the road surface
conditions.
5-26Starting and driving
Page 364 of 489
When the vehicle is stuck,● Set the 4WD shift switch to 4H or 4LO.
● If it is difficult to free the vehicle, repeat
forward and backward movement to in-
crease the movement.
● If the vehicle is stuck deep in mud, place
stones or wooden blocks under the tires.
Then try the recovery procedures above. Tire
chains may be effective.
CAUTION
● Do not spin the tires excessively. Tires
will sink deep into the mud, making it
difficult to free the vehicle.
● Avoid shifting gears with the engine
running at high speeds as this may
cause malfunction.
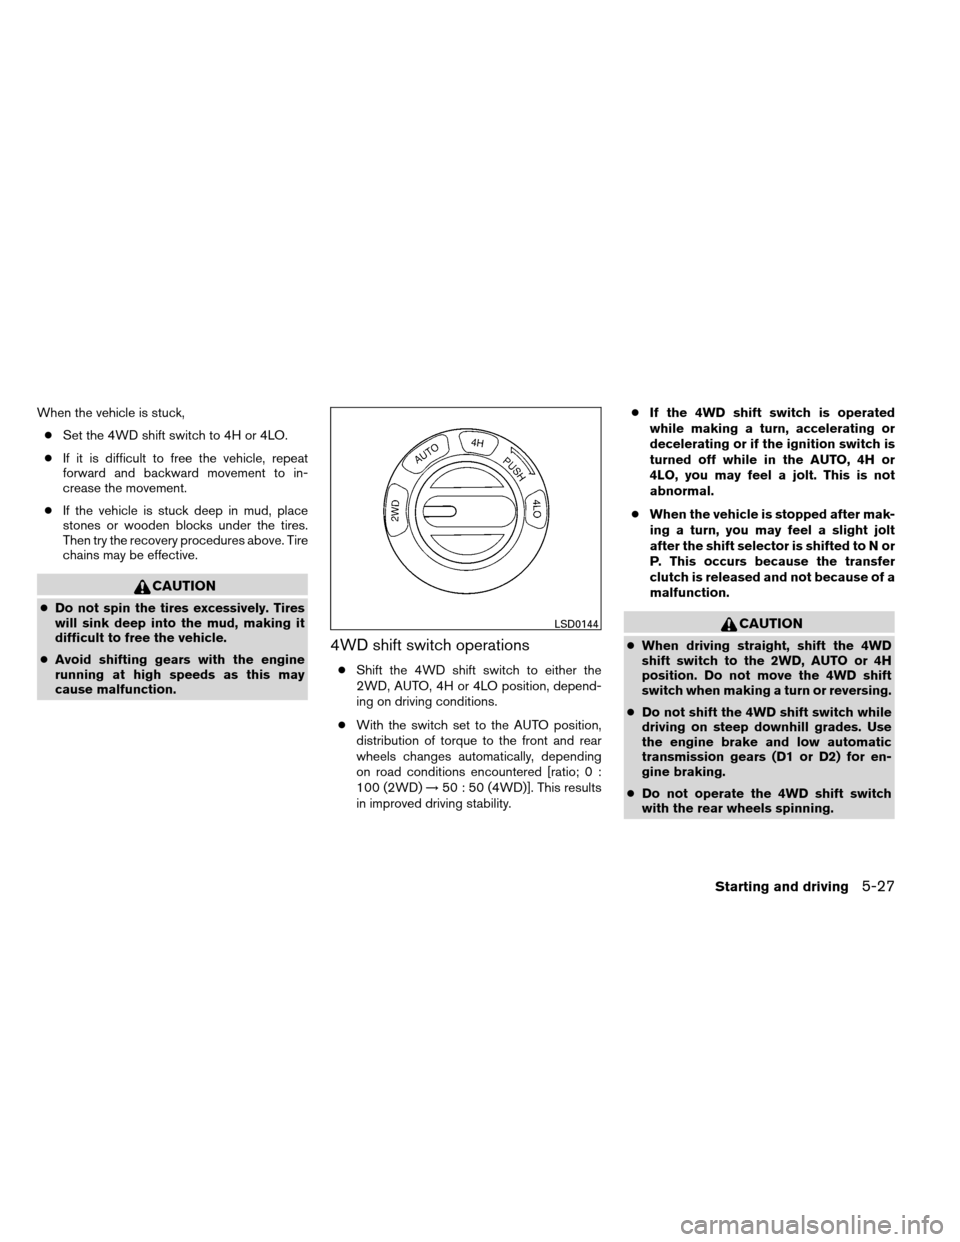
4WD shift switch operations
● Shift the 4WD shift switch to either the
2WD, AUTO, 4H or 4LO position, depend-
ing on driving conditions.
● With the switch set to the AUTO position,
distribution of torque to the front and rear
wheels changes automatically, depending
on road conditions encountered [ratio; 0 :
100 (2WD) →50 : 50 (4WD)]. This results
in improved driving stability. ●
If the 4WD shift switch is operated
while making a turn, accelerating or
decelerating or if the ignition switch is
turned off while in the AUTO, 4H or
4LO, you may feel a jolt. This is not
abnormal.
● When the vehicle is stopped after mak-
ing a turn, you may feel a slight jolt
after the shift selector is shifted to N or
P. This occurs because the transfer
clutch is released and not because of a
malfunction.
CAUTION
● When driving straight, shift the 4WD
shift switch to the 2WD, AUTO or 4H
position. Do not move the 4WD shift
switch when making a turn or reversing.
● Do not shift the 4WD shift switch while
driving on steep downhill grades. Use
the engine brake and low automatic
transmission gears (D1 or D2) for en-
gine braking.
● Do not operate the 4WD shift switch
with the rear wheels spinning.
LSD0144
Starting and driving5-27