Page 18 of 453
QR25DE engine
1. Power steering fluid reservoir (P. 8-14)
2. Engine oil filler cap (P. 8-10)
3. Brake fluid reservoir/Clutch fluidreservoir (M/T model) (P. 8-15, 8-15)
4. Air cleaner (P. 8-20)
5. Fuse block (P. 8-23)
6. Battery (P. 8-16)
7. Fuse/fusible link box (P. 8-23)
8. Engine oil dipstick (P. 8-10)
9. Radiator cap (P. 8-8)
10. Drive belt location (P. 8-18)
11. Engine coolant reservoir (P. 8-8)
12. Windshield-washer fluid reservoir
(P. 8-15)
See the page number indicated in paren-
theses for operating details.
Page 19 of 453
VQ35DE engine
1. Power steering fluid reservoir (P. 8-14)
2. Engine oil filler cap (P. 8-10)
3. Brake fluid reservoir/Clutch fluidreservoir (M/T model) (P. 8-15, 8-15)
4. Air cleaner (P. 8-20)
5. Fuse block (P. 8-23)
6. Battery (P. 8-16)
7. Fuse/fusible link box (P. 8-23)
8. Engine oil dipstick (P. 8-10)
9. Radiator cap (P. 8-8)
10. Drive belt location (P. 8-18)
11. Engine coolant reservoir (P. 8-8)
12. Windshield-washer fluid reservoir
(P. 8-15)
See the page number indicated in paren-
theses for operating details.
Page 98 of 453
Alert mode
The alert mode allows you to set alerts notifying
you of time to rest or icy conditions.
The time to rest alert lets you know when you
have been traveling for a long time and may need
a break.
The icy alert notifies you that icy driving condi-
tions may exist.Reset mode
The reset mode can be selected in any screen
that allows for preferences to be programmed.
Once the screen is selected, you have the option
to reset the selected distances or time to a new
setting.
Maintenance mode
The maintenance mode allows you to set alerts
for the reminding of maintenance intervals for the
following:
● tires
● oil
● filter
● other
Set a desired interval by pushing
Page 100 of 453
Indicators for maintenance
1. Engine oil replacement indicatorThis indicator appears when the customer
set distance comes for changing the engine
oil. You can set or reset the distance for
changing the engine oil. See “Maintenance
mode” earlier in this section.
2. Oil filter replacement indicator This indicator appears when the customer
set distance comes for replacing the oil filter.
You can set or reset the distance for replac-
ing the oil filter. See “Maintenance mode”
earlier in this section.
3. Tire replacement indicator This indicator appears when the customer
set distance comes for replacing tires. You
can set or reset the distance for replacing
tires. See “Maintenance mode” earlier in this
section.
Page 192 of 453

OPERATING TIPS
●When the engine coolant temperature and
outside air temperature are low, the air flow
from the foot outlets may not operate for a
maximum of 150 seconds. However, this is
not a malfunction. After the coolant tempera-
ture warms up, air flow from the foot outlets
will operate normally.
The sunload sensor, located on the top of the
instrument panel on the driver’s side, helps the
system maintain a constant temperature. Do not
put anything on or around this sensor. The air conditioner system in your NISSAN ve-
hicle is charged with a refrigerant designed with
the environment in mind.
This refrigerant does not harm the earth’s
ozone layer.
Special charging equipment and lubricant is re-
quired when servicing your NISSAN air condi-
tioner. Using improper refrigerants or lubricants
will cause severe damage to your air conditioner
system. See “Air conditioner system refrigerant
and oil recommendations” in the “Technical and
consumer information” section of this manual.
A NISSAN dealer is able to service your “environ-
mentally friendly” air conditioning system.
Page 335 of 453

CAUTION
During the first 1,200 miles (2,000 km) ,
follow these recommendations to obtain
maximum engine performance and en-
sure the future reliability and economy of
your new vehicle. Failure to follow these
recommendations may result in short-
ened engine life and reduced engine
performance.● Avoid driving for long periods at constant
speed, either fast or slow, and do not run the
engine over 4,000 rpm.
● Do not accelerate at full throttle in any gear.
● Avoid quick starts.
● Avoid hard braking as much as possible.
● Do not tow a trailer for the first 500 miles
(800 km) . Your engine, axle or other parts
could be damaged. ●
Accelerate slowly and smoothly. Maintain
cruising speeds with a constant accelerator
position.
● Drive at moderate speeds on the highway.
Driving at high speed lowers fuel economy.
● Avoid unnecessary stopping and braking.
Maintain a safe distance behind other ve-
hicles.
● Use a proper gear range which suits road
conditions. On level roads, shift into high
gear as soon as possible.
● Avoid unnecessary engine idling.
● Keep your engine tuned up.
● Follow the recommended periodic mainte-
nance schedule.
● Keep the tires inflated to the correct pres-
sure. Low tire pressure increases tire wear
and lowers fuel economy.
● Keep the wheels in correct alignment. Im-
proper alignment increases tire wear and
lowers fuel economy.
● Air conditioner operation lowers fuel
economy. Use the air conditioner only when
necessary. ●
When cruising at highway speeds, it is more
economical to use the air conditioner and
leave the windows closed to reduce drag.
● Use the recommended viscosity engine oil.
See “Capacities and recommended
fuel/lubricants” in the “Technical and con-
sumer information” section of this manual.
BREAK-IN SCHEDULE INCREASING FUEL ECONOMY
5-22Starting and driving
Page 360 of 453

REMOVING SPOTS
Remove tar and oil spots, industrial dust, insects,
and tree sap as quickly as possible from the
surface of the paint to avoid lasting damage or
staining. Special cleaning products are available
at a NISSAN dealer or any automotive accessory
store.
UNDERBODY
In areas where road salt is used in winter, it is
necessary to clean the underbody regularly in
order to prevent dirt and salt from building up and
causing the acceleration of corrosion on the un-
derbody and suspension. Before the winter pe-
riod and again in the spring, the underseal must
be checked and, if necessary, retreated.
GLASS
When cleaning the rear window, it may be easier
to clean if the high-mounted stop light (if so
equipped) is removed first.
Be careful when removing the high-mounted
stop light to reduce the risk of damaging the
high-mounted stop light wires.
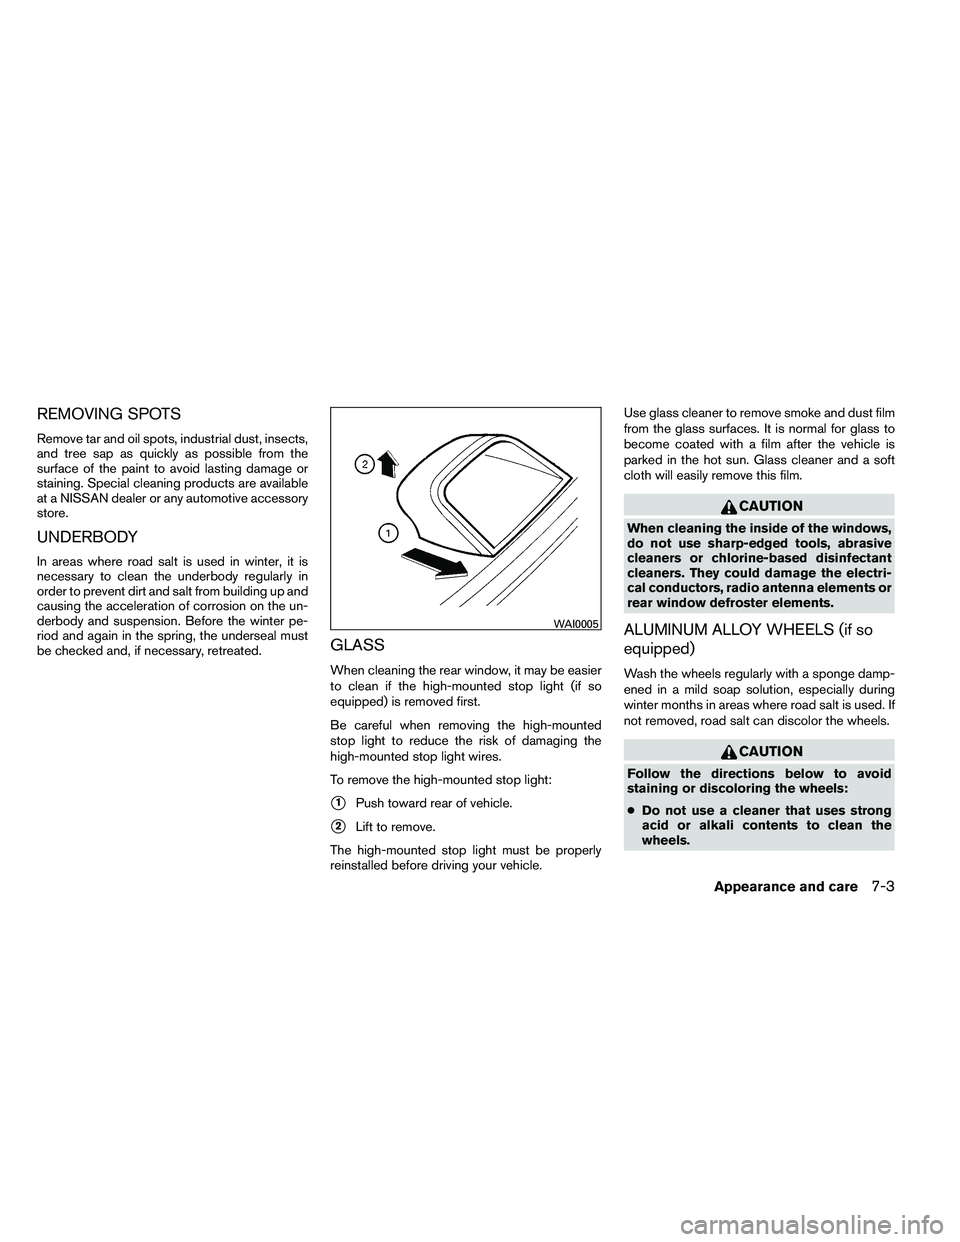
To remove the high-mounted stop light:
�1Push toward rear of vehicle.
�2Lift to remove.
The high-mounted stop light must be properly
reinstalled before driving your vehicle. Use glass cleaner to remove smoke and dust film
from the glass surfaces. It is normal for glass to
become coated with a film after the vehicle is
parked in the hot sun. Glass cleaner and a soft
cloth will easily remove this film.
Page 361 of 453

●Do not apply wheel cleaners to the
wheels when they are hot. The wheel
temperature should be the same as am-
bient temperature.
● Rinse the wheel to completely remove
the cleaner within 15 minutes after the
cleaner is applied.
CHROME PARTS
Clean all chrome parts regularly with a non-
abrasive chrome polish to maintain the finish.
TIRE DRESSINGS
NISSAN does not recommend the use of tire
dressings. Tire manufacturers apply a coating to
the tires to help reduce discoloration of the rub-
ber. If a tire dressing is applied to the tires, it may
react with the coating and form a compound. This
compound may come off the tire while driving and
stain the vehicle paint.
If you choose to use a tire dressing, take the
following precautions:
● Use a water-based tire dressing. The coat-
ing on the tire dissolves more easily than
with an oil-based tire dressing. ●
Apply a light coat of tire dressing to help
prevent it from entering the tire
tread/grooves (where it would be difficult to
remove) .
● Wipe off excess tire dressing using a dry
towel. Make sure the tire dressing is com-
pletely removed from the tire tread/grooves.
● Allow the tire dressing to dry as recom-
mended by the tire dressing manufacturer. Occasionally remove loose dust from the interior
trim, plastic parts and seats using a vacuum
cleaner or soft bristled brush. Wipe the vinyl and
leather surfaces with a clean, soft cloth damp-
ened in mild soap solution, then wipe clean with a
dry, soft cloth.
Regular care and cleaning is required in order to
maintain the appearance of the leather.
Before using any fabric protector, read the manu-
facturer’s recommendations. Some fabric pro-
tectors contain chemicals that may stain or
bleach the seat material.
Use a cloth dampened only with water to clean
the meter and gauge lens.