Page 352 of 454

Always refer to the proper illustrations for the
correct placement and jack-up points for your
specific vehicle model and jack type.
Carefully read the caution label attached to
the jack body and the following instruc-
tions.1. Loosen each wheel nut one or two turns by turning counterclockwise with the wheel nut
wrench. Do not remove the wheel nuts
until the tire is off the ground.
2. Place the jack directly under the jack-up point as illustrated so the top of the jack
contacts the vehicle at the jack-up point.
Align the jack head between the two notches in the front or the rear as shown.
Also fit the groove of the jack head between
the notches as shown.
The jack should be used on firm and
level ground.
3. To lift the vehicle, securely hold the jack lever and rod with both hands. Carefully raise the
vehicle until the tire clears the ground. Re-
move the wheel nuts, and then remove the
tire.Installing the spare tire
The spare tire is designed for emergency
use. See specific instructions under the
heading “Wheels and tires” in the “Mainte-
nance and do-it-yourself” section of this
manual.
1. Clean any mud or dirt from the surface be- tween the wheel and hub.
2. Carefully put the spare tire on and tighten the wheel nuts finger tight.
3. With the wheel nut wrench, tighten wheel nuts alternately and evenly as illustrated until
they are tight.
LCE0020WCE0056
In case of emergency6-7
Page 378 of 454
CAUTION
Oil level should be checked regularly. Op-
erating the engine with an insufficient
amount of oil can damage the engine, and
such damage is not covered by warranty.
CHANGING ENGINE OIL
1. Park the vehicle on a level surface and applythe parking brake.
2. Start the engine and let it idle until it reaches operating temperature, then turn it off.
3. Remove the oil filler
�Acap by turning it
counterclockwise.
4. Place a large drain pan under the drain plug
�B. 5. Remove the drain plug
�Bwith a wrench by
turning it counterclockwise and completely
drain the oil.
If the oil filter is to be changed, remove and
replace it at this time. See “Changing engine
oil filter” in this section.
● Waste oil must be disposed of prop-
erly.
● Check your local regulations.
QR25DE
WDI0492
VQ35DE
WDI0493
Maintenance and do-it-yourself8-11
Page 379 of 454

WARNING
●Prolonged and repeated contact with
used engine oil may cause skin cancer.
● Try to avoid direct skin contact with
used oil. If skin contact is made, wash
thoroughly with soap or hand cleaner
as soon as possible.
● Keep used engine oil out of reach of
children.
CAUTION
Be careful not to burn yourself. The engine
oil may be hot.
6. Clean and reinstall the drain plug and a new washer. Securely tighten the drain plug with
a wrench. Do not use excessive force.
Drain plug tightening torque: 22 - 29 ft-lb (29 - 39 N·m)
7. Refill engine with recommended oil through the oil filler opening, then install the oil filler
cap securely.
See “Capacities and recommended
fuel/lubricants” in the “Technical and con-
sumer information” section of this manual for
drain and refill capacity. The drain and refill capacity depends on the
oil temperature and drain time. Use these
specifications for reference only. Always use
the dipstick to determine when the proper
amount of oil is in the engine.
8. Start the engine. Check for leakage around the drain plug and oil filter. Correct as re-
quired.
9. Turn the engine off and wait more than 10 minutes. Check the oil level with the dipstick.
Add engine oil if necessary.
CHANGING ENGINE OIL FILTER
1. Park the vehicle on a level surface and applythe parking brake.
2. Turn the engine off.
3. Place a large drain pan under the oil filter
�A.
4. Loosen the oil filter
�Awith an oil filter
wrench by turning it counterclockwise. Then
remove the oil filter by turning it by hand.
QR25DE
WDI0494
8-12Maintenance and do-it-yourself
Page 402 of 454
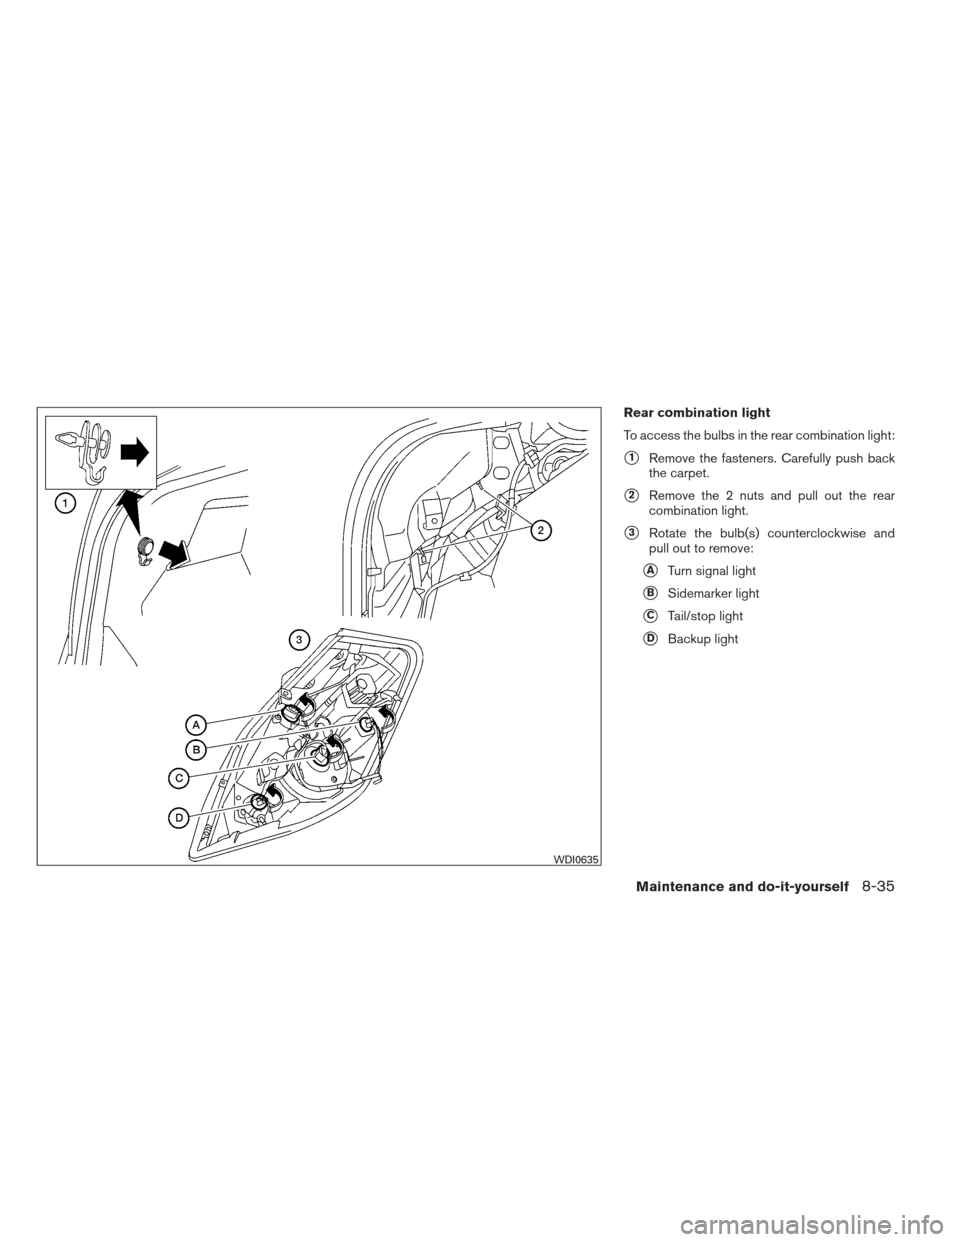
Rear combination light
To access the bulbs in the rear combination light:
�1Remove the fasteners. Carefully push back
the carpet.
�2Remove the 2 nuts and pull out the rear
combination light.
�3Rotate the bulb(s) counterclockwise and
pull out to remove:
�ATurn signal light
�BSidemarker light
�CTail/stop light
�DBackup light
WDI0635
Maintenance and do-it-yourself8-35
Page 447 of 454

Precautions on child
restraints.........1-22,1-28,1-33,1-37
Top tether strap anchor point locations . .1-26
Child safety rear door lock ............3-6
Chimes, audible reminders ...........2-16
Cleaningexteriorandinterior...........7-2
Clock ...................4-45,4-50 (models with navigation system) .......4-8
(models without navigation system) ....4-45
Clockset..................4-8,4-45
Clutch Clutchfluid..................8-15
C.M.V.S.S. certification label ..........9-10
Cold weather driving ..............5-28
Compact disc (CD) player ........4-46,4-52,
4-63, 4-69
Compass display .................2-6
Console box ...................2-41
Console light ...................2-49
Continuously Variable Transmission (CVT). . .5-12 Continuously Variable Transmission
(CVT) fluid ..................8-13
Driving with Continuously Variable
Transmission (CVT) .............5-12
Transmission shift selector lock release . .5-16
Controlpanelbuttons...............4-2 Brightness/contrast button .........4-12
Enterbutton..................4-2
Setting button .................4-6
Controls Heater and air conditioner
controls ................4-19,4-26
Coolant Capacities and recommended
fuel/lubricants .................9-2
Changing engine coolant ...........8-9 Checking engine coolant level
........8-9
Engine coolant temperature gauge .....2-5
Corrosion protection ...............7-6
Cruisecontrol..................5-20
Cupholders................2-39,2-40
D
Daytime running light system (Canada only) . .2-32
Defroster switch Rear window and outside mirror defroster
switch.....................2-28
Digital Versatile Disc (DVD) player .......4-68
Dimensionsandweights.............9-8
Dimmer switch for instrument panel ......2-33
Display controls (see control panel buttons) . .4-2
Door locks .....................3-4
Drive belt .....................8-18
Driving Cold weather driving ............5-28
Driving with Continuously Variable
Transmission (CVT) .............5-12
Driving with manual transmission ......5-17
Precautions when starting and driving ....5-2
E
Economy - fuel ..................5-22
Emission control information label .......9-11
Emission control system warranty .......9-25
Engine Before starting the engine ..........5-10
Block heater .................5-29 Capacities and recommended
fuel/lubricants
.................9-2
Changingenginecoolant...........8-9
Changingengineoil.............8-11
Changing engine oil filter ..........8-12
Checking engine coolant level ........8-9
Checking engine oil level ..........8-10
Engine compartment check locations ....8-6
Engine coolant temperature gauge .....2-5
Engine cooling system ............8-8
Engine
oil ...................8-10
Engine oil and oil filter recommendation . . .9-5
Engine oil pressure warning light ......2-12
Engine oil viscosity ..............9-5
Engine serial number ............9-10
Engine specifications .............9-7
Starting the engine .............5-11
Enterbutton....................4-2
Eventdatarecorders ..............9-26
Exhaust gas (Carbon monoxide) .........5-2
Extended storage switch ............8-26
Eyeglass case ..................2-38
F
Flashers
(See hazard warning flasher switch) ......2-34
Flat tire .......................6-2
Floor mat positioning aid .............7-5
Fluid Brake fluid ..................8-14
Capacities and recommended
fuel/lubricants .................9-2
Clutch fluid ..................8-15
10-2