2012 NISSAN ALTIMA COUPE trunk release
[x] Cancel search: trunk releasePage 12 of 454
Coupe
1. Rear window and outside mirror(if so equipped) defroster switch
(P. 2-28)
2. Interior trunk lid release (P. 3-25)
3. Trunk lid (P. 3-24)
4. Vehicle loading (P. 9-12)
5. Opener operation (P. 3-24)
6. Replacing bulbs (P. 8-28)
7. Fuel-filler cap, fuel recommendation
(P. 3-26, P. 9-3)
8. Fuel-filler door (P. 3-26)
WII0125
EXTERIOR REAR
Illustrated table of contents0-5
Page 13 of 454
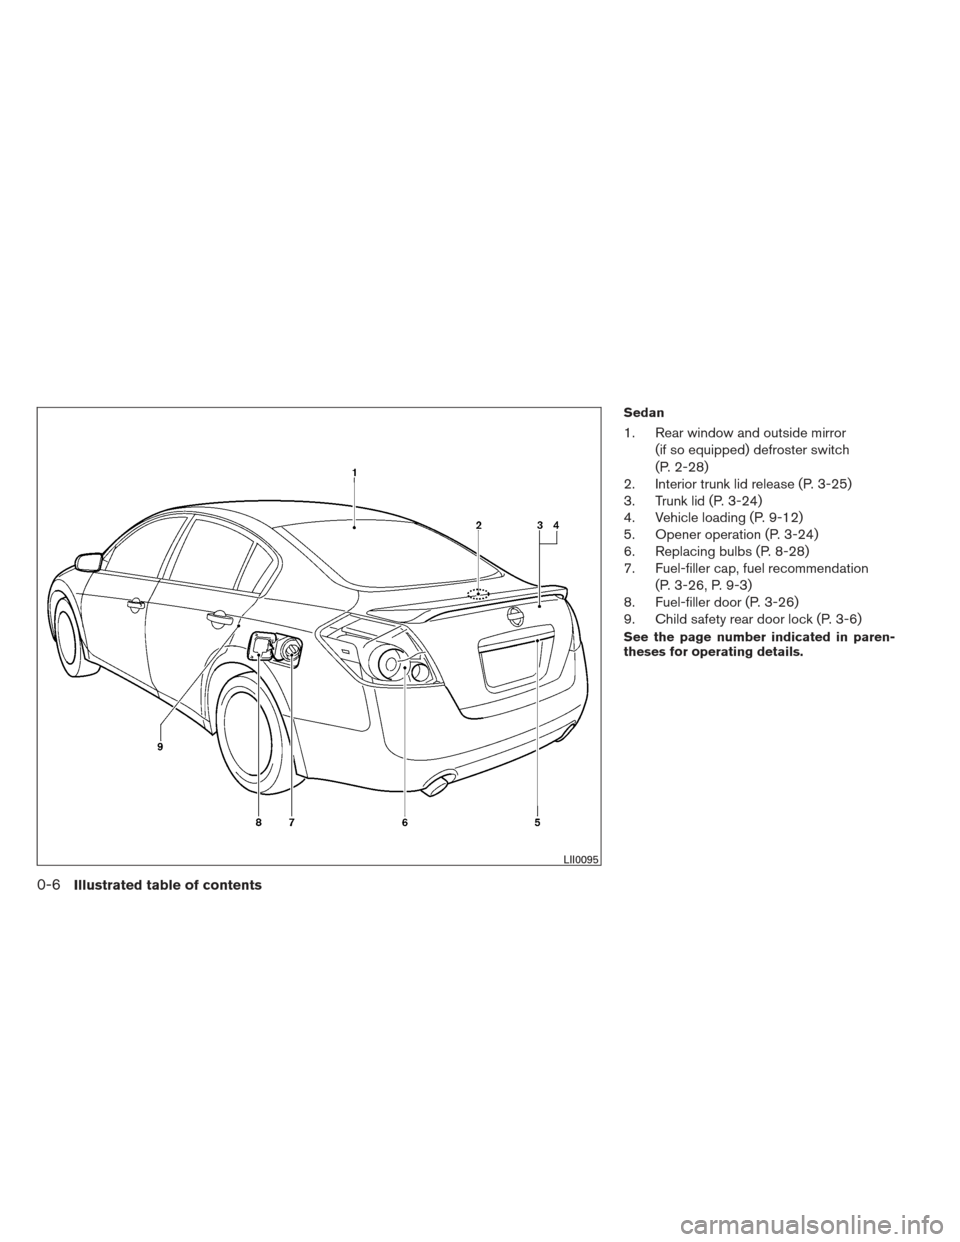
Sedan
1. Rear window and outside mirror(if so equipped) defroster switch
(P. 2-28)
2. Interior trunk lid release (P. 3-25)
3. Trunk lid (P. 3-24)
4. Vehicle loading (P. 9-12)
5. Opener operation (P. 3-24)
6. Replacing bulbs (P. 8-28)
7. Fuel-filler cap, fuel recommendation
(P. 3-26, P. 9-3)
8. Fuel-filler door (P. 3-26)
9. Child safety rear door lock (P. 3-6)
See the page number indicated in paren-
theses for operating details.
LII0095
0-6Illustrated table of contents
Page 16 of 454
20. Vehicle information display controls(P. 2-17)
21. Hood release (P. 3-24)
22. Trunk opener (P. 3-24) Vehicle Dynamic Control (VDC) OFF
switch (P. 2-36)
NISSAN Intelligent Key™ port (P. 5-7)
*: Refer to the separate Navigation System Own-
er’s Manual (if so equipped) .
See the page number indicated in paren-
theses for operating details.
Illustrated table of contents0-9
Page 27 of 454
FOLDING REAR SEAT
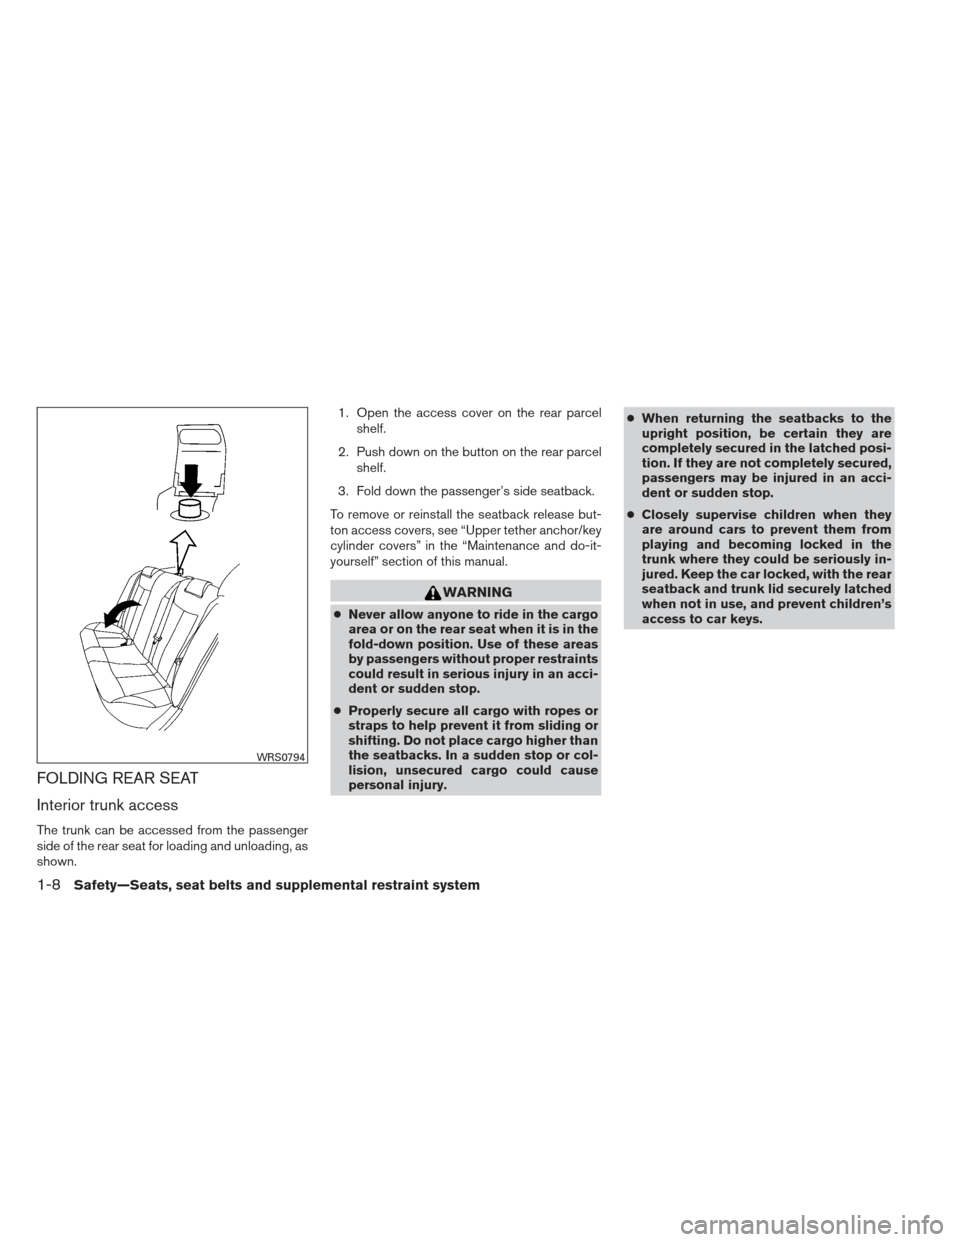
Interior trunk access
The trunk can be accessed from the passenger
side of the rear seat for loading and unloading, as
shown.1. Open the access cover on the rear parcel
shelf.
2. Push down on the button on the rear parcel shelf.
3. Fold down the passenger’s side seatback.
To remove or reinstall the seatback release but-
ton access covers, see “Upper tether anchor/key
cylinder covers” in the “Maintenance and do-it-
yourself” section of this manual.
WARNING
● Never allow anyone to ride in the cargo
area or on the rear seat when it is in the
fold-down position. Use of these areas
by passengers without proper restraints
could result in serious injury in an acci-
dent or sudden stop.
● Properly secure all cargo with ropes or
straps to help prevent it from sliding or
shifting. Do not place cargo higher than
the seatbacks. In a sudden stop or col-
lision, unsecured cargo could cause
personal injury. ●
When returning the seatbacks to the
upright position, be certain they are
completely secured in the latched posi-
tion. If they are not completely secured,
passengers may be injured in an acci-
dent or sudden stop.
● Closely supervise children when they
are around cars to prevent them from
playing and becoming locked in the
trunk where they could be seriously in-
jured. Keep the car locked, with the rear
seatback and trunk lid securely latched
when not in use, and prevent children’s
access to car keys.
WRS0794
1-8Safety—Seats, seat belts and supplemental restraint system
Page 80 of 454
20. Vehicle information display controls(P. 2-17)
21. Hood release (P. 3-24)
22. Trunk opener (P. 3-24) Vehicle Dynamic Control (VDC) OFF
switch (P. 2-36)
NISSAN Intelligent Key™ port (P. 5-7)
*: Refer to the separate Navigation System Own-
er’s Manual (if so equipped) .
See the page number indicated in paren-
theses for operating details.
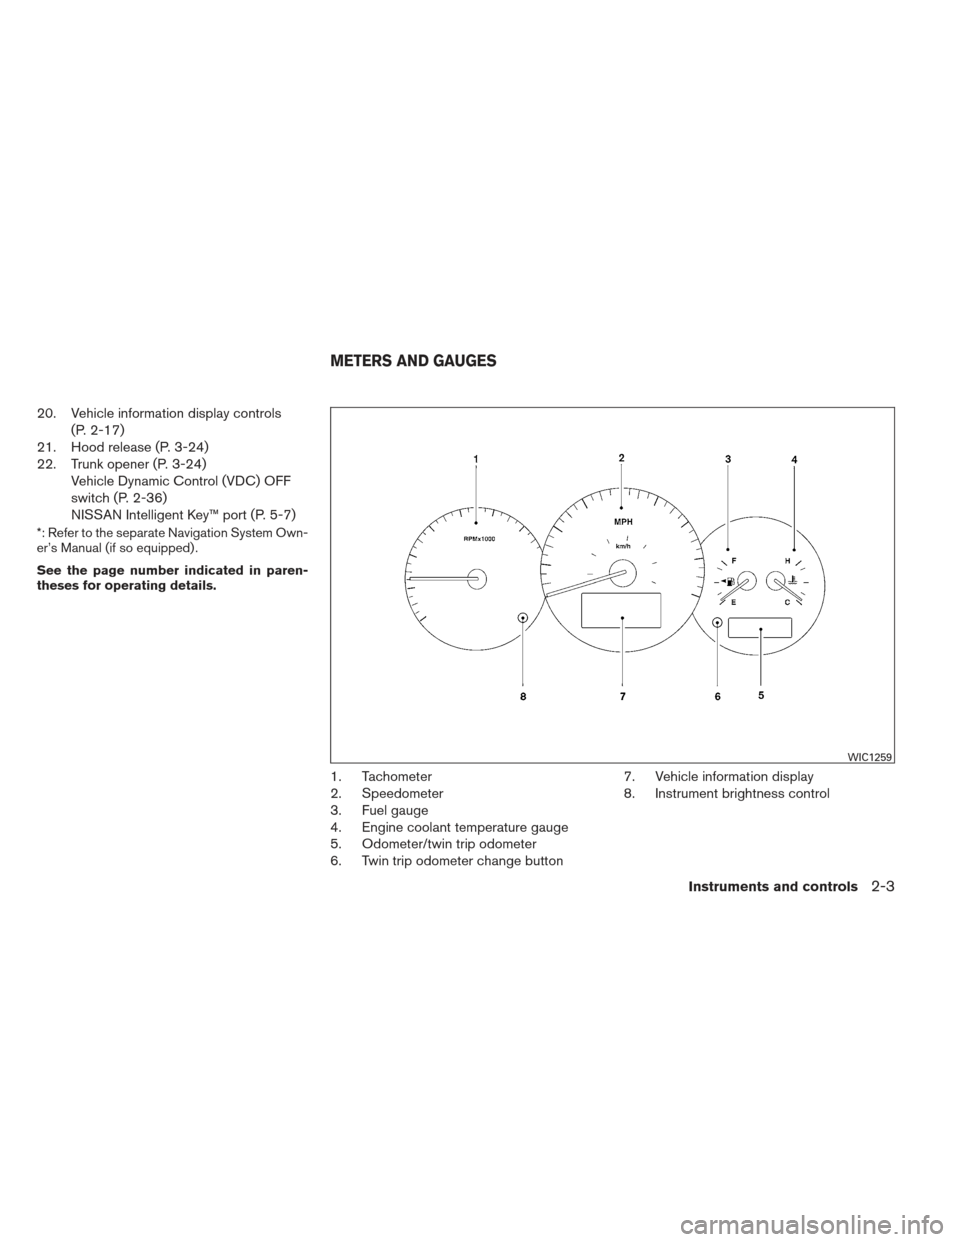
1. Tachometer
2. Speedometer
3. Fuel gauge
4. Engine coolant temperature gauge
5. Odometer/twin trip odometer
6. Twin trip odometer change button 7. Vehicle information display
8. Instrument brightness control
WIC1259
METERS AND GAUGES
Instruments and controls2-3
Page 91 of 454
●No key warning
● Low fuel warning
● Low windshield-washer fluid warning
● Parking brake release warning
● Door/trunk open warning
● Loose fuel cap
● Check tire pressure warning
Seat belt warning light and
chime
The light and chime remind you to fasten your
seat belts. The light illuminates whenever the
ignition switch is placed in the ON or START
position and remains illuminated until the driver’s
seat belt is fastened. At the same time, the chime
sounds for about 6 seconds unless the driver’s
seat belt is securely fastened.
The seat belt warning light may also illuminate if
the front passenger’s seat belt is not fastened
when the front passenger’s seat is occupied. For
7 seconds after the ignition switch is placed in
the ON position, the system does not activate the
warning light for the front passenger.
Refer to “Seat belts” in the “Safety—Seats, seat
belts and supplemental restraint system” section
for precautions on seat belt usage.
Supplemental air bag warninglight
When the ignition switch is placed in the ON or
START position, the supplemental air bag warn-
ing light illuminates for about 7 seconds and then
turns off. This means the system is operational.
If any of the following conditions occur, the front
air bag, side air bag, curtain air bag, and preten-
sioner systems need servicing and your vehicle
must be taken to a NISSAN dealer:
● The supplemental air bag warning light re-
mains on after approximately 7 seconds.
● The supplemental air bag warning light
flashes intermittently.
● The supplemental air bag warning light does
not come on at all.
Unless checked and repaired, the supplemental
restraint system (air bag system) and/or the pre-
tensioners may not function properly. For addi-
tional details, see “Supplemental restraint sys-
tem” in the “Safety—Seats, seat belts and
supplemental restraint system” section of this
manual.
WARNING
If the supplemental air bag warning light
is on, it could mean that the front air bag,
side air bag, curtain air bag systems
and/or pretensioner systems will not op-
erate in an accident. To help avoid injury
to yourself or others, have your vehicle
checked by a NISSAN dealer as soon as
possible.
INDICATOR LIGHTS
For additional information on warnings and indi-
cators, see “Vehicle information display” later in
this section.
Continuously Variable Transmission (CVT) position
indicator light (if so equipped)
When the ignition switch is placed in the ON
position, this indicator light shows the shift selec-
tor position. See “Driving the vehicle” in the
“Starting and driving” section of this manual.
2-14Instruments and controls
Page 103 of 454
The system helps deter vehicle theft but cannot
prevent it, nor can it prevent the theft of interior or
exterior vehicle components in all situations. Al-
ways secure your vehicle even if parking for a
brief period. Never leave your Intelligent Key in
the vehicle, and always lock the vehicle when
unattended. Be aware of your surroundings, and
park in secure, well-lit areas whenever possible.
Many devices offering additional protection, such
as component locks, identification markers, and
tracking systems, are available at auto supply
stores and specialty shops. Your NISSAN dealer
may also offer such equipment. Check with your
insurance company to see if you may be eligible
for discounts for various theft protection features.
How to arm the vehicle security
system
1. Close all windows.(The system can be
armed even if the windows are open.)
2. Remove the Intelligent Key from the vehicle.
3. Close all doors, hood and trunk. Lock all doors. The doors can be locked with the
Intelligent Key, door handle request switch
(if so equipped) , power door lock switch or
mechanical key. 4. Confirm that the security indicator light
comes on. The security light stays on for
about 30 seconds. The vehicle security sys-
tem is now pre-armed. After about 30 sec-
onds the vehicle security system automati-
cally shifts into the armed phase. The
security light begins to flash once every 3
seconds. If, during the 30-second pre-arm
time period, the driver’s door is unlocked by
the key or the keyfob, or the ignition switch is
placed in the ACC or ON position, the sys-
tem will not arm.
● Even when the driver and/or passen-
gers are in the vehicle, the system will
activate with all the doors, hood and
trunk lid locked with the ignition
switch placed in the LOCK position.
When placing the ignition switch in the
ACC or ON position, the system will be
released.
Vehicle security system activation
The vehicle security system will give the following
alarm:
● The headlights blink and the horn sounds
intermittently. ●
The alarm automatically turns off after a pe-
riod of time. However, the alarm reactivates if
the vehicle is tampered with again. The alarm
can be shut off by unlocking the driver’s door
or trunk lid with the key, or by pressing
the
button on the Intelligent Key.
The alarm is activated by: ● opening the door or trunk lid without using
the key or Intelligent Key (even if the door is
unlocked by releasing the door inside lock
switch) .
How to stop an activated alarm
The alarm stops only by unlocking the driver’s
door or the trunk lid with the key, pressing
the
button on the Intelligent Key, or press-
ing the request switch (if so equipped) on the
driver’s or passenger’s door with the Intelligent
Key in range of the door handle.
2-26Instruments and controls
Page 134 of 454
3 Pre-driving checks and adjustments
Keys .............................................3-2NISSAN Intelligent Key™ ........................3-2
NISSAN Vehicle Immobilizer System keys .........3-3
Doors ............................................3-4
Locking with key ................................3-4
Locking with inside lock knob ....................3-5
Locking with power door lock switch .............3-5
Automatic door locks ...........................3-5
Child safety rear door lock (Sedan only) ...........3-6
NISSAN Intelligent Key™ With Door and Trunk
Request Switches .................................3-6
Operating range ................................3-8
Door locks/unlocks precaution ...................3-9
NISSAN Intelligent Key™ operation ...............3-9
How to use the remote keyless entry
function ...................................... 3-12
Warning signals ............................... 3-15
Troubleshooting guide ......................... 3-16
NISSAN Intelligent Key™ Without Door and Trunk
Request Switches ................................ 3-18
Operating range ............................... 3-19How to use the remote keyless entry
function
...................................... 3-19
Warning signals ............................... 3-22
Troubleshooting guide ......................... 3-23
Hood ........................................... 3-24
Trunk lid ......................................... 3-24
Opener operation .............................. 3-24
Interior trunk lid release ........................ 3-25
Fuel-filler door ................................... 3-26
Opener operation .............................. 3-26
Fuel-filler cap . . ............................... 3-26
Tilt/telescopic steering ............................ 3-29
Tilt operation .................................. 3-29
Telescopic operation ........................... 3-29
Sun visors ....................................... 3-29
Vanity mirrors (if so equipped) ...................3-30
Mirrors .......................................... 3-30
Rearview mirror (if so equipped) .................3-30
Automatic anti-glare rearview mirror
(if so equipped) ............................... 3-31
Outside mirrors ............................... 3-32