2012 NISSAN 370Z COUPE belt
[x] Cancel search: beltPage 295 of 427
.Make sure the area around the vehicle is
clear.
. Check fluid levels such as engine oil, cool-
ant, brake fluid and window washer fluid as
frequently as possible, or at least whenever
you refuel.
. Check that all windows and lights are clean.
. Visually inspect tires for their appearance
and condition. Also check tires for proper
inflation.
. Lock all doors.
. Position seat and adjust head restraints.
. Adjust inside and outside mirrors.
. Fasten seat belts and ask all passengers to
do likewise.
. Check the operation of warning lights when
the ignition switch is pushed to the ON
position. (See “Warning/indicator lights and
audible reminders” (P.2-9) .) 1. Apply the parking brake.
2.
Automatic Transmission (AT) model:
Move the selector lever to the P (Park) or N
(Neutral) position. (P is recommended.)
The starter is designed not to operate unless
the selector lever is in either of the above
positions.
Manual Transmission (MT) model:
Move the shift lever to the N (Neutral)
position. Depress the clutch pedal fully to
the floor.
The starter is designed not to operate unless
the clutch pedal is fully depressed.
The Intelligent Key must be carried
when operating the ignition switch.
3. Push the ignition switch to the ON position. Depress the brake pedal (AT model) or the
clutch pedal (MT model) and push the
ignition switch to start the engine.
To start the engine immediately, push and
release the ignition switch while depressing
the brake pedal with the ignition switch in
any position.
.If the engine is very hard to start inextremely cold weather or when restart-
ing, depress the accelerator pedal a little
(approximately 1/3 to the floor) and while
holding, crank the engine. Release the accelerator pedal when the engine starts.
.If the engine is very hard to start because
it is flooded, depress the accelerator
pedal all the way to the floor and hold it.
Push the ignition switch to the ON
position to start cranking the engine.
After 5 or 6 seconds, stop cranking by
pushing the ignition switch to OFF. After
cranking the engine, release the accel-
erator pedal. Crank the engine with your
foot off the accelerator pedal by
depressing the brake pedal and pushing
the push-button ignition switch to start
the engine. If the engine starts, but fails
to run, repeat the above procedure.
CAUTION
Do not operate the starter for more
than 15 seconds at a time. If the engine
does not start, push the ignition switch
to OFF and wait 10 seconds before
cranking again, otherwise the starter
could be damaged.
4. Warm-up
Allow the engine to idle for at least 30
seconds after starting. Do not race the
engine while warming it up. Drive at
Starting and driving5-11
BEFORE STARTING THE ENGINE STARTING THE ENGINE
Page 309 of 427
4. Push the ignition switch to the OFF position.
WARNING
If the engine is not running or is turned
off while driving, the power assist for
the steering will not work. Steering will
be harder to operate.
The power assisted steering uses a hydraulic
pump, driven by the engine, to assist steering.
If the engine stops or the drive belt breaks, you
will still have control of the vehicle. However,
much greater steering effort is needed, espe-
cially in sharp turns and at low speeds.
BRAKING PRECAUTIONS
The brake system has two separate hydraulic
circuits. If one circuit malfunctions, you will still
have braking at two wheels.
Vacuum assisted brakes
The brake booster aids braking by using engine
vacuum. If the engine stops, you can stop the
vehicle by depressing the brake pedal. However,
greater foot pressure on the brake pedal will be
required to stop the vehicle and the stopping
distance will be longer.
When the brake pedal is depressed slowly and
firmly, you may hear a clicking noise and feel a
slight pulsation. This is normal and indicates that
the Brake Assist System is operating.
Wet brakes
When the vehicle is washed or driven through
water, the brakes may get wet. As a result, your
braking distance will be longer and the vehicle
may pull to one side during braking.
To dry brakes, drive the vehicle at a safe speed
while lightly tapping the brake pedal to heat-up
the brakes. Do this until the brakes return to
normal. Avoid driving the vehicle at high speeds
until the brakes function correctly.
Starting and driving5-25
POWER STEERING BRAKE SYSTEM
Page 322 of 427
6-4In case of emergency
MCE0001A
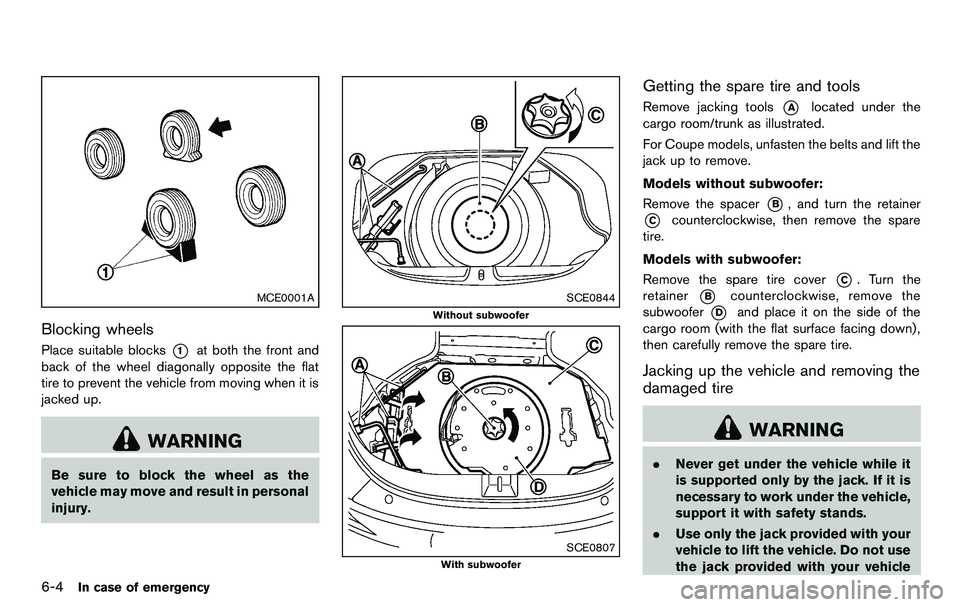
Blocking wheels
Place suitable blocks*1at both the front and
back of the wheel diagonally opposite the flat
tire to prevent the vehicle from moving when it is
jacked up.
WARNING
Be sure to block the wheel as the
vehicle may move and result in personal
injury.
SCE0844
Without subwoofer
SCE0807
With subwoofer
Getting the spare tire and tools
Remove jacking tools*Alocated under the
cargo room/trunk as illustrated.
For Coupe models, unfasten the belts and lift the
jack up to remove.
Models without subwoofer:
Remove the spacer
*B, and turn the retainer
*Ccounterclockwise, then remove the spare
tire.
Models with subwoofer:
Remove the spare tire cover
*C. Turn the
retainer
*Bcounterclockwise, remove the
subwoofer
*Dand place it on the side of the
cargo room (with the flat surface facing down) ,
then carefully remove the spare tire.
Jacking up the vehicle and removing the
damaged tire
WARNING
. Never get under the vehicle while it
is supported only by the jack. If it is
necessary to work under the vehicle,
support it with safety stands.
. Use only the jack provided with your
vehicle to lift the vehicle. Do not use
the jack provided with your vehicle
Page 335 of 427
2. Turn off the air conditioner. Open all thewindows, move the heater or air conditioner
temperature control to maximum hot and fan
control to high speed.
3. If engine overheating is caused by climbing a long hill on a hot day, run the engine at a
fast idle (approximately 1,500 rpm) until the
temperature gauge indication returns to
normal.
4. Get out of the vehicle. Look and listen for steam or coolant escaping from the radiator
before opening the hood. (If steam or
coolant is escaping, turn off the engine.)
Do not open the hood further until no steam
or coolant can be seen.
5. Open the engine hood.
WARNING
If steam or water is coming from the
engine, stand clear to prevent getting
burned.
6. Visually check if the cooling fan is running. The radiator hoses and radiator should not
leak water. If coolant is leaking or the cooling
fan does not run, stop the engine.
WARNING
Be careful not to allow your hands, hair,
jewelry or clothing to come into contact
with, or get caught in, engine belts or
the engine cooling fan. The engine
cooling fan can start at any time.
7. After the engine cools down, check the coolant level in the reservoir with the engine
running. Add coolant to the reservoir if
necessary. Have your vehicle repaired at
the nearest NISSAN dealer.
In case of emergency6-17
Page 343 of 427
7 Appearance and care
Cleaning exterior ....................................................................... 7-2Washing ........................................................................\
......... 7-2
Soft top care and cleaning (Roadster models) ........... 7-3
Waxing ........................................................................\
........... 7-4
Removing spots ................................................................... 7-4
Underbody ........................................................................\
..... 7-4
Glass ........................................................................\
.............. 7-4
Wheels ........................................................................\
........... 7-4
Chrome parts ....................................................................... 7-5
Tire dressing ........................................................................\
. 7-5 Cleaning interior ....................................................................... 7-5
Air fresheners ..................................................................... 7-6
Floor mats ........................................................................\
... 7-6
Seat belts ........................................................................\
.... 7-7
Corrosion protection ................................................................ 7-8 Most common factors contributing to
vehicle corrosion ............................................................... 7-8
Environmental factors influence the rate
of corrosion ........................................................................\
7-8
To protect your vehicle from corrosion ....................... 7-8
Page 349 of 427
SAI0044
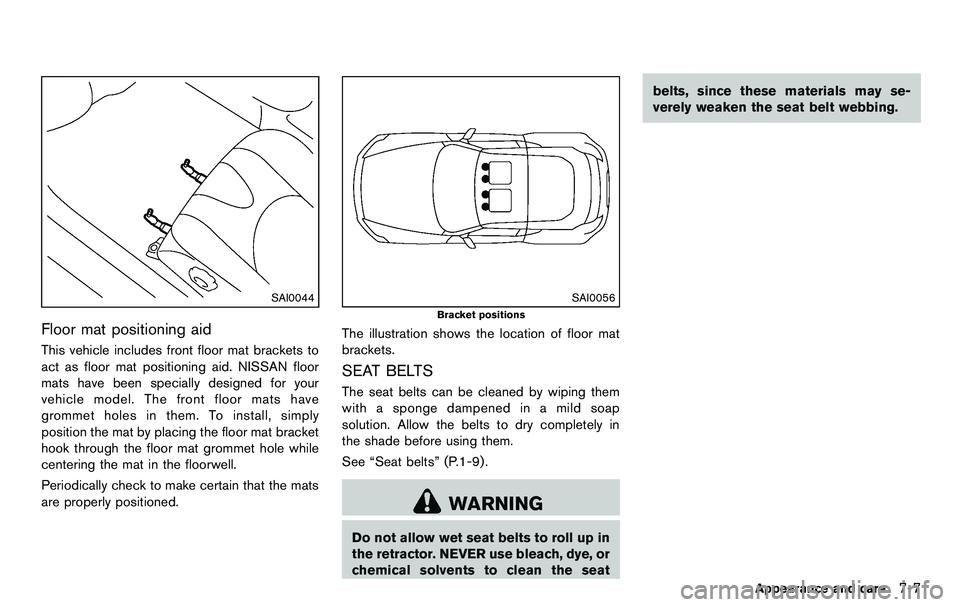
Floor mat positioning aid
This vehicle includes front floor mat brackets to
act as floor mat positioning aid. NISSAN floor
mats have been specially designed for your
vehicle model. The front floor mats have
grommet holes in them. To install, simply
position the mat by placing the floor mat bracket
hook through the floor mat grommet hole while
centering the mat in the floorwell.
Periodically check to make certain that the mats
are properly positioned.
SAI0056
Bracket positions
The illustration shows the location of floor mat
brackets.
SEAT BELTS
The seat belts can be cleaned by wiping them
with a sponge dampened in a mild soap
solution. Allow the belts to dry completely in
the shade before using them.
See “Seat belts” (P.1-9).
WARNING
Do not allow wet seat belts to roll up in
the retractor. NEVER use bleach, dye, or
chemical solvents to clean the seatbelts, since these materials may se-
verely weaken the seat belt webbing.
Appearance and care7-7
Page 353 of 427
8 Maintenance and do-it-yourself
Maintenance requirement ........................................................ 8-3Scheduled maintenance .................................................... 8-3
General maintenance ......................................................... 8-3
Where to go for service .................................................... 8-3
General maintenance ............................................................... 8-3 Explanation of maintenance items ................................... 8-3
Maintenance precautions ........................................................ 8-6
Engine compartment check locations .................................. 8-8 VQ37VHR engine model .................................................. 8-8
Engine cooling system ............................................................. 8-9
Checking engine coolant level ...................................... 8-10
Changing engine coolant ............................................... 8-10
Engine oil ........................................................................\
......... 8-11
Checking engine oil level ............................................... 8-11
Changing engine oil and filter ....................................... 8-11
Automatic transmission fluid ............................................... 8-13
Power steering fluid ............................................................... 8-13
Brake and clutch fluid ........................................................... 8-14 Brake fluid ........................................................................\
.. 8-14
Clutch fluid (Manual transmission models) ............... 8-15
Window washer fluid ............................................................ 8-15
Battery ........................................................................\
............... 8-16 Jump starting ..................................................................... 8-17 Variable voltage control system ......................................... 8-18
Drive belts ........................................................................\
....... 8-18
Spark plugs ........................................................................\
..... 8-19
Replacing spark plugs .................................................. 8-19
Air cleaner ........................................................................\
....... 8-19
Windshield wiper blades ..................................................... 8-20
Cleaning ........................................................................\
... 8-20
Replacing ........................................................................\
. 8-21
Brakes ........................................................................\
.............. 8-22 Self-adjusting brakes .................................................... 8-22
Brake pad wear warning .............................................. 8-22
Fuses ........................................................................\
................ 8-22 Engine compartment ..................................................... 8-22
Passenger compartment .............................................. 8-24
Intelligent Key battery replacement ................................... 8-25
Lights ........................................................................\
................ 8-27
Coupe ........................................................................\
....... 8-27
Roadster ........................................................................\
... 8-28
Headlights ........................................................................\
8-29
Exterior and interior lights ............................................ 8-29
Wheels and tires ................................................................... 8-31 Tire pressure ................................................................... 8-31
Tire labeling ..................................................................... 8-34
Page 356 of 427
8-4Maintenance and do-it-yourself
Make sure that the headlights, stop lights, tail
lights, turn signal lights, and other lights are all
operating properly and installed securely. Also
check headlight aim.
Road wheel nuts (lug nuts)*:When checking
the tires, make sure no wheel nuts are missing,
and check for any loose wheel nuts. Tighten if
necessary.
Tire rotation*: Tires cannot be rotated, as the
front tires are a different size from the rear tires
and the direction of wheel rotation is fixed in
each tire.
Tires*: Check the pressure with a gauge often
and always prior to long distance trips. If
necessary, adjust the pressure in all tires,
including the spare, to the pressure specified.
Check carefully for damage, cuts or excessive
wear.
Tire Pressure Monitoring System (TPMS)
transmitter components: Replace the TPMS
transmitter grommet seal, valve core and cap
when the tires are replaced due to wear or age.
Tire, wheel alignment and balance: If the
vehicle should pull to either side while driving on
a straight and level road, or if you detect uneven
or abnormal tire wear, there may be a need for
wheel alignment.
If the steering wheel or seat vibrates at normal
highway speeds, wheel balancing may be needed.
For additional information regarding tires, refer
to “Important Tire Safety Information” (US) or
“Tire Safety Information” (Canada) in the
NISSAN Warranty Information Booklet.
Windshield:
Clean the windshield on a regular
basis. Check the windshield at least every six
months for cracks or other damage. Have a
damaged windshield repaired by a qualified
repair facility.
Windshield wiper blades*: Check for cracks
or wear if they do not wipe properly.
Inside the vehicle
The maintenance items listed here should be
checked on a regular basis, such as when
performing scheduled maintenance, cleaning
the vehicle, etc.
Accelerator pedal: Check the pedal for
smooth operation and make sure the pedal
does not catch or require uneven effort. Keep
the floor mat away from the pedal.
Automatic transmission P (Park) mechan-
ism: On a fairly steep hill, check that your
vehicle is held securely with the selector lever in
the P (Park) position without applying any
brakes.
Brake pedal: Check the pedal for smooth
operation. If the brake pedal suddenly goes down further than normal, the pedal feels
spongy or the vehicle seems to take longer to
stop, see a NISSAN dealer immediately. Keep
the floor mat away from the pedal.
Brakes:
Check that the brakes do not pull the
vehicle to one side when applied.
Parking brake: Check the parking brake
operation regularly. The vehicle should be
securely held on a fairly steep hill with only the
parking brake applied. If the parking brake needs
adjusted, see a NISSAN dealer.
Seat belts: Check that all parts of the seat belt
system (for example, buckles, anchors, adjuster
and retractors) operate properly and smoothly,
and are installed securely. Check the belt
webbing for cuts, fraying, wear or damage.
Seats: Check seat position controls such as
seat adjusters, seatback recliner, etc. to ensure
they operate smoothly and that all latches lock
securely in every position. Check that the head
restraints move up and down smoothly and that
the locks (if so equipped) hold securely in all
latched positions.
Steering wheel: Check for changes in the
steering conditions, such as excessive free play,
hard steering or strange noises.
Warning lights and chimes: Make sure that
all warning lights and chimes are operating
properly.