2012 NISSAN 370Z COUPE oil
[x] Cancel search: oilPage 85 of 427
7. Low outside temperature warning
This warning appears if the outside temperature
is below 378F(38C) . The warning can be set not
to be displayed. (See “Trip computer” (P.2-22) .)
8. SynchroRev Match mode (S-MODE)
warning
This warning appears if a system malfunction
occurs. When the warning appears, the S-
MODE function will not operate, but the manual
transmission will operate normally and driving
can be continued. Have the system checked by
a NISSAN dealer.
SIC4237
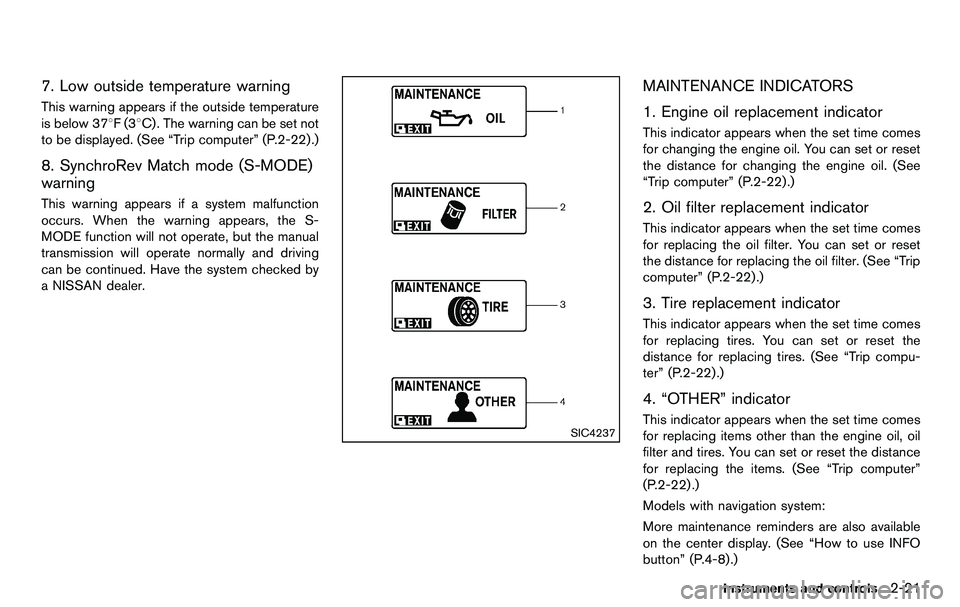
MAINTENANCE INDICATORS
1. Engine oil replacement indicator
This indicator appears when the set time comes
for changing the engine oil. You can set or reset
the distance for changing the engine oil. (See
“Trip computer” (P.2-22) .)
2. Oil filter replacement indicator
This indicator appears when the set time comes
for replacing the oil filter. You can set or reset
the distance for replacing the oil filter. (See “Trip
computer” (P.2-22).)
3. Tire replacement indicator
This indicator appears when the set time comes
for replacing tires. You can set or reset the
distance for replacing tires. (See “Trip compu-
ter” (P.2-22) .)
4. “OTHER” indicator
This indicator appears when the set time comes
for replacing items other than the engine oil, oil
filter and tires. You can set or reset the distance
for replacing the items. (See “Trip computer”
(P.2-22) .)
Models with navigation system:
More maintenance reminders are also available
on the center display. (See “How to use INFO
button” (P.4-8).)
Instruments and controls2-21
Page 89 of 427
SIC3992
Setting
Setting cannot be made while driving. A
message “Setting can only be operated
when stopped” is also displayed on the
vehicle information display.
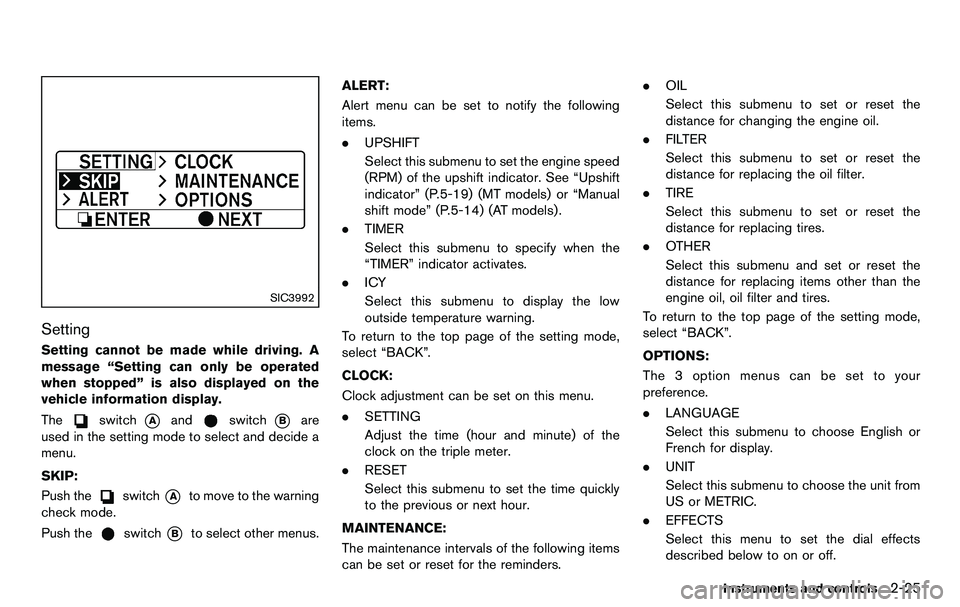
The
switch*Aandswitch*Bare
used in the setting mode to select and decide a
menu.
SKIP:
Push the
switch*Ato move to the warning
check mode.
Push the
switch*Bto select other menus. ALERT:
Alert menu can be set to notify the following
items.
. UPSHIFT
Select this submenu to set the engine speed
(RPM) of the upshift indicator. See “Upshift
indicator” (P.5-19) (MT models) or “Manual
shift mode” (P.5-14) (AT models) .
. TIMER
Select this submenu to specify when the
“TIMER” indicator activates.
. ICY
Select this submenu to display the low
outside temperature warning.
To return to the top page of the setting mode,
select “BACK”.
CLOCK:
Clock adjustment can be set on this menu.
. SETTING
Adjust the time (hour and minute) of the
clock on the triple meter.
. RESET
Select this submenu to set the time quickly
to the previous or next hour.
MAINTENANCE:
The maintenance intervals of the following items
can be set or reset for the reminders. .
OIL
Select this submenu to set or reset the
distance for changing the engine oil.
. FILTER
Select this submenu to set or reset the
distance for replacing the oil filter.
. TIRE
Select this submenu to set or reset the
distance for replacing tires.
. OTHER
Select this submenu and set or reset the
distance for replacing items other than the
engine oil, oil filter and tires.
To return to the top page of the setting mode,
select “BACK”.
OPTIONS:
The 3 option menus can be set to your
preference.
. LANGUAGE
Select this submenu to choose English or
French for display.
. UNIT
Select this submenu to choose the unit from
US or METRIC.
. EFFECTS
Select this menu to set the dial effects
described below to on or off.
Instruments and controls2-25
Page 133 of 427
SPA2573
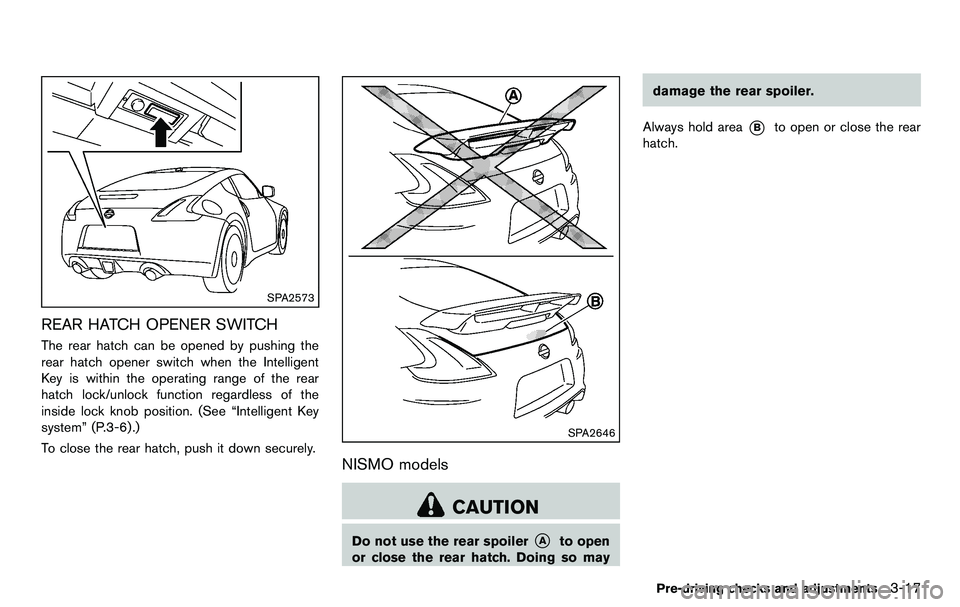
REAR HATCH OPENER SWITCH
The rear hatch can be opened by pushing the
rear hatch opener switch when the Intelligent
Key is within the operating range of the rear
hatch lock/unlock function regardless of the
inside lock knob position. (See “Intelligent Key
system” (P.3-6) .)
To close the rear hatch, push it down securely.
SPA2646
NISMO models
CAUTION
Do not use the rear spoiler*Ato open
or close the rear hatch. Doing so may damage the rear spoiler.
Always hold area
*Bto open or close the rear
hatch.
Pre-driving checks and adjustments3-17
Page 165 of 427
SAA2479
SAA2480
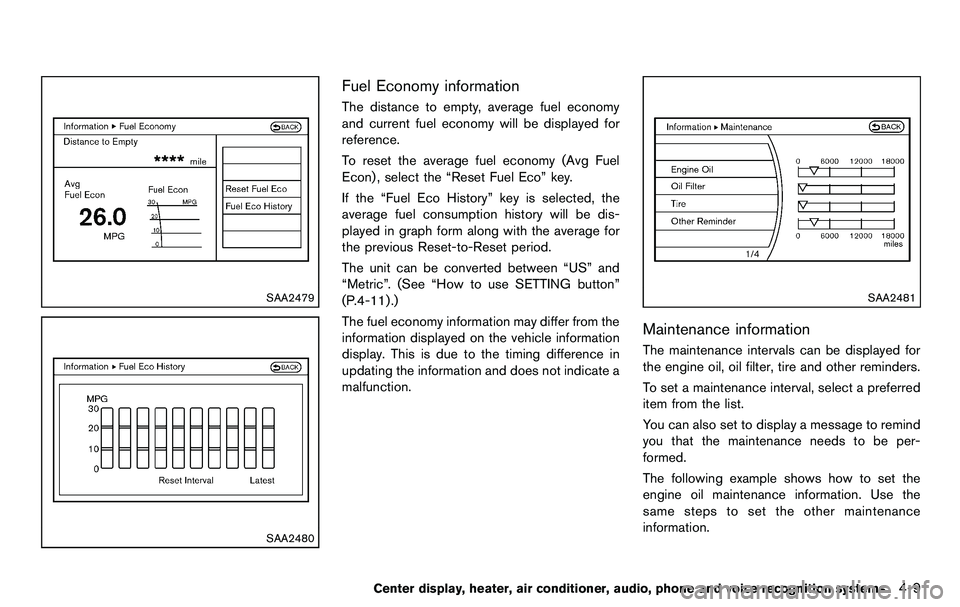
Fuel Economy information
The distance to empty, average fuel economy
and current fuel economy will be displayed for
reference.
To reset the average fuel economy (Avg Fuel
Econ) , select the “Reset Fuel Eco” key.
If the “Fuel Eco History” key is selected, the
average fuel consumption history will be dis-
played in graph form along with the average for
the previous Reset-to-Reset period.
The unit can be converted between “US” and
“Metric”. (See “How to use SETTING button”
(P.4-11) .)
The fuel economy information may differ from the
information displayed on the vehicle information
display. This is due to the timing difference in
updating the information and does not indicate a
malfunction.
SAA2481
Maintenance information
The maintenance intervals can be displayed for
the engine oil, oil filter, tire and other reminders.
To set a maintenance interval, select a preferred
item from the list.
You can also set to display a message to remind
you that the maintenance needs to be per-
formed.
The following example shows how to set the
engine oil maintenance information. Use the
same steps to set the other maintenance
information.
Center display, heater, air conditioner, audio, phone and voice recognition systems4-9
Page 286 of 427
5-2Starting and driving
WARNING
.Do not leave children or adults who
would normally require the support
of others alone in your vehicle. Pets
should not be left alone either. They
could accidentally injure themselves
or others through inadvertent op-
eration of the vehicle. Also, on hot,
sunny days, temperatures in a
closed vehicle could quickly become
high enough to cause severe or
possibly fatal injuries to people or
animals.
. Properly secure all cargo to help
prevent it from sliding or shifting.
Do not place cargo higher than the
seatbacks. In a sudden stop or
collision, unsecured cargo could
cause personal injury (Coupe mod-
els) .
. Closely supervise children when
they are around cars to prevent
them from playing and becoming
locked in the trunk where they could
be seriously injured. Keep the car
locked with the trunk closed when
not in use, and prevent children’s access to car keys (Roadster mod-
els) .
If the engine oil temperature is high, the
engine protection mode, which helps re-
duce the chance of engine damage, could
activate and automatically decrease en-
gine power. Driving while the engine oil
temperature is high may result in engine
damage.
EXHAUST GAS (carbon monoxide)
WARNING
. Do not breathe exhaust gases; they
contain colorless and odorless car-
bon monoxide. Carbon monoxide is
dangerous. It can cause uncon-
sciousness or death.
. If you suspect that exhaust fumes
are entering the vehicle, drive with
all windows fully open, and have the
vehicle inspected immediately.
. Do not run the engine in closed
spaces such as a garage.
. Do not park the vehicle with the
engine running for any extended
length of time. .
Keep the rear hatch/trunk lid closed
while driving, otherwise exhaust
gases could be drawn into the
passenger compartment. If you
must drive with the rear hatch/trunk
lid open, follow these precautions:
1) Open all the windows.
2) Set the
air recirculation to
off and the fan control to high to
circulate the air.
. The exhaust system and body
should be inspected by a qualified
mechanic whenever:
— The vehicle is raised for service.
— You suspect that exhaust fumes
are entering into the passenger
compartment.
— You notice a change in the sound of the exhaust system.
— You have had an accident invol- ving damage to the exhaust
system, underbody, or rear of
the vehicle.
PRECAUTIONS WHEN STARTING
AND DRIVING
Page 295 of 427
.Make sure the area around the vehicle is
clear.
. Check fluid levels such as engine oil, cool-
ant, brake fluid and window washer fluid as
frequently as possible, or at least whenever
you refuel.
. Check that all windows and lights are clean.
. Visually inspect tires for their appearance
and condition. Also check tires for proper
inflation.
. Lock all doors.
. Position seat and adjust head restraints.
. Adjust inside and outside mirrors.
. Fasten seat belts and ask all passengers to
do likewise.
. Check the operation of warning lights when
the ignition switch is pushed to the ON
position. (See “Warning/indicator lights and
audible reminders” (P.2-9) .) 1. Apply the parking brake.
2.
Automatic Transmission (AT) model:
Move the selector lever to the P (Park) or N
(Neutral) position. (P is recommended.)
The starter is designed not to operate unless
the selector lever is in either of the above
positions.
Manual Transmission (MT) model:
Move the shift lever to the N (Neutral)
position. Depress the clutch pedal fully to
the floor.
The starter is designed not to operate unless
the clutch pedal is fully depressed.
The Intelligent Key must be carried
when operating the ignition switch.
3. Push the ignition switch to the ON position. Depress the brake pedal (AT model) or the
clutch pedal (MT model) and push the
ignition switch to start the engine.
To start the engine immediately, push and
release the ignition switch while depressing
the brake pedal with the ignition switch in
any position.
.If the engine is very hard to start inextremely cold weather or when restart-
ing, depress the accelerator pedal a little
(approximately 1/3 to the floor) and while
holding, crank the engine. Release the accelerator pedal when the engine starts.
.If the engine is very hard to start because
it is flooded, depress the accelerator
pedal all the way to the floor and hold it.
Push the ignition switch to the ON
position to start cranking the engine.
After 5 or 6 seconds, stop cranking by
pushing the ignition switch to OFF. After
cranking the engine, release the accel-
erator pedal. Crank the engine with your
foot off the accelerator pedal by
depressing the brake pedal and pushing
the push-button ignition switch to start
the engine. If the engine starts, but fails
to run, repeat the above procedure.
CAUTION
Do not operate the starter for more
than 15 seconds at a time. If the engine
does not start, push the ignition switch
to OFF and wait 10 seconds before
cranking again, otherwise the starter
could be damaged.
4. Warm-up
Allow the engine to idle for at least 30
seconds after starting. Do not race the
engine while warming it up. Drive at
Starting and driving5-11
BEFORE STARTING THE ENGINE STARTING THE ENGINE
Page 301 of 427
SSD0536
Shifting
To change gears, or when upshifting or down-
shifting, fully depress the clutch pedal, shift into
an appropriate gear, and then slowly and
smoothly release the clutch pedal.
This vehicle is equipped with a short throw
shifter manual transmission. To ensure smooth
gear changes, be sure to fully depress the clutch
pedal before operating the shift lever. If the
clutch pedal is not fully depressed before the
transmission is shifted, a gear noise may be
heard. Transmission damage could occur.
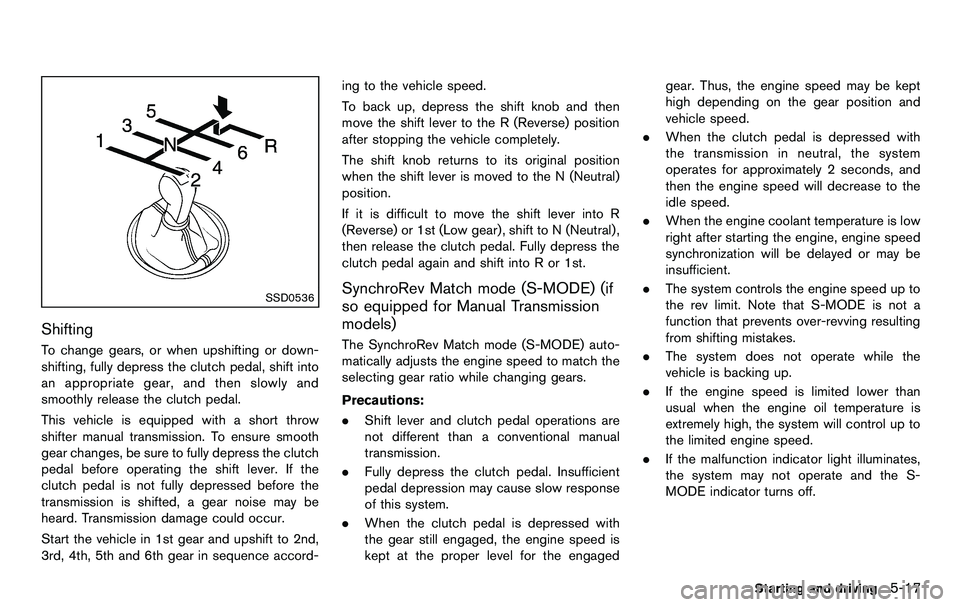
Start the vehicle in 1st gear and upshift to 2nd,
3rd, 4th, 5th and 6th gear in sequence accord-ing to the vehicle speed.
To back up, depress the shift knob and then
move the shift lever to the R (Reverse) position
after stopping the vehicle completely.
The shift knob returns to its original position
when the shift lever is moved to the N (Neutral)
position.
If it is difficult to move the shift lever into R
(Reverse) or 1st (Low gear), shift to N (Neutral) ,
then release the clutch pedal. Fully depress the
clutch pedal again and shift into R or 1st.
SynchroRev Match mode (S-MODE) (if
so equipped for Manual Transmission
models)
The SynchroRev Match mode (S-MODE) auto-
matically adjusts the engine speed to match the
selecting gear ratio while changing gears.
Precautions:
.
Shift lever and clutch pedal operations are
not different than a conventional manual
transmission.
. Fully depress the clutch pedal. Insufficient
pedal depression may cause slow response
of this system.
. When the clutch pedal is depressed with
the gear still engaged, the engine speed is
kept at the proper level for the engaged gear. Thus, the engine speed may be kept
high depending on the gear position and
vehicle speed.
. When the clutch pedal is depressed with
the transmission in neutral, the system
operates for approximately 2 seconds, and
then the engine speed will decrease to the
idle speed.
. When the engine coolant temperature is low
right after starting the engine, engine speed
synchronization will be delayed or may be
insufficient.
. The system controls the engine speed up to
the rev limit. Note that S-MODE is not a
function that prevents over-revving resulting
from shifting mistakes.
. The system does not operate while the
vehicle is backing up.
. If the engine speed is limited lower than
usual when the engine oil temperature is
extremely high, the system will control up to
the limited engine speed.
. If the malfunction indicator light illuminates,
the system may not operate and the S-
MODE indicator turns off.
Starting and driving5-17
Page 325 of 427
the hole in the spare tire wheel is aligned
with the pin on the brake rotor.
3. With the wheel nut wrench, tighten wheel nuts alternately and evenly in the sequence
as illustrated (
*1,*2,*3,*4,*5) until
they are tight.
4. Lower the vehicle slowly until the tire touches the ground. Then, with the wheel
nut wrench, tighten the wheel nuts securely
in the sequence as illustrated. Lower the
vehicle completely.
WARNING
.Incorrect wheel nuts or improperly
tightened wheel nuts can cause the
wheel to become loose or come off.
This could cause an accident.
. Do not use oil or grease on the
wheel studs or nuts. This could
cause the nuts to become loose.
. Retighten the wheel nuts when the
vehicle has been driven for 600
miles (1,000 km) (also in cases of a
flat tire, etc.) .
. As soon as possible, tighten the wheel
nuts to the specified torque with a torque wrench.
Wheel nut tightening torque:
80 ft-lb (108 N·m)
The wheel nuts must be kept tightened
to specification at all times. It is
recommended that wheel nuts be tigh-
tened to specifications at each lubrica-
tion interval.
. Adjust tire pressure to the COLD pres-
sure.
COLD pressure:
After the vehicle has been parked for
three hours or more or driven less than
1 mile (1.6 km) .
COLD tire pressures are shown on the
Tire and Loading Information label
affixed to the driver side center pillar.
Stowing the damaged tire and tools
Coupe models:
1. Securely store the damaged tire and jacking
tools in the storage area.
2. Place the spare tire cover and the cargo room carpet over the damaged tire.
3. Close the rear hatch.
SCE0845
Roadster models:
Securely store the jacking tools in the storage
area.
Place the spare tire cover and trunk room carpet
back in the trunk, and then close the trunk lid.
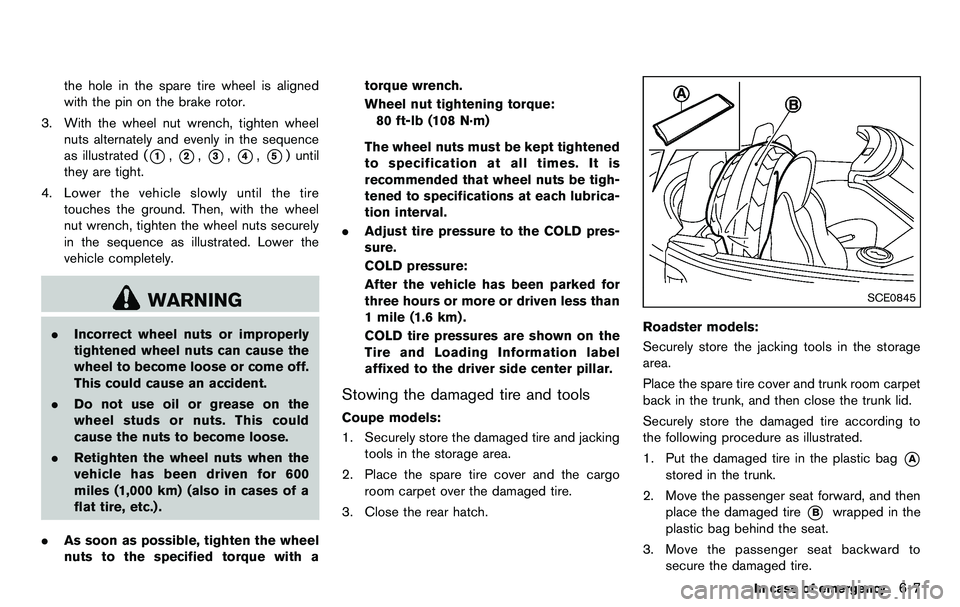
Securely store the damaged tire according to
the following procedure as illustrated.
1. Put the damaged tire in the plastic bag
*A
stored in the trunk.
2. Move the passenger seat forward, and then place the damaged tire
*Bwrapped in the
plastic bag behind the seat.
3. Move the passenger seat backward to secure the damaged tire.
In case of emergency6-7