2012 NISSAN 370Z COUPE change wheel
[x] Cancel search: change wheelPage 280 of 427
4-124Center display, heater, air conditioner, audio, phone and voice recognition systems
.Speak in a natural voice without pausing
between words.
SAA2167
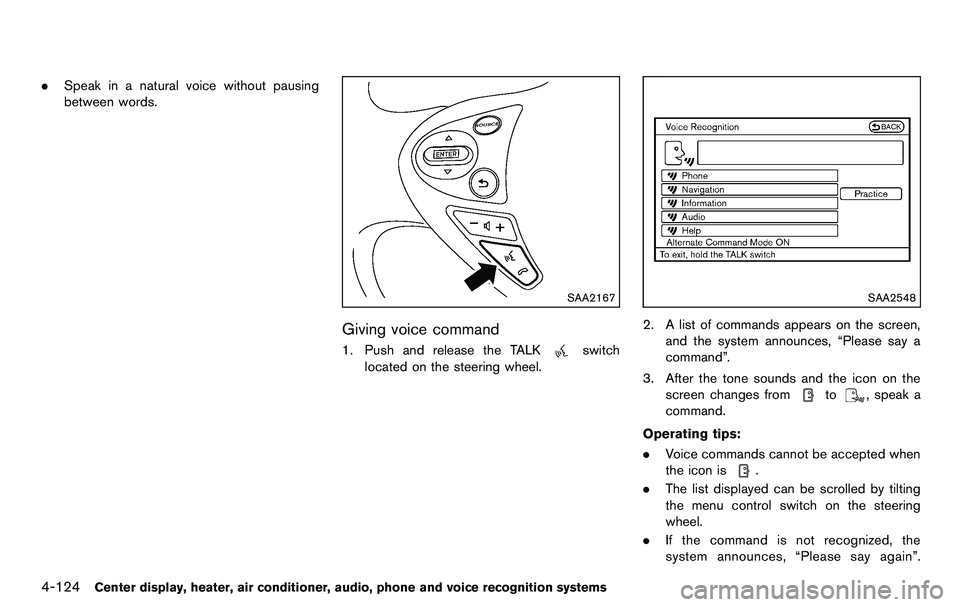
Giving voice command
1. Push and release the TALKswitch
located on the steering wheel.
SAA2548
2. A list of commands appears on the screen,
and the system announces, “Please say a
command”.
3. After the tone sounds and the icon on the screen changes from
to, speak a
command.
Operating tips:
. Voice commands cannot be accepted when
the icon is
.
. The list displayed can be scrolled by tilting
the menu control switch on the steering
wheel.
. If the command is not recognized, the
system announces, “Please say again”.
Page 289 of 427
.Replacing tires with those not ori-
ginally specified by NISSAN could
affect the proper operation of the
TPMS.
. Do not inject any tire liquid or
aerosol tire sealant into the tires,
as this may cause a malfunction of
the tire pressure sensors (for mod-
els not equipped with the emer-
gency tire puncture repair kit) .
. If you used the Emergency Tire
Sealant to repair a minor tire punc-
ture, your NISSAN dealer will also
need to replace the TPMS sensor in
addition to repairing or replacing
the tire (for models equipped with
the emergency tire puncture repair
kit) .
. NISSAN recommends using only
NISSAN Genuine Emergency Tire
Sealant provided with your vehicle.
Other tire sealants may damage the
valve stem seal which can cause the
tire to lose air pressure (for models
equipped with the emergency tire
puncture repair kit) .CAUTION
.The TPMS may not function properly
when the wheels are equipped with
tire chains or the wheels are buried
in snow.
. Do not place metalized film or any
metal parts (antenna, etc.) on the
windows. This may cause poor re-
ception of the signals from the tire
pressure sensors, and the TPMS will
not function properly.
Some devices and transmitters may temporarily
interfere with the operation of the TPMS and
cause the low tire pressure warning light to
illuminate. Some examples are:
. Facilities or electric devices using similar
radio frequencies are near the vehicle.
. If a transmitter set to similar frequencies is
being used in or near the vehicle.
. If a computer (or similar equipment) or a DC/
AC converter is being used in or near the
vehicle. FCC Notice:
For USA:
This device complies with Part 15 of the
FCC Rules. Operation is subject to the
following two conditions:
(1) This device may not cause harmful
interference, and (2) this device must
accept any interference received, including
interference that may cause undesired
operation.
Note: Changes or modifications not ex-
pressly approved by the party responsible
for compliance could void the user’s
authority to operate the equipment.
For Canada:
This device complies with RSS-210 of
Industry Canada. Operation is subject to
the following two conditions:
(1) this device may not cause interference,
and (2) this device must accept any inter-
ference, including interference that may
cause undesired operation of the device.
Starting and driving5-5
Page 291 of 427
WARNING
The following actions can increase the
chance of losing control of the vehicle if
there is a sudden loss of tire air
pressure. Losing control of the vehicle
may cause a collision and result in
personal injury.
.The vehicle generally moves or pulls
in the direction of the flat tire.
. Do not rapidly apply the brakes.
. Do not rapidly release the accelera-
tor pedal.
. Do not rapidly turn the steering
wheel.
1. Remain calm and do not overreact.
2. Maintain a firm grip on the steering wheel with both hands and try to hold a straight
course.
3. When appropriate, slowly release the accel- erator pedal to gradually slow the vehicle.
4. Gradually steer the vehicle to a safe location off the road and away from traffic if possible.
5. Lightly apply the brake pedal to gradually stop the vehicle. 6. Turn on the hazard warning flashers and
either contact a roadside emergency service
to change the tire or see “Changing a flat
tire (for models with spare tire)” (P.6-3) of
this Owner’s Manual.
DRINKING ALCOHOL/DRUGS AND
DRIVING
WARNING
Never drive under the influence of
alcohol or drugs. Alcohol in the blood-
stream reduces coordination, delays
reaction time and impairs judgement.
Driving after drinking alcohol increases
the likelihood of being involved in an
accident injuring yourself and others.
Additionally, if you are injured in an
accident, alcohol can increase the se-
verity of the injury.
NISSAN is committed to safe driving. However,
you must choose not to drive under the influence
of alcohol. Every year thousands of people are
injured or killed in alcohol-related accidents.
Although the local laws vary on what is
considered to be legally intoxicated, the fact is
that alcohol affects all people differently and
most people underestimate the effects of alcohol.
Remember, drinking and driving don’t mix! And
that is true for drugs, too (over-the-counter,
prescription, and illegal drugs) . Don’t drive if
your ability to operate your vehicle is impaired by
alcohol, drugs, or some other physical condition.
Starting and driving5-7
Page 346 of 427
7-4Appearance and care
.If glass cleaner gets on the soft top,
immediately wash it off with clean
water.
. Do not apply direct water pressure,
such as high pressured water from
household hoses, on the lining of
the soft top and vehicle body, as this
may cause water to leak into the
inside of your vehicle.
After cleaning, always be sure the top and its
storage are completely drybefore opening the
top. Opening the top while it is wet or damp may
cause interior water damage, water stains or
mildew on the top.
WAXING
Regular waxing protects the paint surface and
helps retain new vehicle appearance. Polishing
is recommended to remove built-up wax residue
and to avoid a weathered appearance before
reapplying wax.
A NISSAN dealer can assist you in choosing the
proper product.
. Wax your vehicle only after a thorough
washing. Follow the instructions supplied
with the wax.
. Do not use a wax containing any abrasives,
cutting compounds or cleaners that may damage the vehicle finish.
Machine compound or aggressive polishing on a
base coat/clear coat paint finish may dull the
finish or leave swirl marks.
REMOVING SPOTS
Remove tar and oil spots, industrial dust,
insects, and tree sap as quickly as possible
from the paint surface to avoid lasting damage
or staining. Special cleaning products are
available at a NISSAN dealer or any automotive
accessory stores.
UNDERBODY
In areas where road salt is used in winter, the
underbody must be cleaned regularly. This will
prevent dirt and salt from building up and
causing the acceleration of corrosion on the
underbody and suspension. Before the winter
period and again in the spring, the underseal
must be checked and, if necessary, re-treated.
GLASS
Use glass cleaner to remove smoke and dust
film from the glass surfaces. It is normal for glass
to become coated with a film after the vehicle is
parked in the hot sun. Glass cleaner and a soft
cloth will easily remove this film.
CAUTION
. When cleaning the inside of the
windows, do not use sharp-edged
tools, abrasive cleaners or chlorine-
based disinfectant cleaners. They
could damage the electrical conduc-
tors, radio antenna elements or rear
window defroster elements.
. If glass cleaner gets on the soft top,
immediately wash it off with clean
water (Roadster models) .
WHEELS
Wash the wheels when washing the vehicle to
maintain their appearance.
.Clean the inner side of the wheels when the
wheel is changed or the underside of the
vehicle is washed.
. Inspect wheel rims regularly for dents or
corrosion. Such damage may cause loss of
pressure or poor seal at the tire bead.
. NISSAN recommends that the road wheels
be waxed to protect against road salt in
areas where it is used during winter.
Page 356 of 427
8-4Maintenance and do-it-yourself
Make sure that the headlights, stop lights, tail
lights, turn signal lights, and other lights are all
operating properly and installed securely. Also
check headlight aim.
Road wheel nuts (lug nuts)*:When checking
the tires, make sure no wheel nuts are missing,
and check for any loose wheel nuts. Tighten if
necessary.
Tire rotation*: Tires cannot be rotated, as the
front tires are a different size from the rear tires
and the direction of wheel rotation is fixed in
each tire.
Tires*: Check the pressure with a gauge often
and always prior to long distance trips. If
necessary, adjust the pressure in all tires,
including the spare, to the pressure specified.
Check carefully for damage, cuts or excessive
wear.
Tire Pressure Monitoring System (TPMS)
transmitter components: Replace the TPMS
transmitter grommet seal, valve core and cap
when the tires are replaced due to wear or age.
Tire, wheel alignment and balance: If the
vehicle should pull to either side while driving on
a straight and level road, or if you detect uneven
or abnormal tire wear, there may be a need for
wheel alignment.
If the steering wheel or seat vibrates at normal
highway speeds, wheel balancing may be needed.
For additional information regarding tires, refer
to “Important Tire Safety Information” (US) or
“Tire Safety Information” (Canada) in the
NISSAN Warranty Information Booklet.
Windshield:
Clean the windshield on a regular
basis. Check the windshield at least every six
months for cracks or other damage. Have a
damaged windshield repaired by a qualified
repair facility.
Windshield wiper blades*: Check for cracks
or wear if they do not wipe properly.
Inside the vehicle
The maintenance items listed here should be
checked on a regular basis, such as when
performing scheduled maintenance, cleaning
the vehicle, etc.
Accelerator pedal: Check the pedal for
smooth operation and make sure the pedal
does not catch or require uneven effort. Keep
the floor mat away from the pedal.
Automatic transmission P (Park) mechan-
ism: On a fairly steep hill, check that your
vehicle is held securely with the selector lever in
the P (Park) position without applying any
brakes.
Brake pedal: Check the pedal for smooth
operation. If the brake pedal suddenly goes down further than normal, the pedal feels
spongy or the vehicle seems to take longer to
stop, see a NISSAN dealer immediately. Keep
the floor mat away from the pedal.
Brakes:
Check that the brakes do not pull the
vehicle to one side when applied.
Parking brake: Check the parking brake
operation regularly. The vehicle should be
securely held on a fairly steep hill with only the
parking brake applied. If the parking brake needs
adjusted, see a NISSAN dealer.
Seat belts: Check that all parts of the seat belt
system (for example, buckles, anchors, adjuster
and retractors) operate properly and smoothly,
and are installed securely. Check the belt
webbing for cuts, fraying, wear or damage.
Seats: Check seat position controls such as
seat adjusters, seatback recliner, etc. to ensure
they operate smoothly and that all latches lock
securely in every position. Check that the head
restraints move up and down smoothly and that
the locks (if so equipped) hold securely in all
latched positions.
Steering wheel: Check for changes in the
steering conditions, such as excessive free play,
hard steering or strange noises.
Warning lights and chimes: Make sure that
all warning lights and chimes are operating
properly.
Page 391 of 427
.The original tires have built-in
tread wear indicators. When
wear indicators are visible, the
tire(s) should be replaced.
. Tires degrade with age and use.
Have tires, including the spare,
over 6 years old checked by a
qualified technician, because
some tire damage may not be
obvious. Replace the tires as
necessary to prevent tire failure
and possible personal injury.
. Improper service of the spare
tire may result in serious perso-
nal injury. If it is necessary to
repair the spare tire, contact a
NISSAN dealer.
. For additional information re-
garding tires, refer to “Important
Tire Safety Information” (US) or
“Tire Safety Information” (Cana-
da) in the Warranty Information
Booklet.Replacing wheels and tires
When replacing a tire, use the same size, tread
design, speed rating and load carrying capacity
as originally equipped. (See “Specifications”
(P.9-8) for recommended types and sizes of
tires and wheels.)
WARNING
. The use of tires other than those
recommended or the mixed use of
tires of different brands, construc-
tion (bias, bias-belted or radial) , or
tread patterns can adversely affect
the ride, braking, handling, ground
clearance, body-to-tire clearance,
tire chain clearance, speedometer
calibration, headlight aim and bum-
per height. Some of these effects
may lead to accidents and could
result in serious personal injury.
. If the wheels are changed for any
reason, always replace with wheels
which have the same off-set dimen-
sion. Wheels of a different off-set
could cause premature tire wear,
degrade vehicle handling character-
istics and/or interference with the
brake discs/drums. Such interfer- ence can lead to decreased braking
efficiency and/or early brake pad/
shoe wear. See “Wheels and tires”
(P.9-9) of this manual for wheel off-
set dimensions.
. When a spare tire is mounted or a
wheel is replaced, the TPMS will not
function and the low tire pressure
warning light will flash for approxi-
mately 1 minute. The light will
remain on after 1 minute. Contact
your NISSAN dealer as soon as
possible for tire replacement and/
or system resetting.
. Replacing tires with those not ori-
ginally specified by NISSAN could
affect the proper operation of the
TPMS.
. Do not install a deformed wheel or
tire even if it has been repaired.
Such wheels or tires could have
structural damage and could fail
without warning.
. The use of retread tire is not re-
commended.
. For additional information regard-
ing tires, refer to “Important Tire
Safety Information” (US) or “Tire
Maintenance and do-it-yourself8-39
Page 410 of 427
9-16Technical and consumer information
FOR NISMO MODELS
Use the following steps to mount the license
plate:
Before mounting the license plate, confirm that
the following parts are enclosed in the vinyl bag.
.License plate bracket
. J-nut 62
. Screw 64
. Screw grommet 64
1. Park the vehicle on flat, level ground.
2. Temporarily place the license plate bracket while aligning points
*Aof the front bumper
fascia with holes
*Bin the license plate
bracket.
3. Confirm that points
*Aand*Bare aligned.
Hold the license plate bracket and mark the
points
*Con the bumper facia through the
center of the holes
*Dwith a felt-tip pen.
4. Remove the license plate bracket.
5. Carefully drill two shallow pilot holes
*A
and*Cusing a 0.39 in (10 mm) drill bit at
the marked locations. (Be sure that the
drill only goes through the fascia.)
6. Insert grommets into the hole on the fascia.
7. Insert a flat-blade screwdriver into the grommet hole to add a 908 turn onto the
part
*E. 8. Insert a J-nut into the license plate bracket
before placing the license plate bracket on
the fascia.
9. Install the license plate bracket with the screws.
10. Install the license plate with bolts that are not longer than 0.55 in (14 mm).
When the recovery hook is used, you need to
temporarily remove the front license plate and
bracket from the vehicle. (See “Vehicle recovery
(freeing a stuck vehicle)” (P.6-21) for further
details.)
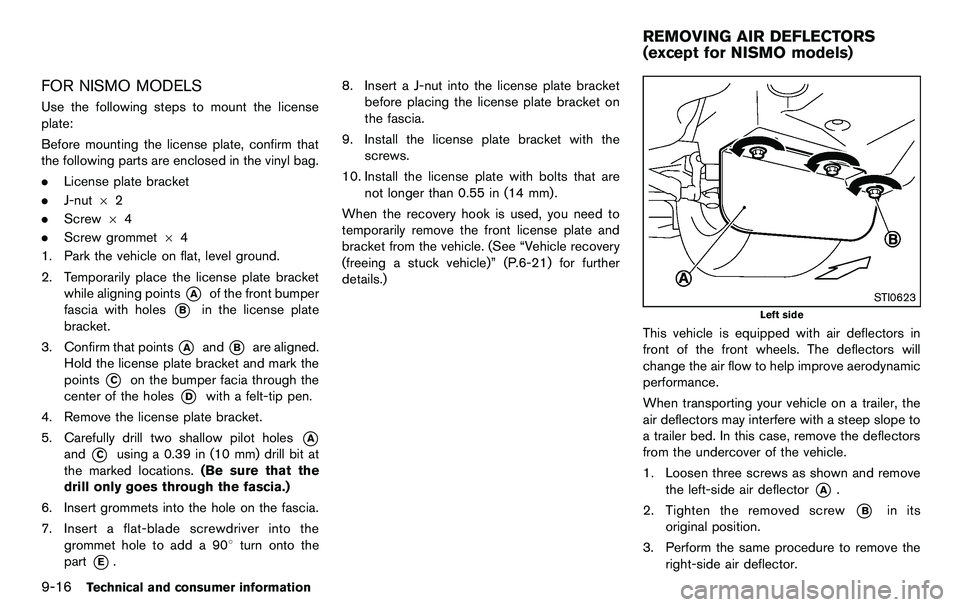
STI0623
Left side
This vehicle is equipped with air deflectors in
front of the front wheels. The deflectors will
change the air flow to help improve aerodynamic
performance.
When transporting your vehicle on a trailer, the
air deflectors may interfere with a steep slope to
a trailer bed. In this case, remove the deflectors
from the undercover of the vehicle.
1. Loosen three screws as shown and remove the left-side air deflector
*A.
2. Tighten the removed screw
*Bin its
original position.
3. Perform the same procedure to remove the right-side air deflector.
REMOVING AIR DEFLECTORS
(except for NISMO models)
Page 413 of 427
capacity. For example, if the XXX
amount equals 1400 lbs. and there will
be five 150 lb. passengers in your
vehicle, the amount of available cargo
and luggage load capacity is 650 lbs.
(1400−750 (5 x 150) = 650 lbs or
640 −340 (5 x 70) = 300 kg.)
5. Determine the combined weight of luggage and cargo being loaded on
the vehicle. That weight may not safely
exceed the available cargo and luggage
load capacity calculated in Step 4.
6. If your vehicle will be towing a trailer, load from your trailer will be transferred
to your vehicle. Consult this manual to
determine how this reduces the avail-
able cargo and luggage load capacity
of your vehicle.
Before driving a loaded vehicle, confirm
that you do not exceed the Gross Vehicle
Weight Rating (GVWR) or the Gross Axle
Weight Rating (GAWR) for your vehicle.
(See “Measurement of weights” (P.9-19) .)
Also check tires for proper inflation pres-
sures. See the Tire and Loading Information
label.LOADING TIPS
. The GVW must not exceed GVWR or
GAWR as specified on the F.M.V.S.S./
C.M.V.S.S. certification label.
. Do not load the front and rear axle to
the GAWR. Doing so will exceed the
GVWR.
WARNING
.Properly secure all cargo to help
prevent it from sliding or shift-
ing. Do not place cargo higher
than the seatbacks. In a sudden
stop or collision, unsecured car-
go could cause personal injury.
. Do not load your vehicle any
heavier than the GVWR or the
maximum front and rear
GAWRs. If you do, parts of your
vehicle can break, tire damage
could occur, or it can change the
way your vehicle handles. This
could result in loss of control
and cause personal injury. .
Overloading could not only
shorten the life of your vehicle
and the tires, but also could lead
to hazardous vehicle handling
and long braking distance. This
may cause a premature tire
malfunction, which could result
in a serious accident and perso-
nal injury. Failures caused by
overloading are not covered by
the vehicle’s warranty.
MEASUREMENT OF WEIGHTS
Secure loose items to prevent weight shifts
that could affect the balance of your
vehicle. When the vehicle is loaded, drive
to a scale and weigh the front and the rear
wheels separately to determine axle loads.
Individual axle loads should not exceed
either of the gross axle weight ratings
(GAWR). The total of the axle loads should
not exceed the gross vehicle weight rating
(GVWR) . These ratings are given on the
vehicle certification label. If weight ratings
are exceeded, move or remove items to
bring all weights below the ratings.
Technical and consumer information9-19