2012 NISSAN 370Z COUPE brake light
[x] Cancel search: brake lightPage 137 of 427
SPA2685
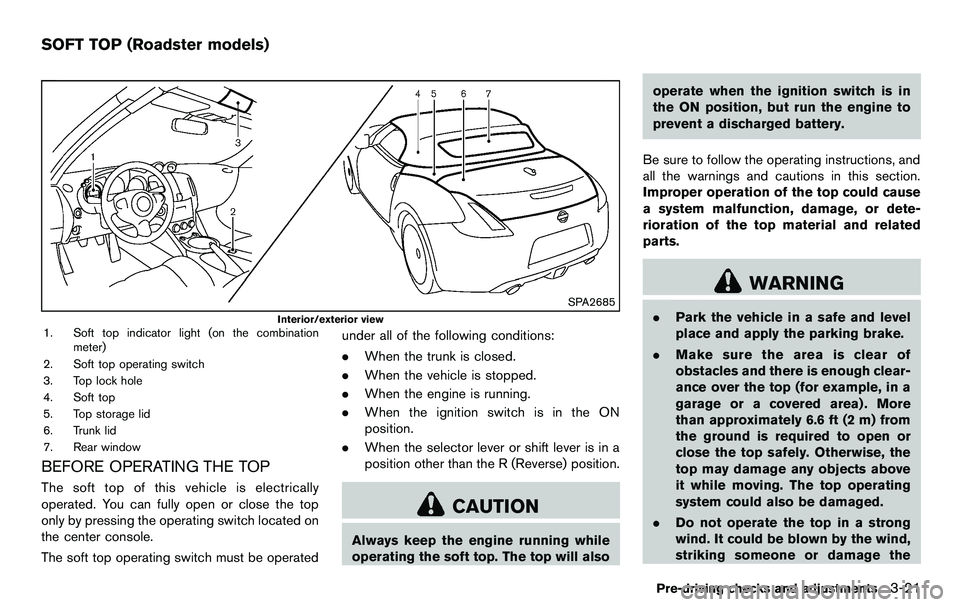
Interior/exterior view1. Soft top indicator light (on the combinationmeter)
2. Soft top operating switch
3. Top lock hole
4. Soft top
5. Top storage lid
6. Trunk lid
7. Rear window
BEFORE OPERATING THE TOP
The soft top of this vehicle is electrically
operated. You can fully open or close the top
only by pressing the operating switch located on
the center console.
The soft top operating switch must be operated under all of the following conditions:
.
When the trunk is closed.
. When the vehicle is stopped.
. When the engine is running.
. When the ignition switch is in the ON
position.
. When the selector lever or shift lever is in a
position other than the R (Reverse) position.
CAUTION
Always keep the engine running while
operating the soft top. The top will also operate when the ignition switch is in
the ON position, but run the engine to
prevent a discharged battery.
Be sure to follow the operating instructions, and
all the warnings and cautions in this section.
Improper operation of the top could cause
a system malfunction, damage, or dete-
rioration of the top material and related
parts.
WARNING
. Park the vehicle in a safe and level
place and apply the parking brake.
. Make sure the area is clear of
obstacles and there is enough clear-
ance over the top (for example, in a
garage or a covered area) . More
than approximately 6.6 ft (2 m) from
the ground is required to open or
close the top safely. Otherwise, the
top may damage any objects above
it while moving. The top operating
system could also be damaged.
. Do not operate the top in a strong
wind. It could be blown by the wind,
striking someone or damage the
Pre-driving checks and adjustments3-21
SOFT TOP (Roadster models)
Page 179 of 427
course.
HOW TO ADJUST SCREEN
To adjust the Display ON/OFF, Brightness, Tint,
Color, Contrast and Black Level of the RearView
monitor, push the SETTING button with the
RearView monitor on, select the “Display” key on
the screen and select the item key and adjust
the level using the multi-function controller.
Do not adjust the Brightness, Tint, Color,
Contrast and Black Level of the RearView
monitor while the vehicle is moving. Make sure
the parking brake is firmly applied and the
engine is not running.
The display of the predicted course lines can be
set to ON or OFF. For details, see “CAMERA
settings” (P.4-16) .
OPERATING TIPS
.When the selector/shift lever is shifted to
the R (Reverse) position, the monitor screen
automatically changes to the RearView
monitor mode.
. It may take some time until the RearView
monitor is displayed after the selector/shift
lever has been shifted to R from another
position or to another position from “R”.
Objects may be distorted momentarily until
the RearView monitor screen is displayed
completely. .
When the temperature is extremely high or
low, the screen may not clearly display
objects. This is not a malfunction.
. When strong light directly enters the cam-
era, objects may not be displayed clearly.
This is not a malfunction.
. Vertical lines may be seen in objects on the
screen. This is due to strong reflected light
from the bumper. This is not a malfunction.
. The screen may flicker under fluorescent
light. This is not a malfunction.
. The colors of objects on the RearView
monitor may differ somewhat from those of
the actual object.
. Objects on the monitor may not be clear in a
dark place or at night. This is not a
malfunction.
. If dirt, rain or snow attaches to the camera,
the RearView monitor may not clearly display
objects. Clean the camera.
. Do not use alcohol, benzine or thinner to
clean the camera. This will cause discolora-
tion. To clean the camera, wipe with a cloth
dampened with diluted mild cleaning agent
and then wipe with a dry cloth.
. Do not damage the camera as the monitor
screen may be adversely affected.
. Do not use wax on the camera window.
Wipe off any wax with a clean cloth dampened with mild detergent diluted with
water.
Center display, heater, air conditioner, audio, phone and voice recognition systems4-23
Page 291 of 427
WARNING
The following actions can increase the
chance of losing control of the vehicle if
there is a sudden loss of tire air
pressure. Losing control of the vehicle
may cause a collision and result in
personal injury.
.The vehicle generally moves or pulls
in the direction of the flat tire.
. Do not rapidly apply the brakes.
. Do not rapidly release the accelera-
tor pedal.
. Do not rapidly turn the steering
wheel.
1. Remain calm and do not overreact.
2. Maintain a firm grip on the steering wheel with both hands and try to hold a straight
course.
3. When appropriate, slowly release the accel- erator pedal to gradually slow the vehicle.
4. Gradually steer the vehicle to a safe location off the road and away from traffic if possible.
5. Lightly apply the brake pedal to gradually stop the vehicle. 6. Turn on the hazard warning flashers and
either contact a roadside emergency service
to change the tire or see “Changing a flat
tire (for models with spare tire)” (P.6-3) of
this Owner’s Manual.
DRINKING ALCOHOL/DRUGS AND
DRIVING
WARNING
Never drive under the influence of
alcohol or drugs. Alcohol in the blood-
stream reduces coordination, delays
reaction time and impairs judgement.
Driving after drinking alcohol increases
the likelihood of being involved in an
accident injuring yourself and others.
Additionally, if you are injured in an
accident, alcohol can increase the se-
verity of the injury.
NISSAN is committed to safe driving. However,
you must choose not to drive under the influence
of alcohol. Every year thousands of people are
injured or killed in alcohol-related accidents.
Although the local laws vary on what is
considered to be legally intoxicated, the fact is
that alcohol affects all people differently and
most people underestimate the effects of alcohol.
Remember, drinking and driving don’t mix! And
that is true for drugs, too (over-the-counter,
prescription, and illegal drugs) . Don’t drive if
your ability to operate your vehicle is impaired by
alcohol, drugs, or some other physical condition.
Starting and driving5-7
Page 295 of 427
.Make sure the area around the vehicle is
clear.
. Check fluid levels such as engine oil, cool-
ant, brake fluid and window washer fluid as
frequently as possible, or at least whenever
you refuel.
. Check that all windows and lights are clean.
. Visually inspect tires for their appearance
and condition. Also check tires for proper
inflation.
. Lock all doors.
. Position seat and adjust head restraints.
. Adjust inside and outside mirrors.
. Fasten seat belts and ask all passengers to
do likewise.
. Check the operation of warning lights when
the ignition switch is pushed to the ON
position. (See “Warning/indicator lights and
audible reminders” (P.2-9) .) 1. Apply the parking brake.
2.
Automatic Transmission (AT) model:
Move the selector lever to the P (Park) or N
(Neutral) position. (P is recommended.)
The starter is designed not to operate unless
the selector lever is in either of the above
positions.
Manual Transmission (MT) model:
Move the shift lever to the N (Neutral)
position. Depress the clutch pedal fully to
the floor.
The starter is designed not to operate unless
the clutch pedal is fully depressed.
The Intelligent Key must be carried
when operating the ignition switch.
3. Push the ignition switch to the ON position. Depress the brake pedal (AT model) or the
clutch pedal (MT model) and push the
ignition switch to start the engine.
To start the engine immediately, push and
release the ignition switch while depressing
the brake pedal with the ignition switch in
any position.
.If the engine is very hard to start inextremely cold weather or when restart-
ing, depress the accelerator pedal a little
(approximately 1/3 to the floor) and while
holding, crank the engine. Release the accelerator pedal when the engine starts.
.If the engine is very hard to start because
it is flooded, depress the accelerator
pedal all the way to the floor and hold it.
Push the ignition switch to the ON
position to start cranking the engine.
After 5 or 6 seconds, stop cranking by
pushing the ignition switch to OFF. After
cranking the engine, release the accel-
erator pedal. Crank the engine with your
foot off the accelerator pedal by
depressing the brake pedal and pushing
the push-button ignition switch to start
the engine. If the engine starts, but fails
to run, repeat the above procedure.
CAUTION
Do not operate the starter for more
than 15 seconds at a time. If the engine
does not start, push the ignition switch
to OFF and wait 10 seconds before
cranking again, otherwise the starter
could be damaged.
4. Warm-up
Allow the engine to idle for at least 30
seconds after starting. Do not race the
engine while warming it up. Drive at
Starting and driving5-11
BEFORE STARTING THE ENGINE STARTING THE ENGINE
Page 300 of 427
5-16Starting and driving
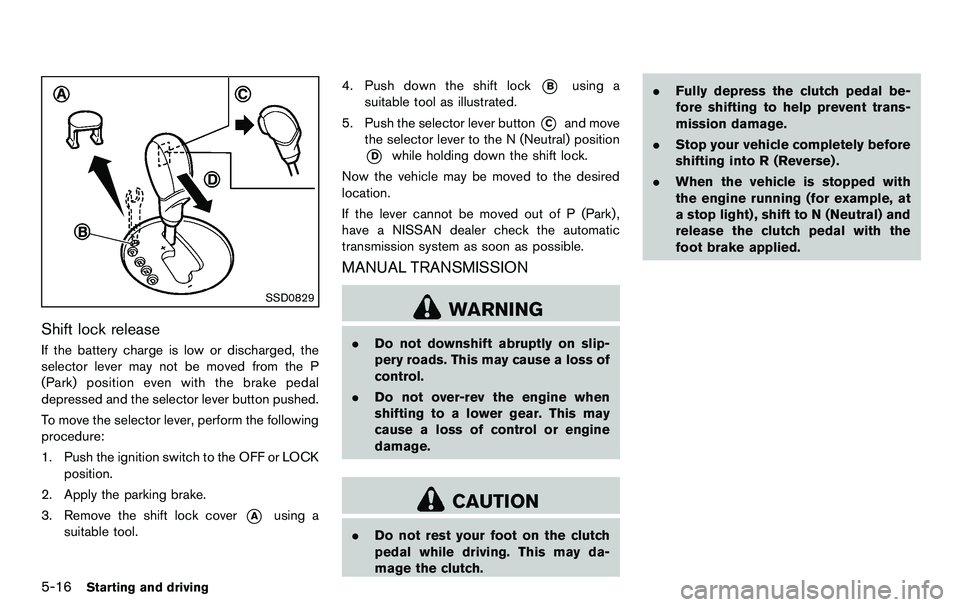
SSD0829
Shift lock release
If the battery charge is low or discharged, the
selector lever may not be moved from the P
(Park) position even with the brake pedal
depressed and the selector lever button pushed.
To move the selector lever, perform the following
procedure:
1. Push the ignition switch to the OFF or LOCKposition.
2. Apply the parking brake.
3. Remove the shift lock cover
*Ausing a
suitable tool. 4. Push down the shift lock
*Busing a
suitable tool as illustrated.
5. Push the selector lever button
*Cand move
the selector lever to the N (Neutral) position
*Dwhile holding down the shift lock.
Now the vehicle may be moved to the desired
location.
If the lever cannot be moved out of P (Park) ,
have a NISSAN dealer check the automatic
transmission system as soon as possible.
MANUAL TRANSMISSION
WARNING
. Do not downshift abruptly on slip-
pery roads. This may cause a loss of
control.
. Do not over-rev the engine when
shifting to a lower gear. This may
cause a loss of control or engine
damage.
CAUTION
.Do not rest your foot on the clutch
pedal while driving. This may da-
mage the clutch. .
Fully depress the clutch pedal be-
fore shifting to help prevent trans-
mission damage.
. Stop your vehicle completely before
shifting into R (Reverse) .
. When the vehicle is stopped with
the engine running (for example, at
a stop light) , shift to N (Neutral) and
release the clutch pedal with the
foot brake applied.
Page 305 of 427
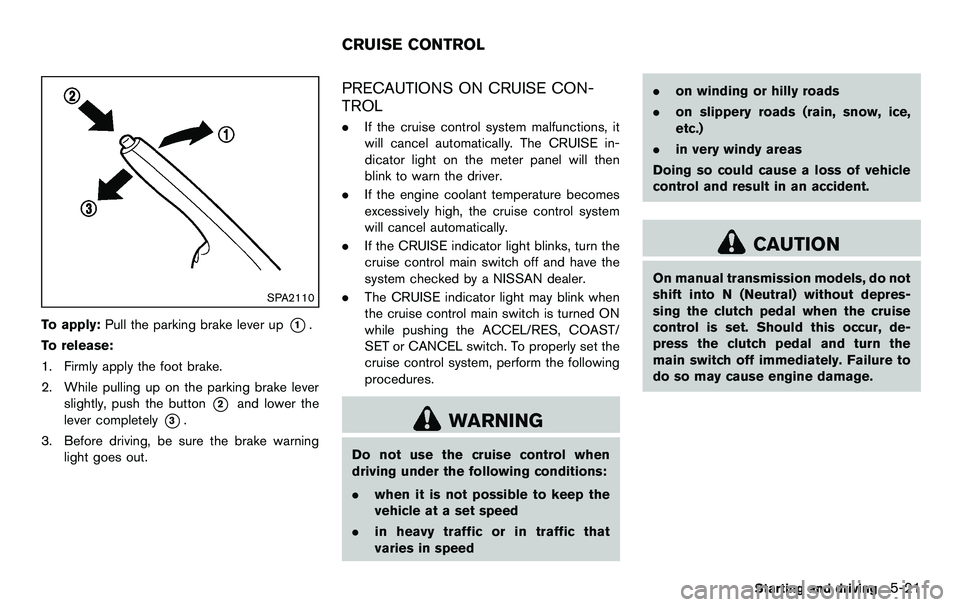
SPA2110
To apply:Pull the parking brake lever up*1.
To release:
1. Firmly apply the foot brake.
2. While pulling up on the parking brake lever slightly, push the button
*2and lower the
lever completely
*3.
3. Before driving, be sure the brake warning light goes out.
PRECAUTIONS ON CRUISE CON-
TROL
.If the cruise control system malfunctions, it
will cancel automatically. The CRUISE in-
dicator light on the meter panel will then
blink to warn the driver.
. If the engine coolant temperature becomes
excessively high, the cruise control system
will cancel automatically.
. If the CRUISE indicator light blinks, turn the
cruise control main switch off and have the
system checked by a NISSAN dealer.
. The CRUISE indicator light may blink when
the cruise control main switch is turned ON
while pushing the ACCEL/RES, COAST/
SET or CANCEL switch. To properly set the
cruise control system, perform the following
procedures.
WARNING
Do not use the cruise control when
driving under the following conditions:
.when it is not possible to keep the
vehicle at a set speed
. in heavy traffic or in traffic that
varies in speed .
on winding or hilly roads
. on slippery roads (rain, snow, ice,
etc.)
. in very windy areas
Doing so could cause a loss of vehicle
control and result in an accident.
CAUTION
On manual transmission models, do not
shift into N (Neutral) without depres-
sing the clutch pedal when the cruise
control is set. Should this occur, de-
press the clutch pedal and turn the
main switch off immediately. Failure to
do so may cause engine damage.
Starting and driving5-21
CRUISE CONTROL
Page 306 of 427
5-22Starting and driving
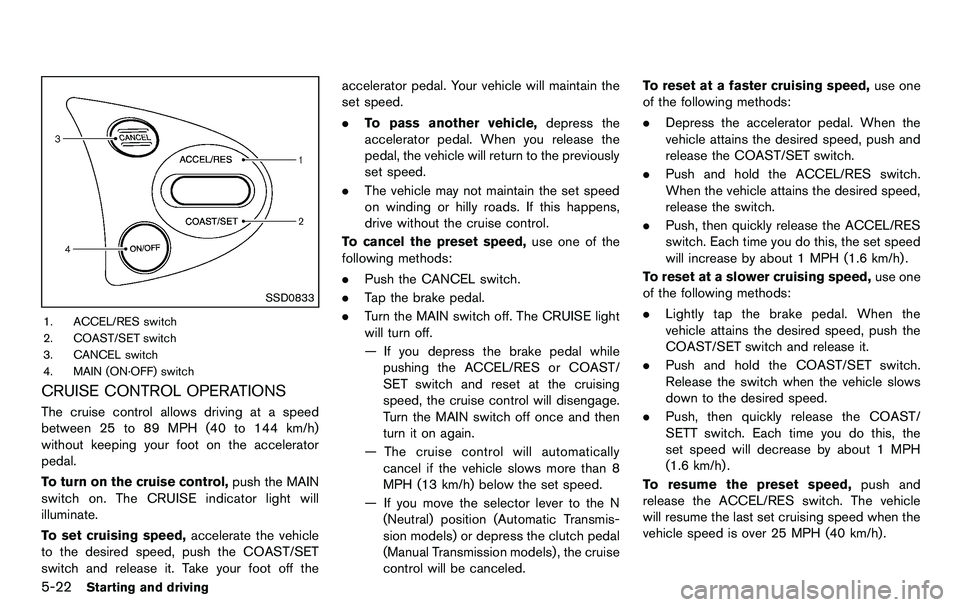
SSD0833
1. ACCEL/RES switch
2. COAST/SET switch
3. CANCEL switch
4. MAIN (ON·OFF) switch
CRUISE CONTROL OPERATIONS
The cruise control allows driving at a speed
between 25 to 89 MPH (40 to 144 km/h)
without keeping your foot on the accelerator
pedal.
To turn on the cruise control,push the MAIN
switch on. The CRUISE indicator light will
illuminate.
To set cruising speed, accelerate the vehicle
to the desired speed, push the COAST/SET
switch and release it. Take your foot off the accelerator pedal. Your vehicle will maintain the
set speed.
.
To pass another vehicle, depress the
accelerator pedal. When you release the
pedal, the vehicle will return to the previously
set speed.
. The vehicle may not maintain the set speed
on winding or hilly roads. If this happens,
drive without the cruise control.
To cancel the preset speed, use one of the
following methods:
. Push the CANCEL switch.
. Tap the brake pedal.
. Turn the MAIN switch off. The CRUISE light
will turn off.
— If you depress the brake pedal while
pushing the ACCEL/RES or COAST/
SET switch and reset at the cruising
speed, the cruise control will disengage.
Turn the MAIN switch off once and then
turn it on again.
— The cruise control will automatically cancel if the vehicle slows more than 8
MPH (13 km/h) below the set speed.
— If you move the selector lever to the N (Neutral) position (Automatic Transmis-
sion models) or depress the clutch pedal
(Manual Transmission models) , the cruise
control will be canceled. To reset at a faster cruising speed,
use one
of the following methods:
. Depress the accelerator pedal. When the
vehicle attains the desired speed, push and
release the COAST/SET switch.
. Push and hold the ACCEL/RES switch.
When the vehicle attains the desired speed,
release the switch.
. Push, then quickly release the ACCEL/RES
switch. Each time you do this, the set speed
will increase by about 1 MPH (1.6 km/h).
To reset at a slower cruising speed, use one
of the following methods:
. Lightly tap the brake pedal. When the
vehicle attains the desired speed, push the
COAST/SET switch and release it.
. Push and hold the COAST/SET switch.
Release the switch when the vehicle slows
down to the desired speed.
. Push, then quickly release the COAST/
SETT switch. Each time you do this, the
set speed will decrease by about 1 MPH
(1.6 km/h).
To resume the preset speed, push and
release the ACCEL/RES switch. The vehicle
will resume the last set cruising speed when the
vehicle speed is over 25 MPH (40 km/h).
Page 309 of 427
4. Push the ignition switch to the OFF position.
WARNING
If the engine is not running or is turned
off while driving, the power assist for
the steering will not work. Steering will
be harder to operate.
The power assisted steering uses a hydraulic
pump, driven by the engine, to assist steering.
If the engine stops or the drive belt breaks, you
will still have control of the vehicle. However,
much greater steering effort is needed, espe-
cially in sharp turns and at low speeds.
BRAKING PRECAUTIONS
The brake system has two separate hydraulic
circuits. If one circuit malfunctions, you will still
have braking at two wheels.
Vacuum assisted brakes
The brake booster aids braking by using engine
vacuum. If the engine stops, you can stop the
vehicle by depressing the brake pedal. However,
greater foot pressure on the brake pedal will be
required to stop the vehicle and the stopping
distance will be longer.
When the brake pedal is depressed slowly and
firmly, you may hear a clicking noise and feel a
slight pulsation. This is normal and indicates that
the Brake Assist System is operating.
Wet brakes
When the vehicle is washed or driven through
water, the brakes may get wet. As a result, your
braking distance will be longer and the vehicle
may pull to one side during braking.
To dry brakes, drive the vehicle at a safe speed
while lightly tapping the brake pedal to heat-up
the brakes. Do this until the brakes return to
normal. Avoid driving the vehicle at high speeds
until the brakes function correctly.
Starting and driving5-25
POWER STEERING BRAKE SYSTEM