Page 46 of 714
Seat and restraint systems
2-19
2
6. Pull the head restraints off the front of the seatback. 7. First check that the head restraints are facing in the right
direction and then insert them into the seatback. The stay
with the notch (D) must be installed in the hole with the
lock knob (E). Push the head restraints down until the
restraints lock into place.
BK0138000US.book 19 ページ 2011年4月13日 水曜日 午前11時17分
Page 47 of 714
2-20 Seat and restraint systems
2
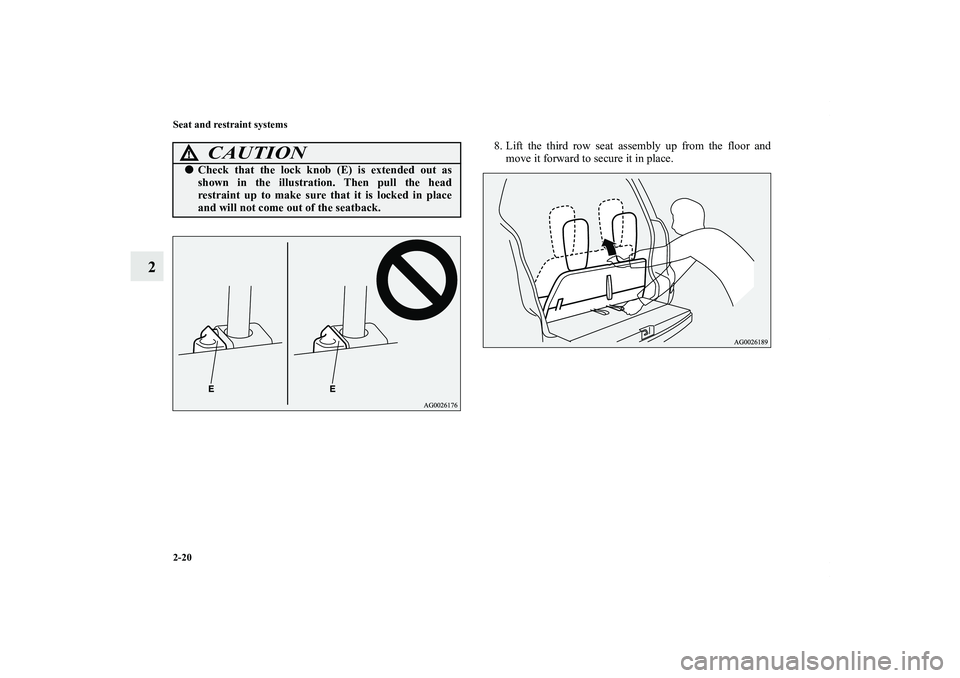
8. Lift the third row seat assembly up from the floor and
move it forward to secure it in place.
CAUTION
!�Check that the lock knob (E) is extended out as
shown in the illustration. Then pull the head
restraint up to make sure that it is locked in place
and will not come out of the seatback.
BK0138000US.book 20 ページ 2011年4月13日 水曜日 午前11時17分
Page 50 of 714
Seat and restraint systems
2-23
2
NOTE�Push down so that the backside of the third row seat is
firmly secured to the floor.
�If it is difficult to lock the seat in place, return the third
row seat to its original position, and then lock it in place
by pushing down while pulling with more force on the
strap, so that the back end of the third row seat touches the
floor.
CAUTION
!�When stowing the third row seat in the floor, keep
your hands away from the end trim (D). Your hands
could get caught and injured.
BK0138000US.book 23 ページ 2011年4月13日 水曜日 午前11時17分
Page 52 of 714
Seat and restraint systems
2-25
2
5. Press the lock knob (E) in the direction shown by the
arrow. Then pull the head restraint up and out of the seat-
back.6. Turn the head restraints up side down and store them in
the front of the seatback by inserting the knob (F) in the
hole (G).
BK0138000US.book 25 ページ 2011年4月13日 水曜日 午前11時17分
Page 54 of 714

Seat and restraint systems
2-27
2
NOTE�The head restraint height in the third row seats cannot be
adjusted.
For instructions regarding on how to use the third row
seats, refer to “Third row seat (Seating 7 passengers)” on
page 2-16.
Adjustment of the head restraint height (The
front and second row seats)To reduce the risk of injury in an accident, adjust the head
restraint height so that the center of the restraint is at your eye
level when seated. Any person too tall for the restraint to reach
their eye level when seated should raise the restraint to the
highest locked position.
�To raise the restraint, pull it straight up.
�To lower the restraint, push down on it while pressing the
lock knob (A) in the direction shown by the arrow.
�After adjusting the height, push down on the restraint to
make sure it is locked in position.
WA R N I N G
!�Driving without the head restraints in place can
cause you and your passengers serious injury or
death in an accident. To reduce the risk of injury in
an accident, always make sure the head restraints
are installed and properly positioned when the seat
is occupied.�In order to minimize the risk of a neck injury due to
a rear impact, the seatback must be adjusted to the
upright position and the head restraint must be
adjusted to the proper position before vehicle opera-
tion. The driver should never adjust the seat while
the vehicle is in motion.�Never place a cushion or similar device on the seat-
back. This can adversely affect head restraint per-
formance by increasing the distance between your
head and the restraint.
BK0138000US.book 27 ページ 2011年4月13日 水曜日 午前11時17分
Page 55 of 714
2-28 Seat and restraint systems
2
To remove (The front and second row seats)Press the lock knob (A) in the direction shown by the arrows.
Then pull the head restraint up and out of the seatback.To install (The front and second row seats)First check that the head restraint is facing in the right direction
as shown in the previous illustration, and then insert it into the
seatback. Push the head restraint down while pressing the lock
knob (A) until the restraint locks into place.
WA R N I N G
!�To help minimize the risk of neck injury in the event
of an accident, the head restraints must be properly
installed and positioned to proper height before
vehicle operation.
CAUTION
!�Check that the lock knob (A) is extended out as
shown in the illustration. Then pull the head
restraint up to make sure that it is locked in place
and will not come out of the seatback.
BK0138000US.book 28 ページ 2011年4月13日 水曜日 午前11時17分
Page 58 of 714
Seat and restraint systems
2-31
2
2. Operate the lever (A) or lock release strap (B) on the sec-
ond row seats to fold down the seatbacks.3. For vehicles with 2nd row seat slide function, the seatback
will fall forward and the entire seat will flip up as it slides
forward.Operating the leverOperating the lock release strap
BK0138000US.book 31 ページ 2011年4月13日 水曜日 午前11時17分
Page 60 of 714
Seat and restraint systems
2-33
2
To put the seat back in its normal position1. While supporting the seat with your hand, pull the lock
release strap (A) on the backside of the seat cushion and
keep it pulled as you lower the seat flat.
CAUTION
!�For vehicles equipped with a third row seat, be care-
ful not to catch the feet of any passengers sitting in
the third row seat, when returning the second row
seats to their original position.
BK0138000US.book 33 ページ 2011年4月13日 水曜日 午前11時17分


 in the direction shown by the
arrow. Then pull the head restraint up and out of the seat-
back.6. Turn the head restraints up side down and")
Press the lock knob (A) in the direction shown by the arrows.
Then pull the head restraint up and out of the seatback.To ins")
 or lock release strap (B) on the sec-
ond row seats to fold down the seatbacks.3. For vehicles with 2nd row seat slide function, the seatback")
 on the backside of the seat cushion and
keep i")