Page 515 of 714

5-84 Comfort controls
5
To change the lock cancellation codeYou can change the code for unlocking channel(s) to any num-
ber you want.
1. Press the TUNE/SOUND switch (7) for about 2 seconds
or longer to enter the MENU mode. Then select the
LOCK setting mode.
2. In the LOCK setting mode, turn the TUNE/SOUND
switch (7) and select “CODE EDIT”.
3. When you press the TUNE/SOUND switch (7), the code
entry window will be shown in the display.
4. Use the memory select buttons (10) to enter the current
code and then press the TUNE/SOUND switch (7).
5. If the correct code is entered, the code entry window will
be shown again. Enter your desired code.
If the entered code is incorrect, a warning sound will be
emitted and “CODE ERROR” will be displayed. The code
entry window will then be shown again.
You can try to enter the code again, no matter how many
times an incorrect code has been entered.
6. After you enter the new code, press the TUNE/SOUND
switch (7). The code entry window will be shown again
for confirmation. Enter the new code again and press the
TUNE/SOUND switch (7).7. “STORED” will be displayed for 2 seconds, the code will
be changed and the satellite radio will return to the LOCK
setting mode.
NOTE�The SKIP settings, LOCK settings and lock cancellation
code are stored in memory. Disconnecting the battery
cable will erase these settings.
(The lock cancellation code will reset to the default fac-
tory setting: “1111”).To reset the lock cancellation codeIn case you forget the code, it is possible to reset the code to the
factory setting (1111).
1. With the audio power OFF, press the PWR switch (2) and
the TUNE/SOUND switch (7) at the same time.
The display will show “CODE INITIAL”.
2. Press the TUNE/SOUND switch (7). “YES” will be dis-
played. To reset the code, press the TUNE/SOUND
switch (7) again. “STORED” will be shown for 2 seconds
and the code will be reset.
If you do not want to reset the code, turn the
TUNE/SOUND switch (7) to display “CANCEL” and
then press the TUNE/SOUND switch (7) again.
BK0138000US.book 84 ページ 2011年4月13日 水曜日 午前11時17分
Page 523 of 714
5-92 Comfort controls
5
To fast forward/reverse the discTo fast forward or fast reverse the disc, press the fast-forward
button (11) or the fast-reverse button (10).
Fast forward
You can fast-forward the disc by pressing the fast-forward but-
ton (11). While the button is kept pressed, the disc will be fast-
forwarded.
Fast reverse
You can fast reverse the disc by pressing the fast-reverse button
(10). While the button is kept pressed, the disc will be fast-
reversed.
To select a desired folder (MP3 CDs only)You can select your desired folder by turning the FOLDER
switch (17).
Folder up
Turn the FOLDER switch (17) clockwise until the desired
folder number appears on the display.
Folder down
Turn the FOLDER switch (17) counterclockwise until the
desired folder number appears on the display.
BK0138000US.book 92 ページ 2011年4月13日 水曜日 午前11時17分
Page 565 of 714
5-134 Comfort controls
5Antenna
N00734200400
Roof antenna (except for vehicles with SIRIUS
satellite radio)When listening to the radio, fold the antenna toward the rear of
the vehicle until you hear it click.
To r e m o v eTurn the pole (A) counterclockwise.To i n s t a l lScrew the pole (A) clockwise into the base (B) until it is
securely retained.NOTE�Be sure to remove the roof antenna in the following cases:
• When using an automatic car wash
• When covering your vehicle with a car cover
�Before driving into a structure that has a low ceiling, fold
down the antenna toward the front of the vehicle to pre-
vent it from hitting the ceiling.
BK0138000US.book 134 ページ 2011年4月13日 水曜日 午前11時17分
Page 566 of 714
Comfort controls
5-135
5
Roof antenna (for vehicles with SIRIUS satellite
radio)For securing the best satellite reception, the angle of the
antenna is fixed.
To r e m o v eTurn the pole (A) counterclockwise.To i n s t a l lScrew the pole (A) clockwise into the base (B) until it is
securely retained.NOTE�Be sure to remove the roof antenna in the following cases:
• When entering a place with low clearance
• When using an automatic car wash
• When covering your vehicle with a car cover
BK0138000US.book 135 ページ 2011年4月13日 水曜日 午前11時17分
Page 567 of 714

5-136 Comfort controls
5Clock
(if so equipped)
N00755000078
The time is displayed when the ignition switch is in the “ON”
or “ACC” position.To set the time1. Press and hold the CLOCK button and the clock display
flashes.
2. Press the various buttons to adjust.3. When the time is set, press the DISP button to stop the
clock display from flashing. After time signal setting,
however, the clock display automatically stops flashing.
NOTE�Reset the time after the battery terminals are disconnected
and reconnected.
�Seconds do not appear in the clock display, but after
adjusting the “Minutes” setting and time signal setting,
the clock begins to operate from 0 seconds.
H — “Hour” setting
Press this button to fast-forward the “hours”.
M — “Minutes” setting
Press this button to fast-forward the “minutes”.
CLOCK DISP H M :00
:00 — Time signal setting
At the same time the button is pressed, the fol-
lowing modifications are made.
10:00 - 10:29 ......Change to 10:00
10:30 - 11:00 ......Change to 11:00
BK0138000US.book 136 ページ 2011年4月13日 水曜日 午前11時17分
Page 568 of 714

Comfort controls
5-137
5 General information about your radio
N00733900413
Your vehicle’s radio receives both AM and FM stations.
The quality of your reception is affected by distance, obstacles,
and signal interference.
This radio complies with Part 15 of Federal Communications
Commission (FCC) Rules (for vehicles sold in U.S.A.). Opera-
tion is subject to the following conditions:
�The device may not cause harmful interference.
�This device must accept any interference recieved, includ-
ing interference that may cause undesirable operation.
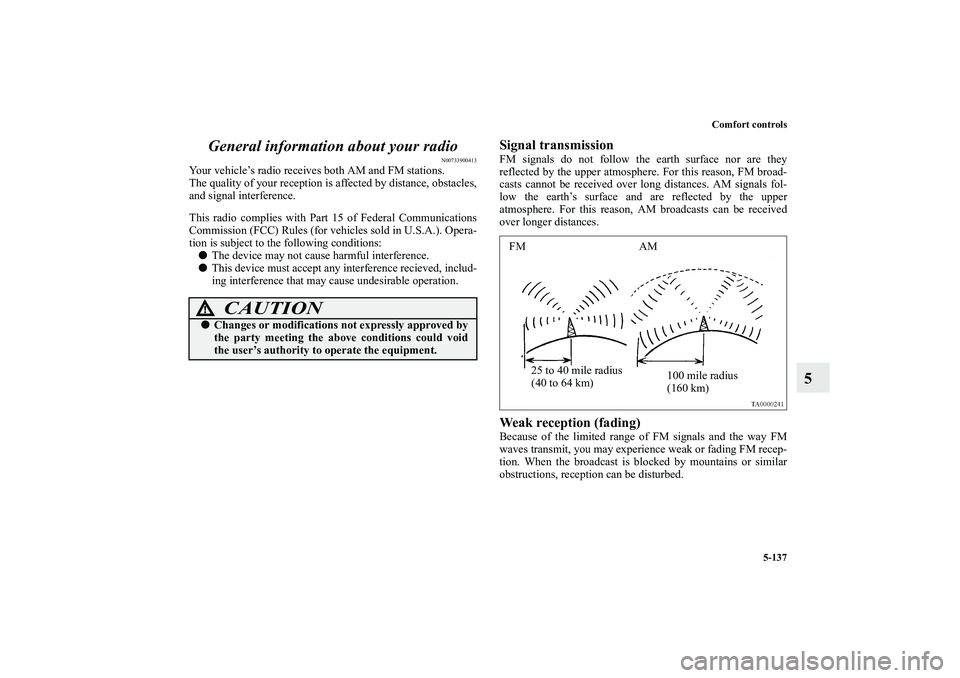
Signal transmissionFM signals do not follow the earth surface nor are they
reflected by the upper atmosphere. For this reason, FM broad-
casts cannot be received over long distances. AM signals fol-
low the earth’s surface and are reflected by the upper
atmosphere. For this reason, AM broadcasts can be received
over longer distances.Weak reception (fading)Because of the limited range of FM signals and the way FM
waves transmit, you may experience weak or fading FM recep-
tion. When the broadcast is blocked by mountains or similar
obstructions, reception can be disturbed.
CAUTION
!�Changes or modifications not expressly approved by
the party meeting the above conditions could void
the user’s authority to operate the equipment.
FM AM
25 to 40 mile radius
(40 to 64 km)100 mile radius
(160 km)
BK0138000US.book 137 ページ 2011年4月13日 水曜日 午前11時17分
Page 576 of 714

For emergencies
6-3
6
3. You could be injured if the vehicles move. Set the parking
brake firmly on each vehicle. Put an automatic transaxle
or CVT in “P” (PARK) or a manual transaxle in “N”
(Neutral). Turn the ignition switch to the “LOCK” posi-
tion.NOTE�Turn off all lights, heater, and other electrical loads. This
will avoid sparks and help save both batteries.
4. Make sure your battery electrolyte is at the proper level.
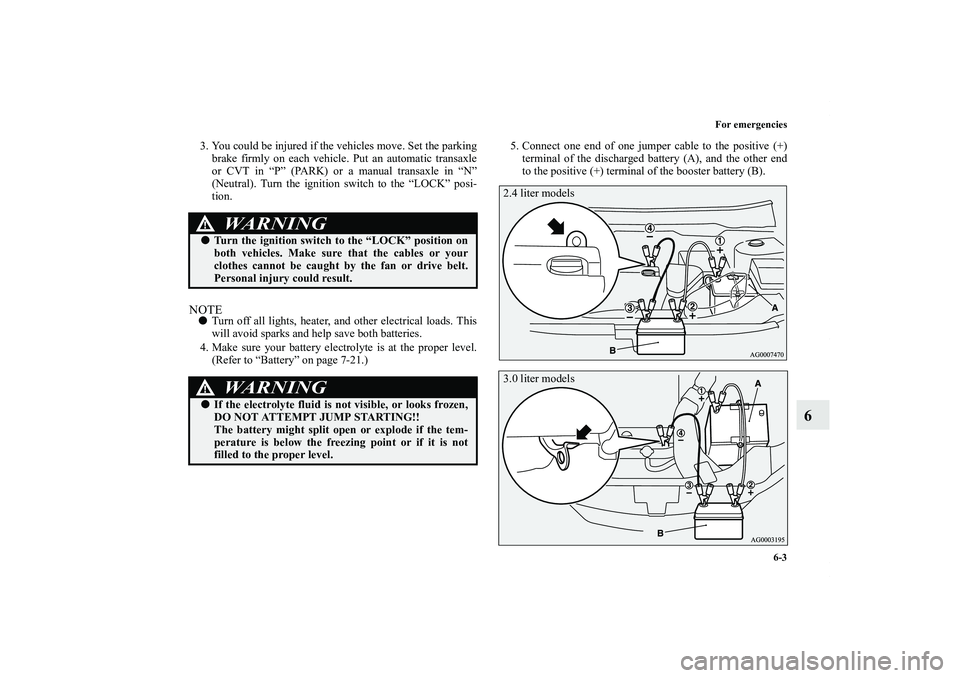
(Refer to “Battery” on page 7-21.)5. Connect one end of one jumper cable to the positive (+)
terminal of the discharged battery (A), and the other end
to the positive (+) terminal of the booster battery (B).
WA R N I N G
!�Turn the ignition switch to the “LOCK” position on
both vehicles. Make sure that the cables or your
clothes cannot be caught by the fan or drive belt.
Personal injury could result.
WA R N I N G
!�If the electrolyte fluid is not visible, or looks frozen,
DO NOT ATTEMPT JUMP STARTING!!
The battery might split open or explode if the tem-
perature is below the freezing point or if it is not
filled to the proper level.
2.4 liter models3.0 liter models
BK0138000US.book 3 ページ 2011年4月13日 水曜日 午前11時17分
Page 577 of 714

6-4 For emergencies
6
NOTE�Open the terminal cover before connecting the jumper
cable to the positive terminal of the battery.
(Refer to “Battery” on page 7-21.)
�Use the proper cables suitable for the battery size.
Otherwise heat damage to the cables could result.
�Check the jumper cables for damage and corrosion before
use.
6. Connect one end of the other jumper cable to the negative
(-) terminal of the booster battery (B), and the other end to
the engine block of the vehicle with the low battery (A) at
the point farthest from the battery.7. Start the engine in the vehicle providing the boost. Let the
engine idle a few minutes, then start the engine in the
vehicle with the low battery.
8. After the engine is started, disconnect the cables in the
reverse order from the way you connected them.
WA R N I N G
!�Be sure to follow the proper order when connecting
the batteries, of: →→→�Make sure that the connection is made to the
engine properly. If the connection is directly made to
the negative terminal of the battery, the flammable
gases from inside the battery might catch fire and
explode, causing personal injury.�When connecting the jumper cable, do not connect
the positive (+) cable to the negative (-) terminal.
Otherwise sparks can make the battery explode.
CAUTION
!�Make sure that the jumper cable will not be caught
in the cooling fan or other moving parts in the
engine compartment.
WA R N I N G
!�Charging your battery while it is still in your vehicle
might cause the battery to catch fire and explode. If
you have to charge it while in the vehicle, disconnect
the negative (-) terminal.�Keep sparks, cigarettes, and flames away from the
battery because the battery could explode.�Keep your work area well vented when charging or
using the battery in an enclosed space.�Remove all the caps before charging the battery.�Electrolyte (battery acid) is made of corrosive
diluted sulfuric acid. If electrolyte comes in contact
with your hands, eyes, clothes, or the painted sur-
face of your vehicle, thoroughly flush with water. If
electrolyte gets in your eyes, flush them immediately
and thoroughly with water, and get prompt medical
attention.�Always wear protective clothing and goggles when
working near the battery.�Keep the battery out of the reach of children.
BK0138000US.book 4 ページ 2011年4月13日 水曜日 午前11時17分