Page 45 of 177

Destination Setting 3-12
Destination Setting
After deciding on a location it can be set as a
destination or way point, or the location can
be stored.
Setting as Destination
Setting the displayed location as the
destination.
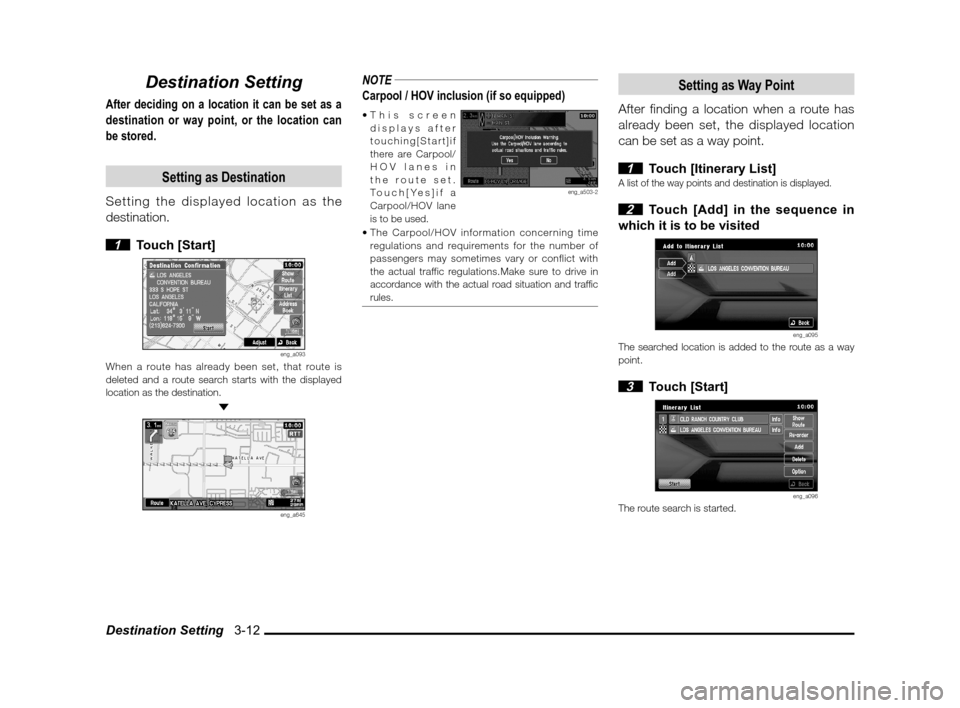
1 Touch [Start]
eng_a093When a route has already been set, that route is
deleted and a route search starts with the displayed
location as the destination.
eng_a645
NOTE
Carpool / HOV inclusion (if so equipped)
screen
displays after
touching[Start]if
there are Carpool/
HOV lanes in
the route set.
Touch[Yes]if a
Carpool/HOV lane
is to be used.
eng_a503-2
regulations and requirements for the number of
passengers may sometimes vary or conflict with
the actual traffic regulations.Make sure to drive in
accordance with the actual road situation and traf� c
rules.
Setting as Way Point
After finding a location when a route has
already been set, the displayed location
can be set as a way point.
1 Touch [Itinerary List]A list of the way points and destination is displayed.
2 Touch [Add] in the sequence in
which it is to be visited
eng_a095The searched location is added to the route as a way
point.
3 Touch [Start]
eng_a096The route search is started.
��������\b ���\b
��\f�� \
������ ��
�������� �\b
\b�� \f
Page 46 of 177
Destination Setting 3-13
Destination
NOTE
display a map of
the vicinity and
corresponding
information.
eng_a097Touch [Show Route] to display the entire route, view 3
different routes and change the calculation conditions in
the same way as
“Showing the Route” (page 4-4).Touch [Re-order] to change the sequence for visiting each
location in the same way as “Re-ordering” (page 4-5).“Adding a Way Point” (page 4-6).
the same way as
“Deleting” (page 4-6).
Touch [Option] to perform settings related to the route in
the same way as “Route Options” (page 11-12)
Storing the Location
Storing the displayed location and adding
it to the address book.
1 Touch [Address Book]The information screen for the location to be stored is
displayed.
2 Touch [Set to Address Book]
eng_a098The displayed location is stored in the address book.
NOTE When editing an icon or name, perform in the same
way as
“Editing a Location” (page 5-4).
��������\b ���\b
��\f�� \
������ ��
�������� �\b
\b�� \f
Page 48 of 177
![MITSUBISHI LANCER 2012 8.G MMCS Manual View Route 4-1
Route
Route
View Route
The created route can be viewed using various
methods.
1 Touch [Route] on the current location
screen
eng_a645The route menu is displayed.
2 Touch [View Ro MITSUBISHI LANCER 2012 8.G MMCS Manual View Route 4-1
Route
Route
View Route
The created route can be viewed using various
methods.
1 Touch [Route] on the current location
screen
eng_a645The route menu is displayed.
2 Touch [View Ro](/manual-img/19/7452/w960_7452-47.png)
View Route 4-1
Route
Route
View Route
The created route can be viewed using various
methods.
1 Touch [Route] on the current location
screen
eng_a645The route menu is displayed.
2 Touch [View Route]
eng_a500-2
Location Information Button
Route Option Icon
eng_a647The view route screen is displayed.
NOTE [] of the location information button or
[1], [2]..., to display the map of the vicinity of the
destination and way point.
Route Option Icon
The route option icon can be used to view
with icons the information set in
“Route
Options” (page 11-12)
.
A) Route Priority
[
]Indicates “Fast”.
[
] Indicates “Short”.
[
] Indicates “Easy”.
B) Minimize Freeway [
]Indicates “Yes”.
[
] Indicates “No”.
C) Minimize Toll Roads [
]Indicates “Yes”.
[
] Indicates “No”.
D) Minimize Ferries [
]Indicates “Yes”.
[
] Indicates “No”.
E) Avoid Traffi c Problems
[
] Indicates “Yes”.
[
] Indicates “No”.
F) Avoid Selected Area [
]Indicates “Yes”.
[
] Indicates “No”.
G) Avoid Time Restricted Roads [
]Indicates “Yes”.
[
] Indicates “No”.
A) B) C) D) E) G)F)
��������\b ���\b
��\f�� \
������ \b�
������� �\b
\b�� \f
Page 49 of 177
View Route 4-2
Remaining
Displaying a map of the entire remaining
route, in a scale where it can all be
displayed.
1 Touch [Remaining] in the view
route screen
(page 4-1)
eng_a101Displays a map of the entire remaining route, in a scale
where it can all be displayed.
Preview
The map can be scrolled along the route.
The type of route taken to the destination
can be viewed.
1 Touch [Preview] in the view route
screen
(page 4-1)The preview screen is displayed.
2 Touch [Backward], [Stop] or
[Forward]
eng_a100
NOTE
position.
Route Outline
A list of the intersections up to the
destination where turns are required is
displayed.
1 Touch [Rt. Outline] in the view
route screen
(page 4-1)
eng_a102A list of the intersections where turns are required is
displayed.
NOTE
Touch an intersection
on the list to display a
map of its vicinity.
eng_a103
��������\b ���\b
��\f�� \
������ \b��������� �\b
\b�\f
�
Page 50 of 177
![MITSUBISHI LANCER 2012 8.G MMCS Manual Detour 4-3
Route
Detour
Detours that specify the distance from the
current location, or detours that specify
streets to avoid can be set.
1 Touch [Route] on the current
location screen
eng_a64 MITSUBISHI LANCER 2012 8.G MMCS Manual Detour 4-3
Route
Detour
Detours that specify the distance from the
current location, or detours that specify
streets to avoid can be set.
1 Touch [Route] on the current
location screen
eng_a64](/manual-img/19/7452/w960_7452-49.png)
Detour 4-3
Route
Detour
Detours that specify the distance from the
current location, or detours that specify
streets to avoid can be set.
1 Touch [Route] on the current
location screen
eng_a645The route menu is displayed.
2 Touch [Detour]
eng_a500-2
eng_a107The detour setting screen is displayed.
Detour Distance
Specifying the distance to calculate the
detour route.
1 Touch the desired detour distance
for “Detour Distance” in the detour
setting screen
(page 4-3)
eng_a648A detour route is calculated according to the speci� ed
distance, and route guidance starts.
NOTEThe distance unit in the factory settings is “miles”. If the
unit is changed to “km” (“System Settings” (page 11-5)),
the detour distances are [1], [5], [10], [20], [40], [80].
cannot be selected.
Avoid Street
Settings are performed here for selecting
a start street and an end street, and
detouring the area in between.
1 Touch [Avoid Street] in the detour
setting screen
(page 4-3)A list of streets to be passed on the current route is
displayed.
2 Touch the start street
eng_a109
NOTE
go to step 4.
3 Touch the end street
eng_a110
4 Touch [Set] A detour route is calculated according to the speci� ed
street area, and route guidance starts.
��������\b ���\b
��\f�� \
������ \b��������� �\b
\b�\f
�
Page 51 of 177

Editing the Route (Itinerary) 4-4
Editing the Route (Itinerary)
The destination position can be changed,
a way point can be added, and the route
calculation conditions can be changed.
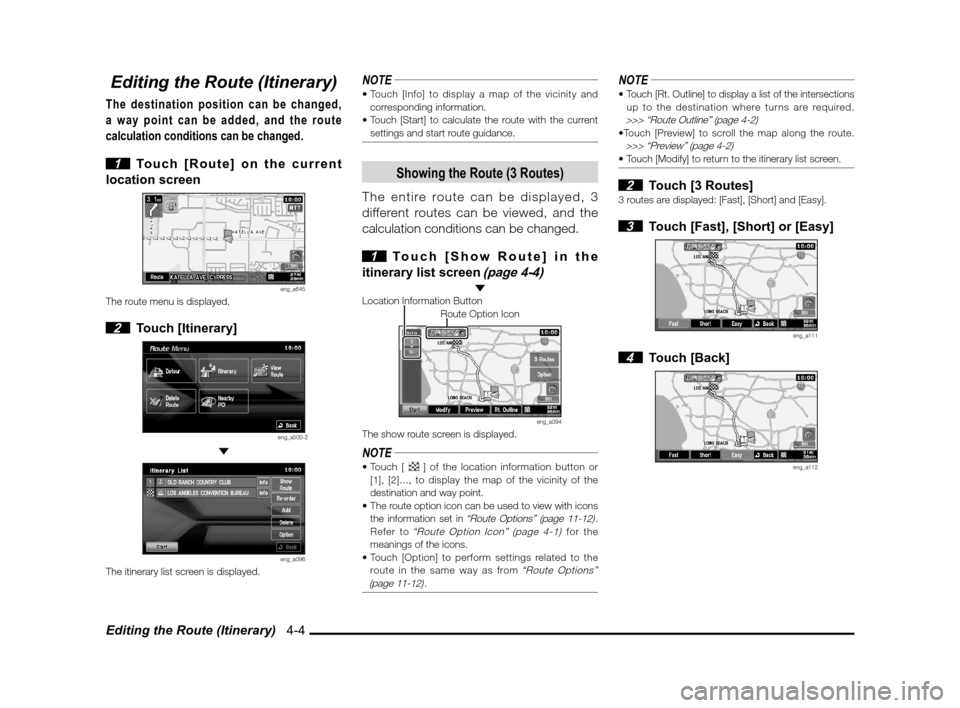
1 Touch [Route] on the current
location screen
eng_a645The route menu is displayed.
2 Touch [Itinerary]
eng_a500-2
eng_a096The itinerary list screen is displayed.
NOTE
corresponding information.
settings and start route guidance.
Showing the Route (3 Routes)
The entire route can be displayed, 3
different routes can be viewed, and the
calculation conditions can be changed.
1 Touch [Show Route] in the
itinerary list screen
(page 4-4) Location Information Button
Route Option Icon
eng_a094The show route screen is displayed.
NOTE [ ] of the location information button or
[1], [2]..., to display the map of the vicinity of the
destination and way point.
the information set in
“Route Options” (page 11-12).
Refer to “Route Option Icon” (page 4-1) for the
meanings of the icons.
route in the same way as from
“Route Options”
(page 11-12).
NOTE up to the destination where turns are required.
>>> “Route Outline” (page 4-2)>>> “Preview” (page 4-2)
2 Touch [3 Routes]3 routes are displayed: [Fast], [Short] and [Easy].
3 Touch [Fast], [Short] or [Easy]
eng_a111
4 Touch [Back]
eng_a112
��������\b ���\b
��\f�� \
������ \b�\b������� �\b
\b�\f
�
Page 52 of 177
Editing the Route (Itinerary) 4-5
Route
5 Touch [Start]
eng_a113Guidance starts for the changed route.
Re-ordering
The sequence for visiting each location
can be changed.
1 Touch [Re-order] in the itinerary
list screen
(page 4-4)The re-order screen is displayed.
2 Touch the locations in the
desired sequence
eng_a114The visiting sequence is displayed on the left of each
location button.
3 Touch [Done]
eng_a115
NOTE
4 Touch [Start]
eng_a116Guidance starts for the changed route.
��������\b ���\b
��\f�� \
������ \b� ������� �\b
\b�\f
�
Page 53 of 177
![MITSUBISHI LANCER 2012 8.G MMCS Manual Editing the Route (Itinerary) 4-6
Adding a Way Point
A way point can be added to the current
route.
1 Touch [Add] in the itinerary list
screen
(page 4-4)The destination search screen is displa MITSUBISHI LANCER 2012 8.G MMCS Manual Editing the Route (Itinerary) 4-6
Adding a Way Point
A way point can be added to the current
route.
1 Touch [Add] in the itinerary list
screen
(page 4-4)The destination search screen is displa](/manual-img/19/7452/w960_7452-52.png)
Editing the Route (Itinerary) 4-6
Adding a Way Point
A way point can be added to the current
route.
1 Touch [Add] in the itinerary list
screen
(page 4-4)The destination search screen is displayed.
2 Touch one of the search methods
to search for the location
eng_a117-2Refer to the following pages to search for the location.>>> [Address/Intersection] (page 3-2)
>>> [Point of Interest] (page 3-5)>>> [Advanced Search] (page 3-8)>>> [Previous 20] (page 3-7) >>> [Address Book] (page 3-7)
3 Touch [Itinerary List]
eng_a118
4 Touch [Add] in the sequence
position in which it is to be visited
eng_a119The searched location is added to the route as a way
point.
5 Touch [Start]
eng_a120Guidance starts for the changed route.
Deleting
A destination or way point can be deleted.
1 Touch [Delete] in the itinerary list
screen
(page 4-4)The delete itinerary screen is displayed.
2 Touch the location to delete
eng_a121
NOTE
Touch a location again to remove it from the deletion
target.
time.
3 Touch [Done]
eng_a122
��������\b ���\b
��\f�� \
������ \b��������� �\b
\b�\f
�