Page 501 of 618

6-10 For emergencies
6
NOTE�The chocks shown in the illustration do not come with
your vehicle. It is recommended that you purchase chocks
or blocks and keep them in the vehicle for use if needed.
�If chocks or blocks are not available, use stones or any
other objects that are large enough to hold the wheel in
position.
6. Get the jack, bar and wheel nut wrench ready.
Refer to “Tools and jack” on page 6-7.Spare tire information
N00849600328
Compact spare tireThe compact spare tire is designed to save space in the trunk.
Its lighter weight makes it easier to use if a flat tire occurs.
WA R N I N G
!�Tires, including spare tire, degrade over time with
age even when they are not being used. It is recom-
mended that tires over 6 years generally be replaced
even if damage is not obvious.
CAUTION
!�While the compact spare tire is stowed, the inflation
pressure should be checked at least once a month to
assure that it remains at the recommended inflation
pressure. See the tire and loading information plac-
ard attached to the driver’s door sill.
Refer to “Tire and loading information placard” on
page 9-4.
�Driving with an improperly inflated tire can cause
an accident. If you have no choice but to drive with
an under-inflated tire, keep your speed down and
avoid sudden steering or braking, if possible. Inflate
the tire to the correct pressure as soon as possible.
Refer to “Tire inflation pressures” on page 7-23.�The compact spare tire should be used only tempo-
rarily. While the compact spare tire is being used,
the tire pressure monitoring system will not function
properly. Have the tire replaced or repaired at an
authorized Mitsubishi Motors dealer or a repair
facility of your choice as soon as possible.�You can use the same wheel nuts on the compact
spare tire wheel. �Do not go over 50 mph (80 km/h) when driving with
the compact spare tire.�Avoid fast starting and braking when driving with
the compact spare tire. �The diameter of the compact spare tire is different
from that of a standard tire. �Because the compact spare tire is designed only for
your vehicle, do not use it on any other vehicle. �Do not put the compact spare tire on a different
wheel, and do not put standard tires, snow tires,
wheel covers or trim rings on the compact spare
wheel. Otherwise, you could damage these parts or
other parts on your vehicle.�Do not use snow chains with your compact spare
tire. Using chains could cause damage to your vehi-
cle and loss of the chains.
CAUTION
!
BK0142300US.book 10 ページ 2011年8月7日 日曜日 午前10時44分
Page 502 of 618
For emergencies
6-11
6
To remove the compact spare tire
N00849700244
1. Lift up the luggage floor board.
2. To remove the spare tire, remove the installation clamp
(A) by turning it counterclockwise.NOTE�The clamp cannot be used for a normal size tire. Store a
normal size tire in the trunk.
NOTE�Put the spare tire under the vehicle body near the jack.
This makes it safer if the jack slips out of position.
BK0142300US.book 11 ページ 2011年8月7日 日曜日 午前10時44分
Page 528 of 618
Vehicle care and maintenance
7-15
7 Rear axle oil
N00915200142
Whenever the oil level is checked, add oil as necessary to
maintain the proper level.
Fill or change oil according to the table.Oil type
AWC control fluid
N00915300013
To check the fluid levelRemove the lid on the trunk room right side trim.
Check the fluid level in the reservoir 90 minutes or more after
turning the ignition switch to the “LOCK” position.
Check to make certain that the AWC control fluid level is
always between the “MAX” and “MIN” level markings on the
fluid reservoir and refill the fluid, if necessary.Fluid type
Lubricant
For differential
mechanismDiaQueen LSD gear oilFor torque transfer
mechanismMITSUBISHI MOTORS
Genuine ATF SP III
Lubricant MITSUBISHI MOTORS Genuine ATF SP III
BK0142300US.book 15 ページ 2011年8月7日 日曜日 午前10時44分
Page 529 of 618

7-16 Vehicle care and maintenance
7Wa s h e r f l u i d
N00938600257
The windshield washer fluid reservoir is in the trunk.
Check the washer fluid level at regular intervals and add
washer fluid to reservoir if necessary. NOTE�Do not spill the fluid onto the trunk. If the fluid spilled,
wipe it up immediately.During cold weatherWhen freezing weather is anticipated, flush out the water in the
reservoir by operating the pump. Fill the reservoir with wind-
shield antifreeze (not radiator antifreeze), and operate the sys-
tem for a few seconds to flush out the residual water.
Brake fluid/Clutch fluid
(if so equipped)
N00938700232
The brake fluid and the clutch fluid share the reservoir tank.To check the fluid levelThe fluid level must be between the “MAX” and “MIN” marks
on the reservoir.
The fluid level falls slightly with wear of the brake pads, but
this does not indicate any abnormality.
The fluid in the master cylinder should be checked when doing
other work under the engine hood. The brake system should
also be checked for leaks at the same time.
If the fluid level falls markedly in a short length of time, it indi-
cates leaks from the brake system.
If this occurs, have the vehicle checked by an authorized
Mitsubishi Motors dealer or a repair facility of your choice.
MAX
MIN
BK0142300US.book 16 ページ 2011年8月7日 日曜日 午前10時44分
Page 531 of 618

7-18 Vehicle care and maintenance
7Battery
N00939100725
The vehicle battery is installed in the trunk behind a panel.
The condition of the battery is very important for quick starting
and to keep the vehicle’s electrical system working properly.
Be sure to have an authorized Mitsubishi Motors dealer check
the battery.
During cold weatherThe battery is weaker in cold temperatures. This has to do with
its chemical and physical properties and is why a very cold bat-
tery, especially one with a low charge, will have a hard time
starting your vehicle.
It is recommended that you have your battery and charging sys-
tem checked by an authorized Mitsubishi Motors dealer before
the start of cold weather. If necessary, have it replaced.Disconnection and connectionTo disconnect the battery cable, stop the engine. Disconnect the
negative (-) terminal first, then the positive (+) terminal. To
reconnect the battery, first connect the positive (+) terminal and
then the negative (-) terminal, before starting the vehicle.
WA R N I N G
!�Be sure to have an authorized Mitsubishi Motors
dealer charge the battery. Do not charge the battery
yourself, as it should only be charged after first
being removed from the vehicle.
In addition, never remove the battery label, upper
cover, exhaust tube, or pipe. Flammable gases may
leak and explode.
WA R N I N G
!�Never disconnect the battery while the engine is run-
ning, or you could damage the vehicle’s electrical
parts. �Never short-circuit the battery. This could cause it
to overheat and be damaged. �Keep sparks, cigarettes, and flames away from the
battery because the battery could explode.
BK0142300US.book 18 ページ 2011年8月7日 日曜日 午前10時44分
Page 532 of 618

Vehicle care and maintenance
7-19
7 Tires
N00939200508
It is important to familiarize yourself with the following terms:
�Cold tire pressure:
• The measured pressure after the vehicle has been parked
for at least three hours,
or
• The measured pressure when the vehicle is driven less
than 1 mile (1.6 km) after having been parked for three
hours.
�Maximum inflation pressure: the maximum permissible
cold tire inflation pressure for this tire.
�Recommended inflation pressure: the inflation pressure
for optimum tire performance.
�Electrolyte (battery acid) is made of corrosive
diluted sulfuric acid. If it spills on nearby parts, it
can crack, stain, or discolor them. And if gets on
your skin or in your eyes, it can cause burns or
blindness. Please observe the following handling
instructions:
• If electrolyte gets on plastic parts or other nearby
parts, wipe it off with a soft cloth or chamois
soaked in a solution of water and neutral detergent
then immediately rinse the affected parts with
plenty of water.
• If electrolyte gets on your hands or clothes, rinse
thoroughly with water. If electrolyte gets in your
eyes, flush them with water immediately and get
immediate medical attention.
�Always wear protective clothing and goggles when
working with the battery, or have a skilled automo-
bile technician do it. �This vehicle is equipped with a maintenance-free
battery located in the trunk. To assure proper bat-
tery installation and venting of flammable gases, the
battery must be serviced and/or replaced by an
authorized Mitsubishi Motors dealer only.�In order to prevent a short circuit, be sure to discon-
nect the negative (-) terminal first, and reconnect it
last. �Battery terminals and related accessories contain
lead and lead compounds. Wash hands after han-
dling.
WA R N I N G
!
WA R N I N G
!�Driving with tires that are worn, damaged or
improperly inflated is dangerous.
These type tire conditions will adversely affect vehi-
cle performance.
These type tire conditions can also cause a tread sep-
aration or blowout which may result in an accident
causing serious injury or death.�Tires, including spare tire, degrade over time with
age even when they are not being used. It is recom-
mended that tires over 6 years generally be replaced
even if damage is not obvious.
BK0142300US.book 19 ページ 2011年8月7日 日曜日 午前10時44分
Page 561 of 618
7-48 Vehicle care and maintenance
7
NOTE�The high-mounted stop light uses LEDs rather than bulbs.
For repair and replacement, contact an authorized
Mitsubishi Motors dealer or a repair facility of your
choice.
Inside
N00950400558
Description
Wa t t a g e
1- Trunk area light 5 W
2- Dome light (rear) (if so equipped) 8 W
3- Dome light (front)/Reading light 8 W
BK0142300US.book 48 ページ 2011年8月7日 日曜日 午前10時44分
Page 577 of 618
7-64 Vehicle care and maintenance
7
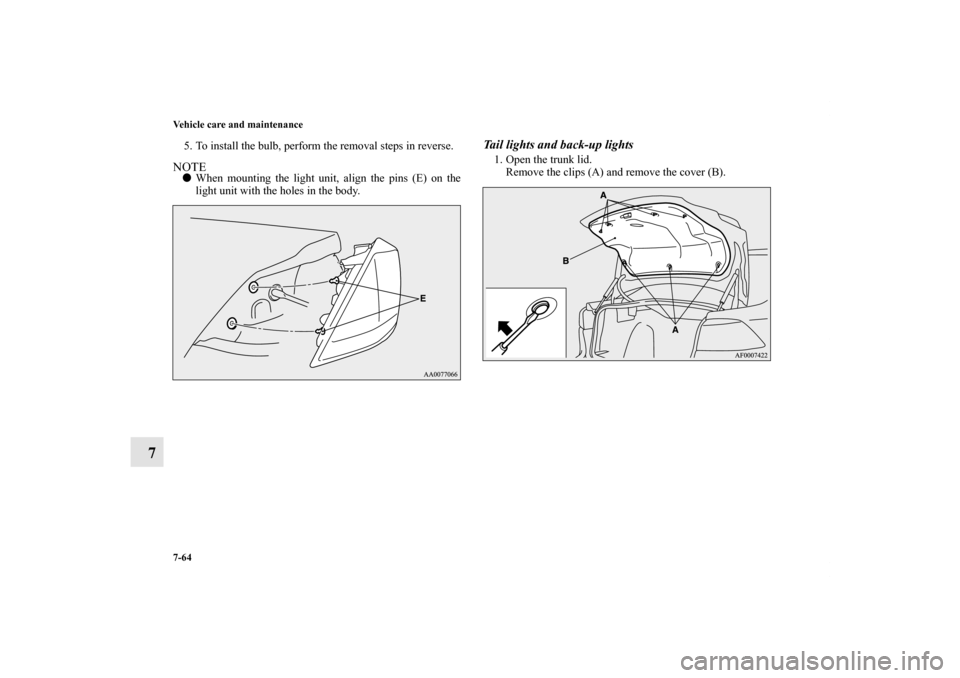
5. To install the bulb, perform the removal steps in reverse.NOTE�When mounting the light unit, align the pins (E) on the
light unit with the holes in the body.
Tail lights and back-up lights1. Open the trunk lid.
Remove the clips (A) and remove the cover (B).
BK0142300US.book 64 ページ 2011年8月7日 日曜日 午前10時44分
 by turning it counterclockwise.N")