Page 10 of 442

Quick index
1
If this warning light comes on or flashes while you’re driving...
N00200701110
NOTE�These warning lights will come on for a few seconds for a bulb check when the electric motor switch is first turned to “ON”.
Warning light
Do this
Ref. page
12V starter battery charging system warning
light�Park your vehicle in a safe place and turn off the electric motor unit.
Contact a certified i-MiEV dealer for assistance.P. 3 - 7 4
or
Brake warning light�If this light comes on while driving, check to see that the parking
brake is fully released.
�If this light stays on after releasing the parking brake, stop and check
the brake fluid level.
�If the brake fluid level is correct, there may be a system malfunction.
Avoid hard braking and high speeds, and contact a certified i-MiEV
dealer for assistance.P. 3 - 7 3
Electric motor unit warning light�Park your vehicle in a safe place and contact a certified i-MiEV
dealer for assistance.P. 3 - 7 5
BK0140800US.book 1 ページ 2011年9月29日 木曜日 午後3時28分
Page 221 of 442

3-72 Features and controls
3Indicators
N00519900127
Turn signal indicators/Hazard warning lights
N00520000232
The arrows will flash in time with the corresponding exterior
turn signals when the turn signal lever is used.
Both arrows will flash when the hazard warning flasher switch
is pressed.NOTE�If the indicator flashes faster than usual or if the indicator
stays on without flashing, check for a malfunctioning turn
signal light bulb or turn signal connection.High beam indicator
N00520100086
A blue light comes on when the headlights are on high beam.Front fog light indicator
(if so equipped)
N00520200221
This indicator comes on while the front fog lights are on.Position indicator
N00551300039
This indicator turns on while the position lights are on.Ready indicator
N00573200012
This indicator comes on when the electric motor switch is
turned to “START” and driving becomes possible.
Charging indicator
N00573300013
This indicator flashes when the regular charging cable or quick
charging cable is connected.
After that, the light switches to being illuminated when charg-
ing starts and goes out when charging is completed.Regenerative brake system indicator
N00573400014
The indicator comes on when the regenerative brake perfor-
mance may be weakened. In this case, drive the vehicle at a
lower speed.
BK0140800US.book 72 ページ 2011年9月29日 木曜日 午後3時28分
Page 231 of 442
. It will return to the neu-
tral posit")
3-82 Features and controls
3Turn signal lever
N00522600506
When changing lanes, or to making a gradual turn, hold the
lever in the “lane change” position (1). It will return to the neu-
tral position when you let go. Use the full position (2) when
making a normal turn. The lever will return to the neutral posi-
tion when the turn is complete. There may be times when the
lever does not return to the neutral position. This usually hap-
pens when the steering wheel is turned only slightly. You can
easily return the lever by hand.
Also, when you move the lever to (1) slightly then release it,
the turn signal lights and indicator in the instrument cluster will
flash three times.
NOTE�A light in the instrument panel flashes to show when the
front and rear turn signal lights are working properly.
If this light flashes faster than usual, check for a burned
out light bulb or malfunctioning connection.
If the panel light does not come on when the lever is
moved, check for a blown fuse or a burned out bulb in the
panel.
Have the vehicle inspected by a certified i-MiEV dealer.
�It is possible to modify functions as follows:
• Deactivate the turn signal light 3-flash function for lane
changes.
• Adjust the time required to operate the lever for the 3-
flash function.
See a certified i-MiEV dealer for details.
BK0140800US.book 82 ページ 2011年9月29日 木曜日 午後3時28分
Page 364 of 442

7
Vehicle care and maintenance
Service precautions . . . . . . . . . . . . . . . . . . . . . . . .7- 2
Hood. . . . . . . . . . . . . . . . . . . . . . . . . . . . . . . . . . . .7- 4
View under the hood and
electric motor unit room . . . . . . . . . . . . . . . . . . .7- 6
Coolant/Hot water heater fluid. . . . . . . . . . . . . . . .7- 7
Washer fluid . . . . . . . . . . . . . . . . . . . . . . . . . . . . . .7- 11
Brake fluid . . . . . . . . . . . . . . . . . . . . . . . . . . . . . . .7- 12
12V starter battery . . . . . . . . . . . . . . . . . . . . . . . . .7- 13
Tires . . . . . . . . . . . . . . . . . . . . . . . . . . . . . . . . . . . .7- 18
Brake pedal free play . . . . . . . . . . . . . . . . . . . . . . .7- 25
Parking brake lever stroke . . . . . . . . . . . . . . . . . . .7- 25
Wiper blades . . . . . . . . . . . . . . . . . . . . . . . . . . . . .7- 26
General maintenance . . . . . . . . . . . . . . . . . . . . . . .7- 27
For cold and snowy weather . . . . . . . . . . . . . . . . .7- 28
Fusible links . . . . . . . . . . . . . . . . . . . . . . . . . . . . . .7- 28
Fuses . . . . . . . . . . . . . . . . . . . . . . . . . . . . . . . . . . .7- 29
Replacement of light bulbs . . . . . . . . . . . . . . . . . .7- 35
Vehicle care precautions . . . . . . . . . . . . . . . . . . . .7- 49
Cleaning the inside of your vehicle . . . . . . . . . . . .7- 50
Cleaning the outside of your vehicle . . . . . . . . . . .7- 52
BK0140800US.book 1 ページ 2011年9月29日 木曜日 午後3時28分
Page 398 of 442

Vehicle care and maintenance
7-35
7 Replacement of light bulbs
N00942900336
Before replacing a bulb, be sure the light is off. Do not touch
the glass part of the new bulb with your bare fingers; the oil
from your skin will stay on the glass and dim or destroy the
bulb when it gets hot.NOTE�If you are unsure of how to carry out the work as required,
it is recommended that these procedures be carried out by
a certified i-MiEV dealer.
�Be careful not to scratch the vehicle body when removing
a light and lens.
�When it rains, or when the vehicle has been washed, the
inside of the lens sometimes becomes temporarily foggy.
This is the same phenomenon as when window glass mists
up on a humid day, and does not indicate a functional
problem.
When the light is switched on, the heat will remove the
fog. However, if water collects inside the light, please
have it checked by a certified i-MiEV dealer.
CAUTION
!�Never use a fuse with a capacity greater than the one
listed or any substitute, such as wire, foil etc. This
would cause the circuit wiring to heat up and could
cause a fire. �If the replacement fuse blows again after a short
time, have the electrical system checked by a certi-
fied i-MiEV dealer to find and correct the cause.
CAUTION
!�Bulbs are extremely hot immediately after being
turned off.
When replacing a bulb, wait for it to cool sufficiently
before touching it. You could otherwise be burned.
BK0140800US.book 35 ページ 2011年9月29日 木曜日 午後3時28分
Page 399 of 442
7-36 Vehicle care and maintenance
7
Bulb capacity
N00943000099
The bulb should only be replaced with a new bulb with the
same rating and type. The type and rating are listed on the base
of the bulb.Outside
N00950300847
NOTE�Check with a certified i-MiEV dealer when the headlight
and the parking light need to be repaired or replaced.
Description
Wa t t a g e
ANSI Trade
No. or Bulb
type
1- Headlight, low beam 55 W H11
2- Head light, high beam 60 W 9005 HB3
3- Front fog light (if so
equipped)35 W H8Front
4- Daytime running light
(if so equipped)13 W P13W
5- Front turn signal light 21 W W21W
6- Parking light 5 W W5W
7- Front side-marker light 5 W W5W
Description
Wa t t a g e
ANSI Trade
No. or Bulb
type
BK0140800US.book 36 ページ 2011年9月29日 木曜日 午後3時28分
Page 400 of 442
Vehicle care and maintenance
7-37
7
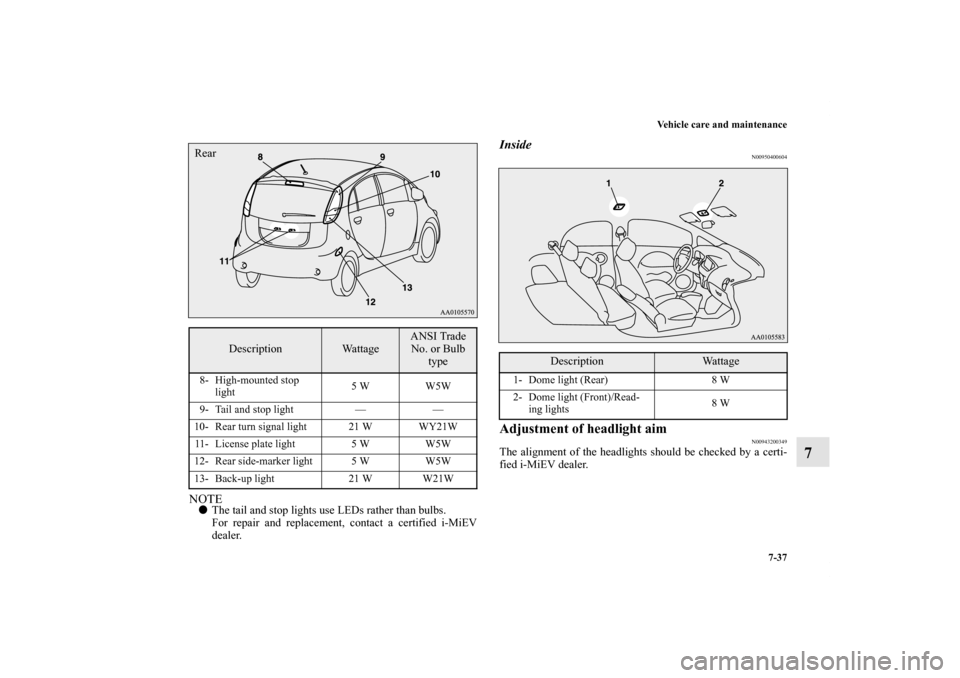
NOTE�The tail and stop lights use LEDs rather than bulbs.
For repair and replacement, contact a certified i-MiEV
dealer.
Inside
N00950400604
Adjustment of headlight aim
N00943200349
The alignment of the headlights should be checked by a certi-
fied i-MiEV dealer.
Description
Wattage
ANSI Trade
No. or Bulb
type
8- High-mounted stop
light5 W W5W
9- Tail and stop light — —
10- Rear turn signal light 21 W WY21W
11- License plate light 5 W W5W
12- Rear side-marker light 5 W W5W
13- Back-up light 21 W W21WRear
Description
Wattage
1- Dome light (Rear) 8 W
2- Dome light (Front)/Read-
ing lights8 W
BK0140800US.book 37 ページ 2011年9月29日 木曜日 午後3時28分
Page 401 of 442
7-38 Vehicle care and maintenance
7
Front side-marker lights
N00915500161
1. Insert a flat blade screwdriver into the end of the light
nearer the rear of the body and pry gently to remove the
light.NOTE�Wrap a cloth around the tip of the screwdriver to keep
from scratching the lens.2. Remove the socket and bulb assembly together by turning
it counterclockwise.*: Front of the vehicle
*
BK0140800US.book 38 ページ 2011年9月29日 木曜日 午後3時28分