Page 408 of 494
Vehicle care and maintenance
7-17
7
Checking battery electrolyte level Use the following procedure to check the battery electrolyte
level.
1. Insert the tip of a screwdriver at the edge of the cap, pry
gently to remove the cap.2. The inside of the battery is divided into several compart-
ments.
Check the electrolyte level (A) in each cell.
The electrolyte level must be within the range (B) shown
in the illustration.
If it is necessary to add fluid, add only distilled water. Do
not overfill above the top of the range because a spill dur-
ing driving could cause damage.
WA R N I N G
!�If the battery goes flat, be sure to check the battery
electrolyte level before connecting booster cables.�After checking the battery electrolyte level, make
sure the caps are fitted securely.�If any of the caps has a loose fit, replace the battery.
Cell
B = . 31 in
(8mm) A
BK0132701US.book 17 ページ 2010年12月6日 月曜日 午後2時3分
Page 414 of 494

Vehicle care and maintenance
7-23
7
Treadwear, Traction and Temperature GradesTreadwear
The treadwear grade is a comparative rating based on the wear
rate of the tire when tested under controlled conditions on a
specified government test course. For example, a tire graded
150 would wear one and one-half (1
1/2) times as well on the
government course as a tire graded 100. The relative perfor-
mance of tires depends upon the actual conditions of their use,
however, and may depart significantly from the norm due to
variations in driving habits, service practices and differences in
road characteristics and climate.
Traction
The traction grades, from highest to lowest, are AA, A, B and
C. Those grades represent the tire’s ability to stop on wet pave-
ment as measured under controlled conditions on specified
government test surfaces of asphalt and concrete. A tire
marked C may have poor traction performance.
Temperature
The temperature grades are A (the highest), B and C, represent-
ing the tire’s resistance to the generation of heat and its ability
to dissipate heat when tested under controlled conditions on a
specified indoor laboratory test wheel. Sustained high tempera-
ture can cause the material of the tire to degenerate and reduce
tire life, and excessive temperature can lead to sudden tire fail-
ure. The grade C corresponds to a level of performance which
all passenger car tires must meet under the Federal Motor Vehi-
cle Safety Standard No. 109. Grades B and A represent higher
levels of performance on the laboratory test wheel than the
minimum required by law.
Tire inflation pressures
N00939300831
Proper tire inflation pressure is essential for the safe and satis-
factory operation of your vehicle. The wrong tire pressure will
cause problems in three major areas:
�Safety
Too little pressure increases flexing in the tire and can
cause tire failure. Too much pressure can cause a tire to
lose its ability to cushion shock. Objects on the road and
potholes could then cause tire damage that may result in
tire failure.
�Economy
The wrong tire pressure can cause uneven wear patterns in
the tire tread. These abnormal wear patterns will reduce
the tread life, and the tire will have to be replaced sooner.
Too little pressure also makes it harder for the tire to roll,
and this uses up more fuel.
�Ride comfort and vehicle stability
The superior riding experience built into your vehicle
partly depends on the correct tire pressure. Too much
pressure gives an uncomfortable and jarring ride. Too lit-
tle pressure feels as if your vehicle is slow to respond.
Unequal tire pressures can make steering your vehicle
uneven and unpredictable.
The correct tire pressure for your vehicle is listed on the plac-
ard attached to the driver’s door sill.
(Refer to “Tire and loading information placard” on page 9-4.)
BK0132701US.book 23 ページ 2010年12月6日 月曜日 午後2時3分
Page 415 of 494

7-24 Vehicle care and maintenance
7
The recommended inflation pressures should be used for the
tires listed below.
Tire pressures should be checked, and adjusted if necessary, at
least once a month.
Pressures should be checked more often whenever weather
temperatures change severely, because tire pressures change
with outdoor temperatures. The pressures listed on the placard
are always “cold inflation pressure”.
Cold inflation pressure is measured after the vehicle has been
parked for at least three hours or is driven less than 1 mile
(1.6 km) after having been parked for three hours.
Cold inflation pressure must not go above the maximum values
molded into the tire sidewall. After driving several miles, your
tire inflation pressure may increase 14 to 41 KPA, 2 to 6 PSI
from the cold inflation pressure. Do not let air out of the tires to
get back to the specified cold pressure, or your tire pressure
will be too low.
Check your tires each time you refuel. If one tire looks lower
than the others, check the pressure for all of them.You should also take the following safety precautions:
�Keep your tires inflated to the recommended pressures.
(See the tire and loading information placard attached to
the driver’s door sill.)
�Stay within the recommended load limits.
�Make sure that the weight of any load in your vehicle is
evenly distributed.
�Drive at safe speeds.
�After filling your tires to the correct pressure, check them
for damage and air leaks. Be sure to reinstall the caps on
the valve stems.
Item
Tire size
Front
Rear
Normal tire P235/45R18220 KPA,
32 PSI220 KPA,
32 PSI
Compact spare tire T125/70D16 420 KPA, 60 PSI
BK0132701US.book 24 ページ 2010年12月6日 月曜日 午後2時3分
Page 429 of 494
7-38 Vehicle care and maintenance
7Fuses
N00942800263
Fuse block location
N00901000064
To prevent damage to the electrical system from short-circuit-
ing or overloading, each individual circuit is equipped with a
fuse. The fuse blocks are located in the passenger compartment
and in the engine compartment. Passenger compartmentThe fuse block in the passenger compartment is located in front
of the driver’s seat at the position shown in the illustration.
Engine compartmentIn the engine compartment, the fuse block is located as shown
in the illustration. A- Type A
B- Type B (ECLIPSE SPYDER only)
C- Type C (2.4 liter models only)
BK0132701US.book 38 ページ 2010年12月6日 月曜日 午後2時3分
Page 431 of 494
7-40 Vehicle care and maintenance
7
Type B (ECLIPSE SPYDER only)
1. Pull the lock lever.
2. Open the cover.Type C (2.4 liter models only)
1. Push the lock lever.
2. Remove the relay box cover.
Fuse load capacities
N00954800127
This fuse list shows the names of the electrical systems and
their fuse capacities.
There are spare fuses in the cover of the instrument panel
(driver’s side). Always replace a blown fuse with one of the
same capacity as the original. *- Front of the vehicle
BK0132701US.book 40 ページ 2010年12月6日 月曜日 午後2時3分
Page 436 of 494
Vehicle care and maintenance
7-45
7
Fuse replacement
N00954900069
1. Before replacing a fuse, always turn off the electrical item
connected to the fuse and turn the ignition key to the
“LOCK” position.
2. There is a fuse puller in the cover of the instrument panel
(driver’s side).
3. Remove the fuse puller from the cover.4. Clamp it on the fuse you wish to remove, and pull the fuse
straight out from the fuse block.
BK0132701US.book 45 ページ 2010年12月6日 月曜日 午後2時3分
Page 452 of 494
Vehicle care and maintenance
7-61
7
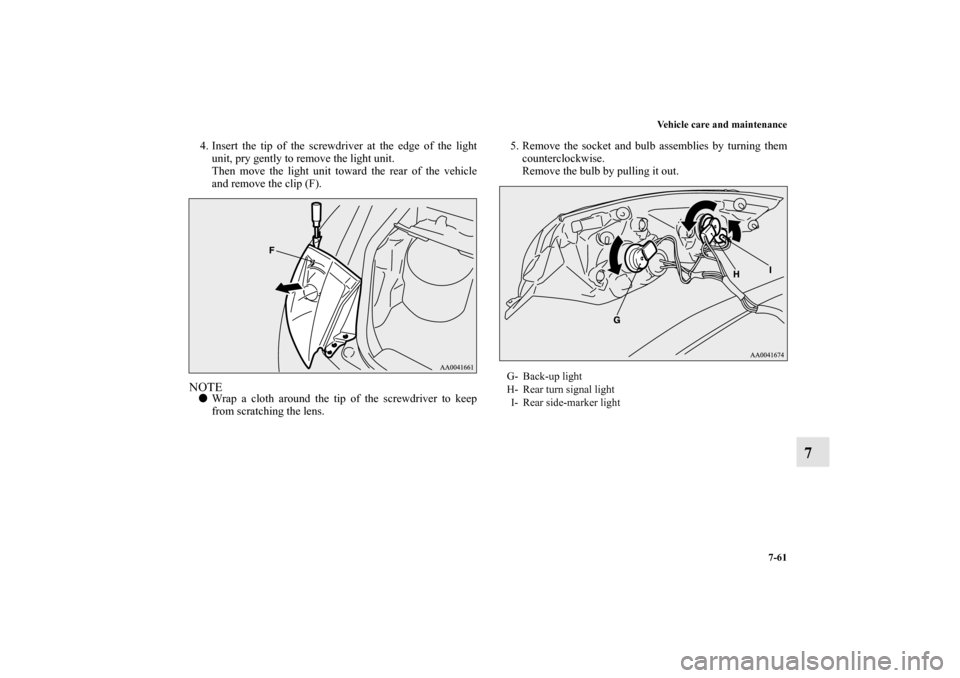
4. Insert the tip of the screwdriver at the edge of the light
unit, pry gently to remove the light unit.
Then move the light unit toward the rear of the vehicle
and remove the clip (F).NOTE�Wrap a cloth around the tip of the screwdriver to keep
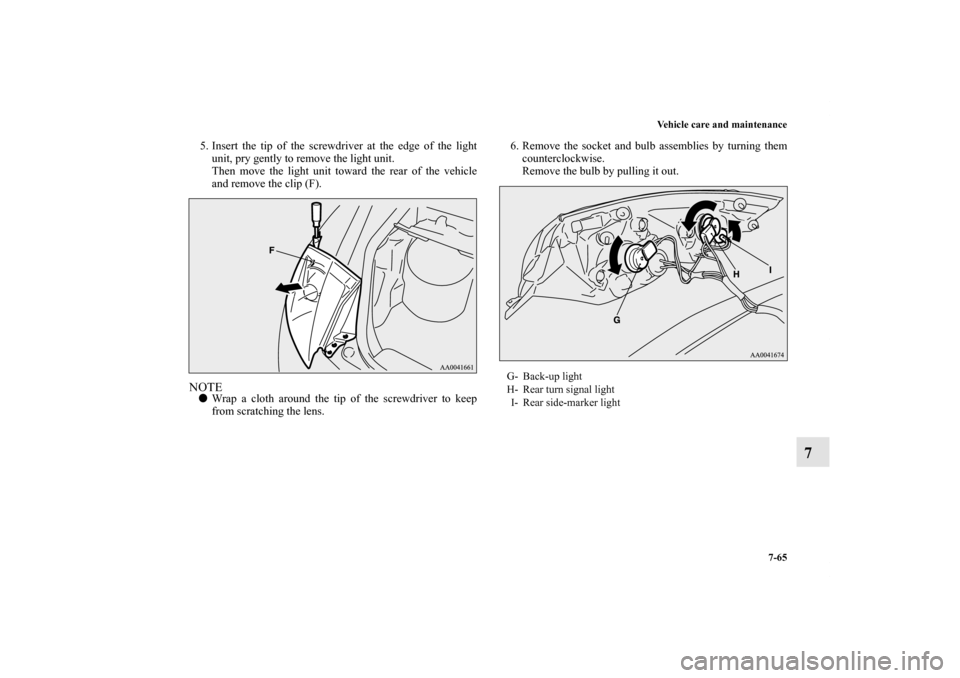
from scratching the lens.5. Remove the socket and bulb assemblies by turning them
counterclockwise.
Remove the bulb by pulling it out.
G- Back-up light
H- Rear turn signal light
I- Rear side-marker light
BK0132701US.book 61 ページ 2010年12月6日 月曜日 午後2時3分
Page 456 of 494
Vehicle care and maintenance
7-65
7
5. Insert the tip of the screwdriver at the edge of the light
unit, pry gently to remove the light unit.
Then move the light unit toward the rear of the vehicle
and remove the clip (F).NOTE�Wrap a cloth around the tip of the screwdriver to keep
from scratching the lens.6. Remove the socket and bulb assemblies by turning them
counterclockwise.
Remove the bulb by pulling it out.
G- Back-up light
H- Rear turn signal light
I- Rear side-marker light
BK0132701US.book 65 ページ 2010年12月6日 月曜日 午後2時3分