2012 MITSUBISHI ASX light
[x] Cancel search: lightPage 118 of 378

2. Lightly press the multi-information meter
switch to select “ALARM” (rest time setting).
Type 1
Type 2 3. Press
and hold the multi-information meter
switch for about 2 seconds or more to dis-
play “ALARM” (rest time setting).
Type 1 Type 2 4. Lightly
press the multi-information meter
switch to select the time until the display.
5. Press and hold the multi-information meter switch for about 2 seconds or more, the set-
ting is changed to the selected time.
NOTE l If the battery is disconnected, the unit setting
is erased from memory and is automatically
set to OFF.
l The drive time is reset when the ignition
switch is turned off or the operation mode is
put in OFF.
Changing the turn-signal sound E00529100211
It is possible to change the turn-signal sound.
1. Press
and hold the multi-information meter
switch for about 2 seconds or more to switch
from the setting mode screen to the menu
screen.
Refer to “Changing the function settings
(when the ignition switch or the operation
mode is ON)” on page 3-17. 2. Lightly
press the multi-information meter
switch to select (changing the turn-sig-
nal sound).
Type 1
Type 2 3. Press
and hold the multi-information meter
switch for about 2 seconds or more to switch
in sequence from 1 (turn-signal sound 1) →
2 (turn-signal sound 2) → 1 (turn-signal
sound 1).
The setting changes to the selected turn-sig-
nal sound.
Changing the momentary fuel consumption dis-
play (Type 2) E00529200195
It is possible to change the bar graph setting of the
momentary fuel consumption display. Instruments and controls
3-22
3
OGWE12E1
Page 119 of 378
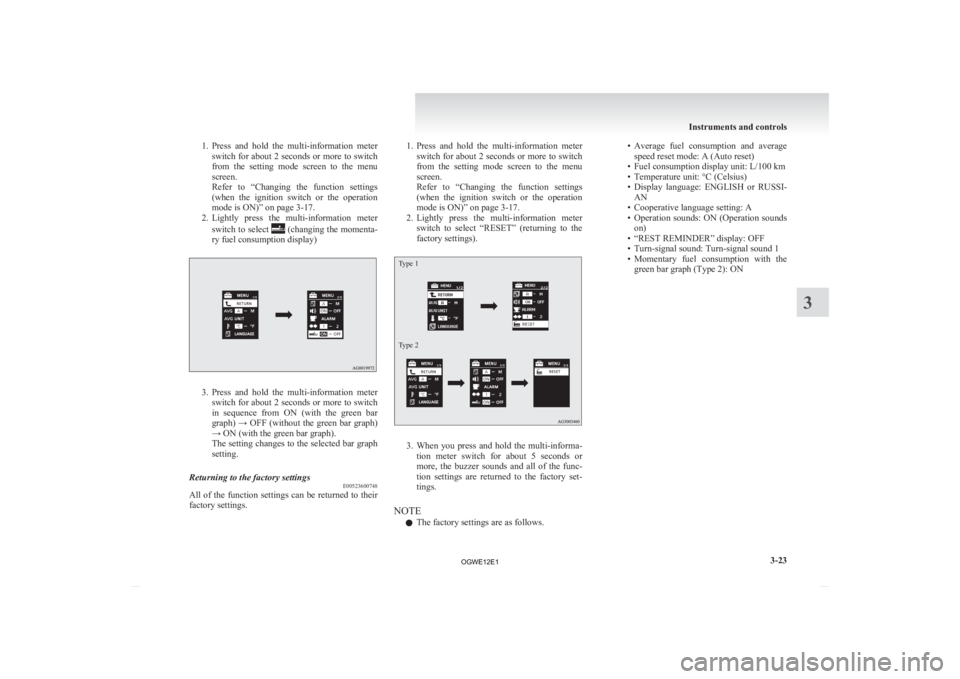
1. Press and hold the multi-information meter
switch for about 2 seconds or more to switch
from the setting mode screen to the menu
screen.
Refer to “Changing the function settings
(when the ignition switch or the operation
mode is ON)” on page 3-17.
2. Lightly press the multi-information meter
switch to select (changing the momenta-
ry fuel consumption display) 3. Press
and hold the multi-information meter
switch for about 2 seconds or more to switch
in sequence from ON (with the green bar
graph) → OFF (without the green bar graph)
→ ON (with the green bar graph).
The setting changes to the selected bar graph
setting.
Returning to the factory settings E00523600748
All of the function settings can be returned to their
factory settings. 1. Press
and hold the multi-information meter
switch for about 2 seconds or more to switch
from the setting mode screen to the menu
screen.
Refer to “Changing the function settings
(when the ignition switch or the operation
mode is ON)” on page 3-17.
2. Lightly press the multi-information meter switch to select “RESET” (returning to the
factory settings).
Type 1
Type 2 3. When
you press and hold the multi-informa-
tion meter switch for about 5 seconds or
more, the buzzer sounds and all of the func-
tion settings are returned to the factory set-
tings.
NOTE l The factory settings are as follows. • Average
fuel consumption and average
speed reset mode: A (Auto reset)
• Fuel consumption display unit: L/100 km
• Temperature unit: °C (Celsius)
• Display language: ENGLISH or RUSSI- AN
• Cooperative language setting: A
• Operation sounds: ON (Operation sounds on)
• “REST REMINDER” display: OFF
• Turn-signal sound: Turn-signal sound 1
• Momentary fuel consumption with the green bar graph (Type 2): ON Instruments and controls
3-23 3
OGWE12E1
Page 140 of 378

Combination headlamps and
dipper switch E00506002174
Headlamps
NOTE l When
entering a country in which vehicles
are driven on the opposite side of the road to
the country in which your vehicles is sup-
plied, necessary measures have to be taken to
avoid dazzling oncoming traffic. However,
headlamps on this vehicle do not need any ad-
justment.
l Do not leave the lights on for a long time
while the engine is stationary (not running).
A rundown battery could result.
l When it rains, or when the vehicle has been
washed, the inside of the lens sometimes be-
comes foggy, but this does not indicate a func-
tional problem.
When the lamp is switched on, the heat will
remove the fog. However, if water gathers in-
side the lamp, we recommend you to have it
checked. Type 1
Rotate the switch to turn on the lamps. OFF
All lamps off {Daytime Running Lamps
(if so equipped)} Position, tail, licence plate and instrument
panel lamps on
Headlamps and other lamps go on
Type 2
Rotate the switch to turn on the lamps. OFF
All lamps off {Daytime Run-
ning Lamps (if so equipped)}
AUTO With the ignition switch or the
operation mode is in ON, head-
lamps, position, tail, licence
plate, and instrument panel
lamps turn on and off automati-
cally in accordance with outside
light level. {Daytime Running
Lamps (if so equipped) will be
turned on while the tail lamps
are
off.} All lamps turn off auto-
matically when the ignition
switch is turned to “OFF” posi-
tion or the operation mode is
put in OFF. Position, tail, licence plate and
instrument panel lamps on
Headlamps and other lamps go
on
NOTE
l On vehicles with the rain sensor, the sensitiv-
ity
of the automatic on/off control can be ad-
justed. For further information, please con-
tact your MITSUBISHI MOTORS Author-
ized Service Point.
On vehicles equipped with MITSUBISHI
Multi-Communication System (MMCS),
screen operations can be used to make the ad-
justment.
Refer to the separate owner’s manual for de-
tails. Instruments and controls
3-44
3
OGWE12E1
Page 141 of 378

l
When the headlamps are turned off by the au-
tomatic on/off control with the ignition
switch in the “ON” position, the front fog
lamps (if so equipped) and rear fog lamps al-
so go off. When the headlamps are subse-
quently turned back on by the automatic on/
off control, the front fog lamps also come on
but the rear fog lamp stays off. If you wish to
turn the rear fog lamp back on, operate the
switch again.
l Do not place anything on the automatic light
sensor (A), and do not clean with a glass clean-
er. l
If
the lamps do not turn on or off with the
switch in the “AUTO” position, manually op-
erate the switch and we recommend you to
have your vehicle checked.
Lamps (headlamps, fog lamp, etc.) au-
to-cutout function l If the following operation is performed while
the lamp switch is in the “ ”
position, the
lamps will automatically go out when the driv-
er’s door is opened. [Except
vehicles equipped with keyless oper-
ation system]
The ignition switch is turned to the “LOCK”
or “ACC” position, or the key is removed
from the ignition switch.
[For vehicles equipped with keyless opera-
tion system]
The operation mode is in OFF or ACC.
[When the engine was started using the key]
• If the key is removed and the driver’sdoor is opened, a buzzer sounds at a high
pitch intermittently to remind the driver
to turn off the lamps.
[When the engine was started using the key-
less operation function] • If the operation mode is put in OFF andthe driver’s door is opened, a buzzer
sounds at a high pitch intermittently to re-
mind the driver to turn off the lamps.
l If the following operation is performed while
the lamp switch is in the “ ”
position, the
lamps will remain on for about 3 minutes
while the driver’s door is shut and will then
automatically go out.
[Except vehicles equipped with keyless oper-
ation system]
The ignition switch is turned to the “LOCK”
or “ACC” position, or the key is removed
from the ignition switch.
[For vehicles equipped with keyless opera-
tion system]
The operation mode is in OFF or ACC. NOTE
l The
lamp auto-cutout will not function when
the lamp switch is in the “ ” position.
l The
lamp auto-cutout function can also be dis-
abled.
For further information, we recommend you
to consult a MITSUBISHI MOTORS Author-
ized Service Point.
On vehicles equipped with MITSUBISHI
Multi-Communication System (MMCS),
screen operations can be used to make the ad-
justment. Refer to the separate owner’s man-
ual for details.
When you want to keep the lamps on: 1. In the following cases, turn the lamp switchto the “OFF” position.
[Except vehicles equipped with keyless oper-
ation system]
The ignition switch is in the “LOCK” or
“ACC” position.
[For vehicles equipped with keyless opera-
tion system]
The operation mode is in OFF or ACC.
2. Turn on the lamps with the switch in the
“ ”
or “ ” position again, then the
lamps will remain on.
NOTE l When the engine was started using the key, if
the driver’s door is opened and the key is re-
moved, the lamp monitor buzzer sounds at a
high pitch intermittently.
The buzzer stops when the driver’s door is
closed. (The warning is also displayed on the
multi-information display.)
The buzzer stops in the following manner. Instruments and controls
3-45 3
OGWE12E1
Page 142 of 378

• Turn the lamp switch to the “OFF” posi-
tion.
• Close the driver’s door.
l When the engine was started using the key-
less operation function, if the driver’s door is
opened and the operation mode is put in
OFF, the lamp monitor buzzer sounds at a
high pitch intermittently.
The buzzer stops when the driver’s door is
closed. (The warning is also displayed on the
multi-information display.)
The buzzer stops in the following manner.
• Turn the lamp switch to the “OFF” posi-tion.
• Close the driver’s door.
Lamp monitor buzzer E00506100559
[When the engine was started using the key]
If
the driver’s door is opened when the key is in the
“LOCK” or “ACC” position or removed from the
ignition switch while the lamps are on, a buzzer
will sound to remind the driver to turn off the lamps.
[When the engine was started using the keyless op-
eration function]
If the driver’s door is opened when the operation
mode is in ACC or OFF with the lamps illumina-
ted, a buzzer will sound to remind the driver to turn
off the lamps.
In both cases, the buzzer will automatically stop if
the auto-cutoff function is activated, the lamp
switch is turned off, or the door is closed. Dipper (High/Low beam change)
E00506200329
When
the lamp switch is in the “ ”
position, the
beam changes from high to low (or low to high)
each time the lever is pulled fully (1). While the high-
beam is on, the high-beam indication lamp in the in-
strument cluster will also illuminate. Headlamp flasher
E00506300199
The high-beams flash when the lever is pulled slight-
ly (2), and will go off when it is released.
When
the high-beam is on, the high-beam indica-
tion lamp in the instrument cluster will illuminate.
NOTE
l The high-beams can also flash when the
lamp switch is OFF.
l If you turn the lamps off with the headlamps
set to high-beam, the headlamps are automat-
ically returned to their low-beam setting
when the lamp switch is next turned to the
“ ” position.Welcome light*
E00528900469
This
function turns on the position and tail lamps
for about 30 seconds after the UNLOCK switch
(A) on the remote control transmitter is pressed
when the combination headlamps and dipper
switch is in the “OFF” or “AUTO” position (for ve-
hicles equipped with the automatic lamp control).
On vehicles equipped with automatic lamp control,
the welcome light function will operate only when
it is dark outside the vehicle. NOTE
l While
the welcome light function is operat-
ing, perform one of the following operations
to cancel the function. • Push the LOCK switch (B) on the remotecontrol transmitter. Instruments and controls
3-46
3
OGWE12E1
Page 143 of 378

• Turn the combination headlamps and dip-
per switch to the “ ” or “ ” position.
• Turn
the ignition switch to the “ON” po-
sition or put the operation mode in ON.
l It is possible to modify functions as follows:
• The headlamps can be set to come on inthe low beam setting.
• The welcome light function can be deacti- vated.
For further information, please contact
your MITSUBISHI MOTORS Author-
ized Service Point.
On vehicles equipped with MITSUBISHI
Multi-Communication System (MMCS),
screen operations can be used to make
the adjustment. Refer to the separate own-
er’s manual for details.
Coming home light E00529000236
This function turns on the headlamps in the low
beam
setting for about 30 seconds after the ignition
switch is turned to the “OFF” position or the opera-
tion mode is put in OFF. 1. Turn
the combination headlamps and dipper
switch to the “OFF” or “AUTO” position
(for vehicles equipped with the automatic
lamp control).
2. Turn the ignition switch to the “LOCK” posi- tion or put the operation mode in OFF. Also,
if a key was used to start the engine, remove
the key from the ignition switch.
3. Within 60 seconds of turning the ignition switch to the “OFF” position or putting the
operation mode in OFF, pull the turn signal
lever towards you. 4. The
headlamps will come on in the low
beam setting for about 30 seconds. After the
headlamps go off, the headlamps can be
turned on again in the low beam setting for
about 30 seconds by pulling the turn signal
lever towards you within 60 seconds of turn-
ing the ignition switch to the “OFF” position
or putting the operation mode in OFF.
To turn on the headlamps again after 60 sec-
onds of turning the ignition switch to the
“OFF” position or putting the operation
mode in OFF, repeat the process from step 1. NOTE
l While
the coming home light function is op-
erating, perform one of the following opera-
tions to cancel the function. • Pull the lever towards you.
• Turn the combination headlamps and dip-
per switch to the “ ” or “ ” position.
• Turn
the ignition switch to the “ON” po-
sition or put the operation mode in ON.
l It is possible to modify functions as follows:
• The time that the headlamps remain oncan be changed.
• The coming home light function can be deactivated.
For further information, please contact your
MITSUBISHI MOTORS Authorized Service
Point.
On vehicles equipped with MITSUBISHI
Multi-Communication System (MMCS),
screen operations can be used to make the ad-
justment. Refer to the separate owner’s man-
ual for details. Instruments and controls
3-47 3
OGWE12E1
Page 145 of 378

Turn-signal lever
E005065012311- Turn-signals
When making a normal turn, use position
(1). The lever will return automatically when
cornering is completed.
2- Lane-change signals When moving the lever to (2) slightly to
change a lane, the turn-signal lamps and indi-
cation lamp in the instrument cluster will on-
ly flash while the lever is operated.
Also, when you move the lever to (2) slight-
ly then release it, the turn-signal lamps and in-
dication lamp in the instrument cluster will
flash 3 times.
NOTE l If the lamp flashes unusually quickly, the
bulb in a turn-signal lamp may have burned
out. We recommend you to have the vehicle
inspected.
l It is possible to activate the following func-
tions. • Flashing
of the turn-signal lamps when
the lever is operated with the ignition
switch or the operation mode is in ACC.
• Deactivate the turn-signal lamp 3-flash function for lane changes.
• The time required to operate the lever for the 3-flash function can be adjusted.
For further information, we recommend you
to consult a MITSUBISHI MOTORS Author-
ized Service Point.
On vehicles equipped with MITSUBISHI
Multi-Communication System (MMCS),
screen operations can be used to make the ad-
justment. Refer to the separate owner’s man-
ual for details. Hazard warning flasher switch
E00506600860
Use
the hazard warning flasher switch when the ve-
hicle has to be parked on the road for any emergency.
The hazard warning flashers can always be operat-
ed, regardless of the ignition switch position or the
operation mode.
Push the switch to turn on the hazard warning flash-
ers, all turn-signal lamps flash continuously. To
turn them off, push the switch again. NOTE
l While
the hazard warning lamps are blinking
due to having manually pushed the switch,
the emergency stop signal system does not op-
erate.
Refer to “Emergency stop signal system” on
page 4-38. Instruments and controls
3-49 3
OGWE12E1
Page 149 of 378

CAUTION
• A physical shock is applied to the rain
sensor.
NOTE l To
protect the rubber parts of the wipers, this
operation of the wipers does not take place
when the vehicle is stationary and the ambi-
ent temperature is about 0 °C or lower.
l Do not cover the sensor by affixing a sticker
or label to the windscreen. Also, do not put
any water-repellent coating on the wind-
screen. The rain sensor would not be able to
detect the extent of rain, and the wipers
might stop working normally.
l In the following cases, the rain sensor may
be malfunctioning.
For further information, we recommend you
to consult a MITSUBISHI MOTORS Author-
ized Service Point.
• When the wipers operate at a constant in-terval despite changes in the extent of rain.
• When the wipers do not operate even though it is raining.
l The wipers may automatically operate when
things such as insects or foreign objects are
affixed to the windscreen on top of the rain
sensor or when the windscreen is frozen. Ob-
jects affixed to the windscreen will stop the
wipers when the wipers cannot remove them.
To operate the wipers again, move the lever
in the “LO” or “HI” position.
Also, the wipers may operate automatically
due to strong direct sunlight or electromag-
netic wave. To stop the wipers, place the lev-
er in the “OFF” position. l
Contact
a MITSUBISHI MOTORS Author-
ized Service Point when replacing the wind-
screen or reinforcing the glass around the sen-
sor.
To adjust the sensitivity of the rain sensor.
With the lever in the “AUTO” (rain sensor) posi-
tion, it is possible to adjust the sensitivity of the
rain sensor by turning the knob (B). “+”- Higher sensitivity to rain
“-”- Lower sensitivity to rain
NOTE l It
is possible to activate the following func-
tions. • Automatic operation (rain droplet sensi-tive) can be changed to intermittent oper-
ation (vehicle-speed sensitive).
• Automatic operation (rain droplet sensi- tive) can be changed to intermittent oper-
ation (except vehicle-speed sensitive).
For further information, we recommend you
to consult a MITSUBISHI MOTORS Author-
ized Service Point. On vehicles equipped with MITSUBISHI
Multi-Communication
System (MMCS),
screen operations can be used to make the ad-
justment. Refer to the separate owner’s man-
ual for details.
Misting function
Move the lever in the direction of the arrow and re-
lease, to operate the wipers once.
Use this function when you are driving in mist or
drizzle.
The wipers will operate once if the lever is raised
to the “MIST” position and released when the igni-
tion switch or the operation mode is in the “ON” or
“ACC” position. The wipers will continue to oper-
ate while the lever is held in the “MIST” position. Instruments and controls
3-53 3
OGWE12E1