2012 MINI COUPE ROADSTER CONVERTIBLE display
[x] Cancel search: displayPage 21 of 283

AT A GLANCEOnboard computer
20
Adjusting settings
1.Select a field.
2. Turn the MINI joystick until the desired
setting is displayed.
3. Press the MINI joystick to confirm the
setting.
Activating/deactivating functions
Some menu items are preceded by a check box.
It indicates whether the function is activated or
deactivated.
Selecting the menu item activates or deactivates
the function.
Function is activated.
Function is deactivated.
Example: setting the clock
1. Press the button.
The main menu is displayed.
2. Turn the MINI joystick until "Settings" is
selected, and press the MINI joystick.
3. Turn the MINI joystick until "Time/Date" is
selected, and press the MINI joystick.
4. Turn the MINI joystick until "Time:" is
selected, and press the MINI joystick.
5. Turn the MINI joystick to set the hours and
press the MINI joystick.
6. Turn the MINI joystick to set the minutes and
press the MINI joystick.
00320051004F004C00510048000300280047004C0057004C005200510003
Page 22 of 283

Onboard computerAT A GLANCE
21
Status information
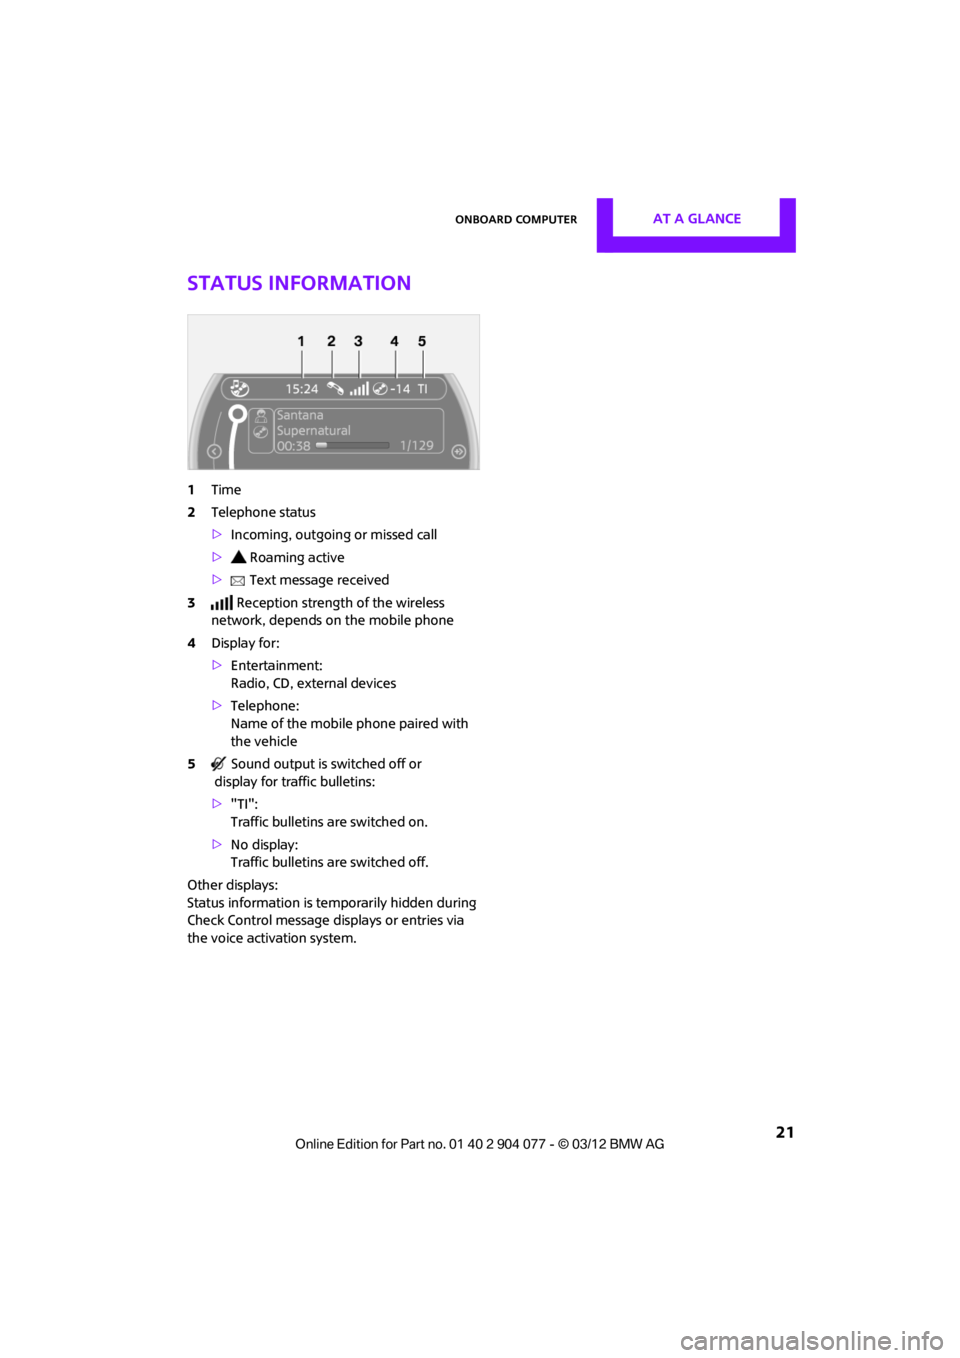
1Time
2 Telephone status
>Incoming, outgoing or missed call
> Roaming active
> Text message received
3 Reception strength of the wireless
network, depends on the mobile phone
4 Display for:
>Entertainment:
Radio, CD, external devices
> Telephone:
Name of the mobile phone paired with
the vehicle
5 Sound output is switched off or
display for traffic bulletins:
> "TI":
Traffic bulletins are switched on.
> No display:
Traffic bulletins are switched off.
Other displays:
Status information is temporarily hidden during
Check Control message displays or entries via
the voice activation system.
00320051004F004C00510048000300280047004C0057004C005200510003
Page 23 of 283

AT A GLANCELetters and numbers
22
Letters and numbers
Vehicle equipment
In this chapter, all production, country, and
optional equipment that is offered in the model
range is described. Equipment is also described
that is not available because of, for example,
selected options or coun try version. This also
applies to safety relate d functions and systems.
Entering letters and
numbers
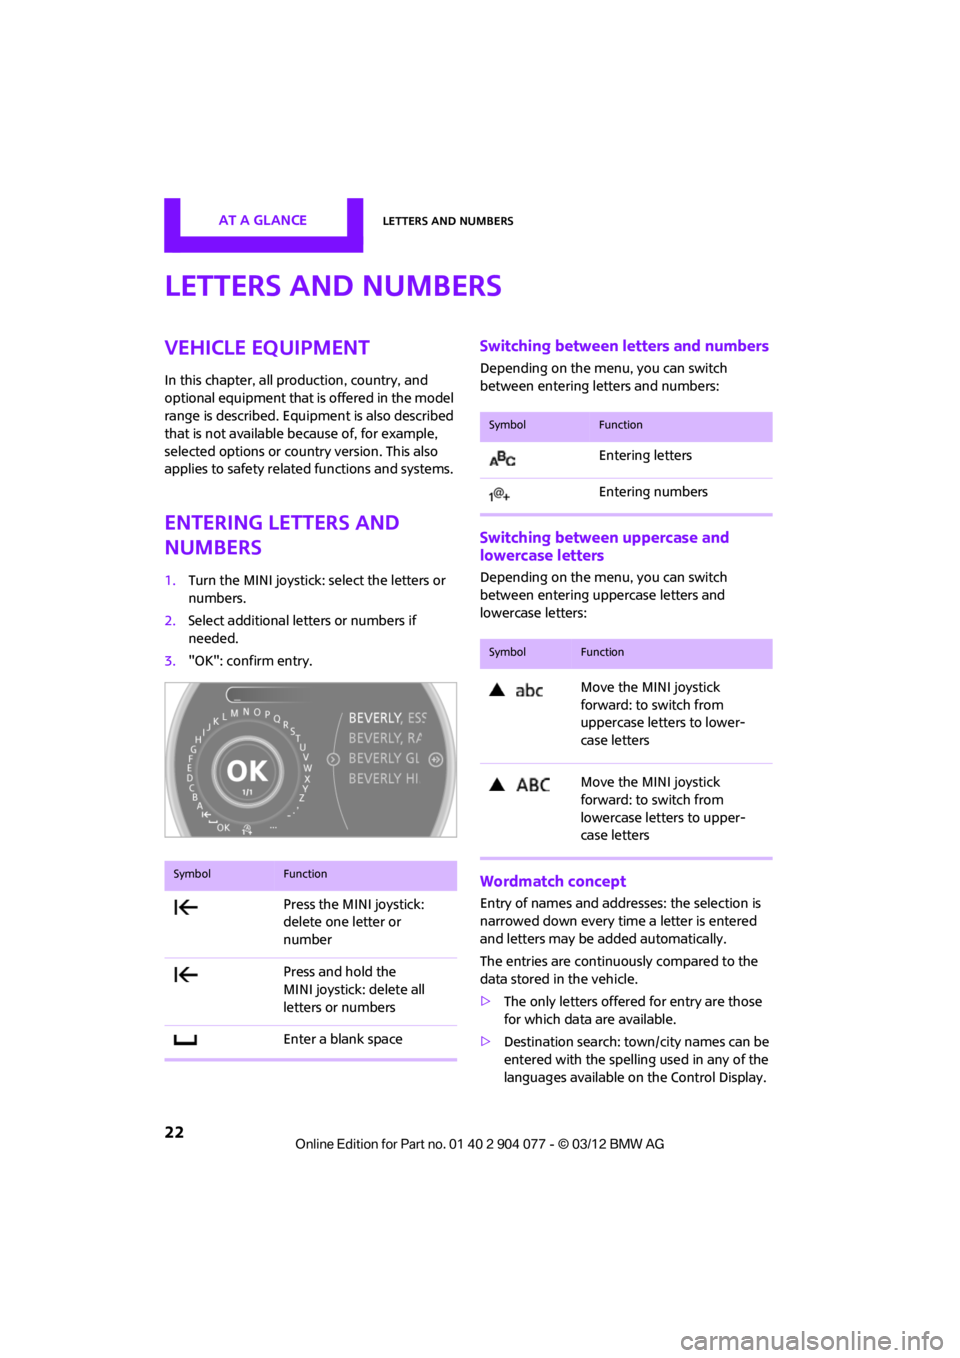
1.Turn the MINI joystick: select the letters or
numbers.
2. Select additional letters or numbers if
needed.
3. "OK": confirm entry.
Switching between letters and numbers
Depending on the menu, you can switch
between entering letters and numbers:
Switching between uppercase and
lowercase letters
Depending on the menu, you can switch
between entering uppercase letters and
lowercase letters:
Wordmatch concept
Entry of names and addre sses: the selection is
narrowed down every time a letter is entered
and letters may be added automatically.
The entries are continuously compared to the
data stored in the vehicle.
> The only letters offered for entry are those
for which data are available.
> Destination search: town/city names can be
entered with the spelling used in any of the
languages available on the Control Display.
SymbolFunction
Press the MINI joystick:
delete one letter or
number
Press and hold the
MINI joystick: delete all
letters or numbers
Enter a blank space
SymbolFunction
Entering letters
Entering numbers
SymbolFunction
Move the MINI joystick
forward: to switch from
uppercase letters to lower-
case letters
Move the MINI joystick
forward: to switch from
lowercase letters to upper-
case letters
00320051004F004C00510048000300280047004C0057004C005200510003
Page 24 of 283

Voice activation systemAT A GLANCE
23
Voice activation system
Vehicle equipment
In this chapter, all production, country, and
optional equipment that is offered in the model
range is described. Equipment is also described
that is not available because of, for example,
selected options or count ry version. This also
applies to safety related functions and systems.
The concept
> By using the voice activation system, individ-
ual functions that are displayed on the
Control Display can be operated via voice
commands. The system supports the entry
process by means of announcements.
> Functions that can only be used while the
vehicle is not moving cannot be operated via
the voice activation system.
> The system includes a special microphone in
the vicinity of the rearview mirror.
Prerequisite
So that voice commands can be identified, set a
language on the Control Display that is sup-
ported by the voice activation system.
To set the language, see page 80.
Symbols in the Owner's Manual
Saying commands
Activating voice activation system
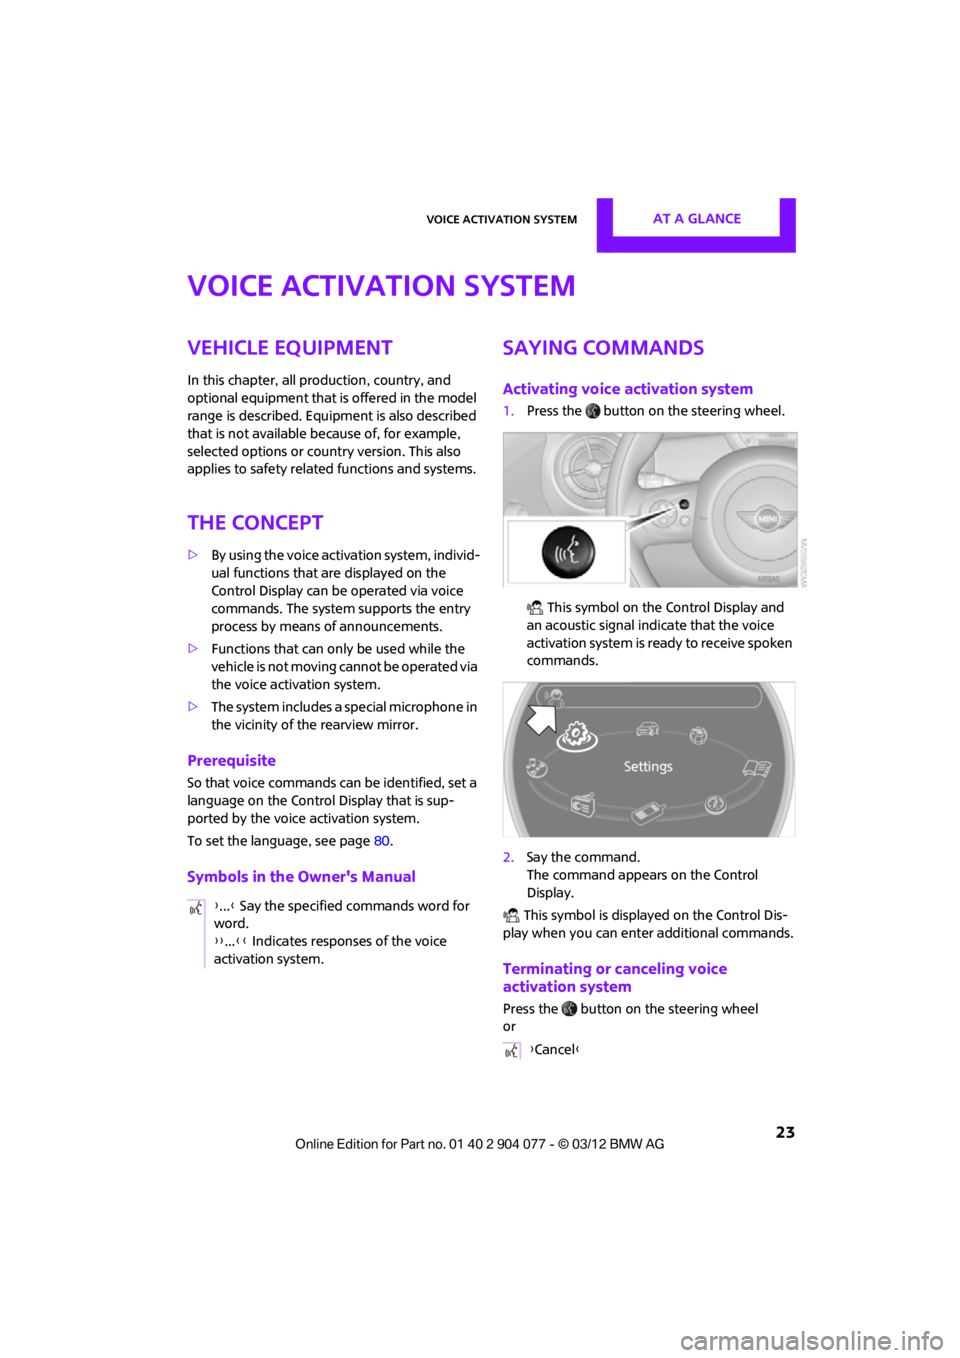
1.Press the button on the steering wheel.
This symbol on the Control Display and
an acoustic signal indicate that the voice
activation system is ready to receive spoken
commands.
2. Say the command.
The command appears on the Control
Display.
This symbol is displayed on the Control Dis-
play when you can ente r additional commands.
Terminating or canceling voice
activation system
Press the button on the steering wheel
or
{
...} Say the specified commands word for
word.
{{ ...}} Indicates responses of the voice
activation system.
{ Cancel }
00320051004F004C00510048000300280047004C0057004C005200510003
Page 25 of 283

AT A GLANCEVoice activation system
24
Commands
Individual menu items on the Control Display
can be voiced as commands.
The commands that are possible depend upon
which menu is currently shown on the Control
Display.
There are short commands for functions in the
main menu.
Some list items, for example telephone book
listings, can also be selected using the voice acti-
vation system. In particular, say the list items
exactly as they are displayed in the respective
list.
Having the possible commands
read aloud
Having the possible co mmands read aloud:
For example if you have selected "CD" the sys-
tem will read aloud the possible commands for
operating the CD player.
Help for the voice activation system
Calling up Help:
Additional commands for Help:
> {Help with examples }: information about
the current operating options and the most
important commands for them are
announced.
> {Help with voice activation }: information
regarding the principles behind the voice
activation system is announced.
Using alternative commands
There are often a number of commands to run a
function, e.g.:
Carrying out functions through short
commands
Main menu functions can be executed immedi-
ately by short commands, almost regardless
of which menu item is selected, e.g., {Vehicle
status }.
List of voice activation system short commands,
see page 260.
Opening the main menu
Example: selecting the track of a CD
1.Switch on Entertainment sound output if
necessary.
2. Press the button on the steering wheel.
Setting the voice dialog
You can set whether the voice activation system
uses the standard dialog or the short version.
With the short version of the spoken dialog, the
requests and responses of the voice activation
system are shortened.
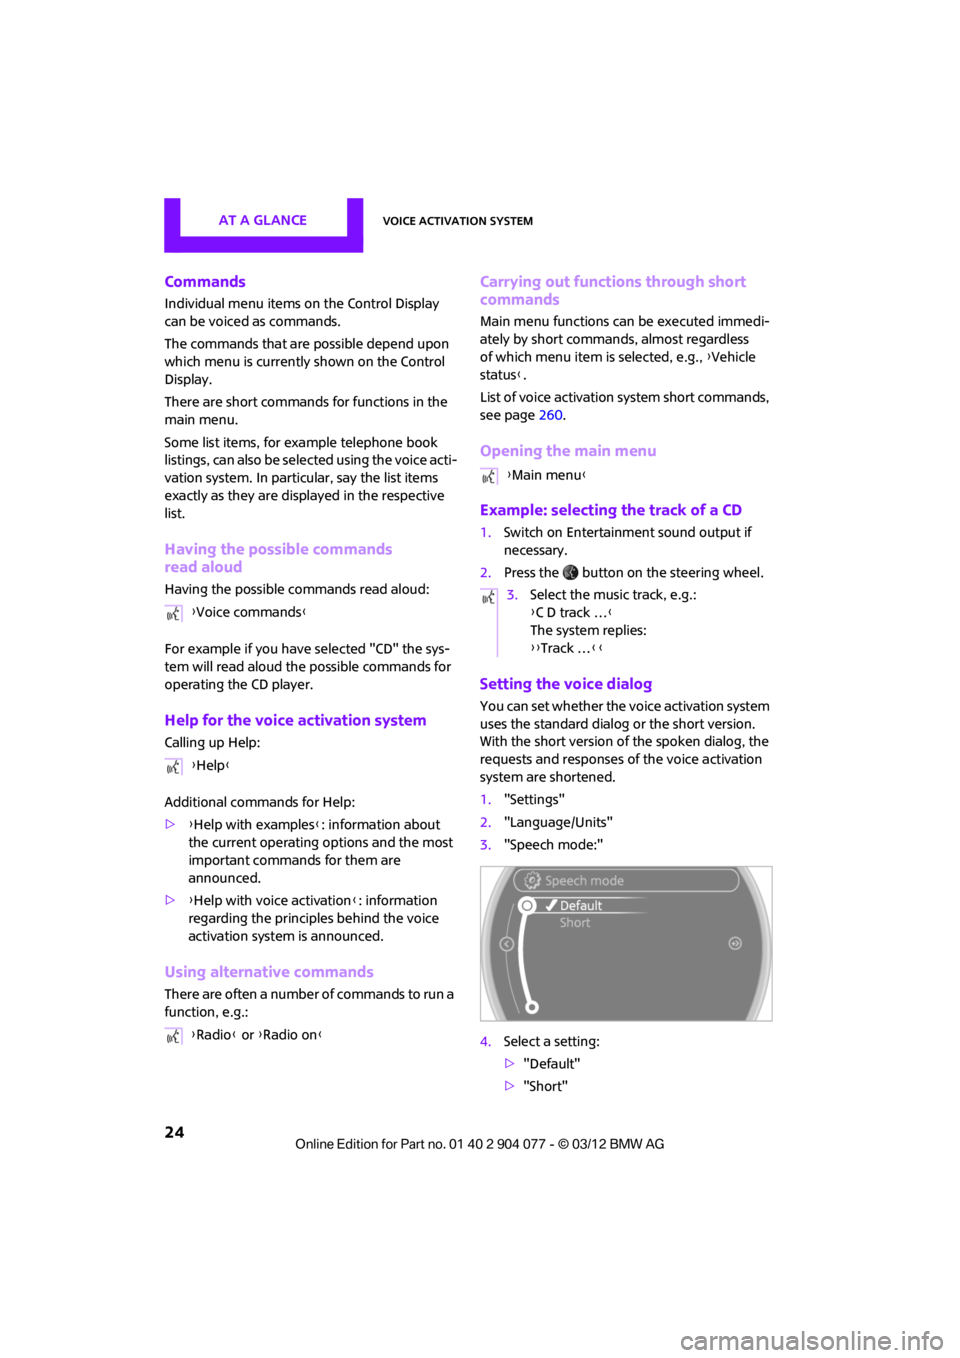
1."Settings"
2. "Language/Units"
3. "Speech mode:"
4. Select a setting:
>"Default"
> "Short"
{
Voice commands }
{ Help }
{ Radio } or {Radio on }
{Main menu }
3. Select the music track, e.g.:
{C D track … }
The system replies:
{{ Track … }}
00320051004F004C00510048000300280047004C0057004C005200510003
Page 30 of 283

Opening and closingCONTROLS
29
This means that your settings will be activated
for you, even if in the meantime your car was
used by someone else with another remote
control and the corresponding settings.
At most three remote co ntrols can be set for
three different people. A prerequisite is that
each person uses a separate remote control.
Personal Profile settings
For more information on specific settings, refer
to the specified pages.
> Response of the central locking system
when the car is being unlocked 30
> Automatic locking of the vehicle 33
> Triple turn signal activation 65
> Settings for the displays on the onboard
computer, in the speedometer and in the
tachometer:
>12 h/24 h mode of the clock 76
> Date format 77
> Brightness of the Control Display 80
> Language on the Control Display 80
> Units of measure for fuel consumption,
distance covered/re maining distances
and temperature 74
> Light settings:
>Pathway lighting 97
> Daytime running lights 97
> Automatic climate control: activating/
deactivating the AUTO program, setting the
temperature, air volume and air
distribution 103
> Entertainment:
>Tone control 147
> Adjusting vo lume levels 147
Central locking system
The concept
The central locking system is ready for operation
whenever the driver's door is closed.
The system simultaneously engages and
releases the locks on the following:
>Doors
> Tailgate
> Fuel filler flap
Operating from outside
>Via the remote control
> Using the door lock
> In cars with Comfor t Access, via the door
handles on the driver's and passenger's
sides
The anti-theft system is also operated at the
same time. It prevents the doors from being
unlocked using the lock buttons or door han-
dles. The remote control can also be used to
switch on/off the welcome lamps and interior
lamps. The alarm system is also activated or
deactivated, page 34.
Operating from inside
Button for central locking system, page 32.
In the event of a sufficiently severe accident,
the central locking system unlocks automati-
cally. In addition, the hazard warning flashers
and interior lamps come on.
Opening and closing:
from outside
Persons or animals in a parked vehicle
could lock the doors from the inside. Take
the key with you when you leave the vehicle
so that the vehicle can be opened from the
outside. <
00320051004F004C00510048000300280047004C0057004C005200510003
Page 36 of 283

Opening and closingCONTROLS
35
>The car’s inclination changes, for example if
an attempt is made to jack it up and steal the
wheels or to raise it prior to towing it away
> There is an interruption in the power supply
from the battery
The alarm system briefly indicates unauthorized
entry or tampering by means of:
> An acoustic alarm
> Switching on the hazard warning flashers
Arming and disarming
General information
Whenever the car is locked or unlocked, the
alarm system is armed or disarmed.
Door lock with armed alarm system
Because of the design, unlocking the door lock
may trigger the alarm in some countries.
To turn off the alarm, unlock the vehicle using
the remote control or switch on the ignition.
Tailgate with armed alarm system
Even when the alarm syst em is armed, you can
open the tailgate by means of the button
on the remote control.
When you subsequently close the tailgate it is
again locked and monitored.
Panic mode
You can activate the alarm system if you find
yourself in a dangerous situation.
Press the button for at least two seconds.
Switching off the alarm:
Press any button.
Switching off an alarm
> Unlock the car with the remote control.
> Insert the key fully into the ignition lock.
> In cars with Comfort Access, press the button
on the door lock.
Display on the revolution counter
When the system is armed, all LEDs pulse. After
approx. 16 minutes one LED flashes.
>LEDs pulse or LED flashes: system is armed.
> One LED flashes at short intervals:
Doors, the hood or the tailgate are not prop-
erly closed. Even if these are not closed fully,
the remaining items are deadlocked and the
LEDs pulse after approx. 10 seconds for
approx. 16 minutes. Afterwards, one LED
flashes.
The interior movement detector is not
activated.
> LEDs go out after the vehicle is unlocked:
No attempt was made to tamper with the
car.
> LEDs flash after unlocking until the key is
inserted in the ignition, but for no longer
than approx. 5 minutes: an attempt was
made to tamper with the vehicle.
Tilt alarm sensor
The vehicle's inclination is monitored. The alarm
is triggered, for instance, if an attempt is made
to steal the vehicle's wheels or tow it away.
Interior movement detector
Before the interior mo vement detector can
operate correctly, the windows and glass roof
must be closed.
00320051004F004C00510048000300280047004C0057004C005200510003
Page 39 of 283

CONTROLSOpening and closing
38
Warning lamps
The warning lamp lights up when an
attempt is made to start the engine: the
engine cannot be started. The remote
control is not inside the vehicle or is malfunc-
tioning. Take the remote control with you inside
the vehicle or have it checked. If necessary,
insert another remote co ntrol into the ignition
lock.
The warning lamp lights up when the
engine is running: the remote control is
no longer inside the vehicle. After the
engine is switched off, the engine can only be
restarted within approx. 10 seconds.
The indicator lamp comes on and a
message appears on the Control
Display: replace the battery in the
remote control.
Replacing the battery
The remote control for Comfort Access contains
a b a t t e r y t h a t w i l l n e e d t o b e r e p l a c e d f r o m t i m e
to time.
1. Remove the cover.
2. Insert the new battery with the plus side
facing up.
3. Press the cover on to close.
Take the old battery to a recycling center
or to your MINI dealer. <
Windows
To prevent injuries, exercise care when
closing the windows.
Take the remote control with you when you
leave the car; otherwise, children could operate
the electric windows and possibly injure
themselves. <
If, after a window is opened and closed
several times in close succession, the
window can only be closed and not opened, the
system is overheated. Le t the system cool for
several minutes with the ignition switched on or
the engine running. <
Opening
>Press the swit ch downward.
The window opens until you release the
switch.
> Push the switch downward.
As of radio readiness, the windows will open
automatically. Push the switch again to stop
the opening movement.
To open the window a crack, press the switch
down twice in quick succession.
Closing
In order to close the window, press the switch
up. The window closes until you release the
switch.
00320051004F004C00510048000300280047004C0057004C005200510003