2012 MINI COUPE ROADSTER CONVERTIBLE automatic transmission
[x] Cancel search: automatic transmissionPage 116 of 283
Things to remember when drivingDRIVING TIPS
115
Hot exhaust system
As in all vehicles, extremely high tempera-
tures are generated on the exhaust sys-
tem. Do not remove the heat shields installed
adjacent to various se ctions of the exhaust
system, and never apply undercoating to them.
Make sure that when driving, idling or when
parking, no easily flamma ble materials, such as
hay, leaves, grass, etc. come into contact with
the hot exhaust system. Such contact could lead
to a fire, with the risk of serious personal injuries
and property damage. Do not touch hot exhaust
tail pipes. Otherwise, there is a risk of burns. <
Hydroplaning
When driving on wet or slushy roads,
reduce road speed. If you do not, a wedge
of water can form betw een tires and road sur-
face. This situation, known as hydroplaning, can
cause partial or complete loss of tire contact
with the road surface, so that the car cannot be
steered or braked properly. <
The risk of hydroplaning increases with declining
tread depth on the tires, refer also to Tread
depth on page 218.
Driving through water
Drive through water on the road only if it is
not deeper than 1 ft/30 cm, and then only
at walking speed at the most. Otherwise, the
vehicle's engine, the electrical systems and the
transmission may be damaged. <
Parking brake on inclines
On inclines, do not hold the vehicle with
the clutch; use the parking brake. Other-
wise, greater clutch wear will result. <
For information on drivin g off using Hill Assist,
refer to page 85.
Braking safely
Your MINI is equipped with ABS. If you are in a
situation which requires full braking, it is best to
brake using maximum brake pressure. Since the vehicle maintains stee
ring responsiveness,
you can still avoid possi ble obstacles with a
minimum of steering effort.
The pulsation of the brake pedal, together with
the sound of hydraulic regulation, indicates that
ABS is functioning properly.
Objects in the movement range of
the pedals
Keep floor mats, carp et, and other objects
out of the movement range of the pedals;
otherwise, they may inhi bit the function of the
pedals during driving.
Do not place additional floor mats onto an
existing one or onto other objects.
Only use floor mats that have been approved for
the vehicle and can be appropriately fastened.
Make sure that the floo r mats are securely fas-
tened again after they have been removed, e.g.
for cleaning.<
Driving in wet conditions
When roads are wet or ther e is heavy rain, briefly
exert gentle pressure on the brake pedal every
few miles. Monitor traffic conditions to ensure
that this maneuver does not endanger other
road users. The heat generated in this process
helps dry the pads and rotors to ensure that.
Then full braking force will be immediately
available when it is needed.
Hills
To prevent overheatin g and the resulting
reduced efficiency of the brake system,
drive long or steep downhill gradients in the
gear in which the least braking is required. Even
light but consistent brake pressure can lead to
high temperatures, brake wear and possibly
even brake failure. <
You can increase the engine's braking effect by
shifting down, all the way to first gear if neces-
sary. This strategy helps you avoid placing
excessive loads on the brake system. Downshift-
ing in manual mo de of the automatic transmis-
sion, page 64.
00320051004F004C00510048000300280047004C0057004C005200510003
Page 117 of 283
DRIVING TIPSThings to remember when driving
116
Never drive with the clutch held down,
with the transmission in neutral or with
the engine switched off; otherwise, engine brak-
ing action will not be present or there will be no
power assistance to the brakes or steering.
Never allow floor mats, carpets or any other
objects to protrude into the area around the
pedals; otherwise, pedal function could be
impaired. <
Corrosion on brake rotors
When the vehicle is driven only occasionally,
during extended periods when the vehicle is not
used at all, and in op erating conditions where
brake applications are less frequent, there is an
increased tendency for corrosion to form on
rotors, while contaminants accumulate on the
brake pads. This occurs because the minimum
pressure which must be exerted by the pads
during brake applications to clean the rotors is
not reached.
Should corrosion form on the brake rotors, the
brakes will tend to respond with a pulsating
effect that even extended application will fail to
cure.
When the vehicle is parked
Condensation forms while the automatic climate
control is in operation, and then exits under the
vehicle. Traces of condensed water under the
vehicle are therefore normal.
In the MINI Cooper S, the coolant pump may
continue to run for some time after the engine is
switched off. This will generate noise in the
engine compartment.
Cargo loading
To avoid loading the tires beyond their
approved carrying ca pacity, never over-
load the vehicle. Overloading can lead to over-
heating and increases the rate at which damage
develops inside the tires. The ultimate result can
assume the form of a sudden blowout.
<
MINI Coupe: cargo area cover
Do not place any objects on the cover;
otherwise, they could endanger the car's
occupants, e.g. in the case of braking or sudden
swerving, or they may damage the cover. <
Your MINI Coupe is equipped with two cargo
area covers. When you open the tailgate, the
rear cargo area cover is raised.
The cargo area covers can be removed
individually.
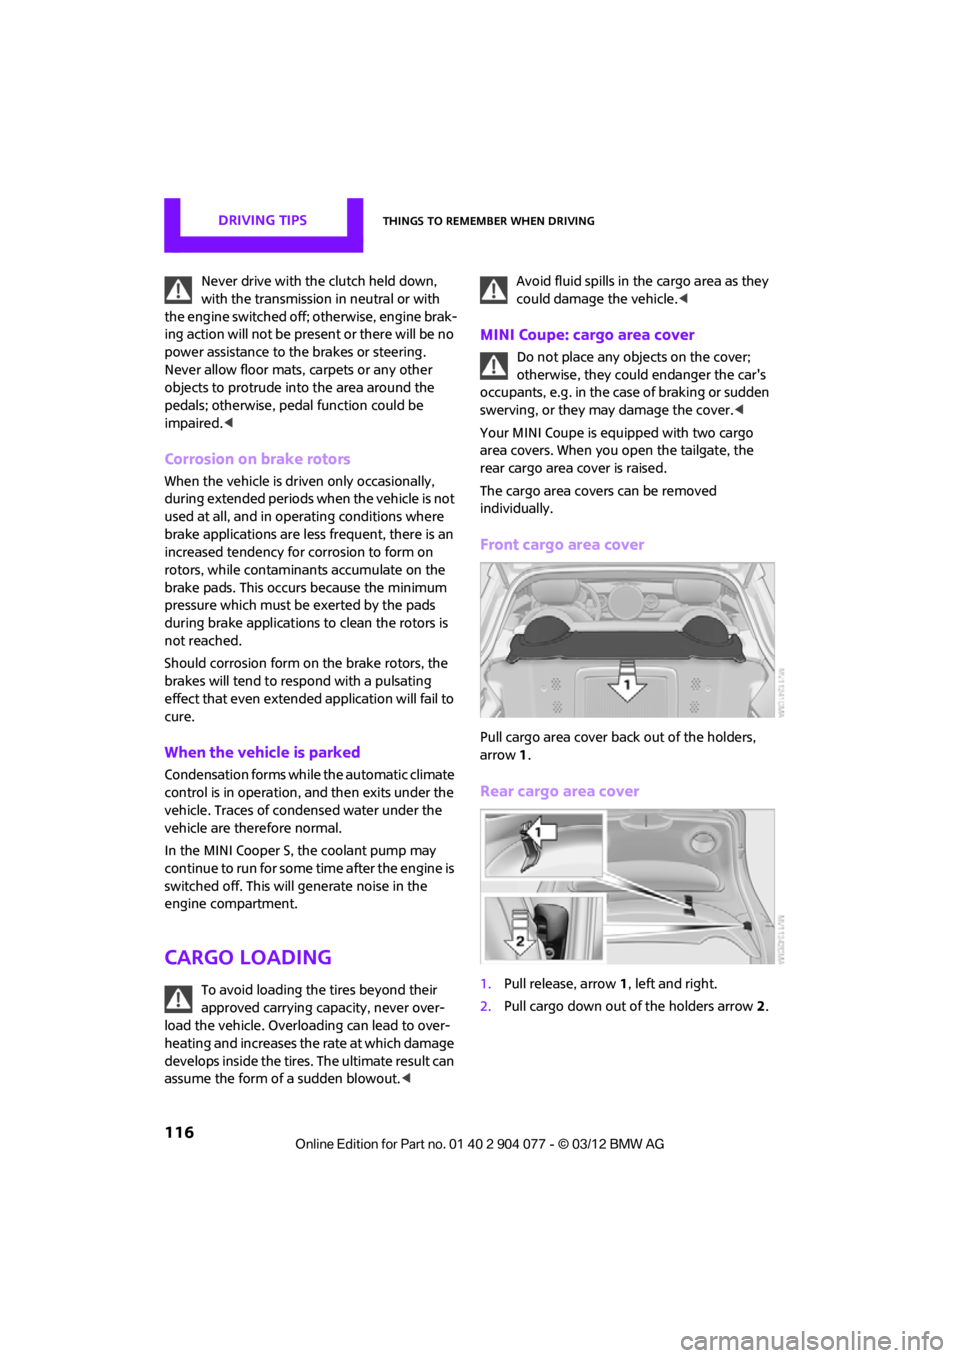
Front cargo area cover
Pull cargo area cover back out of the holders,
arrow 1.
Rear cargo area cover
1. Pull release, arrow 1, left and right.
2. Pull cargo down out of the holders arrow 2.
00320051004F004C00510048000300280047004C0057004C005200510003
Page 155 of 283
ENTERTAINMENTRadio
154
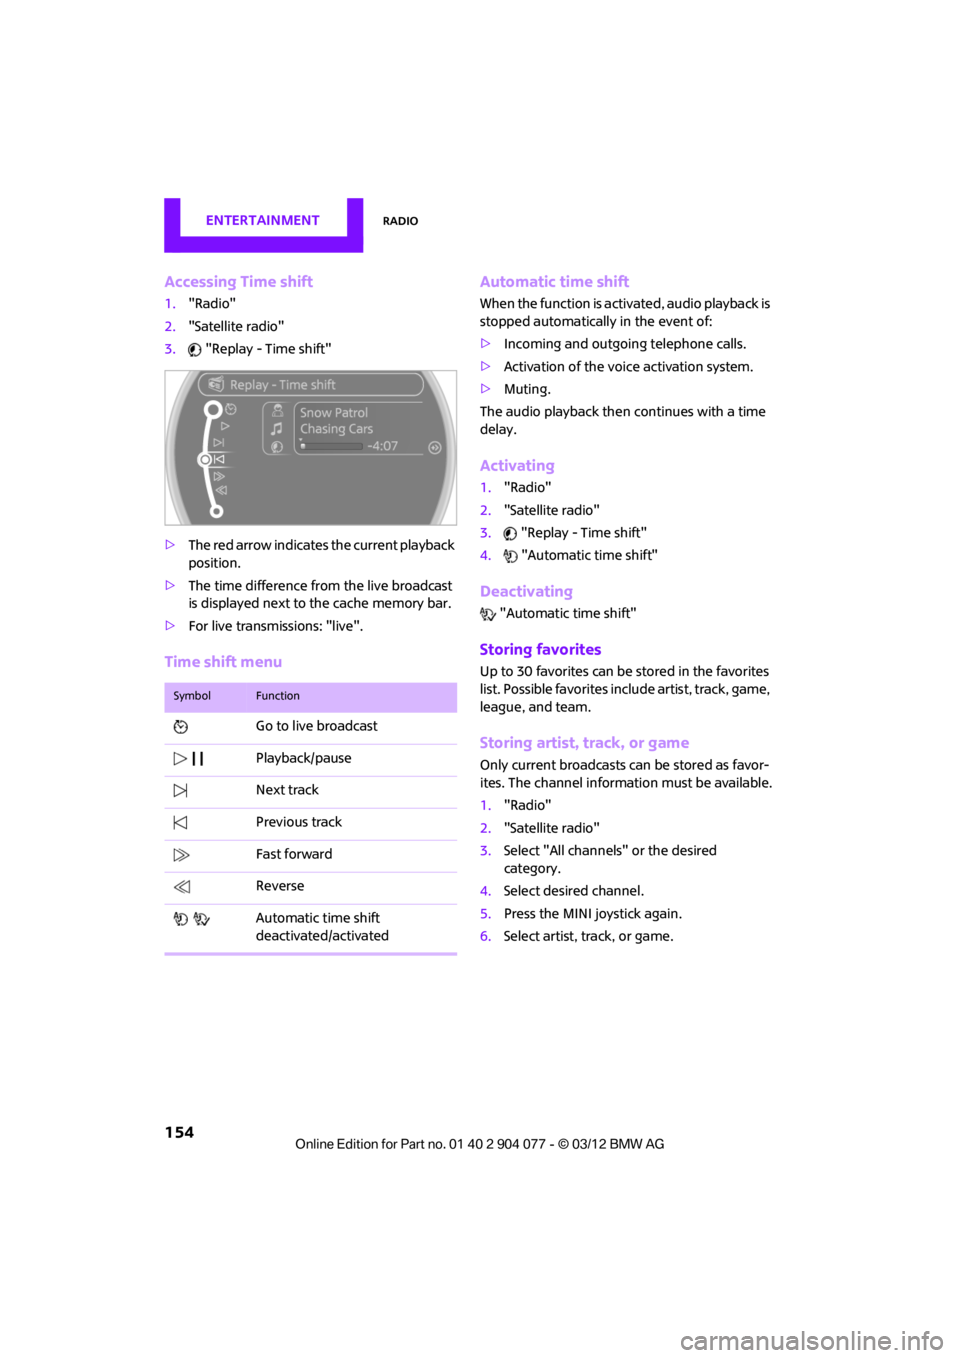
Accessing Time shift
1."Radio"
2. "Satellite radio"
3. "Replay - Time shift"
> The red arrow indicates the current playback
position.
> The time difference from the live broadcast
is displayed next to the cache memory bar.
> For live transmissions: "live".
Time shift menu Automatic time shift
When the function is acti
vated, audio playback is
stopped automatically in the event of:
> Incoming and outgoing telephone calls.
> Activation of the voice activation system.
> Muting.
The audio playback then continues with a time
delay.
Activating
1. "Radio"
2. "Satellite radio"
3. "Replay - Time shift"
4. "Automatic time shift"
Deactivating
"Automatic time shift"
Storing favorites
Up to 30 favorites can be stored in the favorites
list. Possible favorites incl ude artist, track, game,
league, and team.
Storing artist, track, or game
Only current broadcasts can be stored as favor-
ites. The channel informat ion must be available.
1. "Radio"
2. "Satellite radio"
3. Select "All channels" or the desired
category.
4. Select desired channel.
5. Press the MINI joystick again.
6. Select artist, track, or game.
SymbolFunction
Go to live broadcast
Playback/pause
Next track
Previous track
Fast forward
Reverse
Automatic time shift
deactivated/activated
00320051004F004C00510048000300280047004C0057004C005200510003
Page 229 of 283

MOBILITYCare
228
Automatic transmission
Before driving into the car wash, make sure that
the vehicle can roll:
1.Place the remote control, even with Comfort
Access, in the ignition lock.
2. Move the selector lever to position N.
3. Release the parking brake.
4. Switch off the engine.
5. Insert the remote control in the ignition lock
so that the vehicle can roll.
Steam jets/high-pressure washers
When using steam jets or high-pressure
washers, make sure that you maintain
sufficient distance from the vehicle and do not
exceed a maximum temperature of 140 7/
60 6 .
If the distance is too close, the pressure too high,
or the temperature too high, parts of the vehicle
can be damaged, or water can penetrate.
Observe the operating instructions for high-
pressure washers. <
Do not spray sensors, such as the Park Dis-
tance Control, with high-pressure washers
for a long time or at a distance of less than 1 ft/
30 cm. <
Manual washing
Use a great deal of water and, if necessary, car
shampoo when washing your car by hand. Clean
the vehicle with a sponge or a washing brush
applying a slight amount of pressure.
Before cleaning the windshield, deacti-
vate the rain sensor or turn off the ignition
to prevent unintentional wiping. <
Observe local regulations regarding wash-
ing vehicles by hand. <
Headlamps
Do not wipe dry and do not use abrasive or
corrosive cleaning agen ts. Remove dirt and
contamination, such as in sects, by soaking with
shampoo and then washing with plenty of
water.
Do not remove accumulated ice and snow with
an ice scraper; use window deicers instead.
Windows
Clean the outside and inside of the windows and
mirrors with a window cleaner.
Do not clean the mirrors with cleaners
containing quartz. <
Wiper blades
Clean with soapy water and change regularly to
prevent the formation of streaks.
Wax, preservatives and dirt on the win-
dows cause streaks wh en the windshield
wipers are on, and can cause premature wear
of the wiper blades and interfere with the rain
sensor. <
Care of the convertible top
The appearance and service life of the convert-
ible top largely depends on its proper care and
operation.
Please follow these instructions:
>Never attempt to fold and stow the convert-
ible top in the convertible compartment
when the top is wet or frozen. Otherwise,
water stains, mildew, and chafe marks may
occur.
> If water spots occur on the inside headliner
despite precautions, remove them using a
microfiber cloth and interior cleaner.
> If the vehicle is parked in an enclosed area
for a longer period of time, make sure that
there is sufficient ventilation.
> Remove any bird droppings immediately,
since they have corrosive properties which
will corrode the conver tible top and damage
the rubber seals.
00320051004F004C00510048000300280047004C0057004C005200510003
Page 246 of 283
Giving and receiving assistanceMOBILITY
245
Using a tow fitting
The screw-in tow fitting must always be carried
in the car. It can be screwed in at the front or
rear of the MINI.
It is stored in the toolkit in the cargo area
underneath the cover on the right-hand side,
page231.
Use only the tow fitting provided with the
vehicle and screw it all the way in. Use the
tow fitting for towing on paved roads only. Avoid
lateral loading of the tow fitting, e.g. do not lift
the vehicle by the tow fitting. Otherwise, the tow
fitting and the vehicle could be damaged. <
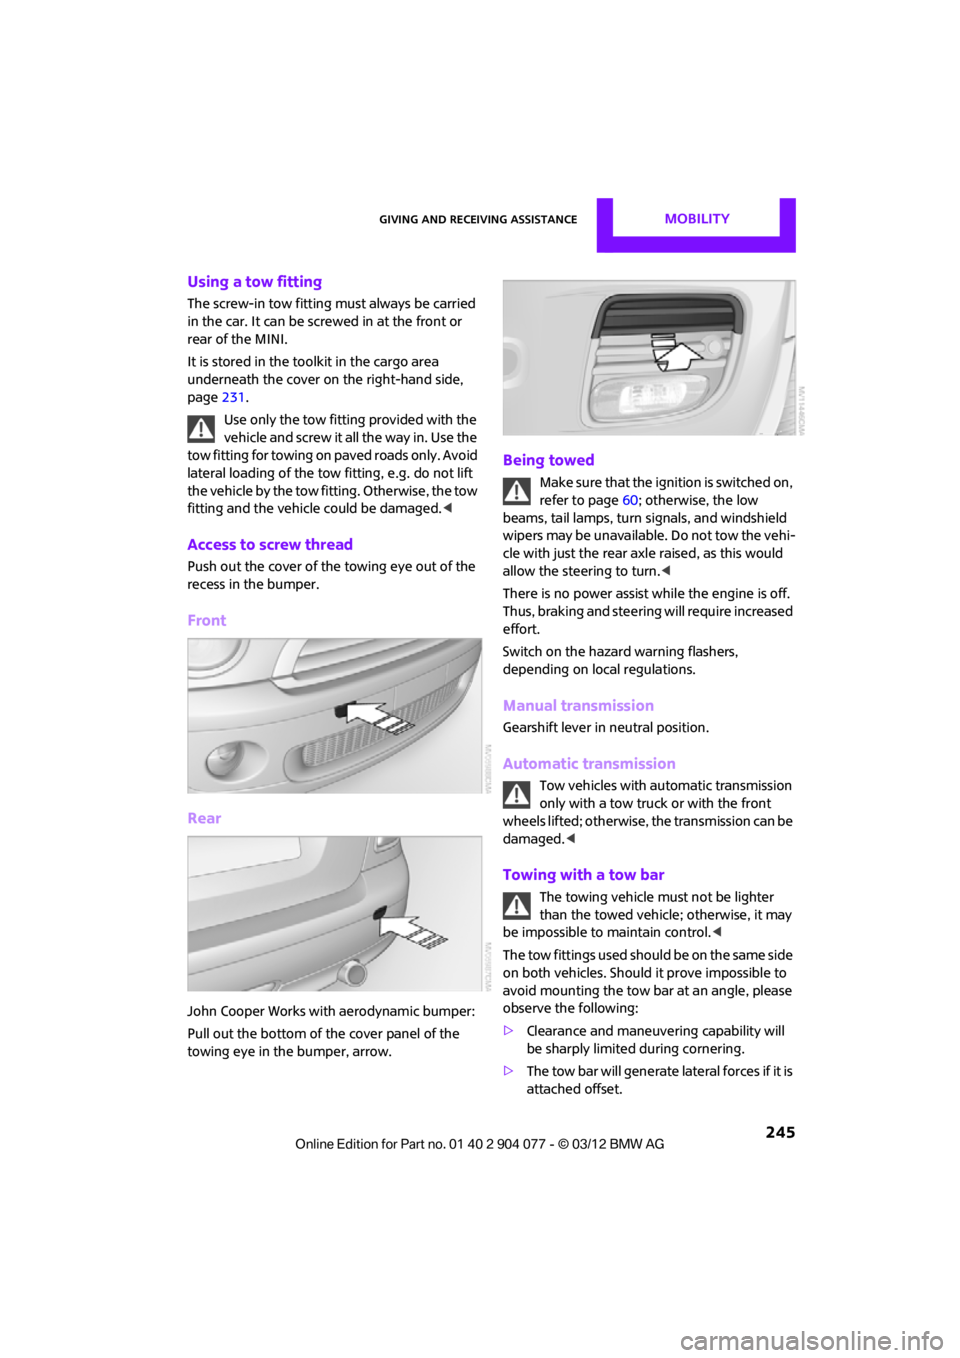
Access to screw thread
Push out the cover of the towing eye out of the
recess in the bumper.
Front
Rear
John Cooper Works with aerodynamic bumper:
Pull out the bottom of the cover panel of the
towing eye in the bumper, arrow.
Being towed
Make sure that the ignition is switched on,
refer to page60; otherwise, the low
beams, tail lamps, turn signals, and windshield
wipers may be unavailable. Do not tow the vehi-
cle with just the rear ax le raised, as this would
allow the steering to turn. <
There is no power assist while the engine is off.
Thus, braking and steering will require increased
effort.
Switch on the hazard warning flashers,
depending on local regulations.
Manual transmission
Gearshift lever in neutral position.
Automatic transmission
Tow vehicles with automatic transmission
only with a tow truck or with the front
wheels lifted; otherwise, the transmission can be
damaged. <
Towing with a tow bar
The towing vehicle must not be lighter
than the towed vehicle; otherwise, it may
be impossible to maintain control. <
The tow fittings used should be on the same side
on both vehicles. Should it prove impossible to
avoid mounting the tow bar at an angle, please
observe the following:
> Clearance and maneuvering capability will
be sharply limited during cornering.
> The tow bar will generate lateral forces if it is
attached offset.
00320051004F004C00510048000300280047004C0057004C005200510003
Page 247 of 283
MOBILITYGiving and receiving assistance
246
Only attach the tow bar to the tow fittings,
as attachment to other vehicle parts can
lead to damage. <
Towing with a tow rope
When starting off in the towing vehicle, make
sure that the tow rope is taut.
To avoid jerking and the associated
stresses on vehicle components when
towing, always use nylon ropes or nylon straps.
Attach the tow rope to the tow fittings only, as
attaching it to other pa rts of the vehicle could
result in damage. <
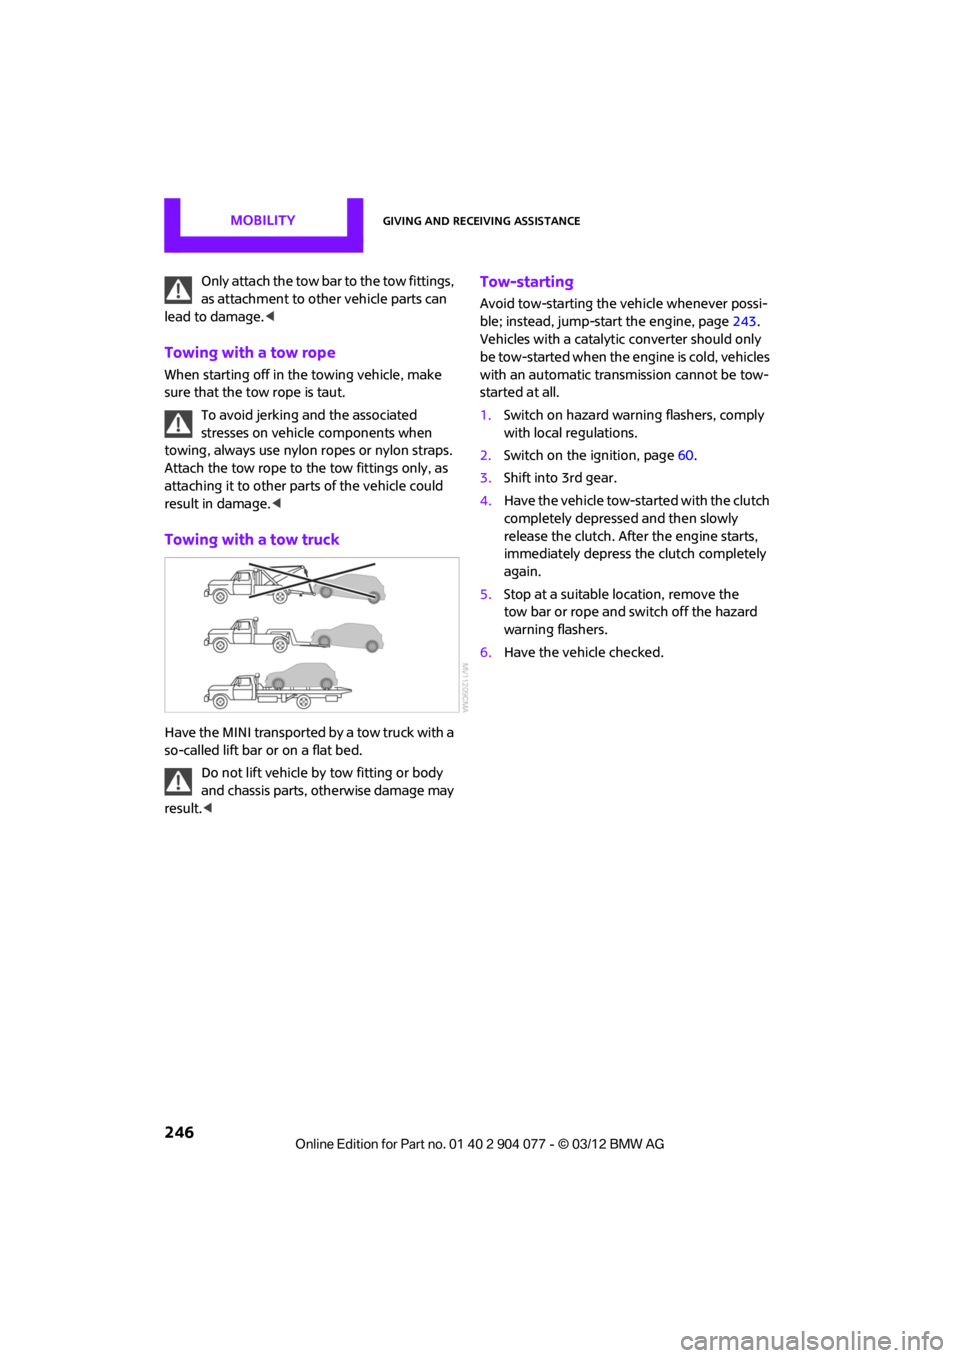
Towing with a tow truck
Have the MINI transported by a tow truck with a
so-called lift bar or on a flat bed.
Do not lift vehicle by tow fitting or body
and chassis parts, otherwise damage may
result. <
Tow-starting
Avoid tow-starting the vehicle whenever possi-
ble; instead, jump-start the engine, page 243.
Vehicles with a catalyti c converter should only
be tow-started when the engine is cold, vehicles
with an automatic transmission cannot be tow-
started at all.
1. Switch on hazard warning flashers, comply
with local regulations.
2. Switch on the ignition, page 60.
3. Shift into 3rd gear.
4. Have the vehicle tow-started with the clutch
completely depressed and then slowly
release the clutch. After the engine starts,
immediately depress the clutch completely
again.
5. Stop at a suitable location, remove the
tow bar or rope and switch off the hazard
warning flashers.
6. Have the vehicle checked.
00320051004F004C00510048000300280047004C0057004C005200510003
Page 258 of 283

Technical dataREFERENCE
257
Weights
Never exceed either the approved axle loads or the gross vehicle weight.
MINI Coupe
CooperCooper SJohn Cooper Works
Curb weight, ready for travel, with all optional extras
>Manual transmission lbs/kg 2,557/1,160 2,679/1,215 2,701/1,225
> Automatic
transmission lbs/kg 2,635/1,195 2,734/1,240 –
Approved gross weight
> Manual transmission lbs/kg 3,175/1,440 3,252/1,475 3,252/1,475
> Automatic
transmission lbs/kg 3,252/1,475 3,307/1,500 –
Approved front axle load
> Manual transmission lbs/kg 1,786/810 1,885/855 1,885/855
> Automatic
transmission lbs/kg 1,863/845 1,940/880 –
Approved rear axle load lb s/kg 1,411/640 1,411/640 1,411/640
Cargo area capacity cu ft/ liters9.9/
280 9.9/
280 9.9/
280
00320051004F004C00510048000300280047004C0057004C005200510003
Page 259 of 283

REFERENCETechnical data
258
MINI Roadster
CooperCooper SJohn Cooper Works
Curb weight, ready for travel, with all optional extras
> Manual transmission lbs/kg 2, 635/1,195 2,745/1,245 2,767/1,255
> Automatic
transmission lbs/kg 2,712/1,230 2,800/1,270 –
Approved gross weight
> Manual transmission lbs/kg 3, 241/1,470 3,329/1,510 3,329/1,510
> Automatic
transmission lbs/kg 3,318/1,505 3,373/1,530 –
Approved front axle load
> Manual transmission lbs/kg 1,786/810 1,896/860 1,896/860
> Automatic
transmission lbs/kg 1,863/845 1,951/885
–
Approved rear axle load lbs/kg 1,488/675 1,466/665 1,488/675
Cargo area capacity cu ft/ liters8.5/
240 8.5/
240 8.5/
240
00320051004F004C00510048000300280047004C0057004C005200510003