2012 MERCEDES-BENZ SLS AMG ROADSTER wiper blades
[x] Cancel search: wiper bladesPage 7 of 288
Jump starting ................................. 243
Location ......................................... 242
Belt
see Seat belts
Blind Spot Assist
Activating/deactivating .................156
Display message ............................ 181
Notes/function .............................. 143
Brake Assist System
see BAS (Brake Assist System)
Brake fluid
Display message ............................ 169
Notes ............................................. 282
Brake lamps
Display message ............................ 174
Brakes
ABS .................................................. 55
BAS .................................................. 55
Brake fluid (notes) .........................282
Display message ............................ 165
Driving tips .................................... 133
High-performance brake system ....134
Important safety notes ..................133
Maintenance .................................. 134
Warning lamp ........................ 190, 192
Breakdown
see Flat tire
see Towing away/tow-starting
Bulbs
see Changing bulbs
C
California Important notice for retail
customers and lessees ....................19
Calling up a malfunction
see Display messages
Capacities
see Technical data
Car
see Vehicle
Care
Car wash ........................................ 223
Display ........................................... 228
Exterior lights ................................ 227
Matte finish ................................... 225
Notes ............................................. 223
Paint .............................................. 225
Plastic trim .................................... 228
Power washer ................................ 224
Rear view camera .......................... 228
Seat belt ........................................ 229
Seat cover ..................................... 229
Sensors ......................................... 228
Soft top .......................................... 226
Tail pipes ....................................... 228
Trim pieces .................................... 229
Wheels ........................................... 225
Windows ........................................ 226
Wiper blades .................................. 227
Wooden trim .................................. 229
Car wash (care) ................................. 223
CD player/CD changer (on-board
computer) .......................................... 154
Center console Lower section .................................. 31
Upper section .................................. 30
Central locking
Automatic locking (on-board
computer) ...................................... 159
Locking/unlocking (SmartKey) ........64
Changing bulbs
Important safety notes ....................98
License plate lighting .......................99
Charge maintenance socket ............ 215
Children In the vehicle ................................... 51
Restraint systems ............................ 51
Child seat
Special seat belt retractor ...............53
Top Tether ....................................... 53
Cigarette lighter ................................ 203
Climate control Automatic climate control (dual-
zone) .............................................. 105
Controlling automatically ...............107
Cooling with air dehumidification ..106
Defrosting the windows .................109
Defrosting the windshield ..............108
Important safety notes ..................104
Indicator lamp ................................ 107
Maximum cooling .......................... 108
Notes on using automatic climate
control ........................................... 106
Overview of systems ......................104Index5
Page 19 of 288
Windshield washer system .............. 221
Notes ............................................. 284
Windshield wipers
Problem (malfunction) ...................101
Replacing the wiper blades ............100
Switching on/off .............................. 99
Winter driving
Important safety notes ..................252
Slippery road surfaces ...................136
Snow chains .................................. 252
Winter tires
M+S tires ....................................... 252
Wiper blades
Cleaning ......................................... 227
Important safety notes ..................100
Wooden trim (cleaning
instructions) ...................................... 229
Workshop see Qualified specialist workshop Index17
Page 101 of 288
Keep bulbs out of the reach of children.
Otherwise, they could damage the bulbs, for
example, and injure themselves.
Never use a bulb which has been dropped.
Such a bulb may break or even explode and
injure you.
Halogen bulbs are pressurized and can
explode when you change them, particularly
if they are very hot. You should therefore wear
eye protection and gloves when you are
changing them.
Changing the front bulbs
You cannot replace the bulbs at the front
yourself. Contact a qualified specialist
workshop which has the necessary specialist
knowledge and tools to carry out the work
required. Mercedes-Benz recommends that
you use an authorized Mercedes-Benz Center
for this purpose.
Changing the rear bulbs
License plate lamps
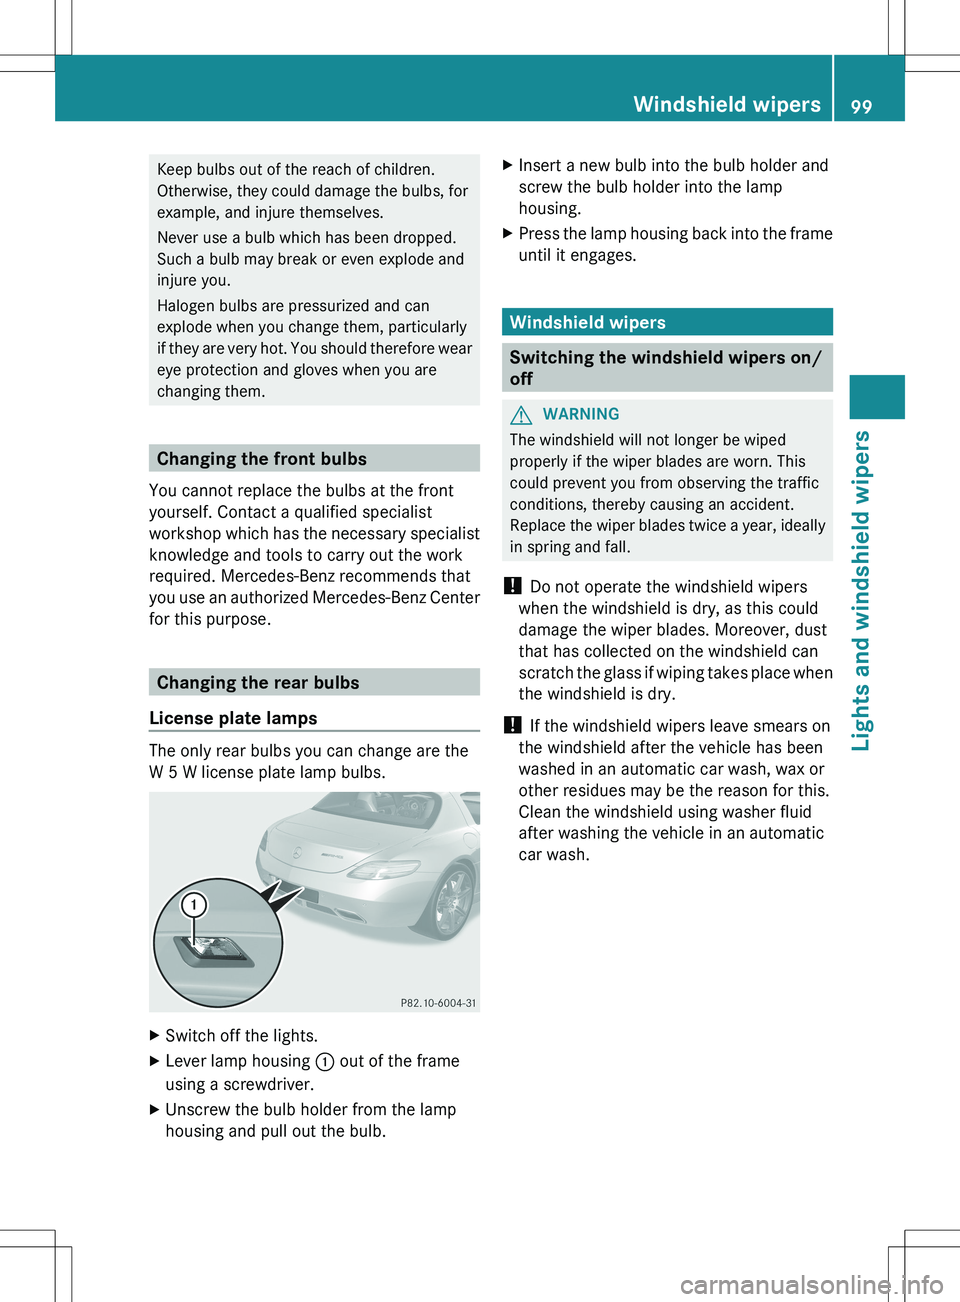
The only rear bulbs you can change are the
W 5 W license plate lamp bulbs.
XSwitch off the lights.XLever lamp housing : out of the frame
using a screwdriver.XUnscrew the bulb holder from the lamp
housing and pull out the bulb.XInsert a new bulb into the bulb holder and
screw the bulb holder into the lamp
housing.XPress the lamp housing back into the frame
until it engages.
Windshield wipers
Switching the windshield wipers on/
off
GWARNING
The windshield will not longer be wiped
properly if the wiper blades are worn. This
could prevent you from observing the traffic
conditions, thereby causing an accident.
Replace the wiper blades twice a year, ideally
in spring and fall.
! Do not operate the windshield wipers
when the windshield is dry, as this could
damage the wiper blades. Moreover, dust
that has collected on the windshield can
scratch the glass if wiping takes place when
the windshield is dry.
! If the windshield wipers leave smears on
the windshield after the vehicle has been
washed in an automatic car wash, wax or
other residues may be the reason for this.
Clean the windshield using washer fluid
after washing the vehicle in an automatic
car wash.
Windshield wipers99Lights and windshield wipersZ
Page 102 of 288
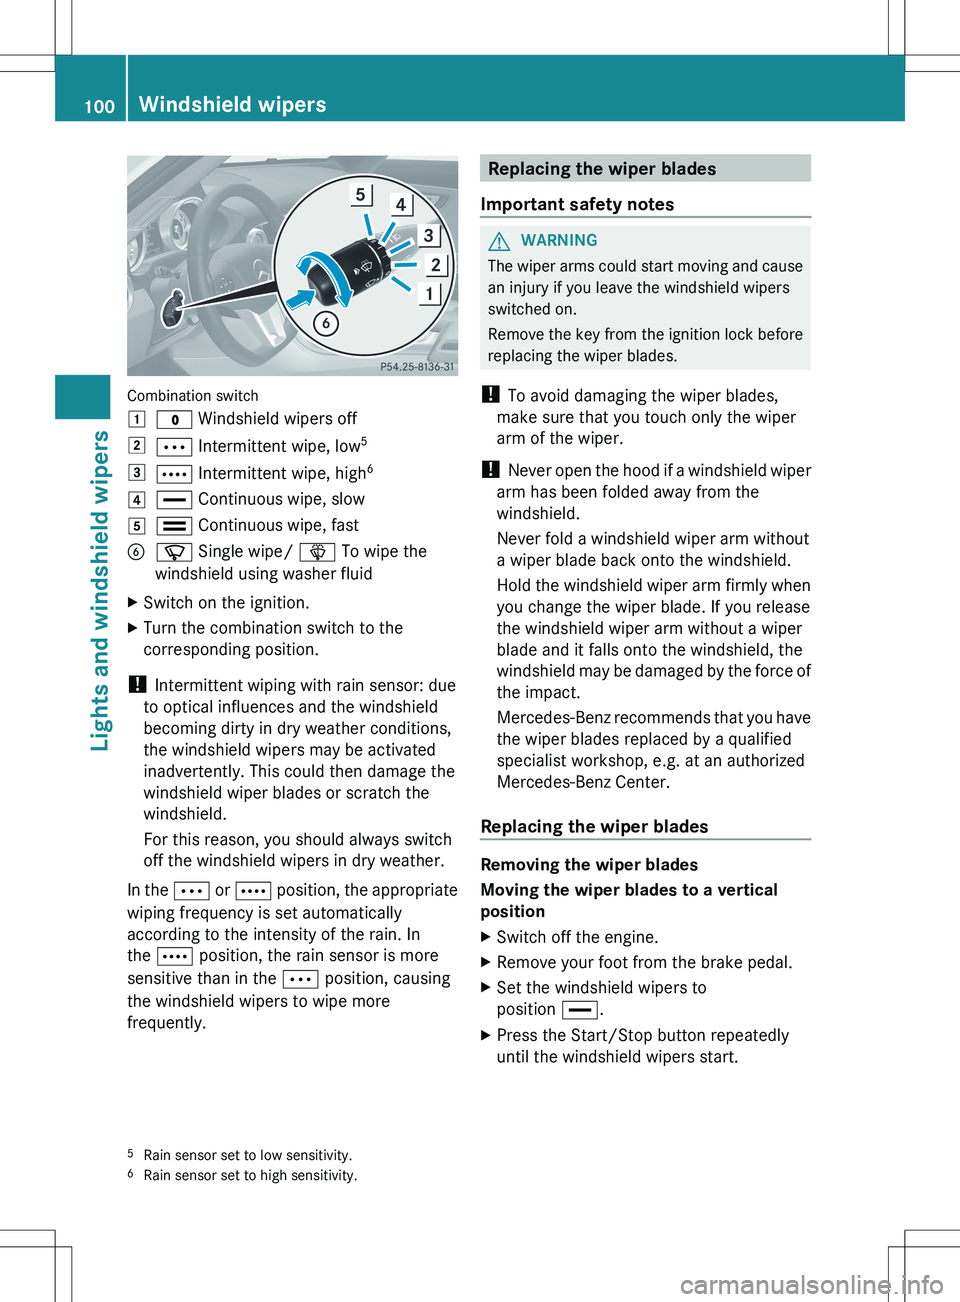
Combination switch
1$ Windshield wipers off2Ä Intermittent wipe, low 53Å
Intermittent wipe, high 64°
Continuous wipe, slow5¯ Continuous wipe, fastBí Single wipe/ î To wipe the
windshield using washer fluidXSwitch on the ignition.XTurn the combination switch to the
corresponding position.
! Intermittent wiping with rain sensor: due
to optical influences and the windshield
becoming dirty in dry weather conditions,
the windshield wipers may be activated
inadvertently. This could then damage the
windshield wiper blades or scratch the
windshield.
For this reason, you should always switch
off the windshield wipers in dry weather.
In the Ä or Å position, the appropriate
wiping frequency is set automatically
according to the intensity of the rain. In
the Å position, the rain sensor is more
sensitive than in the Ä position, causing
the windshield wipers to wipe more
frequently.
Replacing the wiper blades
Important safety notesGWARNING
The wiper arms could start moving and cause
an injury if you leave the windshield wipers
switched on.
Remove the key from the ignition lock before
replacing the wiper blades.
! To avoid damaging the wiper blades,
make sure that you touch only the wiper
arm of the wiper.
! Never open the hood if a windshield wiper
arm has been folded away from the
windshield.
Never fold a windshield wiper arm without
a wiper blade back onto the windshield.
Hold the windshield wiper arm firmly when
you change the wiper blade. If you release
the windshield wiper arm without a wiper
blade and it falls onto the windshield, the
windshield may be damaged by the force of
the impact.
Mercedes-Benz recommends that you have
the wiper blades replaced by a qualified
specialist workshop, e.g. at an authorized
Mercedes-Benz Center.
Replacing the wiper blades
Removing the wiper blades
Moving the wiper blades to a vertical
position
XSwitch off the engine.XRemove your foot from the brake pedal.XSet the windshield wipers to
position °.XPress the Start/Stop button repeatedly
until the windshield wipers start.5 Rain sensor set to low sensitivity.
6 Rain sensor set to high sensitivity.100Windshield wipersLights and windshield wipers
Page 103 of 288
XWhen the wiper arms have reached a
vertical position, press the Start/Stop
button.XFold the wiper arm away from the
windshield until it engages.XSet the wiper blade at right angles to the
wiper arm.
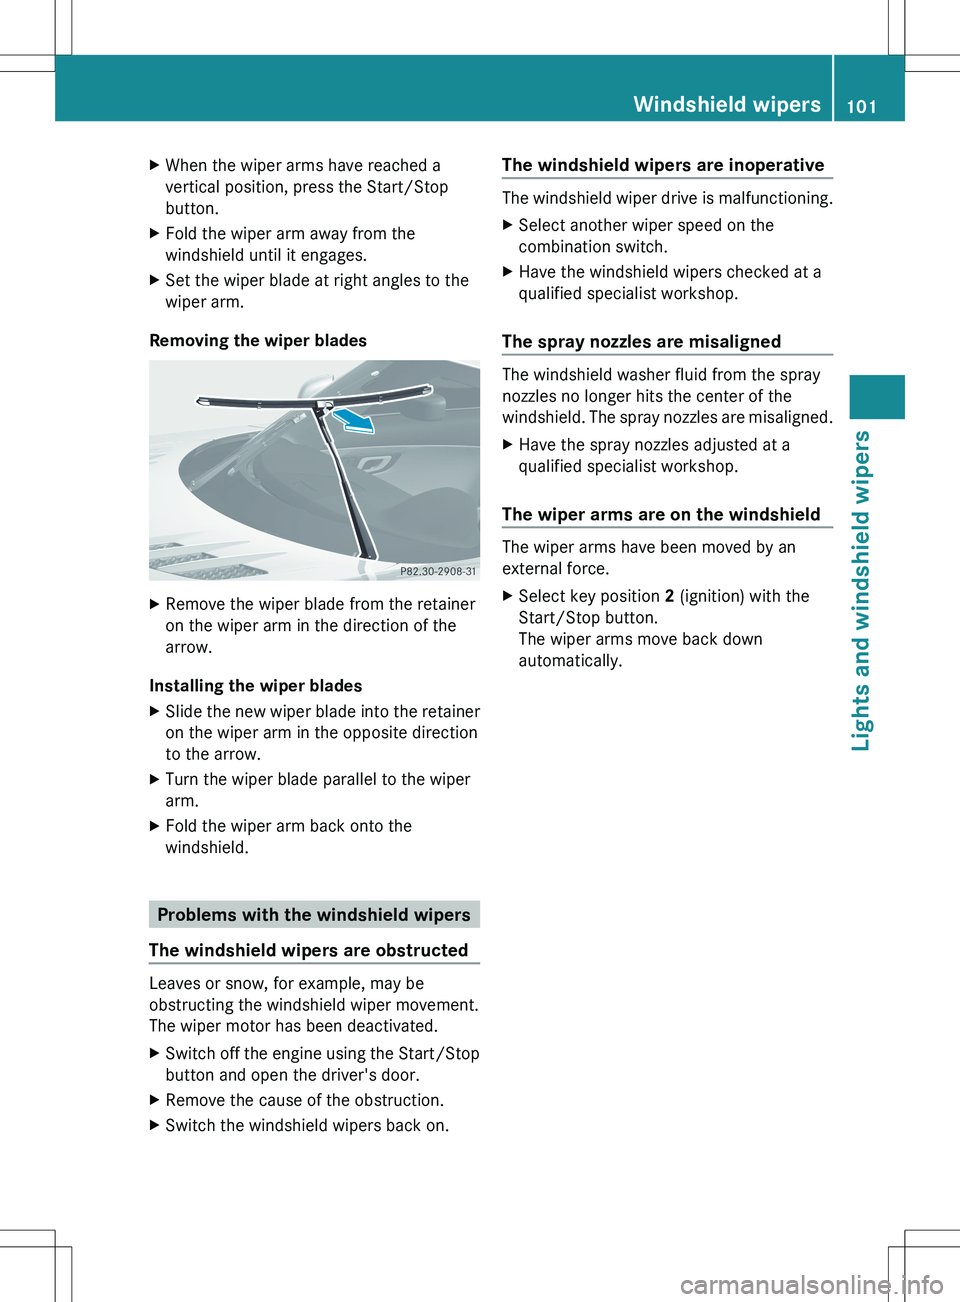
Removing the wiper blades
XRemove the wiper blade from the retainer
on the wiper arm in the direction of the
arrow.
Installing the wiper blades
XSlide the new wiper blade into the retainer
on the wiper arm in the opposite direction
to the arrow.XTurn the wiper blade parallel to the wiper
arm.XFold the wiper arm back onto the
windshield.
Problems with the windshield wipers
The windshield wipers are obstructed
Leaves or snow, for example, may be
obstructing the windshield wiper movement.
The wiper motor has been deactivated.
XSwitch off the engine using the Start/Stop
button and open the driver's door.XRemove the cause of the obstruction.XSwitch the windshield wipers back on.The windshield wipers are inoperative
The windshield wiper drive is malfunctioning.
XSelect another wiper speed on the
combination switch.XHave the windshield wipers checked at a
qualified specialist workshop.
The spray nozzles are misaligned
The windshield washer fluid from the spray
nozzles no longer hits the center of the
windshield. The spray nozzles are misaligned.
XHave the spray nozzles adjusted at a
qualified specialist workshop.
The wiper arms are on the windshield
The wiper arms have been moved by an
external force.
XSelect key position 2 (ignition) with the
Start/Stop button.
The wiper arms move back down
automatically.Windshield wipers101Lights and windshield wipersZ
Page 220 of 288
Useful information
i This Operator's Manual describes all
models and all standard and optional
equipment of your vehicle available at the
time of publication of the Operator's
Manual. Country-specific differences are
possible. Please note that your vehicle may
not be equipped with all features
described. This also applies to safety-
related systems and functions.
i Please read the information on qualified
specialist workshops ( Y page 21).
Engine compartment
Hood
Opening the hood
GWARNING
Do not pull the release lever while the vehicle
is in motion. Otherwise, the hood could be
forced open by passing air flow.
This could cause the hood to come loose and
injure you and/or others.
GWARNING
Do not open the hood when the engine is
overheated. You could be seriously injured.
Observe the coolant temperature gauge to
determine whether the engine may be
overheated. If you see flames or smoke
coming from the engine compartment, move
away from the vehicle. Wait until the engine
has cooled. If necessary, call the fire
department.
GWARNING
There is a risk of injury if the hood is open,
even if the engine is not running.
Some engine components can become very
hot.
To avoid the risk of burns, only touch those
components described in the Operator's
Manual and observe the relevant safety notes.
GWARNING
To help prevent personal injury, stay clear of
moving parts when the hood is open and the
engine is running.
The radiator fan may continue to run for
approximately 30 seconds or may even
restart after the engine has been turned off.
Stay clear of fan blades.
GWARNING
The engine is equipped with a transistorized
ignition system. Because of the high voltage,
it is dangerous to touch any components
(ignition coils, spark plug sockets, diagnostic
socket) of the ignition system:
R with the engine running
R while starting the engine
R when the ignition is switched on and the
engine is turned manually
XMake sure that the windshield wipers are
switched off.GWARNING
The windshield wipers and wiper linkage
could be set in motion.
When the hood is open, you or others could
be injured by the wiper linkage.
Make sure that the windshield wipers are
switched off. When using KEYLESS-GO, make
sure that no ignition position is selected. All
indicator lamps in the instrument cluster must
be off.
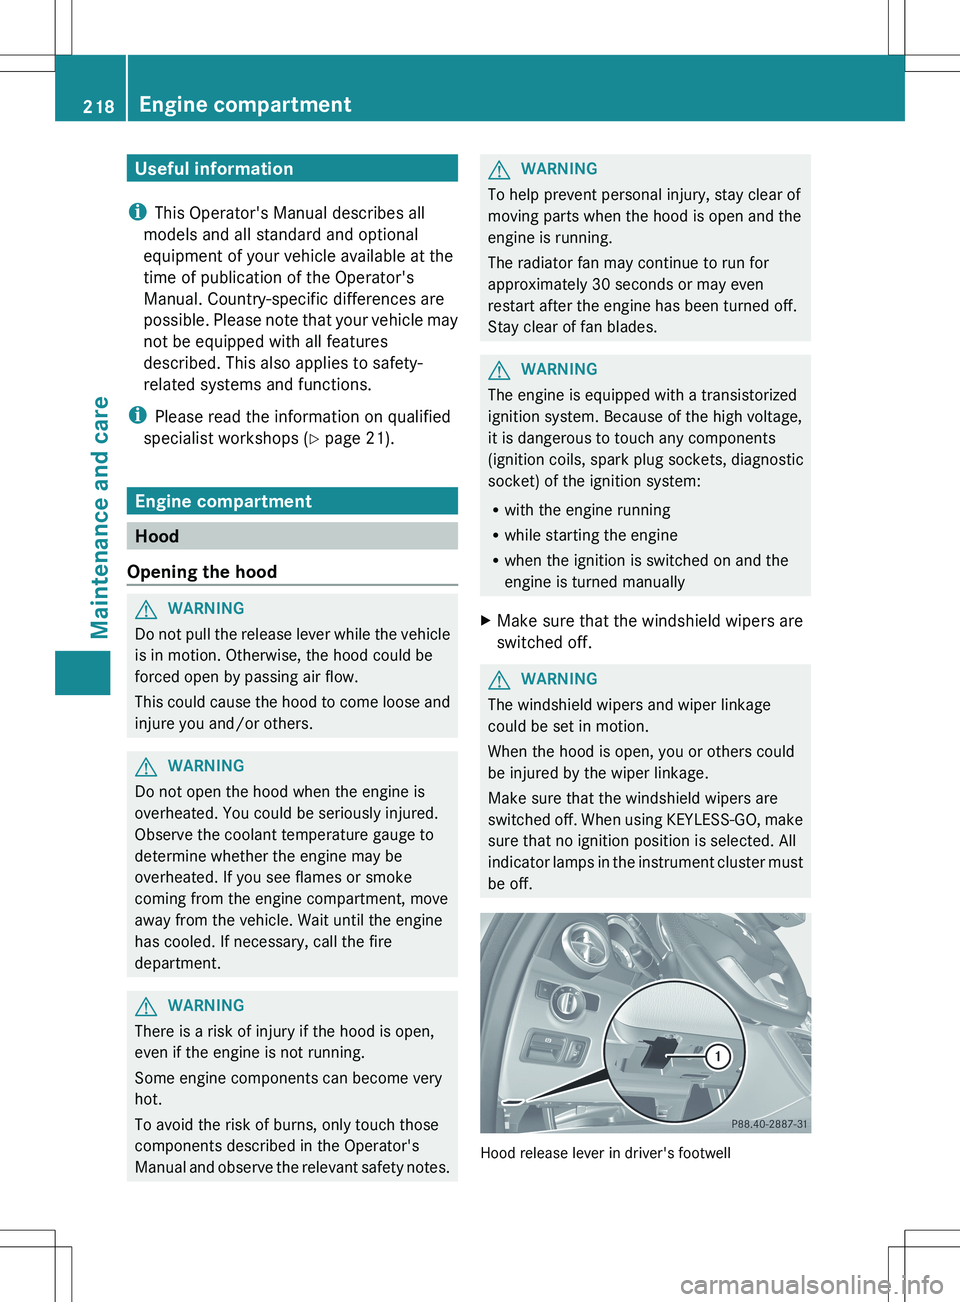
Hood release lever in driver's footwell
218Engine compartmentMaintenance and care
Page 226 of 288
SmartKey to position 2. Make sure that you
then leave the SmartKey in position 2. You
may otherwise damage the vehicle, the
transmission or the car wash.
Check the transmission position in the
instrument cluster.
! Use the E-SELECT lever to shift the
transmission to N before switching the
engine off. If you open the driver's or front-
passenger door, the transmission remains
in this position for up to 30 minutes if the
SmartKey is in the ignition, even if the
engine is switched off. If you do not shift
the transmission to N using the E-SELECT
lever beforehand, it shifts automatically to
parking position P and locks the wheels if
the driver's or front-passenger door is
opened and the engine is switched off. This
may damage the vehicle, the transmission
or the car wash.
Observe the information on maneuvering
( Y page 129).
! Before driving into an automatic car wash,
make sure that it is suitable for the
dimensions of the vehicle. In particular,
make sure that:
R there is enough ground clearance
between the vehicle underbody and the
guide rails of the automatic car wash.
R the clearance width of the automatic car
wash is sufficient, particularly the width
of the guide rails.
R you enter the automatic car wash
straight and in the center of the guide
rails in order to avoid damaging the tires
or wheel rims.
Fold in the exterior mirrors before the
vehicle is washed. The exterior mirrors
could otherwise be damaged.
! Make sure that:R
the side windows are fully closed.
R the ventilation/heating is switched off
(the OFF button has been pressed/the
airflow control is set to position 0).
R that the windshield wiper switch is in
position 0.
Otherwise, the vehicle might be damaged.
! In portal car washes, the windshield
wipers may be moved up the windshield by
the cleaning brushes when the ignition is
switched off.
Set the Start/Stop button to key position
2 to reset the windshield wipers to their
original position.
! Vehicles with a matte finish:
Do not use wash programs with a hot wax
treatment under any circumstances.
After using an automatic car wash, wipe off
wax and drying agents from the windshield
and the wiper blades. This will prevent smears
and reduce wiping noises caused by residue
on the windshield.
Power washersGWARNING
Using power washers with circular-jet nozzles
(dirt grinders) may cause damage to the
vehicle, in particular to the tires.
Using damaged tires results in an increased
risk of accident. A sudden loss of tire pressure
while you are driving may cause you to lose
control of your vehicle, cause an accident and
injure yourself and others.
! Maintain a minimum distance of
11.8 in (30 cm) between the vehicle and the
power washer nozzle. Information about
the correct distance is available from the
equipment manufacturer.
Move the power washer nozzle around
when cleaning your vehicle.
224CareMaintenance and care
Page 228 of 288
! The following may cause the paint to
become shiny and thus reduce the matte
effect:
R Vigorous rubbing with unsuitable
materials.
R Frequent use of car washes.
R Washing the vehicle in direct sunlight.
! Never use paint cleaner, buffing or
polishing products such as gloss preserver
(wax). These products are only suitable for
high-gloss surfaces. Their use on vehicles
with matte finish leads to considerable
surface damage (shiny, spotted areas).
If wax comes into contact with the painted
surface by accident, remove it immediately
with commercially available petroleum
ether. Do so carefully and do not apply too
much pressure to the painted surface.
Ensure that no resinous, greasy or oily
substances come into contact with the
paint, as these can leave a residue. If such
substances do come into contact with the
painted surface accidentally, remove these
immediately with commercially available
petroleum ether. Do so carefully and do not
apply too much pressure to the painted
surface.
Tar stains or marks on the painted surface
can be removed with a commercially
available tar remover. Do so carefully and
do not apply too much pressure to the
painted surface.
Always have paintwork repairs carried out
at a qualified specialist workshop, e.g. an
authorized Mercedes-Benz Center.
! Do not use wash programs with a hot wax
treatment under any circumstances.
i The vehicle should preferably be washed
by hand using a soft sponge, car shampoo
and plenty of water.
i Use only insect remover and car shampoo
from the range of recommended and
approved Mercedes-Benz care products.Cleaning the Roadster soft topXLight soiling: you can clean the soft top
while it is dry or rinse it with clear water.XNormal to heavy soiling: clean the soft
top with a brush and clear water. Clean
stains and other dirt with a brush and soft
top cleaning agents that have been
recommended and approved by Mercedes-
Benz. Always brush from front to back,
following the grain of the fabric.
! Never use any of the following to clean the
soft top:
R gasoline
R thinner
R tar or stain remover
R other organic solvents
! Remove bird droppings immediately as
they are corrosive and, therefore, can make
the soft-top fabric leak. Do not use high-
pressure cleaning equipment to clean the
vehicle. Do not use sharp-edged equipment
to remove ice and snow.
Frequent cleaning reduces the soft top's
resistance to dirt.
To restore this resistance to dirt, clean the
soft top using soft top cleaning agents that
have been recommended and approved by
Mercedes-Benz.
Incorrect cleaning and care, as well as aging,
can cause the soft-top seams to leak. Have
the soft-top seams sealed at a qualified
specialist workshop, e.g. at an authorized
Mercedes-Benz Center.
i Cover the soft top appropriately if you
plan to leave the vehicle outside for a long
period of time.
Cleaning the windows
GWARNING
Switch the windshield wipers off before
cleaning the windshield or wiper blades. Press
the Start/Stop button repeatedly until all
226CareMaintenance and care