2012 MERCEDES-BENZ SLS AMG COUPE light
[x] Cancel search: lightPage 74 of 288
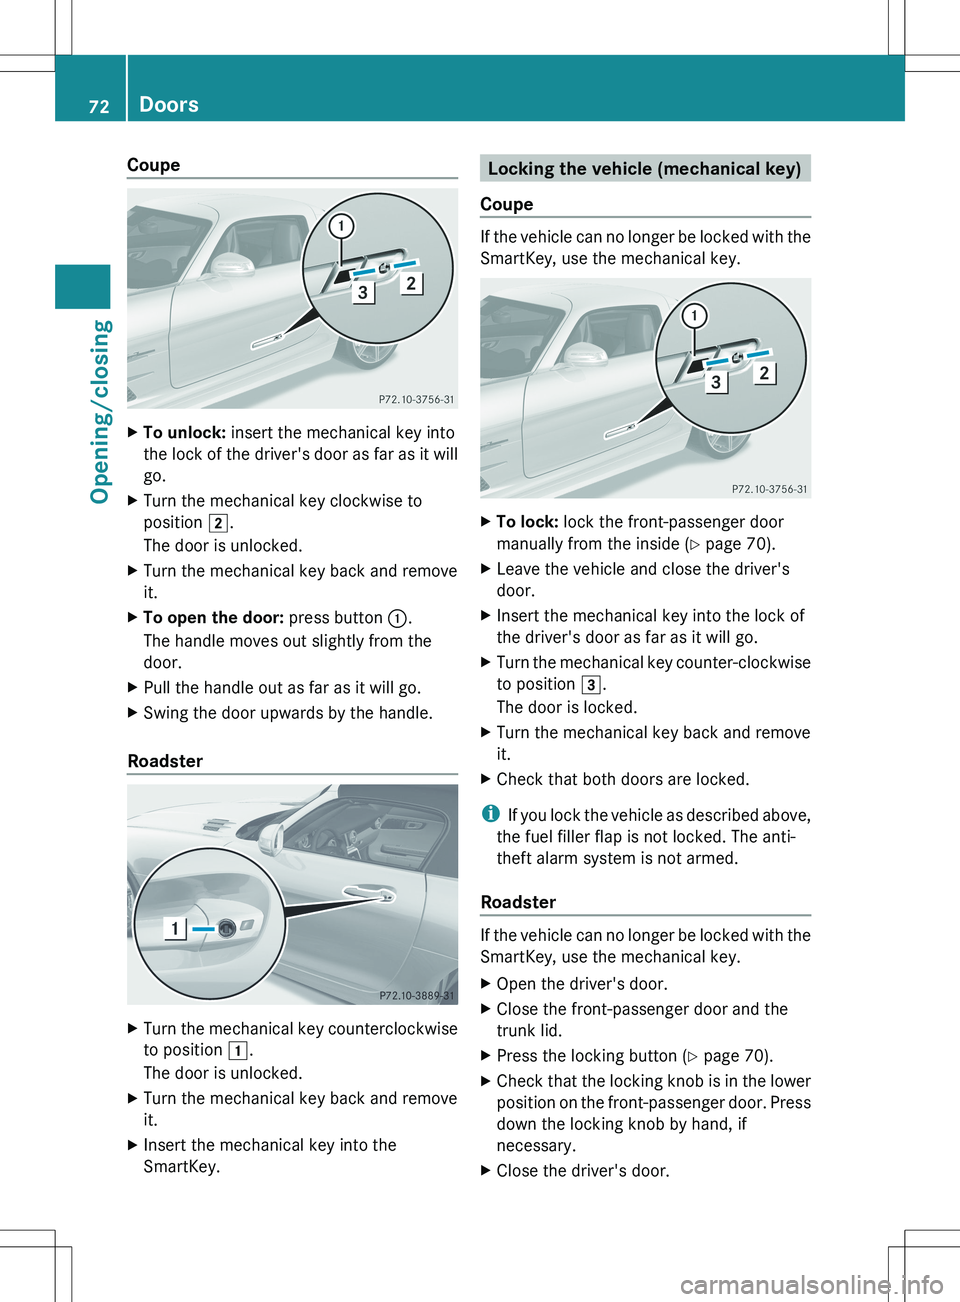
CoupeXTo unlock: insert the mechanical key into
the lock of the driver's door as far as it will
go.XTurn the mechanical key clockwise to
position 2.
The door is unlocked.XTurn the mechanical key back and remove
it.XTo open the door: press button :.
The handle moves out slightly from the
door.XPull the handle out as far as it will go.XSwing the door upwards by the handle.
Roadster
XTurn the mechanical key counterclockwise
to position 1.
The door is unlocked.XTurn the mechanical key back and remove
it.XInsert the mechanical key into the
SmartKey.Locking the vehicle (mechanical key)
Coupe
If the vehicle can no longer be locked with the
SmartKey, use the mechanical key.
XTo lock: lock the front-passenger door
manually from the inside ( Y page 70).XLeave the vehicle and close the driver's
door.XInsert the mechanical key into the lock of
the driver's door as far as it will go.XTurn the mechanical key counter-clockwise
to position 3.
The door is locked.XTurn the mechanical key back and remove
it.XCheck that both doors are locked.
i If you lock the vehicle as described above,
the fuel filler flap is not locked. The anti-
theft alarm system is not armed.
Roadster
If the vehicle can no longer be locked with the
SmartKey, use the mechanical key.
XOpen the driver's door.XClose the front-passenger door and the
trunk lid.XPress the locking button ( Y page 70).XCheck that the locking knob is in the lower
position on the front-passenger door. Press
down the locking knob by hand, if
necessary.XClose the driver's door.72DoorsOpening/closing
Page 75 of 288
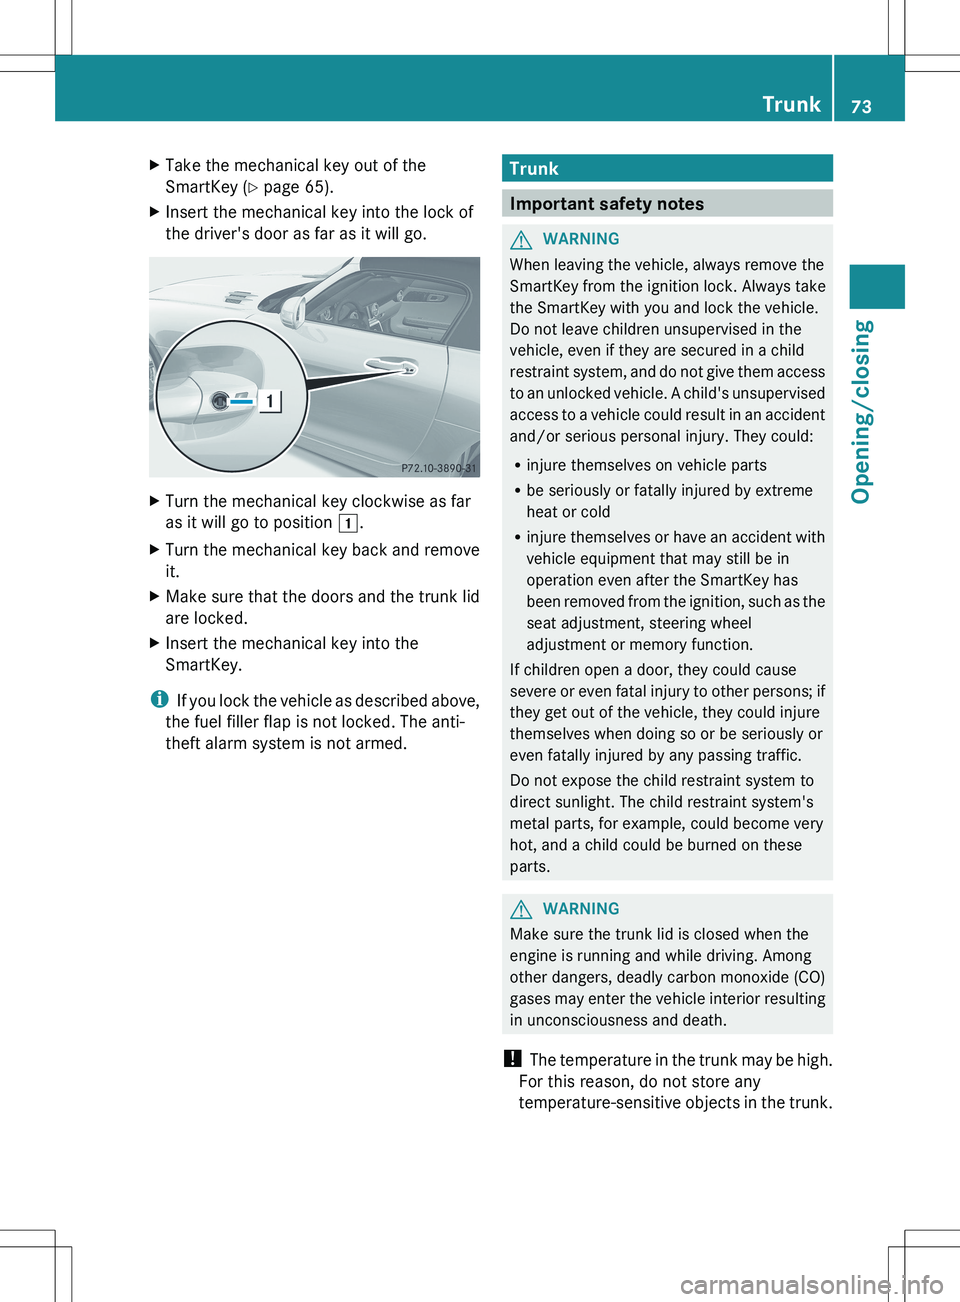
XTake the mechanical key out of the
SmartKey ( Y page 65).XInsert the mechanical key into the lock of
the driver's door as far as it will go.XTurn the mechanical key clockwise as far
as it will go to position 1.XTurn the mechanical key back and remove
it.XMake sure that the doors and the trunk lid
are locked.XInsert the mechanical key into the
SmartKey.
i If you lock the vehicle as described above,
the fuel filler flap is not locked. The anti-
theft alarm system is not armed.
Trunk
Important safety notes
GWARNING
When leaving the vehicle, always remove the
SmartKey from the ignition lock. Always take
the SmartKey with you and lock the vehicle.
Do not leave children unsupervised in the
vehicle, even if they are secured in a child
restraint system, and do not give them access
to an unlocked vehicle. A child's unsupervised
access to a vehicle could result in an accident
and/or serious personal injury. They could:
R injure themselves on vehicle parts
R be seriously or fatally injured by extreme
heat or cold
R injure themselves or have an accident with
vehicle equipment that may still be in
operation even after the SmartKey has
been removed from the ignition, such as the
seat adjustment, steering wheel
adjustment or memory function.
If children open a door, they could cause
severe or even fatal injury to other persons; if
they get out of the vehicle, they could injure
themselves when doing so or be seriously or
even fatally injured by any passing traffic.
Do not expose the child restraint system to
direct sunlight. The child restraint system's
metal parts, for example, could become very
hot, and a child could be burned on these
parts.
GWARNING
Make sure the trunk lid is closed when the
engine is running and while driving. Among
other dangers, deadly carbon monoxide (CO)
gases may enter the vehicle interior resulting
in unconsciousness and death.
! The temperature in the trunk may be high.
For this reason, do not store any
temperature-sensitive objects in the trunk.
Trunk73Opening/closingZ
Page 76 of 288
! The trunk lid swings upwards when
opened. Therefore, make sure that there is
sufficient clearance above the trunk lid.
Coupe: to open the trunk lid fully, a minimum
clearance of 5.5 ft (1.68 m) from the ground
is required.
Roadster: to open the trunk lid fully, a
minimum clearance of 5.7 ft (1.75 m) from
the ground is required.
The trunk lid can be:
R opened automatically from outside
R opened automatically from inside
R locked separately
R unlocked with the mechanical key
R opened with the emergency release button
Opening/closing the trunk
Opening and closing from outside the
vehicle
Opening
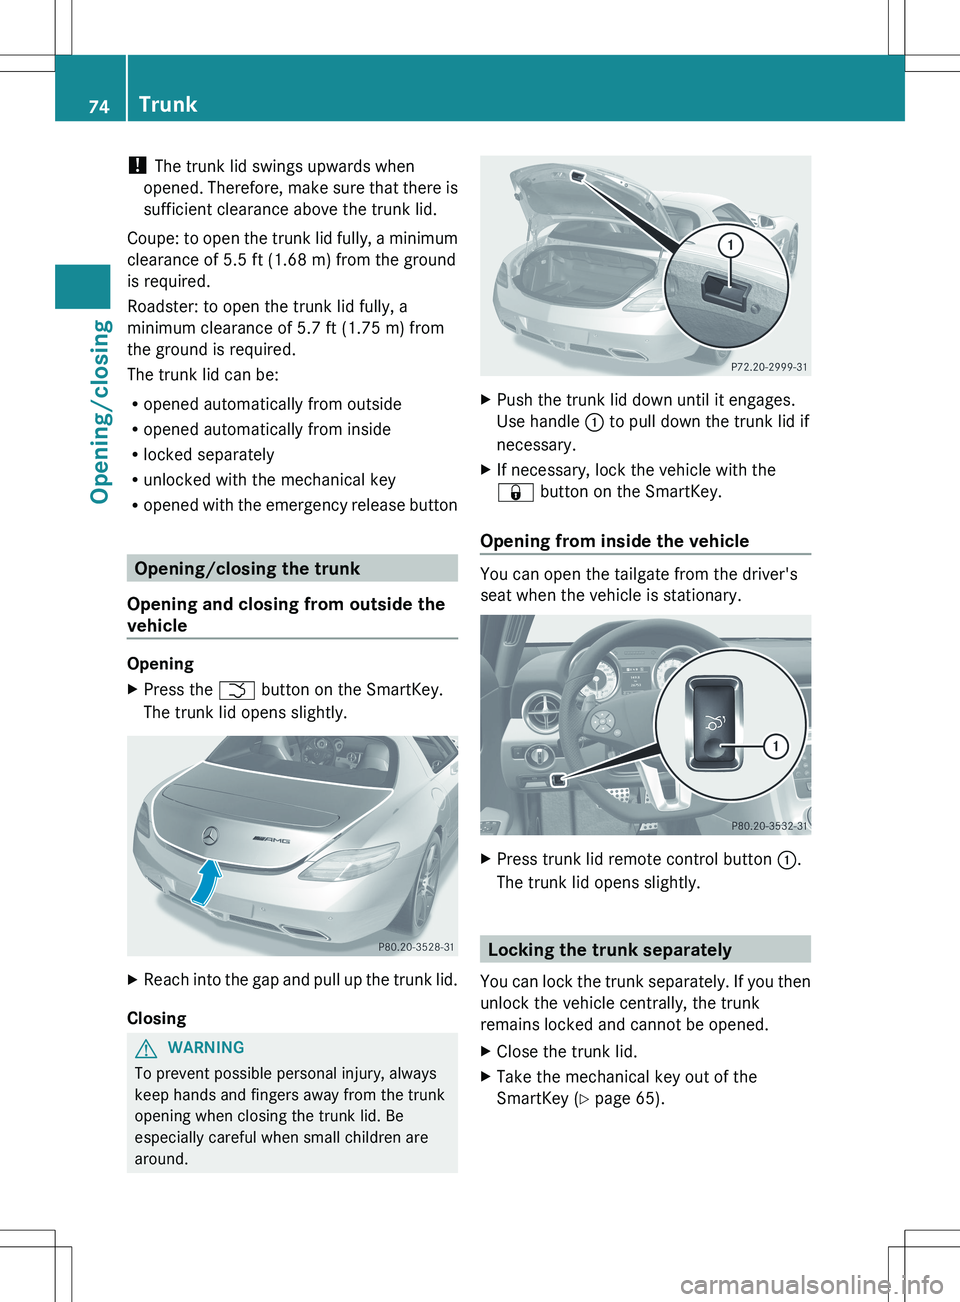
XPress the F button on the SmartKey.
The trunk lid opens slightly.XReach into the gap and pull up the trunk lid.
Closing
GWARNING
To prevent possible personal injury, always
keep hands and fingers away from the trunk
opening when closing the trunk lid. Be
especially careful when small children are
around.
XPush the trunk lid down until it engages.
Use handle : to pull down the trunk lid if
necessary.XIf necessary, lock the vehicle with the
& button on the SmartKey.
Opening from inside the vehicle
You can open the tailgate from the driver's
seat when the vehicle is stationary.
XPress trunk lid remote control button :.
The trunk lid opens slightly.
Locking the trunk separately
You can lock the trunk separately. If you then
unlock the vehicle centrally, the trunk
remains locked and cannot be opened.
XClose the trunk lid.XTake the mechanical key out of the
SmartKey ( Y page 65).74TrunkOpening/closing
Page 77 of 288
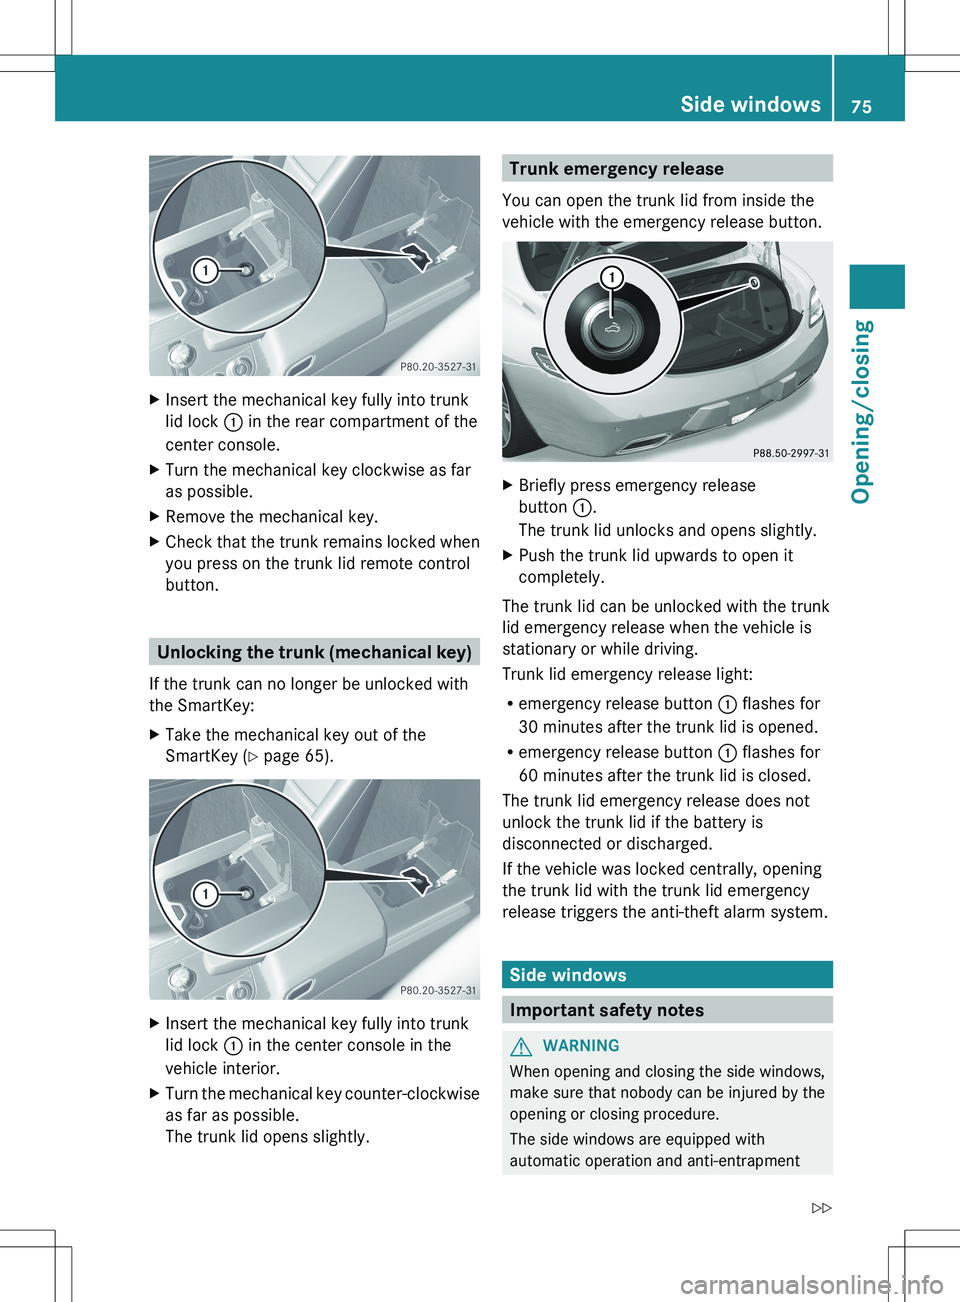
XInsert the mechanical key fully into trunk
lid lock : in the rear compartment of the
center console.XTurn the mechanical key clockwise as far
as possible.XRemove the mechanical key.XCheck that the trunk remains locked when
you press on the trunk lid remote control
button.
Unlocking the trunk (mechanical key)
If the trunk can no longer be unlocked with
the SmartKey:
XTake the mechanical key out of the
SmartKey ( Y page 65).XInsert the mechanical key fully into trunk
lid lock : in the center console in the
vehicle interior.XTurn the mechanical key counter-clockwise
as far as possible.
The trunk lid opens slightly.Trunk emergency release
You can open the trunk lid from inside the
vehicle with the emergency release button.XBriefly press emergency release
button :.
The trunk lid unlocks and opens slightly.XPush the trunk lid upwards to open it
completely.
The trunk lid can be unlocked with the trunk
lid emergency release when the vehicle is
stationary or while driving.
Trunk lid emergency release light:
R emergency release button : flashes for
30 minutes after the trunk lid is opened.
R emergency release button : flashes for
60 minutes after the trunk lid is closed.
The trunk lid emergency release does not
unlock the trunk lid if the battery is
disconnected or discharged.
If the vehicle was locked centrally, opening
the trunk lid with the trunk lid emergency
release triggers the anti-theft alarm system.
Side windows
Important safety notes
GWARNING
When opening and closing the side windows,
make sure that nobody can be injured by the
opening or closing procedure.
The side windows are equipped with
automatic operation and anti-entrapment
Side windows75Opening/closingZ
Page 78 of 288
features. If, in automatic operation mode, a
side window encounters an obstruction that
blocks its path, the anti-entrapment feature
will stop the side window and open it slightly.
The side windows operate differently when
the switch is pulled and held. These details
can be found in the "Closing a blocked side
window" section in this chapter.
The closing of the side windows can be
immediately halted by releasing the switch or,
if the switch was pulled past the resistance
point and released, by pressing or pulling the
respective switch.
If a side window encounters an obstruction
that blocks its path when you are closing the
side windows by pressing and holding the
& button on the SmartKey, the anti-
entrapment feature will not operate.GWARNING
Do not keep any part of your body up against
the window pane when opening a window. The
downward motion of the pane may pull that
part of your body down between the window
pane and the door frame and trap it there. If
there is a risk of entrapment, release the
switch and pull it to close the window.
Observe the important safety notes in the
"Children in the vehicle" section (Y page 51).
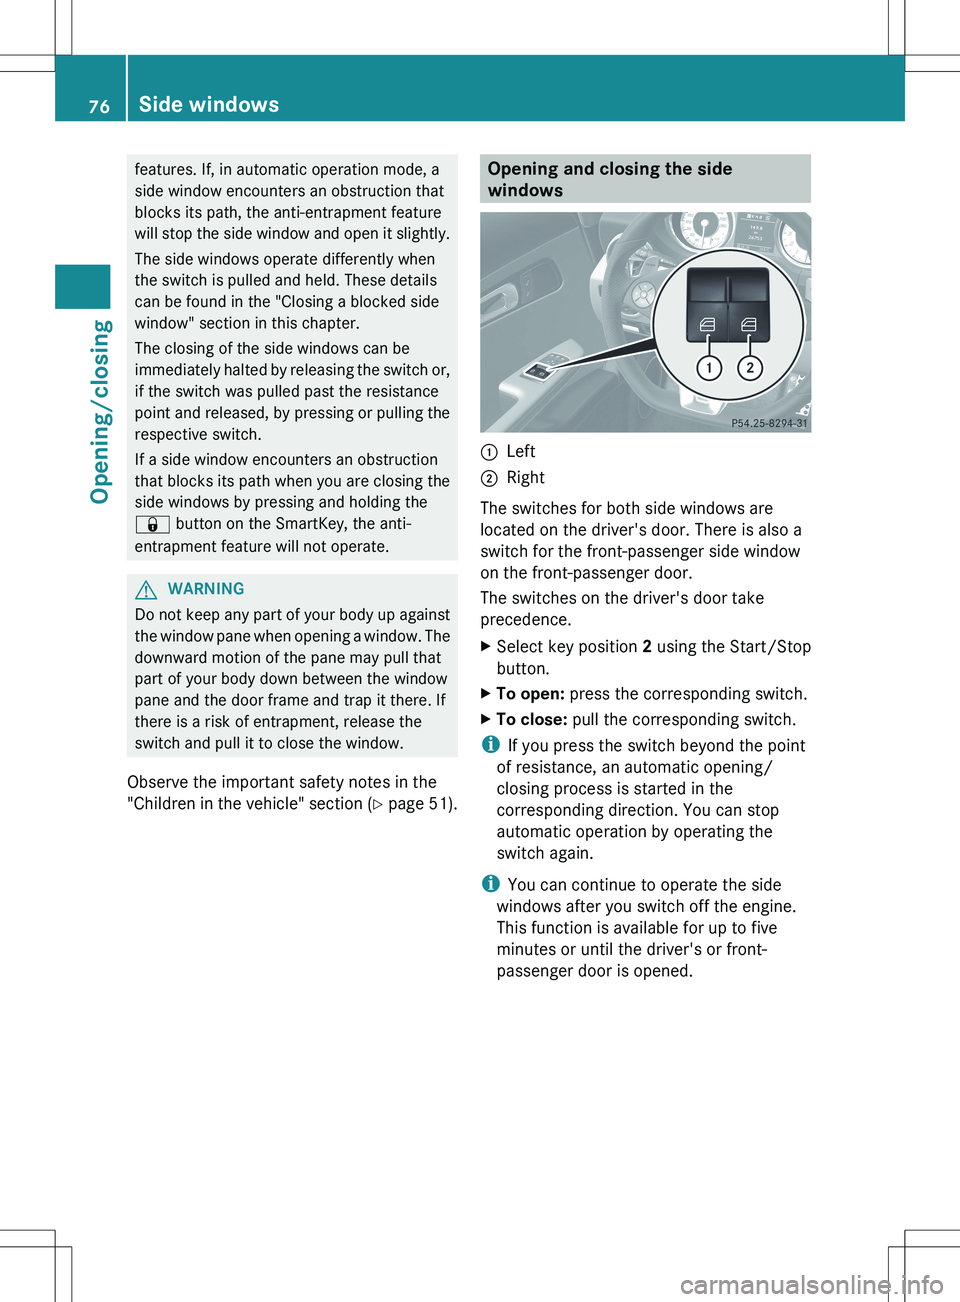
Opening and closing the side
windows:Left;Right
The switches for both side windows are
located on the driver's door. There is also a
switch for the front-passenger side window
on the front-passenger door.
The switches on the driver's door take
precedence.
XSelect key position 2 using the Start/Stop
button.XTo open: press the corresponding switch.XTo close: pull the corresponding switch.
i
If you press the switch beyond the point
of resistance, an automatic opening/
closing process is started in the
corresponding direction. You can stop
automatic operation by operating the
switch again.
i You can continue to operate the side
windows after you switch off the engine.
This function is available for up to five
minutes or until the driver's or front-
passenger door is opened.
76Side windowsOpening/closing
Page 80 of 288
GWARNING
Closing the side windows with increased force
or without the anti-entrapment feature could
lead to serious or even fatal injury. Make sure
that nobody can become trapped when
closing the side windows.
If a side window is obstructed during closing
and reopens again slightly:
XImmediately after the window blocks, pull
the corresponding switch again until the
side window has closed.
The side window is closed with increased
force.
If a side window is obstructed again during
closing and reopens again slightly:
XImmediately after the window blocks, pull
the corresponding switch again until the
side window has closed.
The side window is closed without the anti-
entrapment feature.GWARNING
Pulling and holding the switch to close the
door window immediately after it had been
blocked two times will cause the door window
to close without the anti-entrapment feature
for as long as you hold the switch.
Soft top (Roadster)
Important safety notes
GWARNING
Only drive with the soft top fully open or
closed.
If the soft top does not open or close fully, the
soft-top hydraulics are depressurized and the
soft top is lowered:
R after about seven minutes if the ignition is
switched on
R immediately if the ignition is switched off
A warning tone sounds shortly beforehand.
The Top lowering message appears in the
multifunction display..
Lock the soft top again before driving on.
Otherwise the unlocked soft top could open
during the journey and cause you to lose
control of your vehicle. You and/or other
persons could be injured as a result.
You can open or close the soft top:
R if the vehicle is stationary or
R if the speed does not exceed 30 mph
(50 km/h)
If there is a strong head wind, it may not be
possible to close the soft top fully. In this
case, reduce speed or stop in order to close
the soft top fully.
For safety reasons, Mercedes-Benz
recommends that you only open or close the
soft top when the vehicle is stationary.
! Never sit on the soft top when it is closed
or store heavy objects on it. You will
otherwise damage the soft top of the
vehicle.
! When opening and closing the soft top,
make sure that:
R there is sufficient clearance above it, as
the soft top swings upwards.
R there are no objects on the soft top or
the soft-top covers to the side.
R the fabric is not dirty, wet or frozen
R the outside temperature is above -10 †.
You could otherwise damage the soft top
as well as other parts of the vehicle.
i Make sure that the soft top is dry and
clean before closing it. Otherwise, water or
dirt could enter the vehicle interior or trunk.
Opening and closing with the soft top
switch
Important safety notes
GWARNING
Make sure nobody can be trapped or injured
by moving parts, such as the soft-top linkage
78Soft top (Roadster)Opening/closing
Page 86 of 288
Useful information
i This Operator's Manual describes all
models and all standard and optional
equipment of your vehicle available at the
time of publication of the Operator's
Manual. Country-specific differences are
possible. Please note that your vehicle may
not be equipped with all features
described. This also applies to safety-
related systems and functions.
i Please read the information on qualified
specialist workshops ( Y page 21).
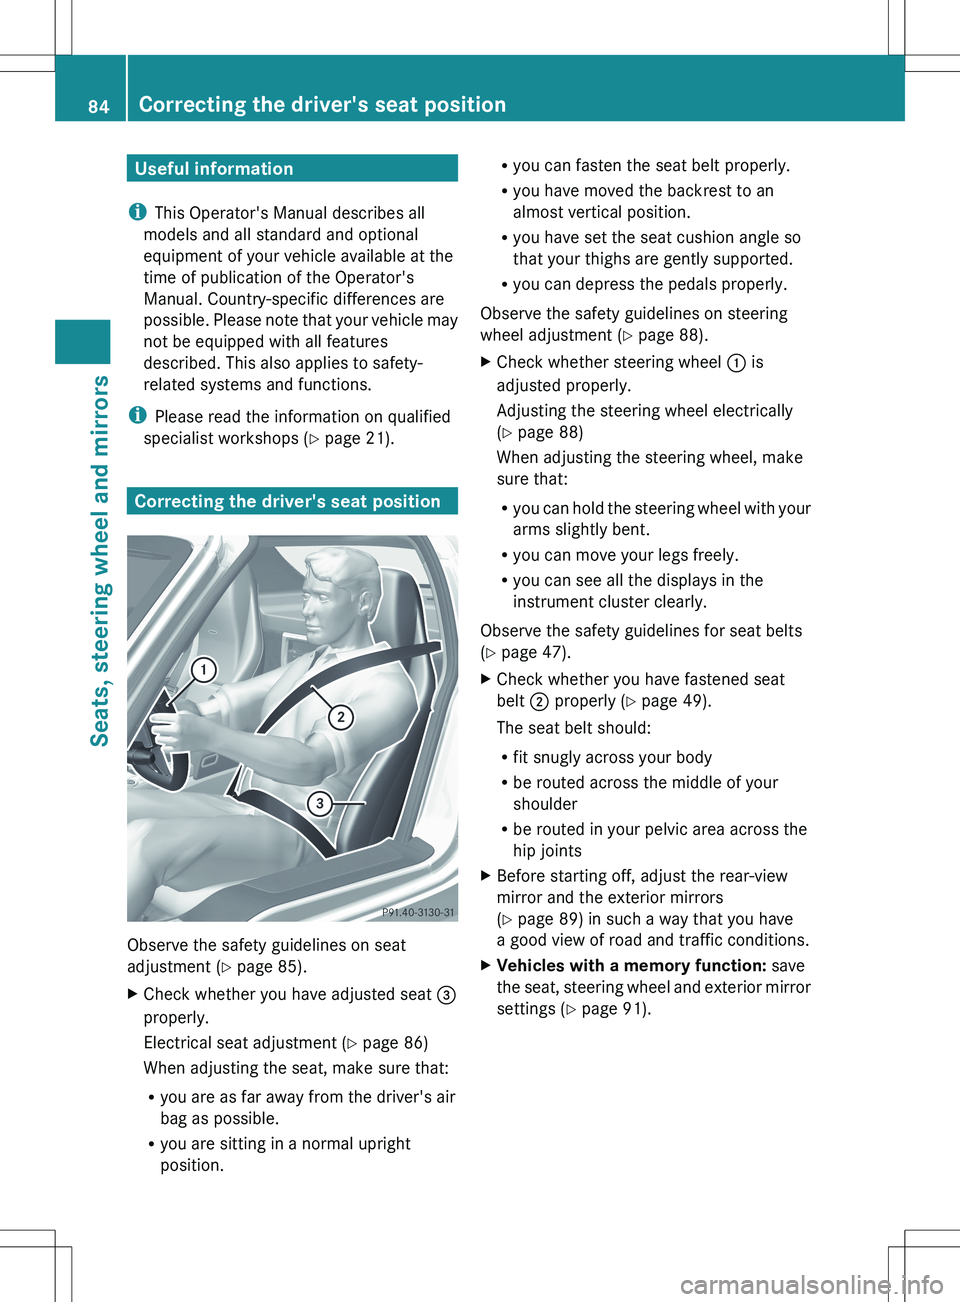
Correcting the driver's seat position
Observe the safety guidelines on seat
adjustment ( Y page 85).
XCheck whether you have adjusted seat =
properly.
Electrical seat adjustment ( Y page 86)
When adjusting the seat, make sure that:
R you are as far away from the driver's air
bag as possible.
R you are sitting in a normal upright
position.R you can fasten the seat belt properly.
R you have moved the backrest to an
almost vertical position.
R you have set the seat cushion angle so
that your thighs are gently supported.
R you can depress the pedals properly.
Observe the safety guidelines on steering
wheel adjustment ( Y page 88).
XCheck whether steering wheel : is
adjusted properly.
Adjusting the steering wheel electrically
( Y page 88)
When adjusting the steering wheel, make
sure that:
R you can hold the steering wheel with your
arms slightly bent.
R you can move your legs freely.
R you can see all the displays in the
instrument cluster clearly.
Observe the safety guidelines for seat belts
( Y page 47).
XCheck whether you have fastened seat
belt ; properly ( Y page 49).
The seat belt should:
R fit snugly across your body
R be routed across the middle of your
shoulder
R be routed in your pelvic area across the
hip jointsXBefore starting off, adjust the rear-view
mirror and the exterior mirrors
( Y page 89) in such a way that you have
a good view of road and traffic conditions.XVehicles with a memory function: save
the seat, steering wheel and exterior mirror
settings ( Y page 91).84Correcting the driver's seat positionSeats, steering wheel and mirrors
Page 87 of 288
Seats
Important safety notes
GWARNING
In order to avoid possible loss of vehicle
control, the following must be done before the
vehicle is put into motion:
R seat adjustment
R steering wheel adjustment
R rear-view mirror adjustment
R fastening of seat belts
GWARNING
In order to avoid possible loss of vehicle
control, all seat, head restraint, steering
wheel and rear view mirror adjustments, as
well as fastening of seat belts, must be done
before setting the vehicle in motion.
GWARNING
Do not adjust the driver's seat while driving.
Adjusting the seat while driving could cause
the driver to lose control of the vehicle.
Never travel in a moving vehicle with the seat
backrest in an excessively reclined position as
this can be dangerous. You could slide under
the seat belt in a collision. If you slide under
it, the seat belt would apply force at the
abdomen or neck. This could cause serious or
fatal injuries. The seat backrest and seat belts
provide the best restraint when the wearer is
in a position that is as upright as possible and
seat belts are properly positioned on the
body.
GWARNING
Your seat belt must be adjusted so that you
can correctly fasten your seat belt.
Observe the following points:
R adjust the seat backrest until your arms are
slightly angled when holding the steering
wheel.
R adjust the seat to a comfortable seating
position that still allows you to reach the
accelerator/brake pedal safely. The
position should be as far back as possible
with the driver still able to operate the
controls properly.
R adjust the head restraint so that it is as
close to the head as possible and the center
of the head restraint supports the back of
the head at eye level.
R never place hands under the seat or near
any moving parts while a seat is being
adjusted.
Failure to do so could result in an accident
and/or serious personal injury.GWARNING
The electrically adjustable seats can be
operated at any time. Therefore, do not leave
children unattended in the vehicle, or with
access to an unlocked vehicle. A child's
unsupervised access to a vehicle could result
in an accident and/or serious personal injury.
GWARNING
Children 12 years old and under must be
seated and properly secured in an
appropriately sized infant restraint, toddler
restraint or booster seat recommended for
the size and weight of the child. For additional
information, see section "Children in the
vehicle".
A child's risk of serious or fatal injuries is
significantly increased if the child restraints
are not properly secured in the vehicle and/
or the child is not properly secured in the child
restraint.
! To avoid damage to the seats and the seat
heating, observe the following information:
R do not spill any liquids on the seats. If
liquid is spilled on the seats, dry them as
soon as possible.
R if the seat covers are damp or wet, do not
switch on the seat heating. The seat
heating should also not to be used to dry
the seats.
Seats85Seats, steering wheel and mirrorsZ