2012 MERCEDES-BENZ SLS AMG COUPE change time
[x] Cancel search: change timePage 231 of 288
parts may break away and be thrown around
the interior when an air bag is deployed, which
may result in severe injuries.
! Do not affix the following to plastic
surfaces:
R stickers
R films
R scented oil bottles or similar items
You can otherwise damage the plastic.
! Do not allow cosmetics, insect repellent
or sunscreen to come into contact with the
plastic trim. This maintains the high-quality
look of the surfaces.XWipe the plastic trim with a damp, lint-free
cloth, e.g. a microfiber cloth.XHeavy soiling: use car care and cleaning
products recommended and approved by
Mercedes-Benz.
The surface may change color temporarily.
Wait until the surface is dry again.
Cleaning genuine wood and trim
elements
! Do not use solvent-based cleaning agents
such as tar remover, wheel cleaners,
polishes or waxes. There is otherwise a risk
of damaging the surface.
! Do not use chrome polish on trim pieces.
The trim pieces have a chrome look but are
mostly made of anodized aluminum and
can lose their shine if chrome polish is
used. Use a damp, lint-free cloth instead
when cleaning the trim pieces.
If the chrome-plated trim pieces are very
dirty, you can use a chrome polish. If you
are unsure as to whether the trim pieces
are chrome-plated or not, consult an
authorized Mercedes-Benz Center.
XWipe the wooden trim and trim pieces with
a damp, lint-free cloth, e.g. a microfiber
cloth.XHeavy soiling: use car care and cleaning
products recommended and approved by
Mercedes-Benz.
Cleaning the seat covers
! Do not use microfiber cloths to clean
genuine leather, artificial leather or
Alcantara® covers. If used often, these can
damage the cover.
! Clean genuine leather covers with a damp
cloth, then wipe the covers down with a dry
cloth. Make sure that the leather does not
become soaked. Only use leather care
agents that have been tested and approved
by Mercedes-Benz. You can obtain these
from any authorized Mercedes-Benz
Center.
i Note that regular care is essential to
ensure that the appearance and comfort of
the covers is retained over time.
Cleaning the seat belts
! Do not clean the seat belts using chemical
cleaning agents. Do not dry the seat belts
by warming them above 176 ‡ (80 †) or
placing them in direct sunlight.
GWARNING
Do not bleach or dye seat belts as this may
severely weaken them. In a crash, they may
not be able to provide adequate protection.
XUse clean, lukewarm water and soap
solution.Care229Maintenance and careZ
Page 234 of 288
Useful information
i This Operator's Manual describes all
models and all standard and optional
equipment of your vehicle available at the
time of publication of the Operator's
Manual. Country-specific differences are
possible. Please note that your vehicle may
not be equipped with all features
described. This also applies to safety-
related systems and functions.
i Please read the information on qualified
specialist workshops ( Y page 21).
Where will I find...?
First-aid kit
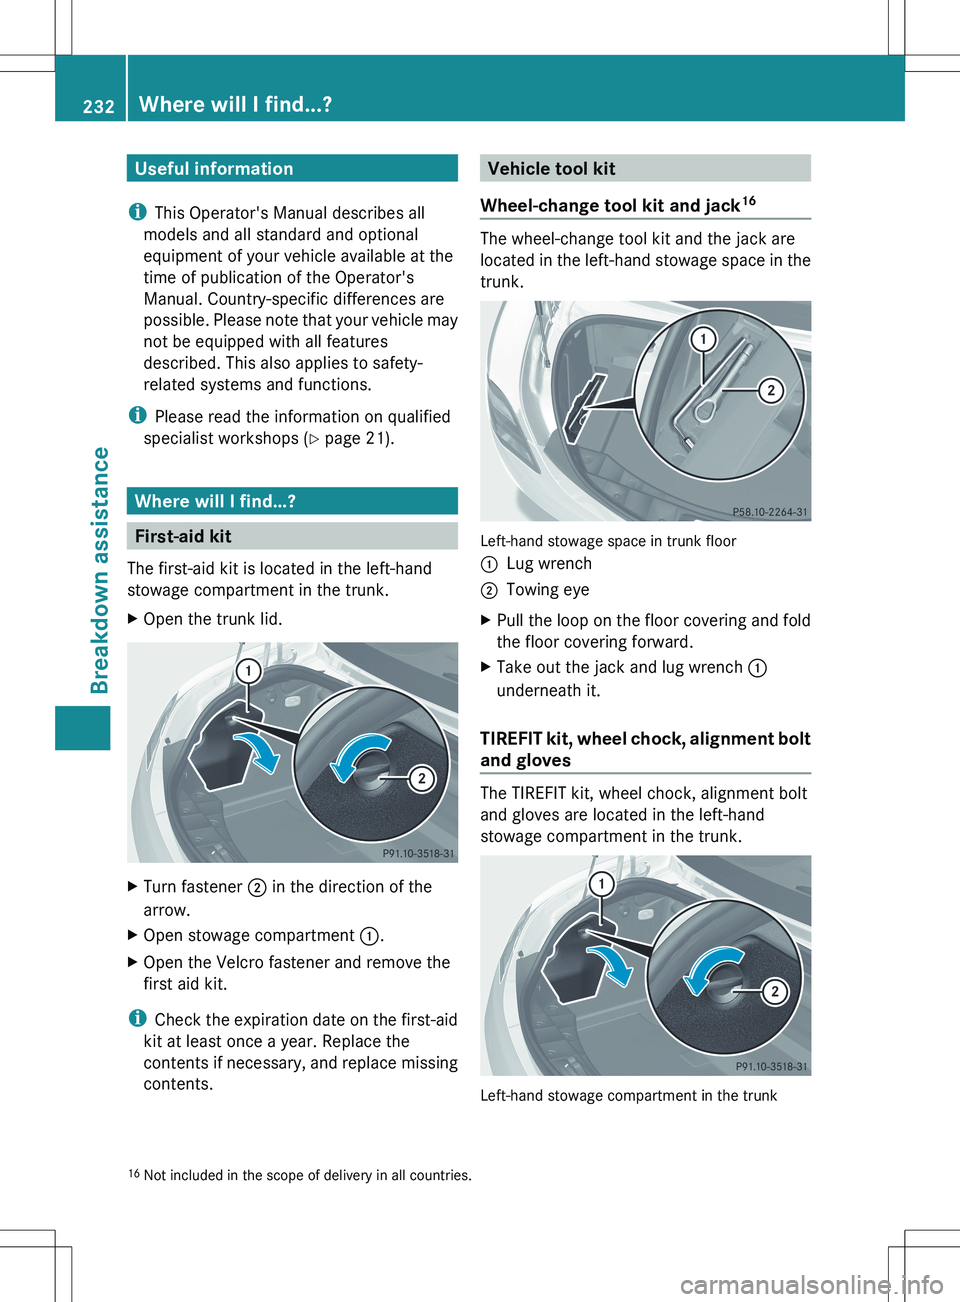
The first-aid kit is located in the left-hand
stowage compartment in the trunk.
XOpen the trunk lid.XTurn fastener ; in the direction of the
arrow.XOpen stowage compartment :.XOpen the Velcro fastener and remove the
first aid kit.
i Check the expiration date on the first-aid
kit at least once a year. Replace the
contents if necessary, and replace missing
contents.
Vehicle tool kit
Wheel-change tool kit and jack 16
The wheel-change tool kit and the jack are
located in the left-hand stowage space in the
trunk.
Left-hand stowage space in trunk floor
:Lug wrench;Towing eyeXPull the loop on the floor covering and fold
the floor covering forward.XTake out the jack and lug wrench :
underneath it.
TIREFIT kit, wheel chock, alignment bolt
and gloves
The TIREFIT kit, wheel chock, alignment bolt
and gloves are located in the left-hand
stowage compartment in the trunk.
Left-hand stowage compartment in the trunk
16 Not included in the scope of delivery in all countries.232Where will I find...?Breakdown assistance
Page 242 of 288
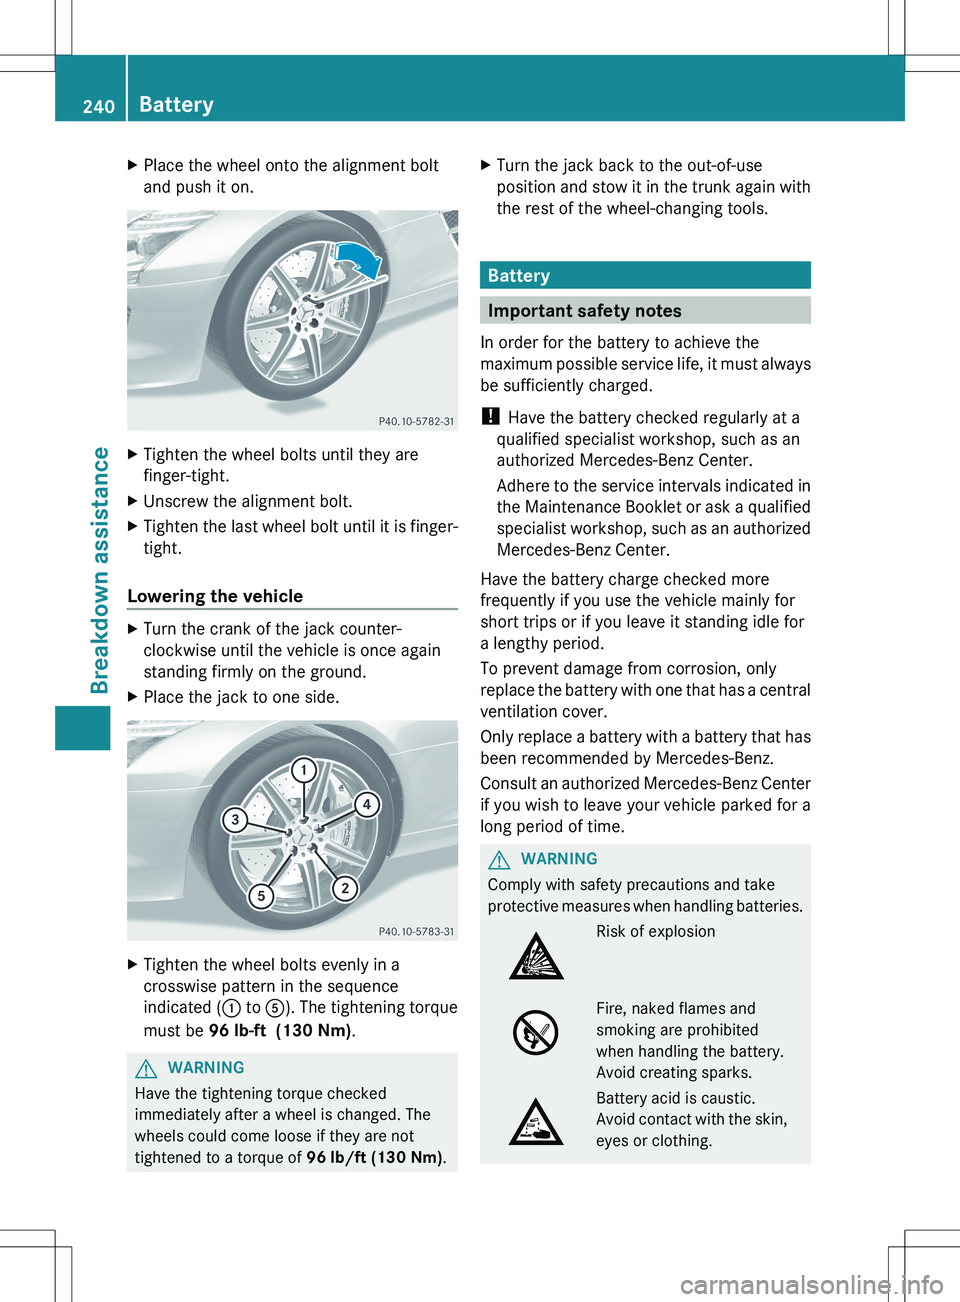
XPlace the wheel onto the alignment bolt
and push it on.XTighten the wheel bolts until they are
finger-tight.XUnscrew the alignment bolt.XTighten the last wheel bolt until it is finger-
tight.
Lowering the vehicle
XTurn the crank of the jack counter-
clockwise until the vehicle is once again
standing firmly on the ground.XPlace the jack to one side.XTighten the wheel bolts evenly in a
crosswise pattern in the sequence
indicated ( : to A). The tightening torque
must be 96 lb-ft (130 Nm) .GWARNING
Have the tightening torque checked
immediately after a wheel is changed. The
wheels could come loose if they are not
tightened to a torque of 96 lb/ft (130 Nm).
XTurn the jack back to the out-of-use
position and stow it in the trunk again with
the rest of the wheel-changing tools.
Battery
Important safety notes
In order for the battery to achieve the
maximum possible service life, it must always
be sufficiently charged.
! Have the battery checked regularly at a
qualified specialist workshop, such as an
authorized Mercedes-Benz Center.
Adhere to the service intervals indicated in
the Maintenance Booklet or ask a qualified
specialist workshop, such as an authorized
Mercedes-Benz Center.
Have the battery charge checked more
frequently if you use the vehicle mainly for
short trips or if you leave it standing idle for
a lengthy period.
To prevent damage from corrosion, only
replace the battery with one that has a central
ventilation cover.
Only replace a battery with a battery that has
been recommended by Mercedes-Benz.
Consult an authorized Mercedes-Benz Center
if you wish to leave your vehicle parked for a
long period of time.
GWARNING
Comply with safety precautions and take
protective measures when handling batteries.
Risk of explosionFire, naked flames and
smoking are prohibited
when handling the battery.
Avoid creating sparks.Battery acid is caustic.
Avoid contact with the skin,
eyes or clothing.240BatteryBreakdown assistance
Page 261 of 288
Each tire that is affected by a significant loss
of pressure is highlighted with a color.
If the following message appears in the
multifunction display: Correct Tire
PressureXCheck the tire pressure on all four wheels
and correct it if necessary.
i If the wheel positions on the vehicle are
interchanged, the tire pressures may be
displayed for the wrong positions for a
short time. This is rectified after a few
minutes of driving, and the tire pressures
are displayed for the correct positions.
Restarting the tire pressure monitor
When you restart the tire pressure monitor,
all existing warning messages are deleted and
the warning lamps go out. The monitor uses
the currently set tire pressures as the
specified values for monitoring.
In most cases, the tire pressure monitor will
automatically detect the new reference
values, e.g. if you have:
R changed the tire pressure
R changed the wheels or tires
R mounted new wheels or tires
If you are defining the new reference values
manually:
XUse the table on the inside of the fuel filler
flap to ensure that the tire pressure is set
correctly in all four tires for the current
operating conditions.
Also observe the notes in the section on tire
pressures ( Y page 253).XSelect key position 2 with the Start/Stop
button.XPress the = or ; button to select the
Service menu.XPress the 9 or : button to select
TIRE PRESS. .XPress the a button.
The display shows either the current tire
pressure for the individual tires or theTire pressures will be displayed
after driving a few minutes
message.XPress the : button.
The Use Current Pressures as New
Reference Values message appears in
the multifunction display.XPress the a button.
The Tire Press. Monitor Restarted
message appears in the multifunction
display.
After a few minutes of driving, the current
pressures are adopted as the new
monitoring values.
Canceling the restart
XPress the % button.
or
XPress the 9 button to leave the menu.
Loading the vehicle
Instruction labels for tires and loads
GWARNING
Do not overload the tires by exceeding the
specified load limit as indicated on the Tire
and Loading Information placard on the
driver's door B-pillar. Overloading the tires
can overheat them, possibly causing a
blowout. Overloading the tires can also result
in handling or steering problems, or brake
failure.
Two instruction labels on your vehicle show
the maximum possible load.
(1)The Tire and Loading Information placard
is on the B-pillar on the driver's side. The
Tire and Loading Information placard
shows the maximum permissible number
of occupants and the maximum
permissible vehicle load. It also contains
details of the tire sizes andLoading the vehicle259Tires and wheelsZ
Page 274 of 288
requires this. Do not change the direction of
wheel rotation.
Clean the contact surfaces of the wheel and
the brake disc thoroughly every time a wheel
is interchanged. Check the tire pressures.
For information on changing tires and
mounting the spare wheel, see (Y page 236).
! On vehicles equipped with a tire pressure
monitor, electronic components are
located in the wheel.
Tire-mounting tools should not be used
near the valve. This could damage the
electronic components.
Only have tires changed at a qualified
specialist workshop.
Direction of rotation
Tires with a specified direction of rotation
have additional benefits, e.g. if there is a risk
of hydroplaning. You will only gain these
benefits if the correct direction of rotation is
maintained.
An arrow on the sidewall of the tire indicates
its correct direction of rotation.
You may mount a spare wheel/emergency
spare wheel against the direction of rotation.
Observe the time restriction on use as well as
the speed limitation specified on the spare
wheel/emergency spare wheel.
Storing wheels
Store wheels that are not being used in a cool,
dry and preferably dark place. Protect the
tires from oil, grease, gasoline and diesel.
Cleaning the wheels
GWARNING
Do not use power washers with circular-jet
nozzles (dirt grinders) to clean your vehicle, in
particular the tires. You could otherwise
damage the tires and cause an accident.
Wheel and tire combinations
Please bear the following in mind
! For safety reasons, Mercedes-Benz
recommends that you only use Tires and
wheels which have been approved by
Mercedes-Benz specifically for your
vehicle.
These tires have been specially adapted for
use with the control systems, such as ABS
or ESP ®
, and are marked as follows:
R MO = Mercedes-Benz Original
R MOE = Mercedes-Benz Original Extended
(tires featuring run-flat characteristics)
R MO1 = Mercedes-Benz Original (only
certain AMG tires)
Mercedes-Benz Original Extended tires
may only be used on wheels that have been
specifically approved by Mercedes-Benz.
Only use tires, wheels or accessories
tested and approved by Mercedes-Benz.
Certain characteristics, e.g. handling,
vehicle noise emissions or fuel
consumption, may otherwise be adversely
affected. In addition, when driving with a
load, tire dimension variations could cause
the tires to come into contact with the
bodywork and axle components. This could
result in damage to the tires or the vehicle.
Mercedes-Benz accepts no liability for
damage resulting from the use of tires,
wheels or accessories other than those
tested and approved.
Further information about tires, wheels and
approved combinations can be obtained
from any authorized Mercedes-Benz
Center.
i The Tire and Load Information placard
with the recommended tire pressures is on
the B-pillar on the driver's side. Further
information about driving at high speeds or
driving with vehicle loads that are lighter
than the maximum vehicle load can be
found in the tire pressure table on the
inside of the fuel filler flap. Check tire
272Wheel and tire combinationsTires and wheels