2012 MERCEDES-BENZ SLS AMG COUPE windshield wipers
[x] Cancel search: windshield wipersPage 101 of 288
Keep bulbs out of the reach of children.
Otherwise, they could damage the bulbs, for
example, and injure themselves.
Never use a bulb which has been dropped.
Such a bulb may break or even explode and
injure you.
Halogen bulbs are pressurized and can
explode when you change them, particularly
if they are very hot. You should therefore wear
eye protection and gloves when you are
changing them.
Changing the front bulbs
You cannot replace the bulbs at the front
yourself. Contact a qualified specialist
workshop which has the necessary specialist
knowledge and tools to carry out the work
required. Mercedes-Benz recommends that
you use an authorized Mercedes-Benz Center
for this purpose.
Changing the rear bulbs
License plate lamps
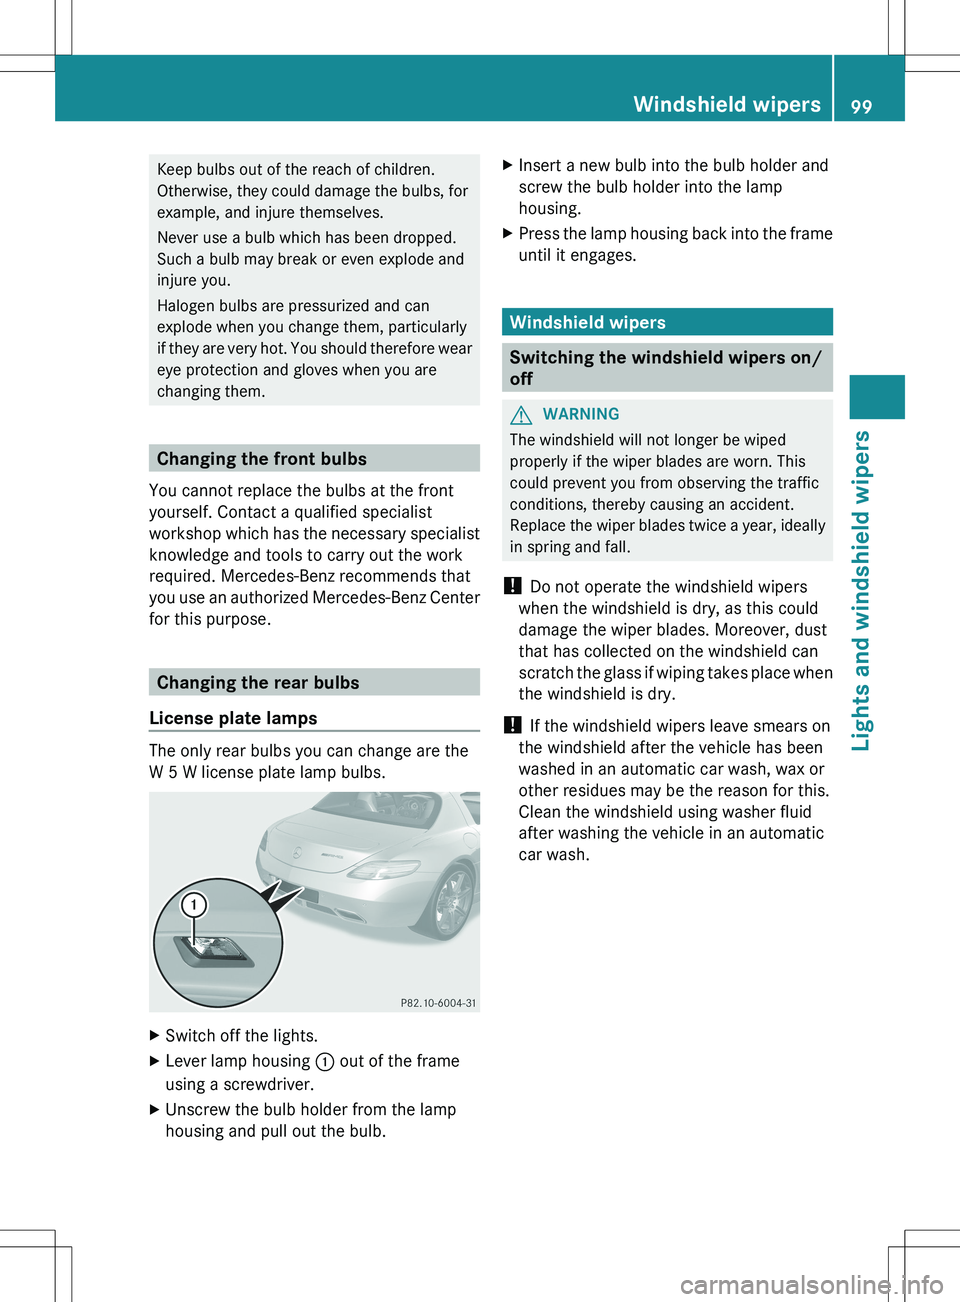
The only rear bulbs you can change are the
W 5 W license plate lamp bulbs.
XSwitch off the lights.XLever lamp housing : out of the frame
using a screwdriver.XUnscrew the bulb holder from the lamp
housing and pull out the bulb.XInsert a new bulb into the bulb holder and
screw the bulb holder into the lamp
housing.XPress the lamp housing back into the frame
until it engages.
Windshield wipers
Switching the windshield wipers on/
off
GWARNING
The windshield will not longer be wiped
properly if the wiper blades are worn. This
could prevent you from observing the traffic
conditions, thereby causing an accident.
Replace the wiper blades twice a year, ideally
in spring and fall.
! Do not operate the windshield wipers
when the windshield is dry, as this could
damage the wiper blades. Moreover, dust
that has collected on the windshield can
scratch the glass if wiping takes place when
the windshield is dry.
! If the windshield wipers leave smears on
the windshield after the vehicle has been
washed in an automatic car wash, wax or
other residues may be the reason for this.
Clean the windshield using washer fluid
after washing the vehicle in an automatic
car wash.
Windshield wipers99Lights and windshield wipersZ
Page 102 of 288
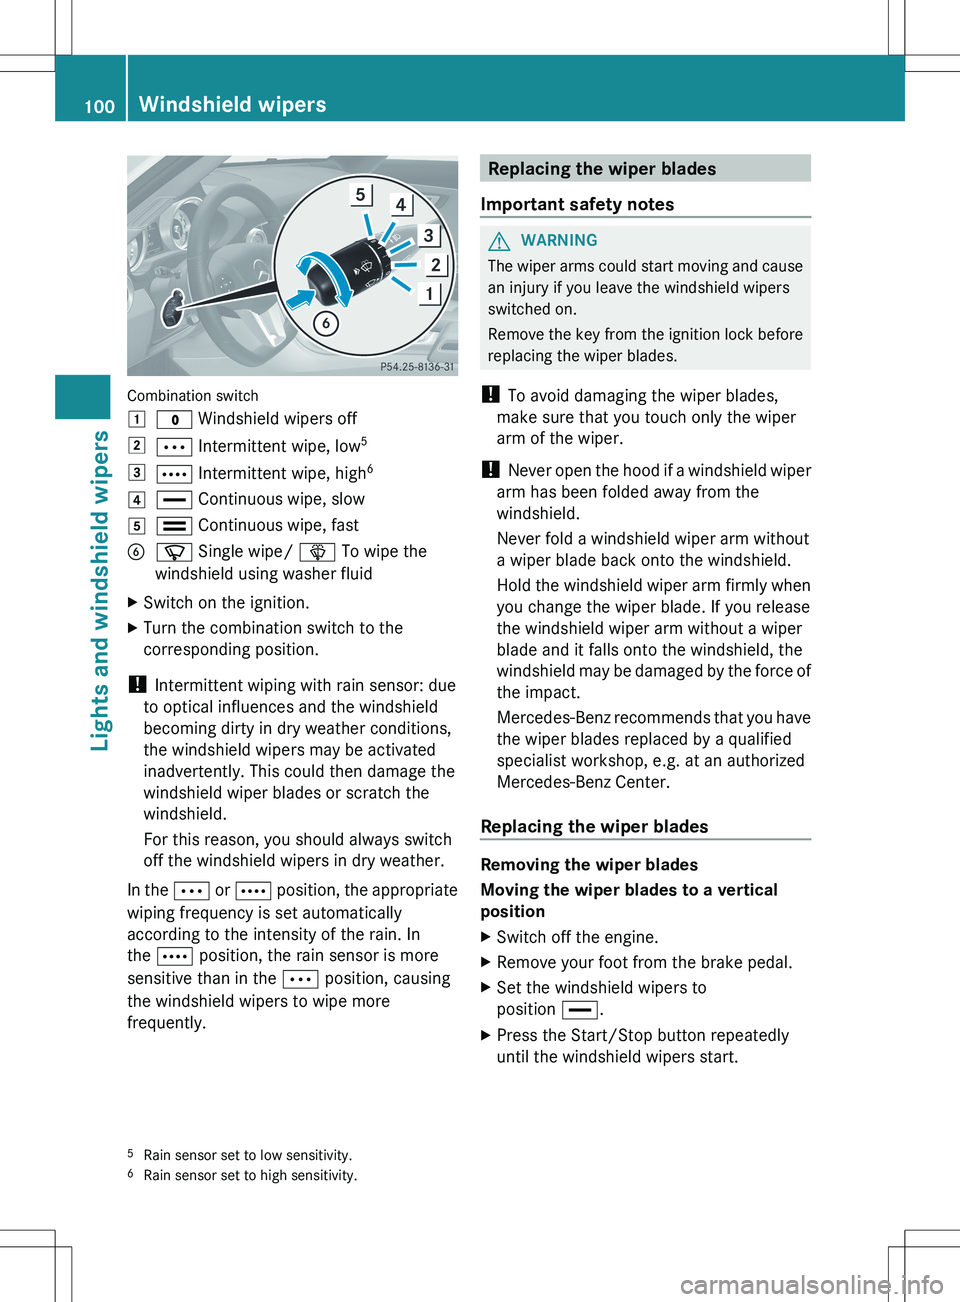
Combination switch
1$ Windshield wipers off2Ä Intermittent wipe, low 53Å
Intermittent wipe, high 64°
Continuous wipe, slow5¯ Continuous wipe, fastBí Single wipe/ î To wipe the
windshield using washer fluidXSwitch on the ignition.XTurn the combination switch to the
corresponding position.
! Intermittent wiping with rain sensor: due
to optical influences and the windshield
becoming dirty in dry weather conditions,
the windshield wipers may be activated
inadvertently. This could then damage the
windshield wiper blades or scratch the
windshield.
For this reason, you should always switch
off the windshield wipers in dry weather.
In the Ä or Å position, the appropriate
wiping frequency is set automatically
according to the intensity of the rain. In
the Å position, the rain sensor is more
sensitive than in the Ä position, causing
the windshield wipers to wipe more
frequently.
Replacing the wiper blades
Important safety notesGWARNING
The wiper arms could start moving and cause
an injury if you leave the windshield wipers
switched on.
Remove the key from the ignition lock before
replacing the wiper blades.
! To avoid damaging the wiper blades,
make sure that you touch only the wiper
arm of the wiper.
! Never open the hood if a windshield wiper
arm has been folded away from the
windshield.
Never fold a windshield wiper arm without
a wiper blade back onto the windshield.
Hold the windshield wiper arm firmly when
you change the wiper blade. If you release
the windshield wiper arm without a wiper
blade and it falls onto the windshield, the
windshield may be damaged by the force of
the impact.
Mercedes-Benz recommends that you have
the wiper blades replaced by a qualified
specialist workshop, e.g. at an authorized
Mercedes-Benz Center.
Replacing the wiper blades
Removing the wiper blades
Moving the wiper blades to a vertical
position
XSwitch off the engine.XRemove your foot from the brake pedal.XSet the windshield wipers to
position °.XPress the Start/Stop button repeatedly
until the windshield wipers start.5 Rain sensor set to low sensitivity.
6 Rain sensor set to high sensitivity.100Windshield wipersLights and windshield wipers
Page 103 of 288
XWhen the wiper arms have reached a
vertical position, press the Start/Stop
button.XFold the wiper arm away from the
windshield until it engages.XSet the wiper blade at right angles to the
wiper arm.
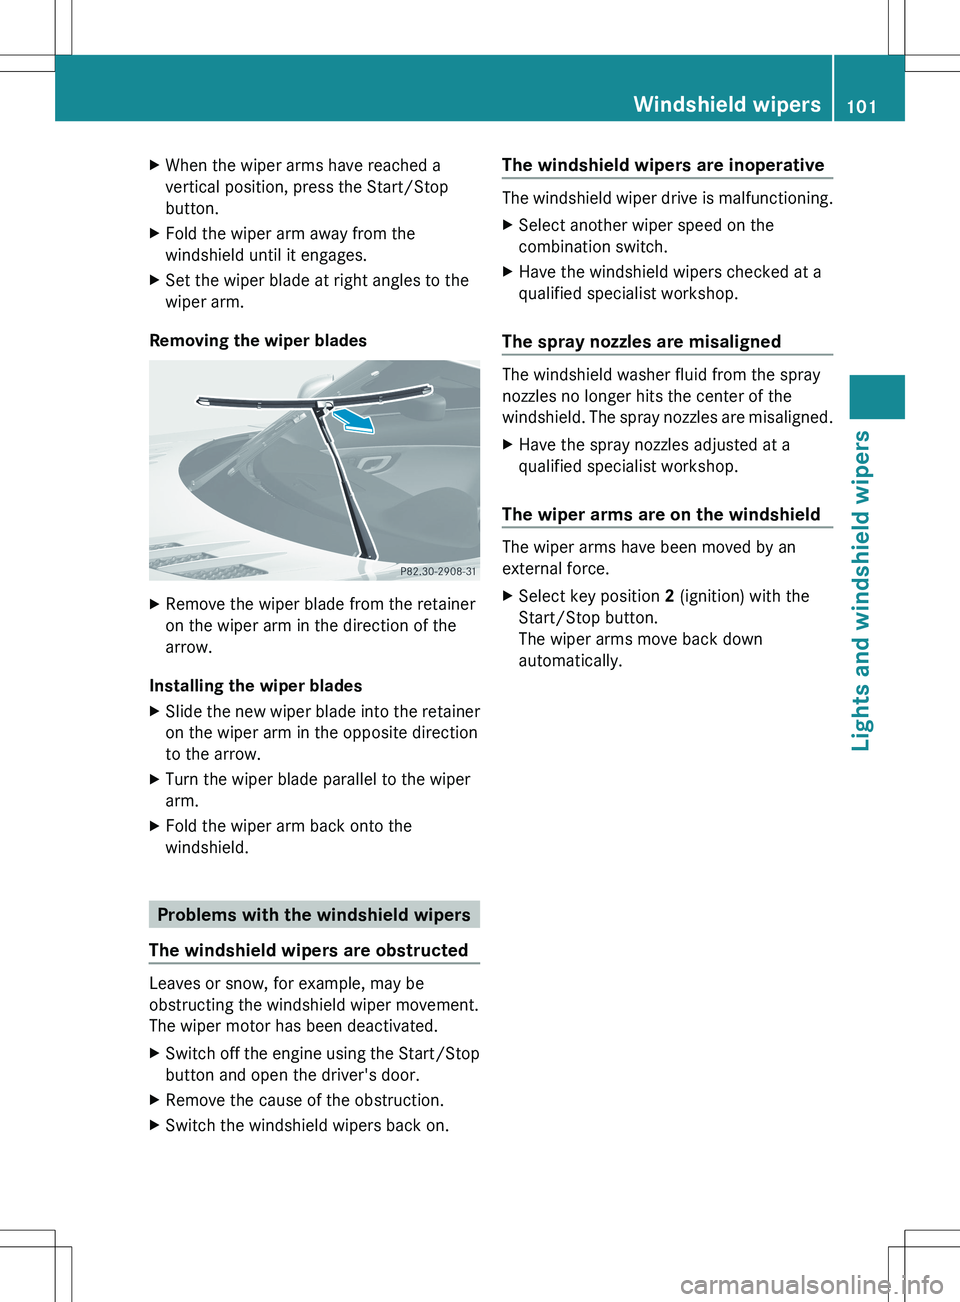
Removing the wiper blades
XRemove the wiper blade from the retainer
on the wiper arm in the direction of the
arrow.
Installing the wiper blades
XSlide the new wiper blade into the retainer
on the wiper arm in the opposite direction
to the arrow.XTurn the wiper blade parallel to the wiper
arm.XFold the wiper arm back onto the
windshield.
Problems with the windshield wipers
The windshield wipers are obstructed
Leaves or snow, for example, may be
obstructing the windshield wiper movement.
The wiper motor has been deactivated.
XSwitch off the engine using the Start/Stop
button and open the driver's door.XRemove the cause of the obstruction.XSwitch the windshield wipers back on.The windshield wipers are inoperative
The windshield wiper drive is malfunctioning.
XSelect another wiper speed on the
combination switch.XHave the windshield wipers checked at a
qualified specialist workshop.
The spray nozzles are misaligned
The windshield washer fluid from the spray
nozzles no longer hits the center of the
windshield. The spray nozzles are misaligned.
XHave the spray nozzles adjusted at a
qualified specialist workshop.
The wiper arms are on the windshield
The wiper arms have been moved by an
external force.
XSelect key position 2 (ignition) with the
Start/Stop button.
The wiper arms move back down
automatically.Windshield wipers101Lights and windshield wipersZ
Page 111 of 288
Defrosting the windows
Windows fogged up on the insideXActivate the cooling with air
dehumidification function.XActivate automatic mode.XIf the windows continue to fog up, activate
the defrosting function.
Windows fogged up on the outside
XActivate the windshield wipers.XPress the _ button repeatedly until the
O or P symbol appears in the
display.
i You should only select this setting until
the windshield is clear again.
Rear window defroster
Activating/deactivating
GWARNING
Any accumulation of snow and ice should be
removed from the rear window before driving.
Visibility could otherwise be impaired,
endangering you and others.
The rear window defroster has a high current
draw. You should therefore switch it off as
soon as the window is clear. It otherwise
switches off automatically after several
minutes.
If the battery voltage is too low, the rear
window defroster may switch off.
XSelect SmartKey position 2 with the Start/
Stop button.XPress the ¤ button.
The indicator lamp in the ¤ button lights
up or goes out.Problems with the rear window
defroster
The rear window defroster has deactivated
prematurely or cannot be activated. The on-
board voltage is too low because too many
electrical consumers are switched on.
XSwitch off any consumers that are not
required, e.g. seat heating or interior
lighting.
When the battery is sufficiently charged,
the rear window defroster is activated
again automatically.
Activating/deactivating air-
recirculation mode
You can deactivate the flow of fresh air if
unpleasant odors are entering the vehicle
from outside. The air already inside the
vehicle will then be recirculated.
GWARNING
Fogged windows impair visibility,
endangering you and others. If the windows
begin to fog on the inside, switching off the
air recirculation mode immediately should
clear interior window fogging. If interior
window fogging persists, make sure the air
conditioning is activated, or press the ¬
button.
XSelect SmartKey position 2 with the Start/
Stop button.XTo activate: press the g button.
The indicator lamp in the g button lights
up.
i Air-recirculation mode is activated
automatically at high outside
temperatures. When air-recirculation mode
is activated automatically, the indicator
lamp in the g button is not lit.
Outside air is added after about 30
minutes.
Operating the climate control system109Climate controlZ
Page 117 of 288
when the engine is idling normally and when
your right foot is firmly on the brake pedal.
! Warm up the engine quickly. Do not use
the engine's full performance until it has
reached operating temperature. The
operating temperature has been reached
when the engine oil temperature display in
the on-board computer's AMG menu no
longer flashes.
Only shift into reverse gear when the
vehicle is stationary.
Where possible, avoid spinning the drive
wheels when pulling away on slippery
roads. You could otherwise damage the
drive train.
! During a cold start, if the engine oil
temperature is low (below 0 †), maximum
engine speed will be limited to protect the
engine. To protect the engine and maintain
smooth engine operation, avoid driving at
full throttle when the engine is cold.
! During a cold start, if the engine oil
temperature is low (below 32 ‡) (0 †),
maximum engine speed will be limited to
protect the engine. To protect the engine
and maintain smooth engine operation,
avoid driving at full throttle when the
engine is cold.
SmartKey positions
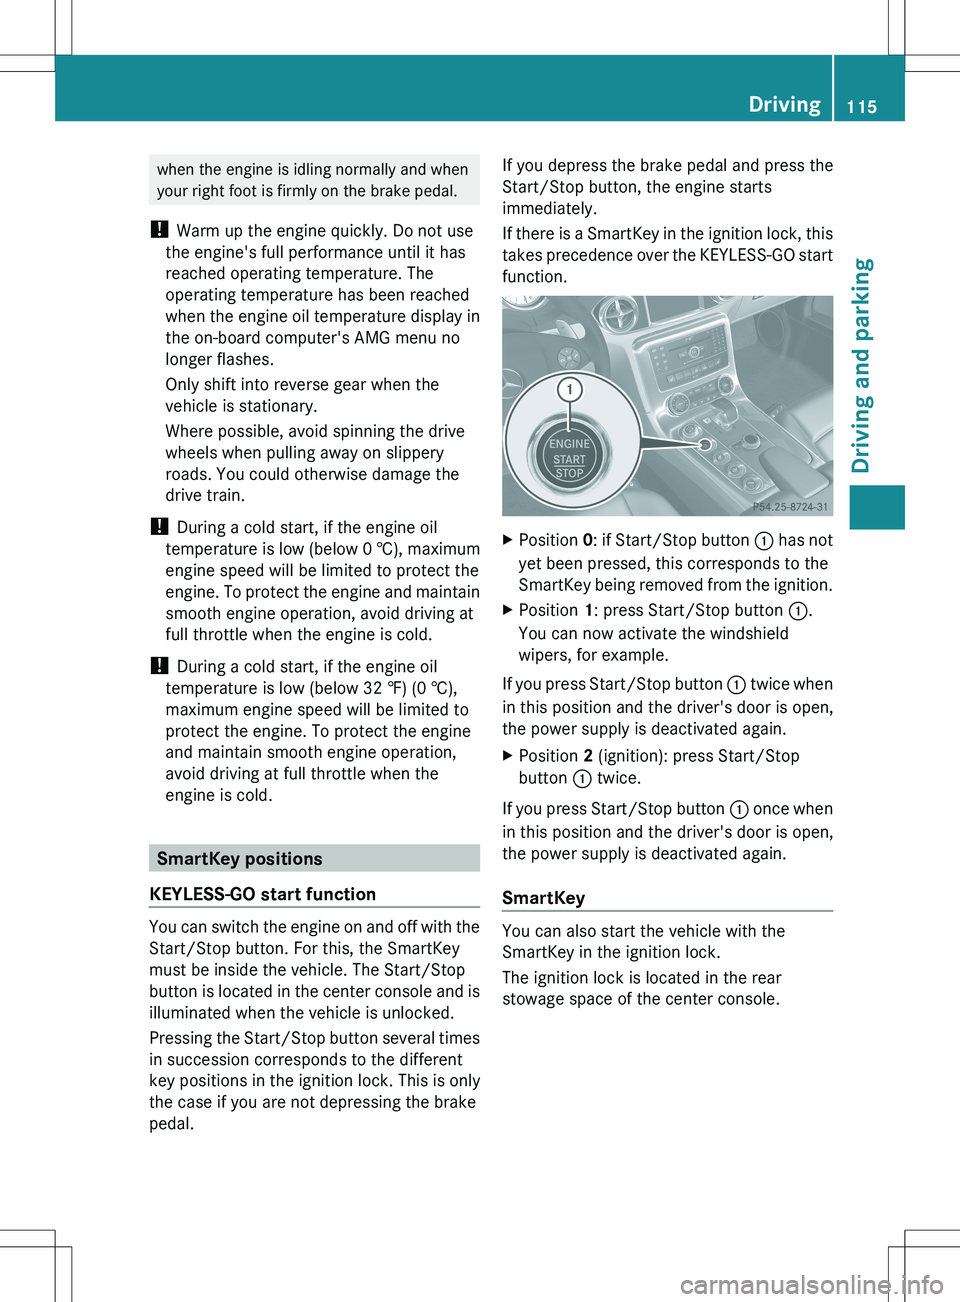
KEYLESS-GO start function
You can switch the engine on and off with the
Start/Stop button. For this, the SmartKey
must be inside the vehicle. The Start/Stop
button is located in the center console and is
illuminated when the vehicle is unlocked.
Pressing the Start/Stop button several times
in succession corresponds to the different
key positions in the ignition lock. This is only
the case if you are not depressing the brake
pedal.
If you depress the brake pedal and press the
Start/Stop button, the engine starts
immediately.
If there is a SmartKey in the ignition lock, this
takes precedence over the KEYLESS-GO start
function.XPosition 0: if Start/Stop button : has not
yet been pressed, this corresponds to the
SmartKey being removed from the ignition.XPosition 1: press Start/Stop button :.
You can now activate the windshield
wipers, for example.
If you press Start/Stop button : twice when
in this position and the driver's door is open,
the power supply is deactivated again.
XPosition 2 (ignition): press Start/Stop
button : twice.
If you press Start/Stop button : once when
in this position and the driver's door is open,
the power supply is deactivated again.
SmartKey
You can also start the vehicle with the
SmartKey in the ignition lock.
The ignition lock is located in the rear
stowage space of the center console.
Driving115Driving and parkingZ
Page 118 of 288
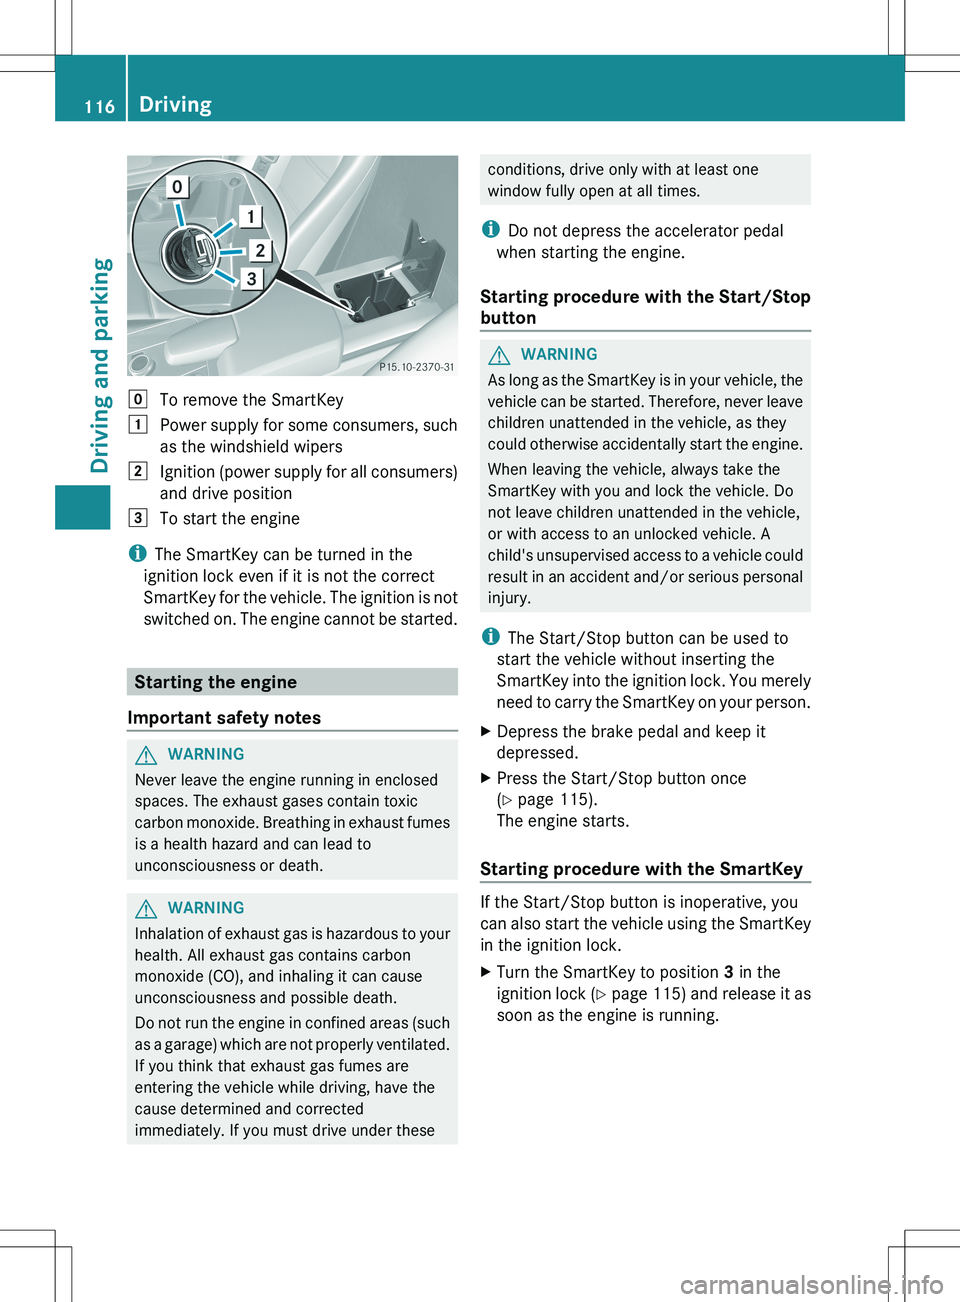
gTo remove the SmartKey1Power supply for some consumers, such
as the windshield wipers2Ignition (power supply for all consumers)
and drive position3To start the engine
i The SmartKey can be turned in the
ignition lock even if it is not the correct
SmartKey for the vehicle. The ignition is not
switched on. The engine cannot be started.
Starting the engine
Important safety notes
GWARNING
Never leave the engine running in enclosed
spaces. The exhaust gases contain toxic
carbon monoxide. Breathing in exhaust fumes
is a health hazard and can lead to
unconsciousness or death.
GWARNING
Inhalation of exhaust gas is hazardous to your
health. All exhaust gas contains carbon
monoxide (CO), and inhaling it can cause
unconsciousness and possible death.
Do not run the engine in confined areas (such
as a garage) which are not properly ventilated.
If you think that exhaust gas fumes are
entering the vehicle while driving, have the
cause determined and corrected
immediately. If you must drive under these
conditions, drive only with at least one
window fully open at all times.
i Do not depress the accelerator pedal
when starting the engine.
Starting procedure with the Start/Stop
buttonGWARNING
As long as the SmartKey is in your vehicle, the
vehicle can be started. Therefore, never leave
children unattended in the vehicle, as they
could otherwise accidentally start the engine.
When leaving the vehicle, always take the
SmartKey with you and lock the vehicle. Do
not leave children unattended in the vehicle,
or with access to an unlocked vehicle. A
child's unsupervised access to a vehicle could
result in an accident and/or serious personal
injury.
i The Start/Stop button can be used to
start the vehicle without inserting the
SmartKey into the ignition lock. You merely
need to carry the SmartKey on your person.
XDepress the brake pedal and keep it
depressed.XPress the Start/Stop button once
( Y page 115).
The engine starts.
Starting procedure with the SmartKey
If the Start/Stop button is inoperative, you
can also start the vehicle using the SmartKey
in the ignition lock.
XTurn the SmartKey to position 3 in the
ignition lock (Y page 115) and release it as
soon as the engine is running.116DrivingDriving and parking
Page 220 of 288
Useful information
i This Operator's Manual describes all
models and all standard and optional
equipment of your vehicle available at the
time of publication of the Operator's
Manual. Country-specific differences are
possible. Please note that your vehicle may
not be equipped with all features
described. This also applies to safety-
related systems and functions.
i Please read the information on qualified
specialist workshops ( Y page 21).
Engine compartment
Hood
Opening the hood
GWARNING
Do not pull the release lever while the vehicle
is in motion. Otherwise, the hood could be
forced open by passing air flow.
This could cause the hood to come loose and
injure you and/or others.
GWARNING
Do not open the hood when the engine is
overheated. You could be seriously injured.
Observe the coolant temperature gauge to
determine whether the engine may be
overheated. If you see flames or smoke
coming from the engine compartment, move
away from the vehicle. Wait until the engine
has cooled. If necessary, call the fire
department.
GWARNING
There is a risk of injury if the hood is open,
even if the engine is not running.
Some engine components can become very
hot.
To avoid the risk of burns, only touch those
components described in the Operator's
Manual and observe the relevant safety notes.
GWARNING
To help prevent personal injury, stay clear of
moving parts when the hood is open and the
engine is running.
The radiator fan may continue to run for
approximately 30 seconds or may even
restart after the engine has been turned off.
Stay clear of fan blades.
GWARNING
The engine is equipped with a transistorized
ignition system. Because of the high voltage,
it is dangerous to touch any components
(ignition coils, spark plug sockets, diagnostic
socket) of the ignition system:
R with the engine running
R while starting the engine
R when the ignition is switched on and the
engine is turned manually
XMake sure that the windshield wipers are
switched off.GWARNING
The windshield wipers and wiper linkage
could be set in motion.
When the hood is open, you or others could
be injured by the wiper linkage.
Make sure that the windshield wipers are
switched off. When using KEYLESS-GO, make
sure that no ignition position is selected. All
indicator lamps in the instrument cluster must
be off.
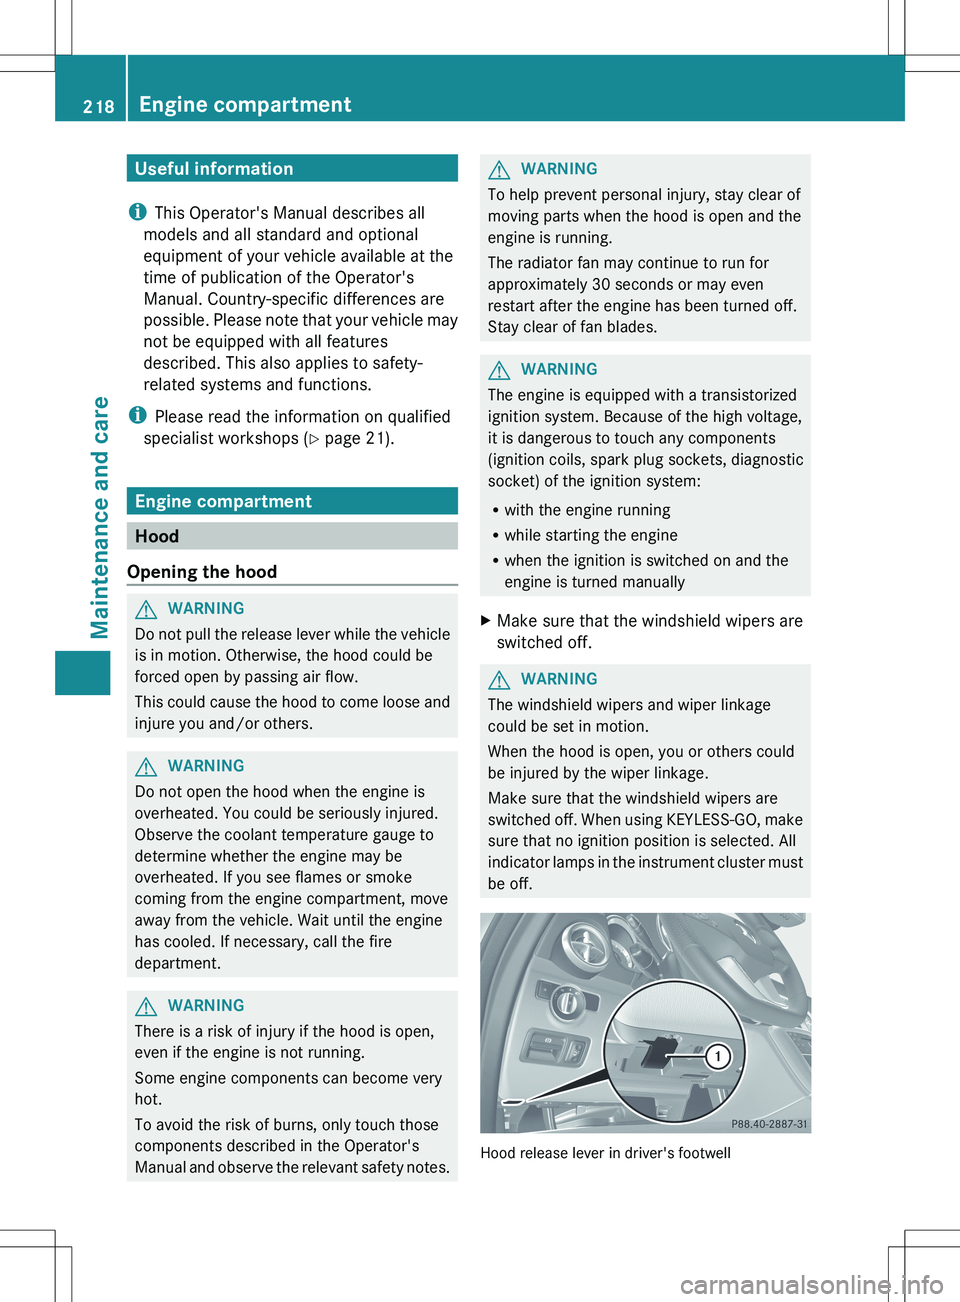
Hood release lever in driver's footwell
218Engine compartmentMaintenance and care
Page 221 of 288
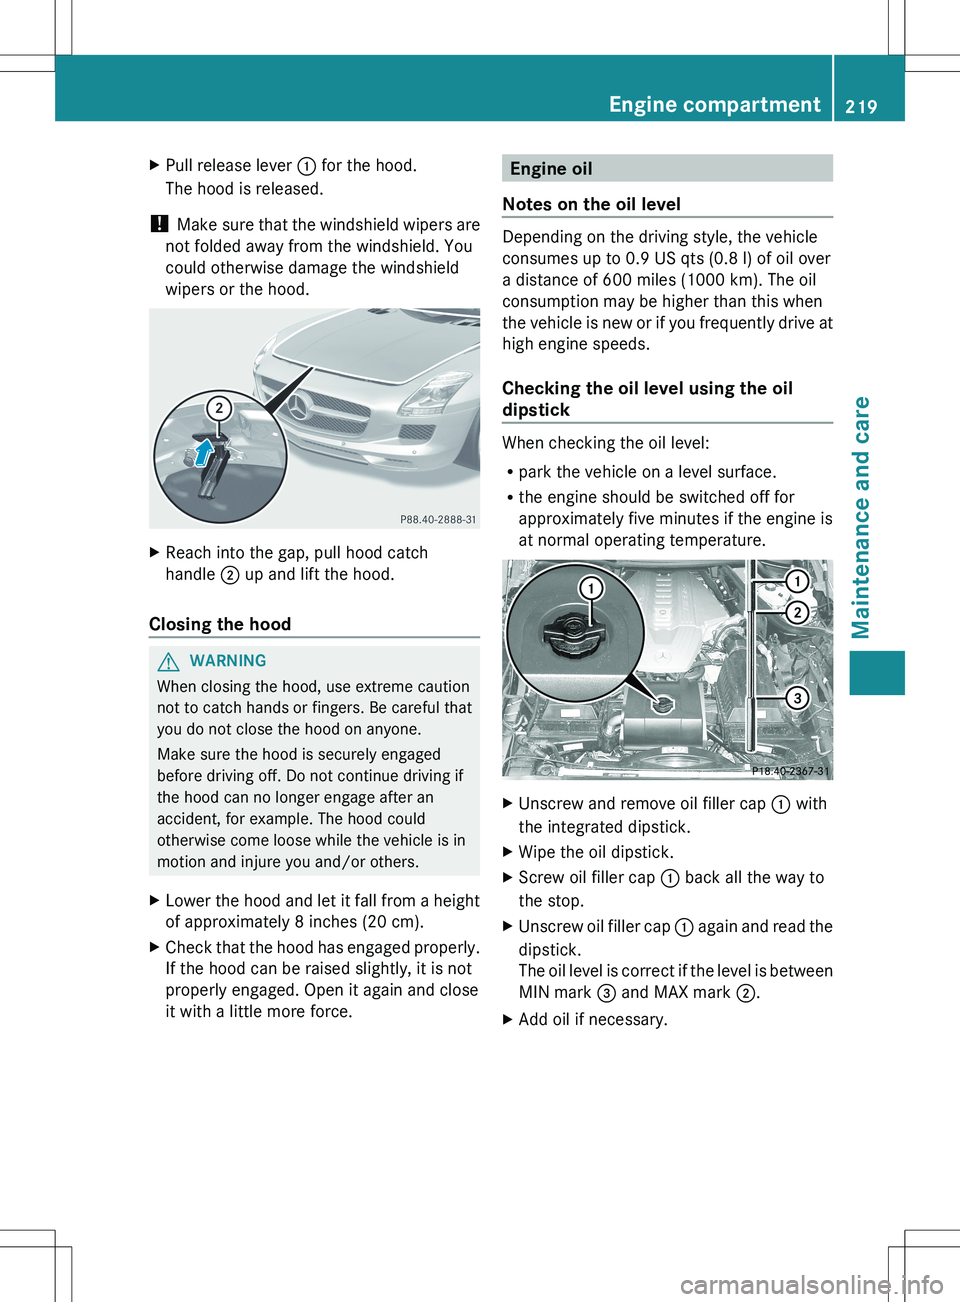
XPull release lever : for the hood.
The hood is released.
! Make sure that the windshield wipers are
not folded away from the windshield. You
could otherwise damage the windshield
wipers or the hood.
XReach into the gap, pull hood catch
handle ; up and lift the hood.
Closing the hood
GWARNING
When closing the hood, use extreme caution
not to catch hands or fingers. Be careful that
you do not close the hood on anyone.
Make sure the hood is securely engaged
before driving off. Do not continue driving if
the hood can no longer engage after an
accident, for example. The hood could
otherwise come loose while the vehicle is in
motion and injure you and/or others.
XLower the hood and let it fall from a height
of approximately 8 inches (20 cm).XCheck that the hood has engaged properly.
If the hood can be raised slightly, it is not
properly engaged. Open it again and close
it with a little more force.Engine oil
Notes on the oil level
Depending on the driving style, the vehicle
consumes up to 0.9 US qts (0.8 l) of oil over
a distance of 600 miles (1000 km). The oil
consumption may be higher than this when
the vehicle is new or if you frequently drive at
high engine speeds.
Checking the oil level using the oil
dipstick
When checking the oil level:
R park the vehicle on a level surface.
R the engine should be switched off for
approximately five minutes if the engine is
at normal operating temperature.
XUnscrew and remove oil filler cap : with
the integrated dipstick.XWipe the oil dipstick.XScrew oil filler cap : back all the way to
the stop.XUnscrew oil filler cap : again and read the
dipstick.
The oil level is correct if the level is between
MIN mark = and MAX mark ;.XAdd oil if necessary.Engine compartment219Maintenance and careZ