2012 MERCEDES-BENZ SLK55AMG trailer
[x] Cancel search: trailerPage 173 of 334
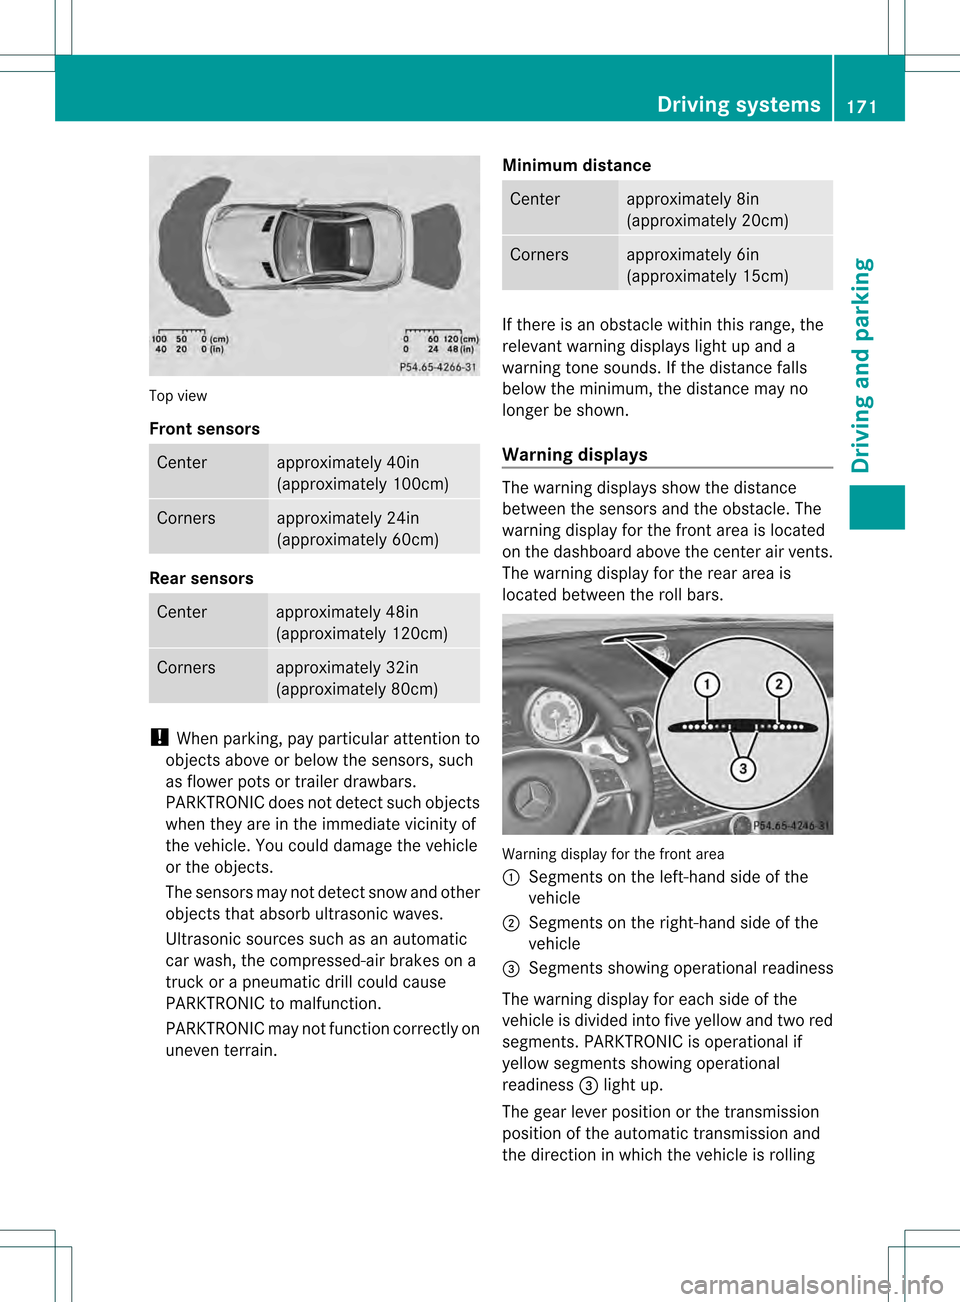
Top view
Front sensors
Center approximately 40in
(approximately 100cm)
Corners approximately 24in
(approximately 60cm)
Rear sensors
Center approximately 48in
(approximately 120cm)
Corners approximately 32in
(approximately 80cm)
!
When parking, pay particular attention to
objects above or below the sensors, such
as flower pots or trailer drawbars.
PARKTRONIC does not detect such objects
when they are in the immediate vicinity of
the vehicle. You could damage the vehicle
or the objects.
The sensors may not detect snow and other
objects that absorb ultrasonic waves.
Ultrasonic sources such as an automatic
car wash, the compressed-air brakes on a
truck or a pneumatic drill could cause
PARKTRONIC to malfunction.
PARKTRONIC may not function correctly on
uneven terrain. Minimum distance Center approximately 8in
(approximately 20cm)
Corners approximately 6in
(approximately 15cm)
If there is an obstacle within this range, the
relevant warning displays light up and a
warning tone sounds. If the distance falls
below the minimum, the distance may no
longer be shown.
Warning displays
The warning displays show the distance
between the sensors and the obstacle. The
warning display for the front area is located
on the dashboard above the center air vents.
The warning display for the rear area is
located between the roll bars.
Warning display for the front area
0002
Segments on the left-hand side of the
vehicle
0003 Segments on the right-hand side of the
vehicle
0023 Segments showing operational readiness
The warning display for each side of the
vehicle is divided into five yellow and two red
segments. PARKTRONIC is operational if
yellow segments showing operational
readiness 0023light up.
The gear lever position or the transmission
position of the automatic transmission and
the direction in which the vehicle is rolling Driving systems
171Driving and parking Z
Page 176 of 334
G
WARNING
Objects located above the height range of
Parking Guidance will not be detected when
the parking space is measured. These objects
are not taken into account when the parking
procedure is calculated, e.g. overhanging
loads, tail sections or loading ramps of goods
vehicles. Under some circumstances, Parking
Guidance might therefore issu esteering
instructions too soon. Thi smay lead to a
collision .For this reason, you should avoid
using Parking Guidance in such situations. G
WARNING
Make sure that no persons or animals are in
the maneuvering range. Otherwise, they
could be injured.
! Pay particular attention to low objects or
objects with flat surfaces, such as trailer
drawbars, posts, cross beams and curbs.
These types of objects cannot be detected
by Parking Guidance and may damage the
vehicle.
When PARKTRONIC is deactivated, Parking
Guidance is also unavailable.
Use Parking Guidance for parking spaces:
R that are parallel to the direction of travel
R that are on straight roads, not bends
R that are on the same level as the road, i.e.
not on the pavement, for example. Parking
Guidance may not detect flat curbs
Parking tips:
R on narrow roads, drive past the parking
space as close as possible.
R parking spaces that are littered, overgrown
or partially occupied by trailer drawbars
might be identified incorrectly or not at all.
R snowfall or heavy rain may lead to a parking
space being measured inaccurately.
R pay attention to the PARKTRONIC
(Y page 171) warning messages during the
parking procedure. R
when transporting a load which protrudes
from your vehicle, you must not use Parking
Guidance.
R never use Parking Guidance with snow
chains or an emergency spare wheel
mounted.
R make sure that the tire pressures are
always correct. This has adirec teffect on
the steering instructions.
R the way you rvehicle is positioned in the
parking space after parkin gis dependent
on various factors. These include the
position and shape of the vehicles parked
in front and behind it and the conditions of
the location. In some cases, Parking
Guidance may guide you too far or not far
enough into a parking space. In some
cases, it may also lead you across or onto
the curb. If necessary, cancel the parking
procedure with Parking Guidance.
! If unavoidable, you should drive over
obstacles such as curbs slowly and not at
a sharp angle. Otherwise, you may damage
the wheels or tires.
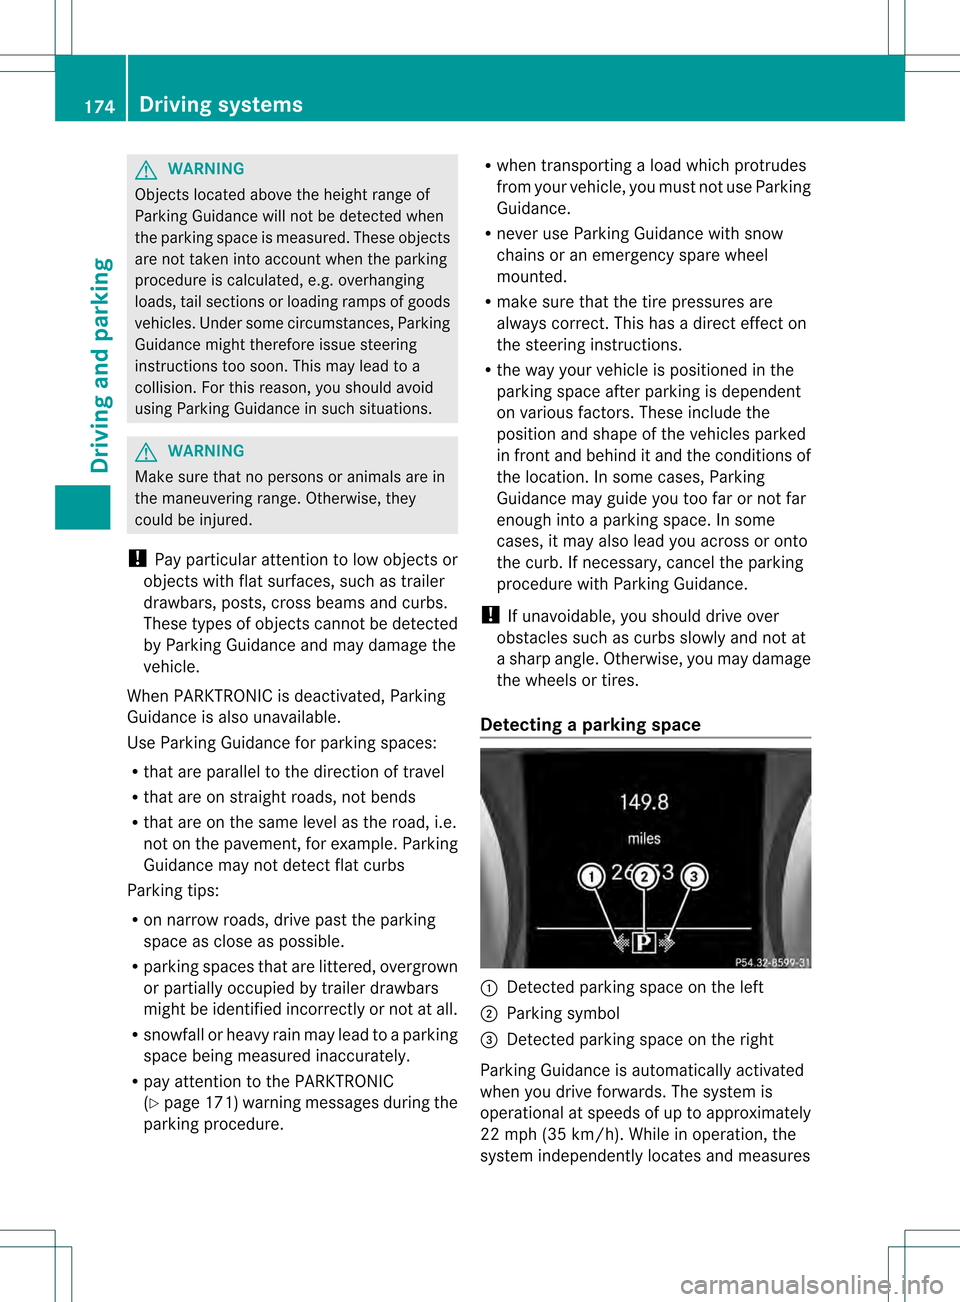
Detecting aparking space 0002
Detected parking space on the left
0003 Parking symbol
0023 Detected parking space on the right
Parking Guidance is automatically activated
whe nyou drive forwards. The system is
operational at speeds of up to approximately
22 mph (35 km/h). While in operation, the
system independently locates and measures 174
Driving systemsDriving and parking
Page 291 of 334
Transporting the vehicle
The towing eye can be used to pull the vehicle
onto a trailer or transporter for transporting
purposes.
X Vehicles with manual transmission:
shift to neutral.
X Vehicles with automatic transmission:
turn the SmartKey to position 2in the
ignition lock.
X Move the selecto rlever to N.
As soon as the vehicle is loaded:
X Preven tthe vehicle from rolling away by
applying the parking brake.
X Vehicles with manual transmission:
shift to first gear or reverse gear.
X Vehicles with automatic transmission:
move the selector lever to P.
X Turn the SmartKey to position 0in the
ignition lock and remove the SmartKey
from the ignition lock.
X Secure the vehicle.
! Only lash the vehicle down by the wheels
or wheel rims, not by parts of the vehicle
such as axle or steering components.
Otherwise, the vehicle could be damaged. Tow-starting (emergency starting)
When tow-starting your vehicle, it is
important that you follow the safety
instructions (Y page 287).
! Vehicles with automatic transmission
must not be started by tow-starting. This
could otherwise damage the transmission.
For further information on "Jump-starting"
see (Y page 285).
Before tow-starting the following conditions
must be fulfilled:
R the battery is connected.
R the engine has cooled down.
R the catalytic converter has cooled down. X
Switch on the hazard warning lamps
(Y page 108).
X Install the towing eye (Y page 287).
X Secure the rigid towing bar or the towing
rope.
X Depress and hold the brake pedal.
X Turn the SmartKey to position 2in the
ignition lock.
X Depress the clutch pedal and keep it
depressed.
X Shift to neutral.
X Release the brake pedal.
X Tow-start the vehicle.
X Shift to second gear.
X Release the clutch pedal slowly;d o not
depress the accelerator pedal while doing
so.
The engine is started.
X Depress the clutch pedal and shift to
neutral.
X Stop at a suitable place.
X Depress the parking brake.
X Remove the rigid towing bar or towing rope.
X Remove the towing eye (Y page 288).
X Switch off the hazard warning lamps. Fuses
Important safety notes
G
WARNING
Only use fuses that have been approved for
Mercedes-Benz vehicles and that have the
correct fuse rating for the systems
concerned. Do not attempt to repair or bridge
faulty fuses. Using fuses that have not been
approved or attempting to repair or bridge
faulty fuses could cause the fuse to be
overloaded and result in afire. Have the cause
traced and rectified at a qualified specialist
workshop.
The fuses in your vehicle serve to close down
faulty circuits. If afuse blows, all the Fuses
289Breakdown assistance Z
Page 307 of 334
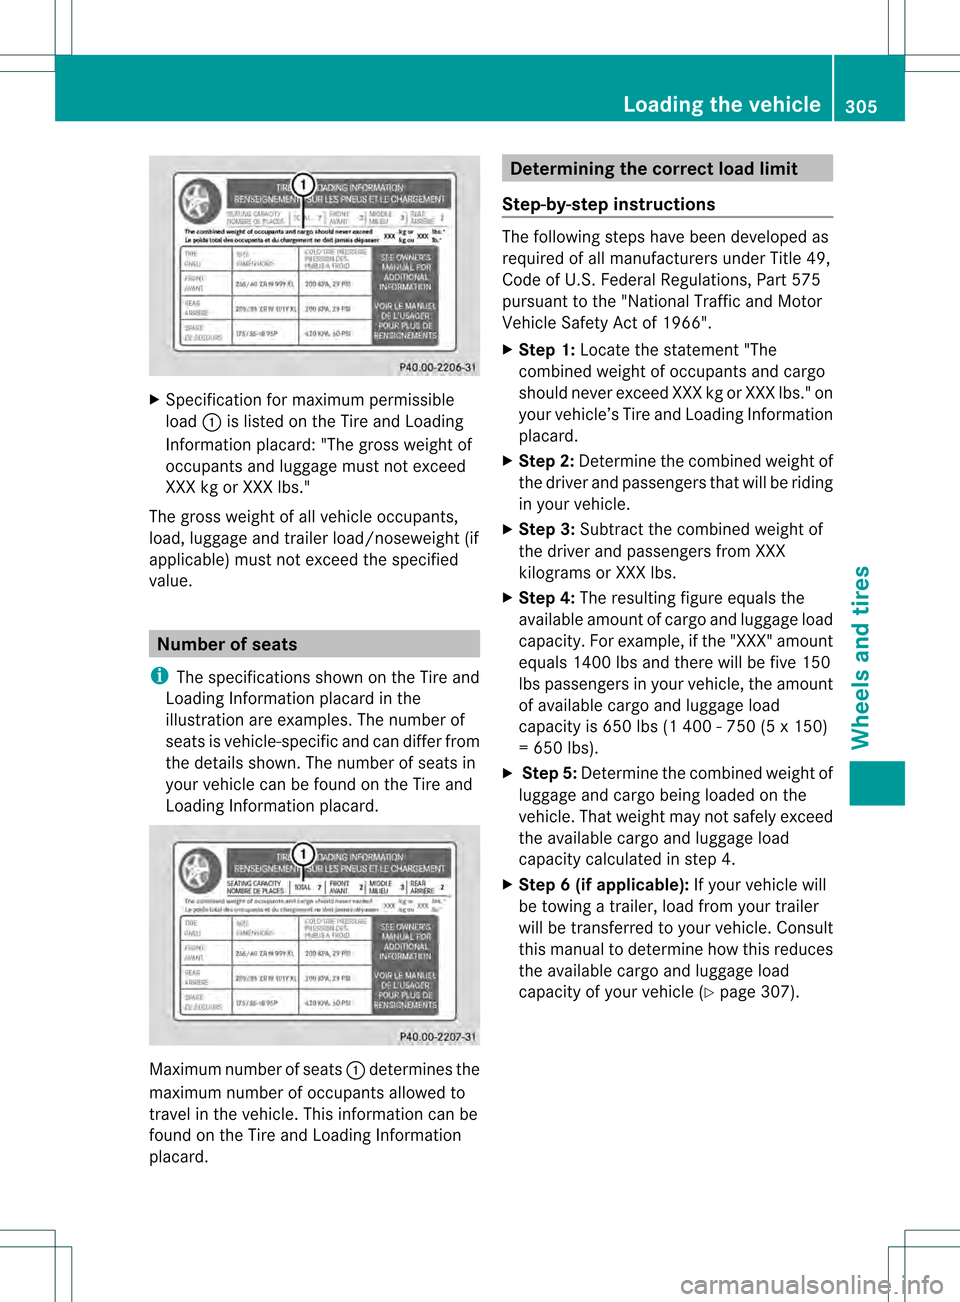
X
Specification for maximum permissible
load 0002is listed on the Tire and Loading
Information placard: "The gross weight of
occupants and luggage mus tnot exceed
XXX kg or XXX lbs."
The gross weight of all vehicle occupants,
load, luggage and trailer load/noseweight (if
applicable) must not exceed the specified
value. Number of seats
i The specifications shown on the Tire and
Loading Information placard in the
illustration are examples. The number of
seats is vehicle-specific and can differ from
the details shown. The number of seats in
your vehicle can be found on the Tire and
Loading Information placard. Maximum number of seats
0002determines the
maximum number of occupants allowed to
travel in the vehicle. This information can be
found on the Tire and Loading Information
placard. Determining the correct load limit
Step-by-step instructions The following steps have been developed as
required of all manufacturers under Title 49,
Code of U.S. Federal Regulations, Part 575
pursuant to the "National Traffic and Motor
Vehicle Safety Act of 1966".
X
Step 1: Locate the statement "The
combined weight of occupant sand cargo
should neve rexceed XXX kg or XXX lbs." on
your vehicle’s Tire and Loading Information
placard.
X Ste p2:Determine the combined weight of
the driver and passengers tha twill be riding
in your vehicle.
X Step 3: Subtract the combined weight of
the drive rand passengers from XXX
kilograms or XXX lbs.
X Ste p4:The resulting figure equals the
available amount of cargo and luggage load
capacity. For example, if the "XXX" amount
equals 1400 lbs and there will be five 150
lbs passengers in your vehicle, the amount
of available cargo and luggage load
capacity is 650 lbs (1 400 - 750 (5 x 150)
= 650 lbs).
X Step 5: Determine the combined weight of
luggage and cargo being loaded on the
vehicle. That weight may not safely exceed
the available cargo and luggage load
capacity calculated in step 4.
X Step 6 (if applicable): If your vehicle will
be towing a trailer, load from your trailer
will be transferred to your vehicle. Consult
this manual to determine how this reduces
the available cargo and luggage load
capacity of your vehicle ( Ypage 307). Loading the vehicle
305Wheels and tires Z
Page 308 of 334
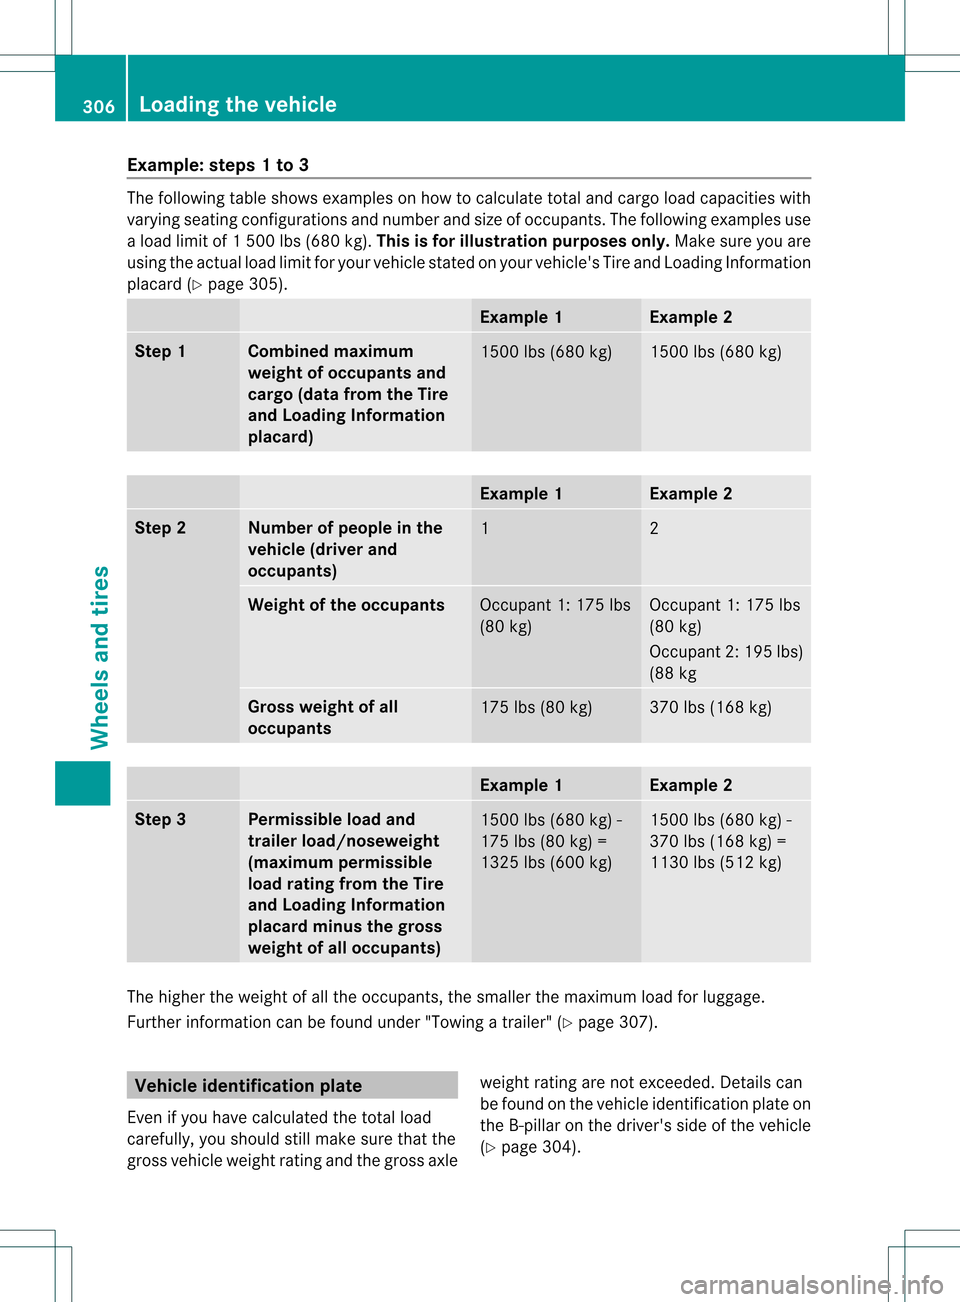
Example: steps 1 to 3
The following table shows examples on how to calculate total and cargo load capacities with
varying seating configurations and number and size of occupants. The following examples use
a load limit of 1500 lbs (680 kg). This is for illustration purposes only. Make sure you are
using the actual load limit for you rvehicle stated on your vehicle's Tire and Loading Information
placard (Y page 305). Example 1 Example 2
Step 1 Combined maximum
weight of occupants and
cargo (data from the Tire
and Loading Information
placard)
1500 lbs (680 kg) 1500 lbs (680 kg)
Example 1 Example 2
Step 2 Number of people in the
vehicle (driver and
occupants)
1 2
Weight of the occupants
Occupant 1: 175 lbs
(80 kg) Occupant 1: 175 lbs
(80 kg)
Occupant 2: 195 lbs)
(88 kg
Gross weight of all
occupants
175 lbs (80 kg) 370 lbs (168 kg)
Example 1 Example 2
Step 3 Permissible load and
trailer load/noseweight
(maximum permissible
load rating from the Tire
and Loading Information
placard minus the gross
weight of all occupants)
1500 lbs (680 kg) -
175 lbs (80 kg) =
1325 lbs (600 kg) 1500 lbs (680 kg) -
370 lbs (168 kg) =
1130 lbs (512 kg)
The higher the weight of all the occupants, the smaller the maximum load for luggage.
Further information can be found under "Towing atrailer" (Y page 307). Vehicle identification plate
Even if you have calculated the total load
carefully, you should still make sure that the
gross vehicle weight rating and the gross axle weight rating are not exceeded. Details can
be found on the vehicle identification plate on
the B-pillar on the driver's side of the vehicle
(Y page 304). 306
Loading the vehicleWheels and tires
Page 309 of 334
Permissible gross vehicle weight:
the
gross weight of the vehicle, all passengers,
load and trailer load/noseweight (if
applicable) must not exceed the permissible
gross vehicle weight.
Gross axle weight rating: the maximum
permissible weight that can be carried by one
axle (front or rear axle).
To ensure that your vehicle does not exceed
the maximum permissible values (gross
vehicle weight and maximum gross axle
weight rating), have your loaded vehicle
(including driver, occupants, cargo, and full
trailer load if applicable) weighed on a
suitable vehicle weighbridge. Trailer load/noseweight
The trailer load/noseweight affects the gross
weight of the vehicle. If a trailer is attached,
the trailer load/noseweight is included in the
load along with occupants and luggage. The
trailer load/noseweight is usually
approximately 10% of the gross weight of the
trailer and its load.
Your Mercedes-Benz has been designed
primarily to carry passengers and their
luggage. Mercedes-Benz does not
recommend towing a trailer with your vehicle. Maximum load rating
Do not overload the tires by exceeding the
specified load limit. The maximum
permissible load can be found on the
vehicle's Tire and Loading Information
placard on the B-pillar on the driver's side
(Y page 304). i
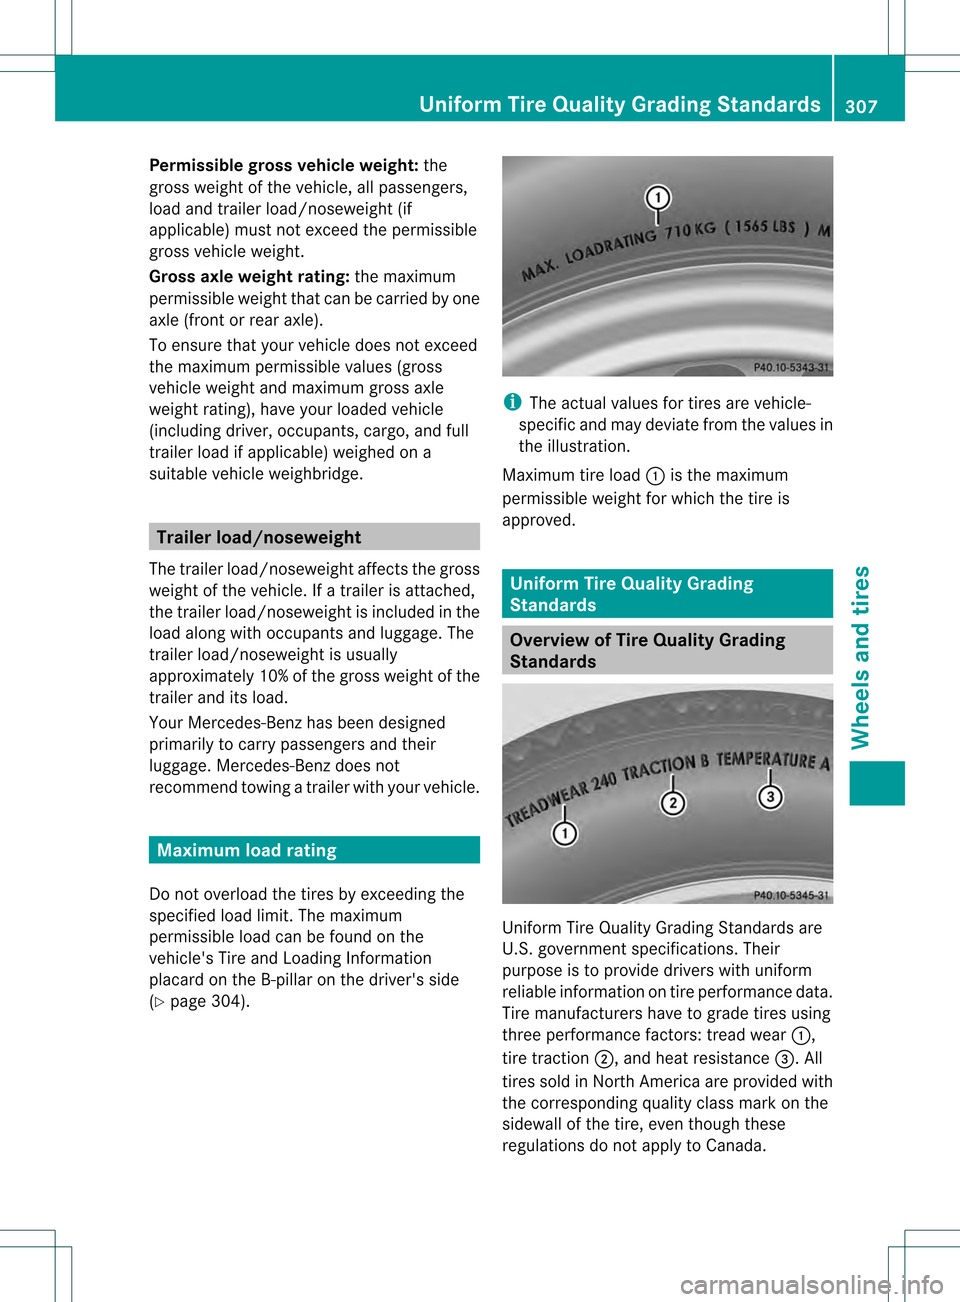
The actual values for tires are vehicle-
specific and may deviate from the values in
the illustration.
Maximum tire load 0002is the maximum
permissible weight for which the tire is
approved. Uniform Tire Quality Grading
Standards
Overview of Tire Quality Grading
Standards
Uniform Tire Quality Grading Standards are
U.S. government specifications. Their
purpose is to provide drivers with uniform
reliable information on tire performance data.
Tire manufacturers have to grade tires using
three performance factors: tread wear
0002,
tire traction 0003, and heat resistance 0023. All
tires sold in North America are provided with
the corresponding quality class mark on the
sidewall of the tire, even though these
regulations do not apply to Canada. Uniform Tire Quality Grading Standards
307Wheels and tires Z