2012 MERCEDES-BENZ SLK55AMG change time
[x] Cancel search: change timePage 159 of 334
Storing and maintaining the current
speed
You can store the current speed if you are
driving faster than 20 mph (30 km/h).
X Accelerate the vehicle to the desired
speed.
X Briefly press the cruise control lever
up 0002 or down 0003.
X Remove your foot from the accelerator
pedal.
Cruise control is activated. The vehicle
automatically maintains the stored speed.
i Cruise control may be unable to maintain
the stored speed on uphill gradients. The
stored speed is resumed when the gradient
evens out. Cruise control maintains the
stored speed on downhill gradients by
automatically applying the brakes.
i Vehicles with manual transmission:
R Always drive at adequate, but not
excessive, engine speeds.
R Change gear in good time.
R If possible, do not shift down several
gears at a time.
Storing the current speed or calling up
the last stored speed G
WARNING
The set speed stored in memory should only
be set again if prevailing road conditions and
legal speed limits permit. Possible
acceleration or deceleration differences
arising from returning to the preset speed
could cause an accident and/or serious injury
to you and others.
X Briefly pull the cruise control lever towards
you 0022.
X Remove your foot from the accelerator
pedal.
The first time cruise control is activated, it
stores the current speed or regulates the speed of the vehicle to the previously
stored speed.
Setting aspeed G
WARNING
Keep in mind tha titmay take a brie fmoment
until the vehicle has made the necessary
adjustments.
Increase or decrease the set vehicle speed to
a value that the prevailing road conditions and
legal speed limits permit. Otherwise, sudden
and unexpected acceleration or deceleration
of the vehicle could cause an accident and/
or serious injury to you and others.
X Press the cruise control lever up 0002for a
higher speed or down 0003for a lower speed.
X To adjust the speed in 1 mph
increments (1 km/h increments): briefly
press the cruise control lever up 0002or
down 0003to the pressure point.
The last speed stored is increased or
decreased every time the cruise control
lever is pushed up 0002or down 0003.
X To adjust the speed in 5 mph
increments (10 km/h increments):
briefly press the cruise control lever
up 0002 or down 0003beyond the pressure
point.
The last speed stored is increased or
decreased every time the cruise control
lever is pushed up 0002or down 0003.
i Cruise control is not deactivated if you
depress the accelerator pedal. For
example, if you accelerate briefly to
overtake, cruise control adjusts the
vehicle's speed to the last speed stored
after you have finished overtaking. Driving systems
157Driving and parking Z
Page 164 of 334
X
Press the cruise control lever repeatedly
up 0002 or down 0003until the desired speed
is set.
i You can use the cruise control lever to set
the stored speed and the control on the
cruise control lever to set the specified
minimum distance (Y page 164).
Pulling away
X If the vehicle in front pulls away: remove
your foot from the brake pedal.
X Briefly pull the cruise control lever towards
you 0022.
or
X Accelerate briefly.
Your vehicle pulls away and adapts its
speed to that of the vehicle in front.
Driving
If there is no vehicle in front, DISTRONIC
PLUS operates in the same way as cruise
control.
If DISTRONIC PLUS detects that the vehicle
in fronth as slowed down, it brakes your
vehicle .Inthis way, the distance you have
selected is maintained.
If DISTRONIC PLUS detects that the vehicle
in front is driving faster, it accelerates your
vehicle, but only up to the speed you have
stored. G
WARNING
If you depress the brake, DISTRONIC PLUS is
deactivated unless your vehicle is stationary.
DISTRONIC PLUS then no longer brakes your
vehicle. In such cases, control the distance
from vehicles travelling in front with the brake
alone. You could otherwise cause an accident
and thereby injure yourself and others. The
driver remains fully responsible for the
vehicle's distance from other vehicles, the
speed being driven and for braking in good
time. Changing lanes
If you change to the passing lane, DISTRONIC
PLUS supports you when:
R
you are driving faster than 40mph
(60 km/h).
R DISTRONIC PLUS is maintaining the
distance to a vehicle in front.
R you switch on the appropriate turn signal.
R DISTRONIC PLUS does not detect a danger
of collision.
If these conditions are fulfilled, your vehicle
is accelerated. Acceleration will be
interrupted if changing lanes takes too long
or if the distance between your vehicle and
the vehicle in front becomes too small.
i When changing lanes, DISTRONIC PLUS
monitors the left lane on left-hand drive
vehicles and the right lane on right-hand
drive vehicles. G
WARNING
DISTRONIC PLUS is only an aid designed to
assist driving.
It is not a substitute for attentive driving. The
driver remains fully responsible for the
vehicle's distance from other vehicles, the
vehicle's speed and for braking in good time.
Always pay attention to traffic conditions and
your surroundings. Otherwise, you may fail to
recognize dangers in time, cause an accident
and injure yourself and others.
Stopping G
WARNING
Never get out of the vehicle when DISTRONIC
PLUS is activated.
DISTRONIC PLUS must also never be
operated, activated or deactivated by a
passenger or from outside the vehicle.
DISTRONIC PLUS does not replace the
electric parking brake and must not be used
for parking. 162
Driving systemsDriving and parking
Page 178 of 334
until the arrow is white and a warning tone
sounds.
X To reverse into the parking space:
maintai nthe steering wheel angle and
reverse carefully.
X Stop as soon as you hear a warning tone,
The vehicle has reached the position in
which you need to countersteer.
The Please steer to the left or
Please steer to the right message
appears in the multifunction display.
X Countersteering: while the vehicle is
stationary, turn the steering wheel in the
specified direction until the arrow is white
and a warning tone sounds.
X To reverse into the parking space:
maintain the steering wheel angle and
reverse carefully.
X Stop as soon as you hear a warning tone,
at the latest when PARKTRONIC sounds the
continuous warning tone.
The Parking Guidance finished message appears in the multifunction
display and a warning tone sounds. You
may be asked to steer in a different
direction and then change gear. In this
case, further displays in the multifunction
display will direct you to the final position.
X Maneuver if necessary.
X Always observe the warning messages
displayed by PARKTRONIC (Y page 171).
Canceling Parking Guidance X
Press the PARKTRONIC button on the
center console (Y page 172).
Parking Guidance is canceled immediately
and PARKTRONIC is deactivated.
Parking Guidance is canceled automatically if
it is no longer possible to guide you into the
parking space, or if a malfunction occurs.
The parking space symbol goes out and a
warning tone sounds. The ParkingGuidance Canceled message appears in the
multifunction display. ATTENTION ASSIST
Important safety notes ATTENTION ASSIST helps you during long,
monotonous journeys such as on freeways
and interstate highways. It is active in the
range between 50 mph (80 km/h) and
112 mph (180 km/h).
If ATTENTION ASSIST detects typical
indicators of fatigue or increasing lapses in
concentration on the part of the driver, it
suggests you take a break.
G
WARNING
ATTENTION ASSIST is only an aid and may
detect your tiredness or lapses in
concentration too late or not at all. It is not a
substitute for a well-rested and attentive
driver.
Fatigue may cause you to recognize
hazardous situations too late, misjudge a
situation or react more slowly.F or this
reason, make sure you feel rested before you
begin driving and during your journey. Make
sure that you take regular breaks in time,
particularly on long journeys. Otherwise, you
may fail to recognize dangers in time, cause
an accident and injure yourself and others.
ATTENTION ASSIST assesses your level of
fatigue or lapses in concentration by taking
the following criteria into account:
R your personal driving style, e.g. steering
characteristics
R driving conditions, e.g. time, driving time
The functionality of ATTENTION ASSIST is
restricted and warnings may be delayed or
not occur at all:
R if the road condition is poor, e.g. if the
surface is uneven or if there are potholes
R if there is a strong side wind
R if you have adopted a sporty driving style
with high cornering speeds or high rates of
acceleration 176
Driving systemsDriving and parking
Page 179 of 334
R
if you are predominantly driving slower
than 50 mph (80 km/h) or faster than
112 mph (180 km/h)
R if you are currently using COMAND or
making a telephone call with it
R if the time has been set incorrectly
R in active driving situations, such as when
you change lanes or change your speed
Warning and display messages in the
multifunction display X
Activate ATTENTION ASSIST using the on-
board computer (Y page 191).
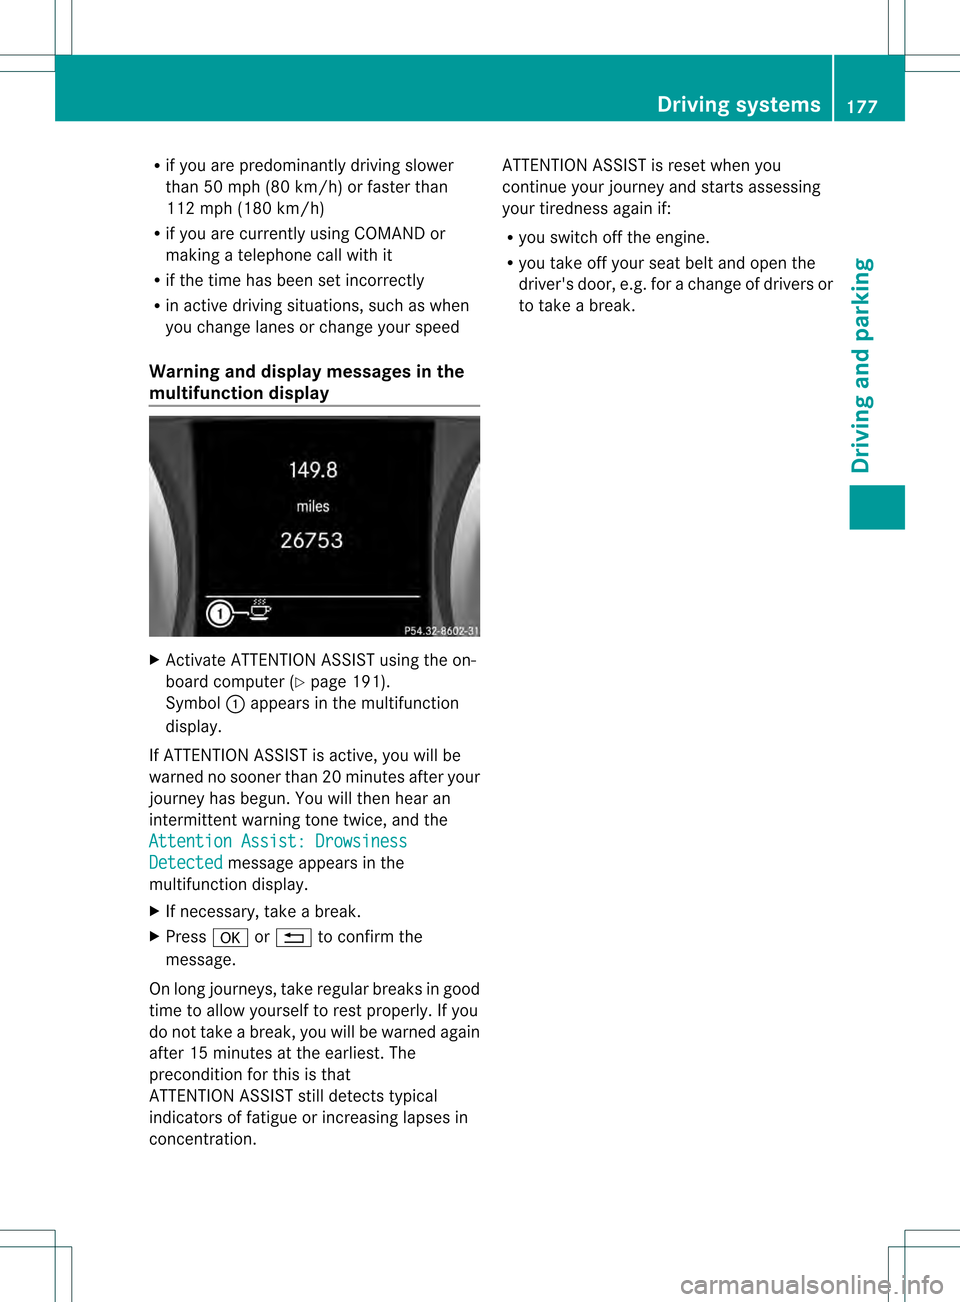
Symbol 0002appears in the multifunction
display.
If ATTENTION ASSIST is active, you will be
warned no sooner than 20 minutes after your
journey has begun. You will the nhear an
intermittent warning tonet wice, and the
Attention Assist: Drowsiness Detected message appears in the
multifunction display.
X If necessary, take a break.
X Press 000Cor0001 to confirm the
message.
On long journeys, take regular breaks in good
time to allow yourself to rest properly. If you
do not take a break, you will be warned again
after 15 minutes at the earliest. The
preconditio nfor this is that
ATTENTION ASSIST still detects typical
indicators of fatigue or increasing lapses in
concentration. ATTENTION ASSIST is reset when you
continue your journey and starts assessing
your tiredness again if:
R
you switch off the engine.
R you take off your seat belt and open the
driver's door, e.g. for a change of drivers or
to take a break. Driving systems
177Driving and parking Z
Page 217 of 334
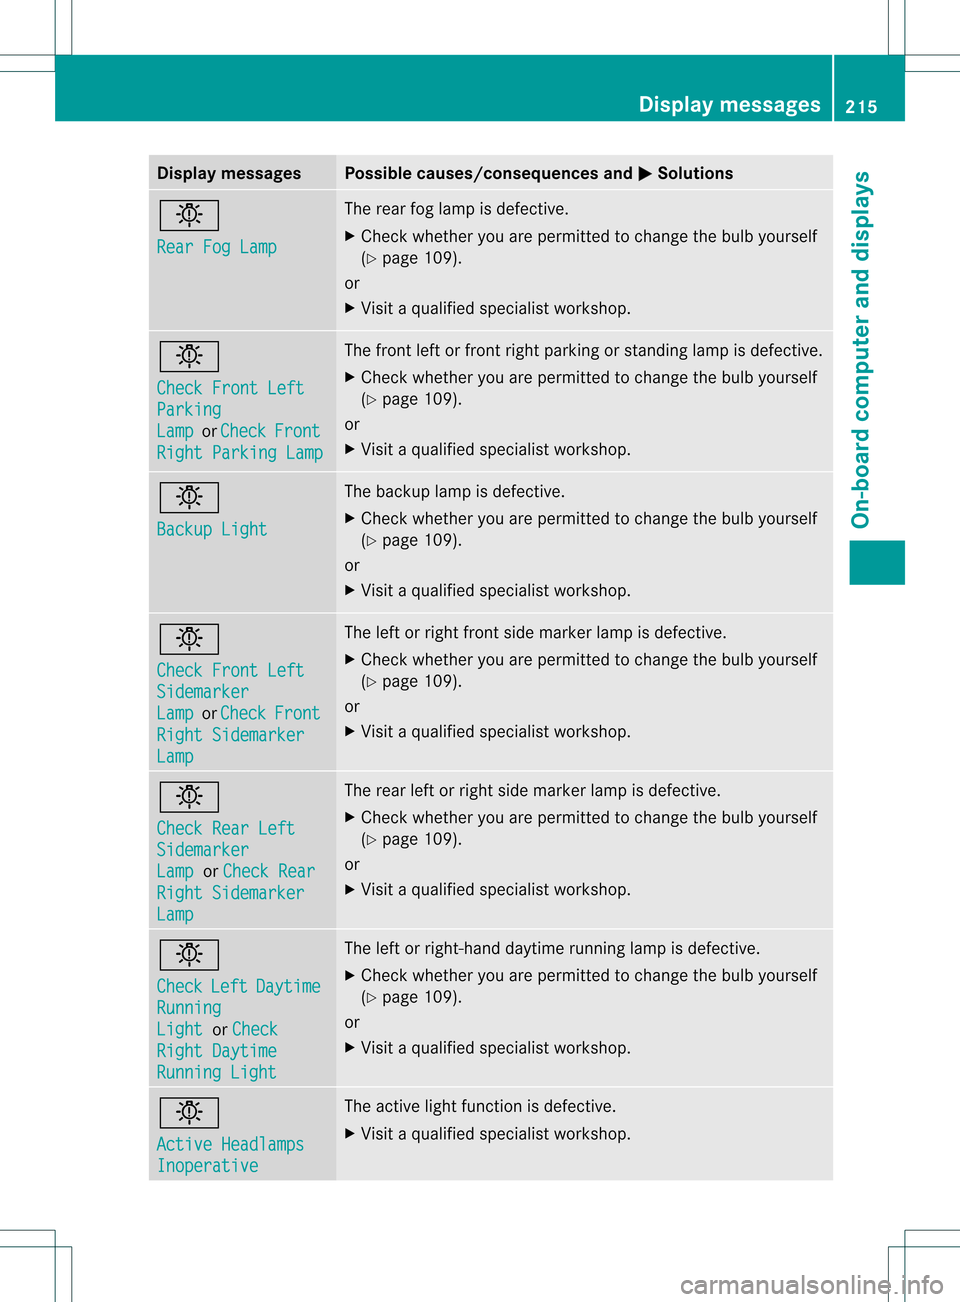
Display messages Possible causes/consequences and
0001 Solutions
0001
Rear Fog Lamp The rear fog lamp is defective.
X
Chec kwhether you are permitted to change the bulb yourself
(Y page 109).
or
X Visit a qualified specialist workshop. 0001
Check Front Left
Parking
Lamp or
Check Front
Right Parking Lamp The front left or front right parking or standing lamp is defective.
X
Check whether you are permitted to change the bulb yourself
(Y page 109).
or
X Visit a qualified specialist workshop. 0001
Backup Light The backup lamp is defective.
X
Check whether you are permitted to change the bulb yourself
(Y page 109).
or
X Visit a qualified specialist workshop. 0001
Check Front Left
Sidemarker
Lamp or
Check Front
Right Sidemarker
Lamp The left or right front side marker lamp is defective.
X
Check whether you are permitted to change the bulb yourself
(Y page 109).
or
X Visit a qualified specialist workshop. 0001
Check Rear Left
Sidemarker
Lamp or
Check Rear Right Sidemarker
Lamp The rear left or right side marker lamp is defective.
X
Check whether you are permitted to change the bulb yourself
(Y page 109).
or
X Visit a qualified specialist workshop. 0001
Check
Left Daytime
Running
Light or
Check Right Daytime
Running Light The left or right-hand daytime running lamp is defective.
X Check whether you are permitted to change the bulb yourself
(Y page 109).
or
X Visit a qualified specialist workshop. 0001
Active Headlamps
Inoperative The active light function is defective.
X
Visit a qualified specialist workshop. Display messages
215On-board computer and displays Z
Page 228 of 334
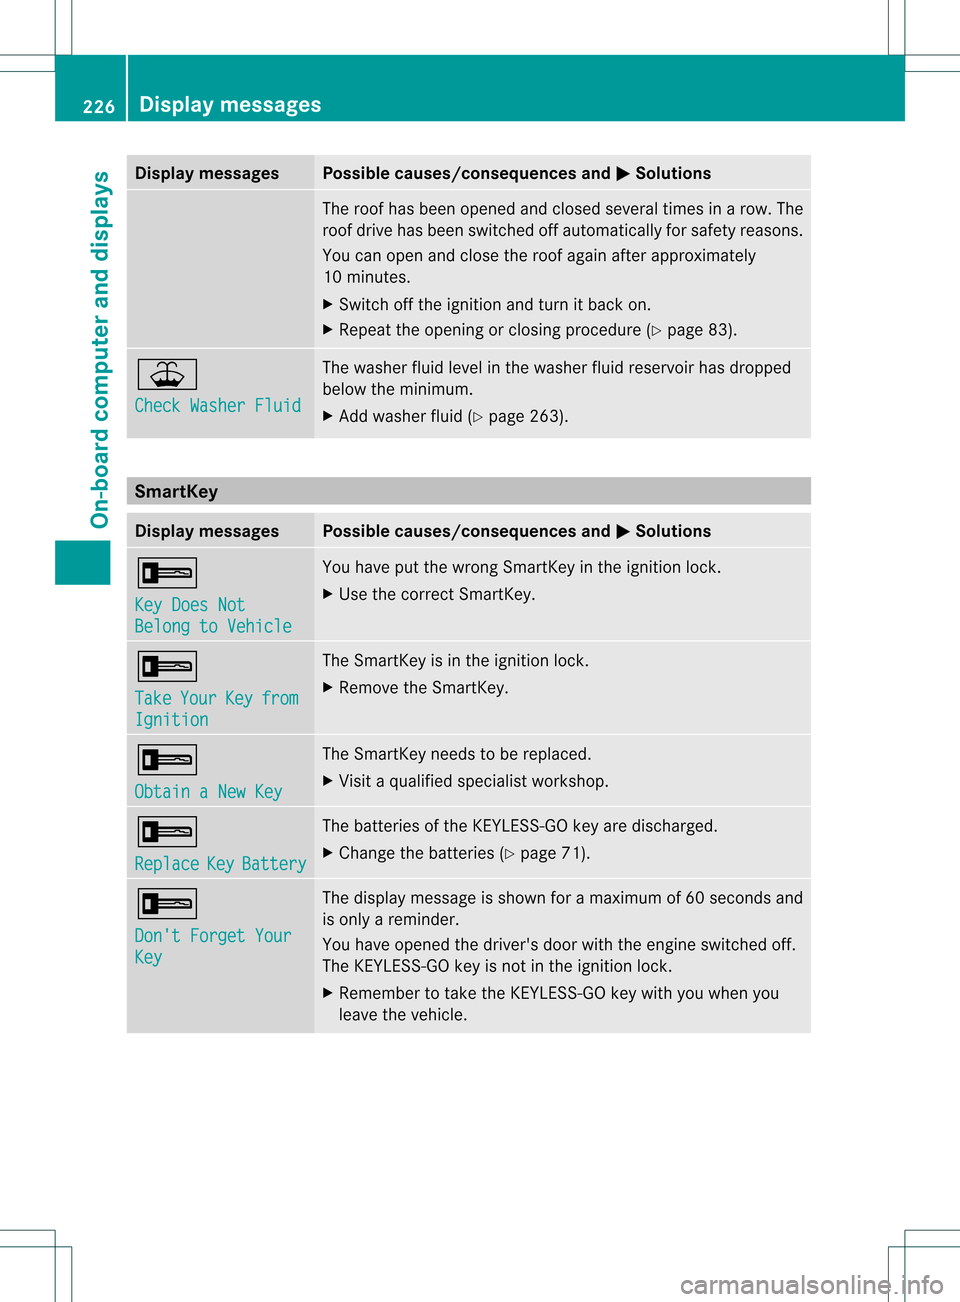
Display messages Possible causes/consequences and
0001 Solutions
The roo
fhas been opened and closed several times in arow. The
roof drive has been switched off automatically for safety reasons.
You can open and close the roof again after approximately
10 minutes.
X Switch off the ignition and turn it back on.
X Repeat the opening or closing procedure (Y page 83).0018
Check Washer Fluid The washer fluid level in the washer fluid reservoir has dropped
below the minimum.
X
Add washer fluid (Y page 263).SmartKey
Display messages Possible causes/consequences and
0001 Solutions
000A
Key Does Not
Belong to Vehicle You have put the wrong SmartKey in the ignition lock.
X
Use the correct SmartKey. 000A
Take
Your Key from
Ignition The SmartKey is in the ignition lock.
X
Remove the SmartKey. 000A
Obtain a New Key The SmartKey needs to be replaced.
X
Visit a qualified specialist workshop. 000A
Replace
Key Battery The batteries of the KEYLESS-GO key are discharged.
X
Change the batteries (Y page 71).000A
Don't Forget Your
Key The display message is shown for a maximum of 60 seconds and
is only a reminder.
You have opened the driver's door with the engine switched off.
The KEYLESS-GO key is not in the ignition lock.
X
Remember to take the KEYLESS-GO key with you when you
leave the vehicle. 226
Display messagesOn-board computer and displays
Page 272 of 334
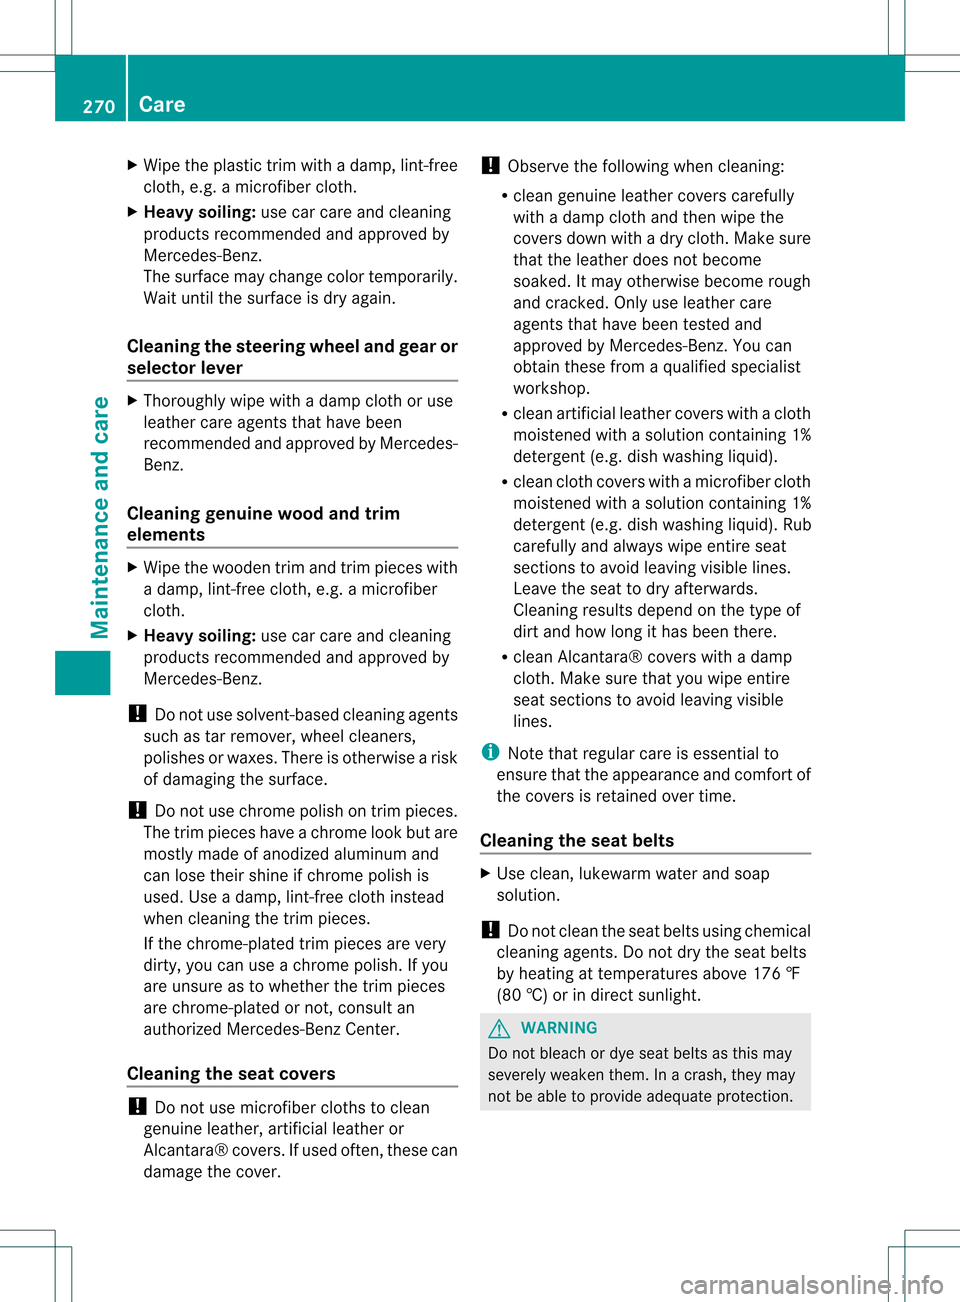
X
Wipe the plastic trim with a damp, lint-free
cloth, e.g. a microfiber cloth.
X Heavy soiling: use car care and cleaning
products recommended and approved by
Mercedes-Benz.
The surface may change color temporarily.
Wait until the surface is dry again.
Cleaning the steering wheel and gear or
selector lever X
Thoroughly wipe with a damp cloth or use
leather care agents that have been
recommended and approved by Mercedes-
Benz.
Cleaning genuine wood and trim
elements X
Wipe the wooden trim and trim pieces with
a damp, lint-free cloth ,e.g. a microfiber
cloth.
X Heavy soiling: use car care and cleaning
products recommended and approved by
Mercedes-Benz.
! Do not use solvent-based cleaning agents
such as tar remover, whee lcleaners,
polishes or waxes. There is otherwise a risk
of damaging the surface.
! Do not use chrome polish on trim pieces.
The trim pieces have a chrome look but are
mostly made of anodized aluminum and
can lose their shine if chrome polish is
used. Use a damp, lint-free cloth instead
when cleaning the trim pieces.
If the chrome-plated trim pieces are very
dirty, you can use a chrome polish. If you
are unsure as to whether the trim pieces
are chrome-plated or not, consult an
authorized Mercedes-Ben zCenter.
Cleaning the seat covers !
Do not use microfiber cloths to clean
genuine leather, artificial leather or
Alcantara® covers. If used often, these can
damage the cover. !
Observe the following when cleaning:
R clean genuine leather cover scarefully
with a damp cloth and then wipe the
covers down with a dry cloth .Make sure
that the leather does no tbecome
soaked. It may otherwise become rough
and cracked. Only use leather care
agents that have been tested and
approved by Mercedes-Benz. You can
obtain these from a qualified specialist
workshop.
R clean artificial leather covers with a cloth
moistened with a solution containing 1%
detergen t(e.g. dish washing liquid).
R clean cloth covers with a microfiber cloth
moistened with a solution containing 1%
detergen t(e.g. dish washing liquid). Rub
carefully and always wipe entire seat
sections to avoid leaving visible lines.
Leave the seat to dry afterwards.
Cleaning results depend on the type of
dirt and how long it has been there.
R clean Alcantara® covers with a damp
cloth. Make sure that you wipe entire
seat sections to avoid leaving visible
lines.
i Note that regular care is essential to
ensure that the appearance and comfort of
the covers is retained over time.
Cleaning the seat belts X
Use clean, lukewarm water and soap
solution.
! Do not clean the seat belts using chemical
cleaning agents .Do not dry the seat belts
by heating at temperatures above 176 ‡
(80 †) or in direct sunlight. G
WARNING
Do not bleach or dye seat belts as this may
severely weaken them. In a crash, they may
not be able to provide adequate protection. 270
CareMaintenance and care
Page 279 of 334

rolling away, for example when changing a
wheel.
X
Fold both plates upwards 0002.
X Fold out lower plate 0003.
X Guide the lugs on the lower plate fully into
the openings in base plate 0023.Securing the vehicle on level ground
X
On level ground: place chocks or other
suitable items under the front and rear of
the wheel that is diagonally opposite the
wheel you wish to change. Securing the vehicle on slight downhill gradients X
On downhill gradients: place chocks or
other suitable items in front of the wheels
of the front and rear axle.
Raising the vehicle G
WARNING
If you do not position the jack correctly at the
appropriate jacking point of the vehicle, the
jack could tip over with the vehicle raised.
There is a risk of injury.
Only position the jack at the appropriate
jacking point of the vehicle. The base of the
jack must be positioned vertically, directly
under the jacking point of the vehicle.
The following must be observed when raising
the vehicle:
R to raise the vehicle, only use the vehicle-
specific jack that has been tested and
approved by Mercedes-Benz. If used
incorrectly, the jack could tip over with the
vehicle raised.
R the jack is designed only to raise and hold
the vehicle for a short time while a wheel
is being changed .Itis not suited for
performing maintenance work under the
vehicle.
R avoid changing the wheel on uphill and
downhill slopes.
R before raising the vehicle, secure it from
rolling away by applying the parking brake
and inserting wheel chocks. Never
disengage the parking brake while the
vehicle is raised.
R the jack must be placed on a firm, flat and
non-slip surface. On a loose surface, a
large, load-bearing underlay must be used.
On a slippery surface, a non-slip underlay
must be used, e.g. rubber mats.
R do not use wooden blocks or similar
objects as a jack underlay.O therwise, the
jac kw ill not be able to achieve its load-
bearing capacity due to the restricted
height. Flat tire
277Breakdown assistance Z