2012 MERCEDES-BENZ SLK55AMG warning
[x] Cancel search: warningPage 241 of 334

approximately one minute and then remain continuously illuminated. This sequence will be
repeated every time the vehicle is started as long as the malfunctio nexists. Whe nthe malfunction
indicator is illuminated, the system may not be able to detect or signal low tire pressure as
intended.
TPMS malfunctions may occur for a variety of reasons, including the installation of incompatible
replacement or alternate tires or wheels on the vehicle that prevent the TPMS from functioning
properly. Always check the TPMS malfunction telltale after replacing one or more tires or wheels
on your vehicle to ensure that the replacement or alternate tires and wheels allow the TPMS to
continue to function properly. Warning and indicator lamps in the instrument cluster
239On-board computer and displays Z
Page 244 of 334

Useful information
i This Operator's Manual describes all
models and all standard and optional
equipment of your vehicle available at the
time of publication of the Operator's
Manual. Country-specific differences are
possible. Please note that your vehicle may
not be equipped with all features
described. This also applies to safety-
related systems and functions.
i Please read the information on qualified
specialist workshops (Y page 23).Stowage areas
Stowage compartments
Important safety notes G
WARNING
To help avoid personal injury during a collision
or sudden maneuver, exercise care when
storing objects in the vehicle. Put luggage or
cargo in the trun kifpossible.
Keep compartment lids closed. This will help
to prevent stored objects from being thrown
about and injuring vehicle occupants during
R braking
R vehicle maneuvers
R an accident
Stowage compartments in the front Glove box
i
The glove box flap contains brackets for
coins, pens, and credit and service cards. X
To open: pull handle 0002and open glove box
flap 0003.
X To close: fold glove box flap 0003upwards
until it engages.
The glove box can be locked and unlocked
using the key (Y page 68) or using the
mechanical key. X
To lock: insert the mechanical key into the
lock and turn it 90° clockwise to position
0006.
X To unlock: insert the mechanical key into
the lock and turn it 90° counter-clockwise
to position 0005.242
Stowage areasStowage and features
Page 246 of 334

Stowage compartments in the doors
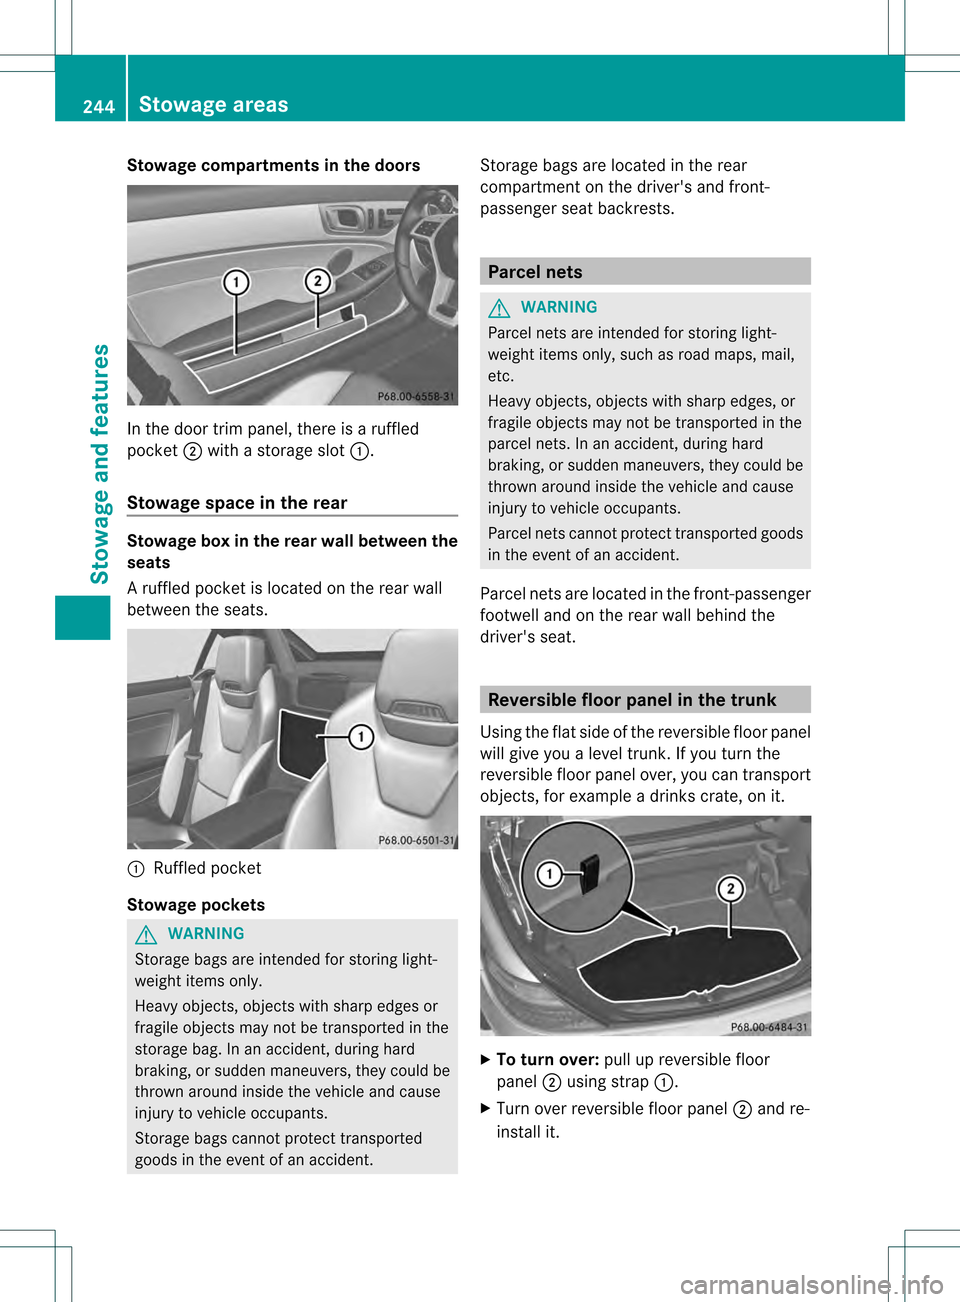
In the door trim panel, there is a ruffled
pocket
0003with a storage slot 0002.
Stowage space in the rear Stowage box in the rear wall between the
seats
Ar
uffled pocke tis located on the rear wall
between the seats. 0002
Ruffled pocket
Stowage pockets G
WARNING
Storage bags are intended for storing light-
weight items only.
Heavy objects, objects with sharp edges or
fragile objects may not be transported in the
storage bag. In an accident, during hard
braking, or sudden maneuvers, they could be
thrown around inside the vehicle and cause
injury to vehicle occupants.
Storage bags cannot protect transported
goods in the event of an accident. Storage bags are located in the rear
compartment on the driver's and front-
passenger seat backrests. Parcel nets
G
WARNING
Parcel nets are intended for storing light-
weight items only, such as road maps, mail,
etc.
Heavy objects, objects with sharp edges, or
fragile objects may not be transported in the
parcel nets. In an accident, during hard
braking, or sudden maneuvers, they could be
thrown around inside the vehicle and cause
injury to vehicle occupants.
Parcel nets cannot protect transported goods
in the event of an accident.
Parcel nets are located in the front-passenger
footwell and on the rear wall behind the
driver's seat. Reversible floor panel in the trunk
Using the flat side of the reversible floor panel
will give you alevel trunk. If you turn the
reversible floor panel over, you can transport
objects, for example a drinks crate, on it. X
To turn over: pull up reversible floor
panel 0003using strap 0002.
X Turn over reversible floor panel 0003and re-
install it. 244
Stowage areasStowage and features
Page 247 of 334

Attached to the reversible floor panel are two
flexible straps 0003thatyou can use to secure
objects, for example draft stop 0023when
reversible floor panel 0002has been turned
over. Roof carrier
Important safety notes !
This vehicle is not designed to transport
items on the roof. Roof carriers and other
devices which are mounted on the roof that
have not been specifically approved for this
model by Mercedes-Benz must not be used
as they could damage the vehicle and the
retractable hardtop (vario-roof).
At the time of going to print, Mercedes-
Benz does not offer any roof carrier or other
roof-installed devices for this model.
! This vehicle is not designed to transport
any items on the trunk lid or to allow
luggage carriers or equipment of any kind
to be installed to the trunk lid. Otherwise
the vehicle and the retractable hardtop
could be damaged. Features
Cup holders
Important safety notes G
WARNING
In order to help prevent spilling liquids on
vehicle occupants and/or vehicle equipment,
only use containers that fit into the cup
holder. Use lids on open containers and do
not fill containers to aheight where the
contents, especially hot liquids, could spill
during braking, vehicle maneuvers, or in an
accident. Liquids spilled on vehicle occupants
may cause serious personal injury. Liquids
spilled on vehicle equipment may cause
damage not covered by the Mercedes-Benz
Limited Warranty.
When not in use, keep the cup holder closed.
An open cup holder may cause injury to you
or others when contacted during braking,
vehicle maneuvers, or in an accident.
Keep in mind that objects placed in the cup
holder may come loose during braking,
vehicle maneuvers, or in an accident and be
thrown around in the vehicle interior. Objects
thrown around in the vehicle interior may
cause an acciden tand/o rserious personal
injury.
Cup holder in the front-compartment
center console You can remove the cup holder insert for
cleaning. Clean with clear, lukewarm water
only. Features
245Stowage and features Z
Page 248 of 334

X
To open: slide cover 0003back.
X To remove the insert: slide catch0002
inwards on both sides in the direction of the
arrow.
X Remove the cup holde rinser tupwards.
X To re-install the insert: place the insert in
the stowage space.
X Slide catch 0002outwards in the direction of
the arrow until it engages. Bottle holder
G
WARNING
Do not transport heavy, sharp-edged, or
fragile bottles in the bottle holder.
In the event of an accident, the bottle holder
cannot secure a bottle sufficiently. You and/
or vehicle occupants could be injured.
! Make sure that any bottles weighing more
than 0.5 kg that are stored in the bottle
holder rest on the vehicle floor. The bottle
holder could otherwise be damaged.
The bottle holder is designed for bottles with
a capacity of 25 fl. oz. (0.7 l) up to 54 fl. oz.
(1.5 l).
The bottle holder does not secure the bottles;
it merely prevents them from tipping over. X
Press the outer edge of button 0002and slide
in the direction of the arrow until the bottle
fits into the opening.
X Insert the bottle into the bottle holder. Sun visors
Overview of sun visors G
WARNING
Do not use the vanity mirror while driving.
Keep the vanity mirrors in the sun visors
closed while the vehicle is in motion.
Reflected glare can endanger you and others. 0002
Mirror light
0003 Bracket
0023 Retaining strip, e.g. for a car park ticket
0022 Vanity mirror
0020 Mirror cover
i When driving at high speeds with the side
window or roof open:
If you have inserted a car park ticket into
retaining strip 0023, make sure that it is not
blown away by the wind.
Vanity mirror in the sun visor Mirror light
0002only functions if the sun visor
is clipped into retainer 0003and mirror cover
0020 has been folded up.
Glare from the side X
Fold down the sun visor.
X Pull the sun visor out of retainer 0003.
X Swing the sun visor to the side.
X Slide the sun visor forwards and back as
required. 246
FeaturesStowage and features
Page 249 of 334

Ashtray
Ashtray in the front-compartment
center console X
To open: press the lower area of cover 0002.
The cover opens.
X To remove the insert: lift insert0023
up 0003 and out.
X To re-install the insert: press insert0023
into the holder until it engages. Cigarette lighter
G
WARNING
When leaving the vehicle, always remove the
SmartKey from the ignition lock. Always take
the SmartKey with you and loc kthe vehicle.
Do not leave children unattended in the
vehicle, even if they are secured in a child
restraint system, or with access to an
unlocked vehicle. Achild's unsupervised
access to a vehicle could result in an accident
and/or serious personal injury. The children
could:
R injure themselves on parts of the vehicle
R be seriously or fatally injured through
excessive exposure to extreme heat or cold
R injure themselves or cause an accident with
vehicle equipment that can be operated
even if the SmartKey is removed from the
ignition lock or removed from the vehicle,
such as seat adjustment, steering wheel
adjustment, or the memory function If children open a door, they could injure other
persons or get out of the vehicle and injure
themselves or be injured by following traffic.
Do not expose the child restraint system to
direct sunlight. The child restraint system's
metal parts, for example, could become very
hot, and the child could be burned on these
parts. G
WARNING
Never touch the heating element or sides of
the lighter; they are extremely hot. Hold the
knob only.
Make sure any children traveling with you do
not injure themselves or start a fire with the
hot cigarette lighter. X
Turn the SmartKey to position 2in the
ignition lock.
X To open: push the lower section of
cover 0002.
The ashtray opens.
X Press in cigarette lighter 0003.
Cigarette lighter 0003will pop out
automatically when the heating element is
red-hot. 12
Vsockets
Points to observe before use !
If you are using all sockets in the vehicle,
make sure that you do no texceed the
maximum current dra wof 55 A. Otherwise,
you will overload the fuses. Features
247Stowage and features Z
Page 251 of 334

The mbrace system is available if:
R
it has been activated and is operational.
R the corresponding mobile phone network
is available for transmitting data to the
Customer Center.
R a service subscription is available.
R the starter battery is sufficiently charged.
i Determining the location of the vehicle on
a map is only possible if there is sufficient
GPS reception and the vehicle position can
be forwarded to the Customer Center.
The mbrace system The mbrace system provides different
services, e.g.:
R
automatic and manual emergency call
R Roadside Assistance call
R MB Info call
To adjust the volume during an mbrace call,
proceed as follows:
X Press the 000Aor000B button on the
multifunction steering wheel.
or
X Use the volume controller of the audio
system/COMAND.
You can find further information and a
description of all available features under
"Owners Online" at http://
www.mbusa.com 16
.
System self-test After you have switched on the ignition, the
system carries out a self-diagnosis. G
WARNING
Am alfunction in the system has been
detected if one of the following conditions
occurs:
R the indicator lamp in the SOS button does
no tlight up during the system self-
diagnosis.
R the indicator lamp in the 0005Roadside
Assistance button does not light up during
the system self-diagnosis.
R The indicator lamp in the 0007information
button does not light up during self-
diagnosis of the system.
R the indicator lamp in the SOS button,
0005 Roadside Assistance button or 0007
information button continues to be lit red
after the system self-diagnosis.
R The Tele Aid Inoperative or
Tele Aid
Not Activated message appears in the
multifunction display after the system self-
test.
If a malfunction is indicated as outlined above,
the system may not operate as expected. In
the even tofanemergency, assistance must
be summoned by other means.
Have the system checked at the nearest
authorized Mercedes-Benz Center or contact
the following service hotlines:
R USA: Mercedes-Benz Customer Assistance
Center under
1-800-FOR-MERCedes(1-800-367-6372)
or 1-888-990-9007
R Canada: Customer Service at
1-888-923-8367
Emergency call Important safety notes
!
Alicense agreement must exis tinorder
to activate the mbrace service. Ensure that
yours ystem is activated and ready fo ruse,
and press the 0007MB Info call button to
register. If any of the steps mentioned is
16 USA only. Features
249Stowage and features Z
Page 252 of 334

not carried out, the system may not be
activated.
If you have questions abou
tthe activation,
contact one of the following telephone
assistance services:
R USA: Mercedes-Ben zCustomer
Assistance Cente runder
1-800-FOR-MERCedes
(1-800-367-6372) or 1-888-990-9007
R Canada: Customer Service at
1-888-923-8367
An emergency call is dialed automatically if
an ai rbag or Emergency Tensioning Device is
triggered.
i An mbrace emergency call that has been
initiated automatically canno tbe
terminated by the customer.
An emergency call can also be initiated
manually.
As soon as the emergency call has been
initiated, the indicator lamp in the SOS button
flashes. The Connecting Call message
appears on the multifunctio ndisplay.
The audio output is muted.
Once a connection has been established, the
Call Connected message appears in the
multifunction display.
All important information on the emergency
is transmitted, for example:
R current location of the vehicle (as
determined by the GPS system)
R vehicle identification number
R information on the type of emergency
Shortly after the emergency call has been
initiated, a voice connection is automatically
established between the Mercedes-Benz
Customer Assistance Center and the vehicle
occupants. If the vehicle occupants respond,
the Mercedes-Ben zCustome rAssistance
Center attempts to get more information on
the emergency.
i If there is no response from the vehicle
occupants, an ambulance is immediately
sent to the vehicle. G
WARNING
If the indicator lamp in the SOS button is
flashing continuously and there was no voice
connection to the Response Center
established, then the mbrace system could
not initiate an emergency call (e.g. the
relevant cellularp hone network is not
available).
The message Call Failed appears in the
multifunction display for approximately
10 seconds.
Should this occur, assistance must be
summoned by other means.
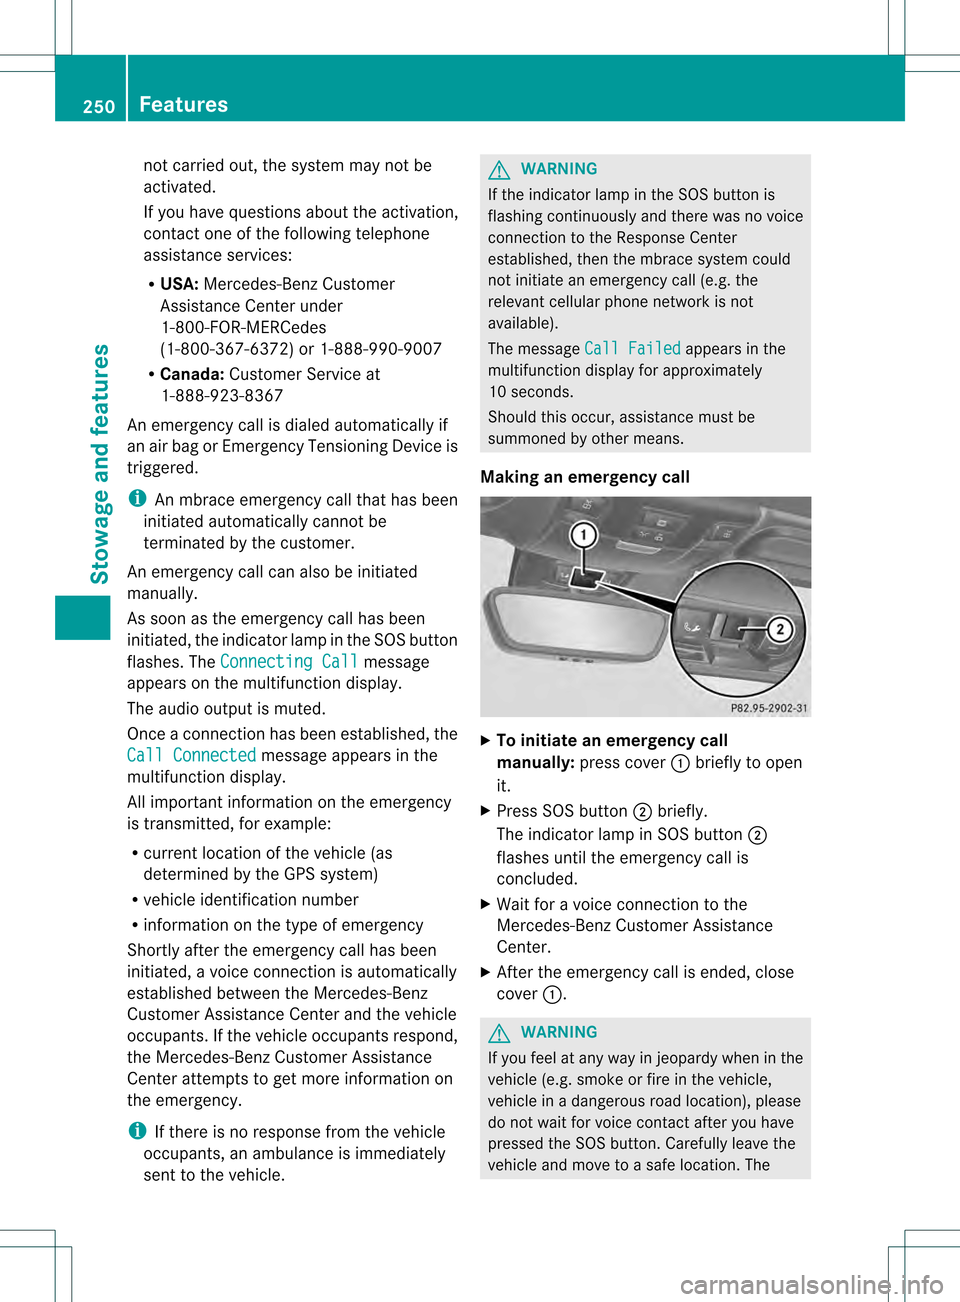
Making an emergency call X
To initiate an emergency call
manually: press cover 0002briefly to open
it.
X Press SOS button 0003briefly.
The indicator lamp in SOS button 0003
flashes until the emergency call is
concluded.
X Wait for a voice connection to the
Mercedes-Ben zCustome rAssistance
Center.
X After the emergency call is ended, close
cover 0002. G
WARNING
If you feel at any way in jeopardy when in the
vehicle (e.g. smoke or fire in the vehicle,
vehicle in a dangerous road location), please
do not wait for voice contact after you have
pressed the SOS button. Carefully leave the
vehicle and move to a safe location. The 250
FeaturesStowage and features