2012 MERCEDES-BENZ SLK350 reset
[x] Cancel search: resetPage 162 of 334
too late. This could cause an accident in which
you and/or others could be injured.
G
WARNING
The "Resume" functio nshould only be
operated if the driver is fully aware of the
previously set speed and wishes to resume
this particular preset speed. G
WARNING
Your undivided attention to street and traffic
conditions is necessary at all times whether
DISTRONIC PLUS is active or not.
The use of DISTRONIC PLUS can be
dangerous on winding roads or in heavy traffic
because conditions do not allow safe driving
at a constant speed.
DISTRONIC PLUS does not react to stationary
objects on the road (for example, a vehicle
stopped in traffic or an abandoned vehicle).
DISTRONIC PLUS likewise does not react to
oncoming vehicles.
Deactivate DISTRONIC PLUS:
R when changing to the right lane, if the
vehicles in the left lane are driving slower
R when driving into a filter lane or an
expressway exit
R in complex driving situations, for example
in construction sites on an expressway
In these situations DISTRONIC PLUS will
maintain the set speed if it is not deactivated.
DISTRONIC PLUS is intended only for
maintaining a set speed and a set distance
from the objects moving in front of the
vehicle. G
WARNING
An intermittent warning sounds and the
distance warning lamp 000Cin the instrument
cluster is illuminated if the DISTRONIC PLUS
system calculates that the distance to the
vehicle ahead and your vehicle's current
speed indicate that the DISTRONIC PLUS will
not be capable of slowing the vehicle
sufficiently to maintain the preset following distance, which creates a danger of a
collision.
Immediately brake the vehicle to increase
your distance to the preceding vehicle. The
warning sound is intended as a final caution
in which you should intercede with your own
braking inputs to avoid a potentially
dangerous situation. Do not wait for the
operation of the warning signal to intercede
with your own braking. This will result in
potentially dangerous emergency braking
which will not always result in an impact being
avoided.
Tailgating increases the risk of an accident.
G
WARNING
DISTRONIC PLUS brakes your vehicle with a
maximum deceleration of 13 ft/s 2
(4 m/s 2
).
This corresponds to approximately 40% of
your vehicle's maximum braking force.
To avoid a collision, you must apply the brakes
yourself. DISTRONIC PLUS brakes the vehicle
just enough to restore the preset speed or the
preset distance to the vehicle in front. G
WARNING
If you do not receive visual or acoustic
warning signals during a critical traffic
situation, DISTRONIC PLUS has either not
recognized the collision risk, has been
deactivated or is malfunctioning.
Remember, whether or not DISTRONIC PLUS
is operating, it is ultimately always the drivers
responsibility to apply the brakes in order to
control the vehicle and avoid a collision. 160
Driving systemsDriving and parking
Page 166 of 334

press the cruise control lever up
0002or
down 0003to the pressure point.
The last speed stored is increased or
decreased every time the cruise control
lever is pushed up 0002or down 0003.
X To adjust the speed in 5 mph
increments (10 km/h increments):
briefly press the cruise control lever
up 0002 or down 0003beyond the pressure
point.
The last speed stored is increased or
decreased every time the cruise control
lever is pushed up 0002or down 0003.
i DISTRONIC PLUS is not deactivated if you
depress the accelerator pedal. If you
accelerate to overtake, DISTRONIC PLUS
adjusts the vehicle's speed to the last
speed stored after you have finished
overtaking.
Storing the current speed or calling up
a stored speed G
WARNING
The set speed stored in memory should only
be set again if prevailing road conditions and
legal speed limits permit .Possible
acceleration or deceleration differences
arising from returning to the preset speed
could cause an accident and/or serious injury
to you and others.
X Briefly pull the cruise control lever towards
you 0022.
X Remove your foot from the accelerator
pedal.
DISTRONIC PLUS is activated. The first
time it is activated, the current speed is
stored. Otherwise, it sets the vehicle cruise
speed to the previously stored value.
Setting the specified minimum distance You can set the specified minimum distance
for DISTRONIC PLUS by varying the time span
between one and two seconds. With this
function, you can set the minimum distance that DISTRONIC PLUS keeps to the vehicle in
front, dependent on vehicle speed. You can
see this distance in the multifunction display
(Y page 165). G
WARNING
It is up to the driver to exercise discretion to
select the appropriate setting given road
conditions, traffic, driver's preferred driving
style and applicable laws and driving
recommendations for safe following distance. X
To increase: turn control0003in direction
0023.
DISTRONIC PLUS then maintains a greater
distance between your vehicle and the
vehicle in front.
X To decrease: turn control0003in
direction 0002.
DISTRONIC PLUS then maintains a shorter
distance between your vehicle and the
vehicle in front.
i Make sure that you maintain a sufficiently
safe distance from the vehicle in front.
Adjust the distance to the vehicle in front if
necessary. 164
Driving systemsDriving and parking
Page 179 of 334
R
if you are predominantly driving slower
than 50 mph (80 km/h) or faster than
112 mph (180 km/h)
R if you are currently using COMAND or
making a telephone call with it
R if the time has been set incorrectly
R in active driving situations, such as when
you change lanes or change your speed
Warning and display messages in the
multifunction display X
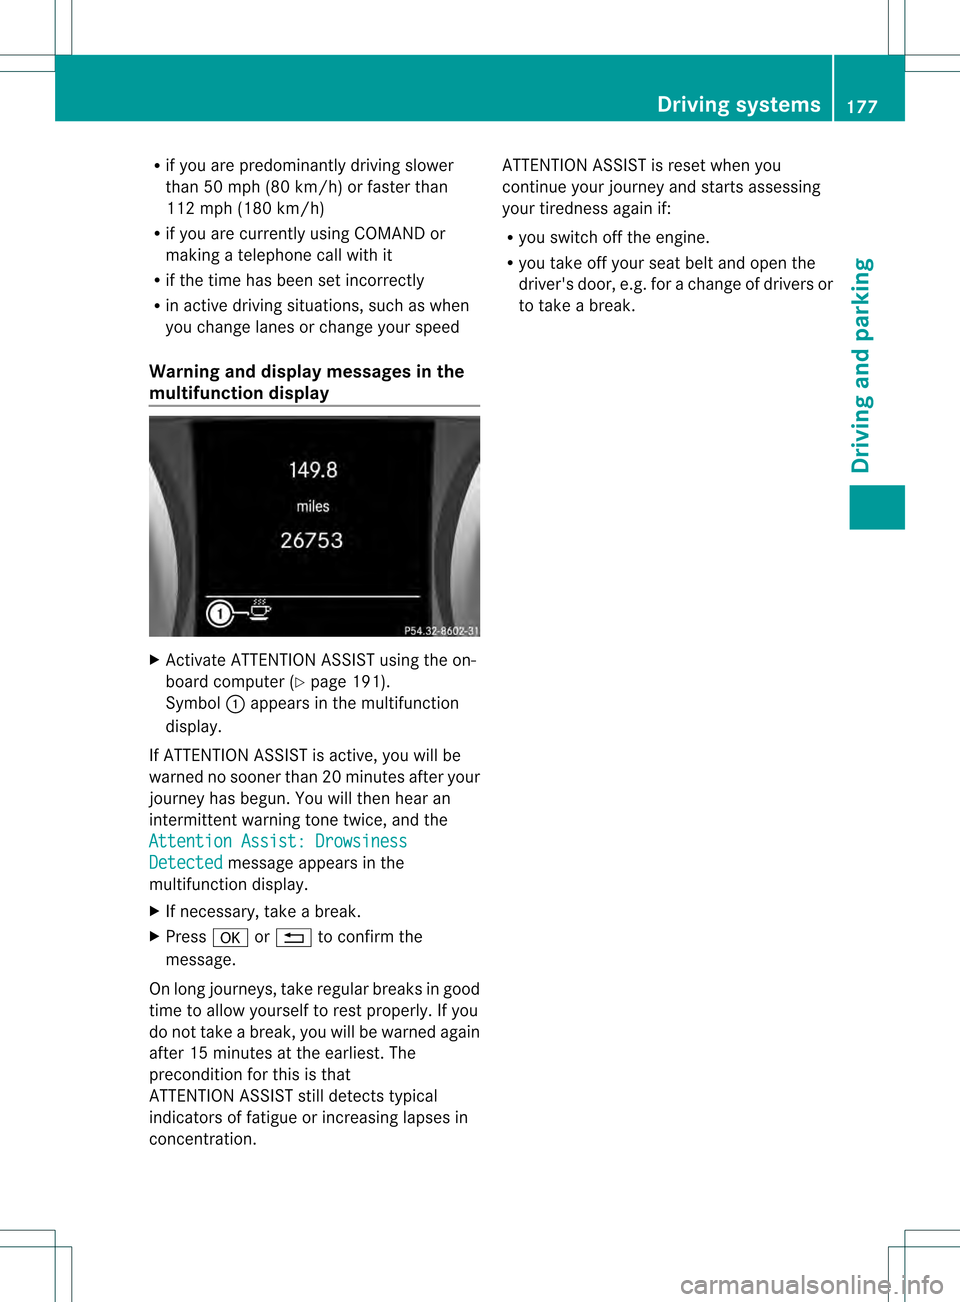
Activate ATTENTION ASSIST using the on-
board computer (Y page 191).
Symbol 0002appears in the multifunction
display.
If ATTENTION ASSIST is active, you will be
warned no sooner than 20 minutes after your
journey has begun. You will the nhear an
intermittent warning tonet wice, and the
Attention Assist: Drowsiness Detected message appears in the
multifunction display.
X If necessary, take a break.
X Press 000Cor0001 to confirm the
message.
On long journeys, take regular breaks in good
time to allow yourself to rest properly. If you
do not take a break, you will be warned again
after 15 minutes at the earliest. The
preconditio nfor this is that
ATTENTION ASSIST still detects typical
indicators of fatigue or increasing lapses in
concentration. ATTENTION ASSIST is reset when you
continue your journey and starts assessing
your tiredness again if:
R
you switch off the engine.
R you take off your seat belt and open the
driver's door, e.g. for a change of drivers or
to take a break. Driving systems
177Driving and parking Z
Page 187 of 334
Trip menu
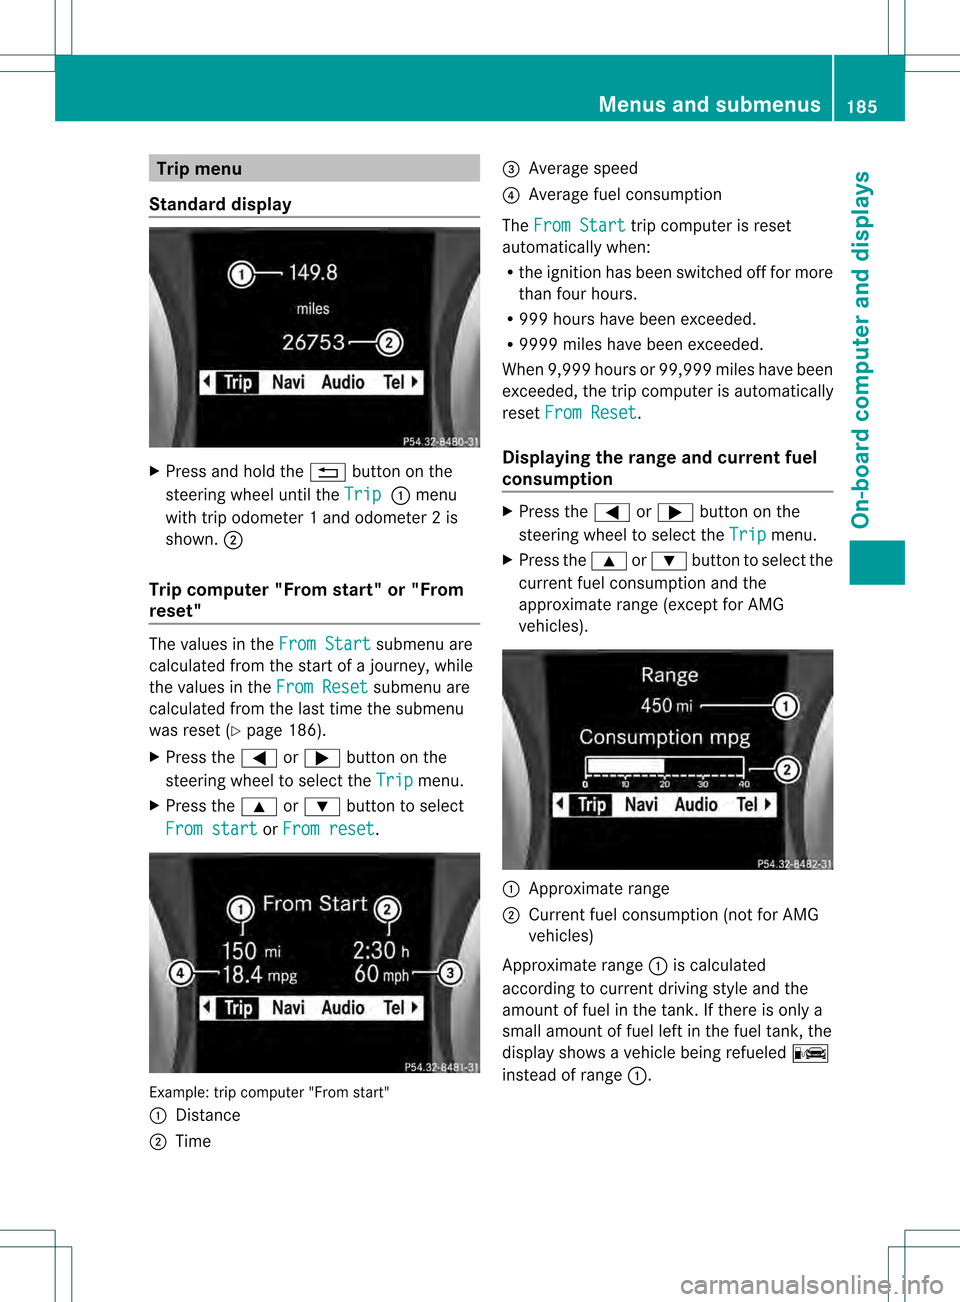
Standard display X
Press and hold the 0001button on the
steering wheel until the Trip 0002
menu
with trip odometer 1 and odometer 2 is
shown. 0003
Trip computer "From start" or "From
reset" The values in the
From Start submenu are
calculated fro mthe start of a journey, while
the values in the From Reset submenu are
calculated from the last time the submenu
was reset (Y page 186).
X Press the 0002or0005 button on the
steering wheel to select the Trip menu.
X Press the 0003or0004 button to select
From start or
From reset .
Example: trip computer "From start"
0002
Distance
0003 Time 0023
Average speed
0022 Average fuel consumption
The From Start trip computer is reset
automatically when:
R the ignition has been switched off for more
than four hours.
R 999 hours have been exceeded.
R 9999 miles have been exceeded.
When 9,999 hours or 99,999 miles have been
exceeded, the trip computer is automatically
reset From Reset .
Displaying the range and current fuel
consumption X
Press the 0002or0005 button on the
steering wheel to select the Trip menu.
X Press the 0003or0004 button to select the
current fuel consumption and the
approximate range (except for AMG
vehicles). 0002
Approximate range
0003 Current fuel consumption (not for AMG
vehicles)
Approximate range 0002is calculated
according to current driving style and the
amount of fuel in the tank. If there is only a
small amount of fuel left in the fuel tank, the
display shows a vehicle being refueled 0009
instead of range 0002. Menus and submenus
185On-board computer and displays Z
Page 188 of 334
Digital speedometer
X
Press the 0002or0005 button on the
steering wheel to selec tthe Trip menu.
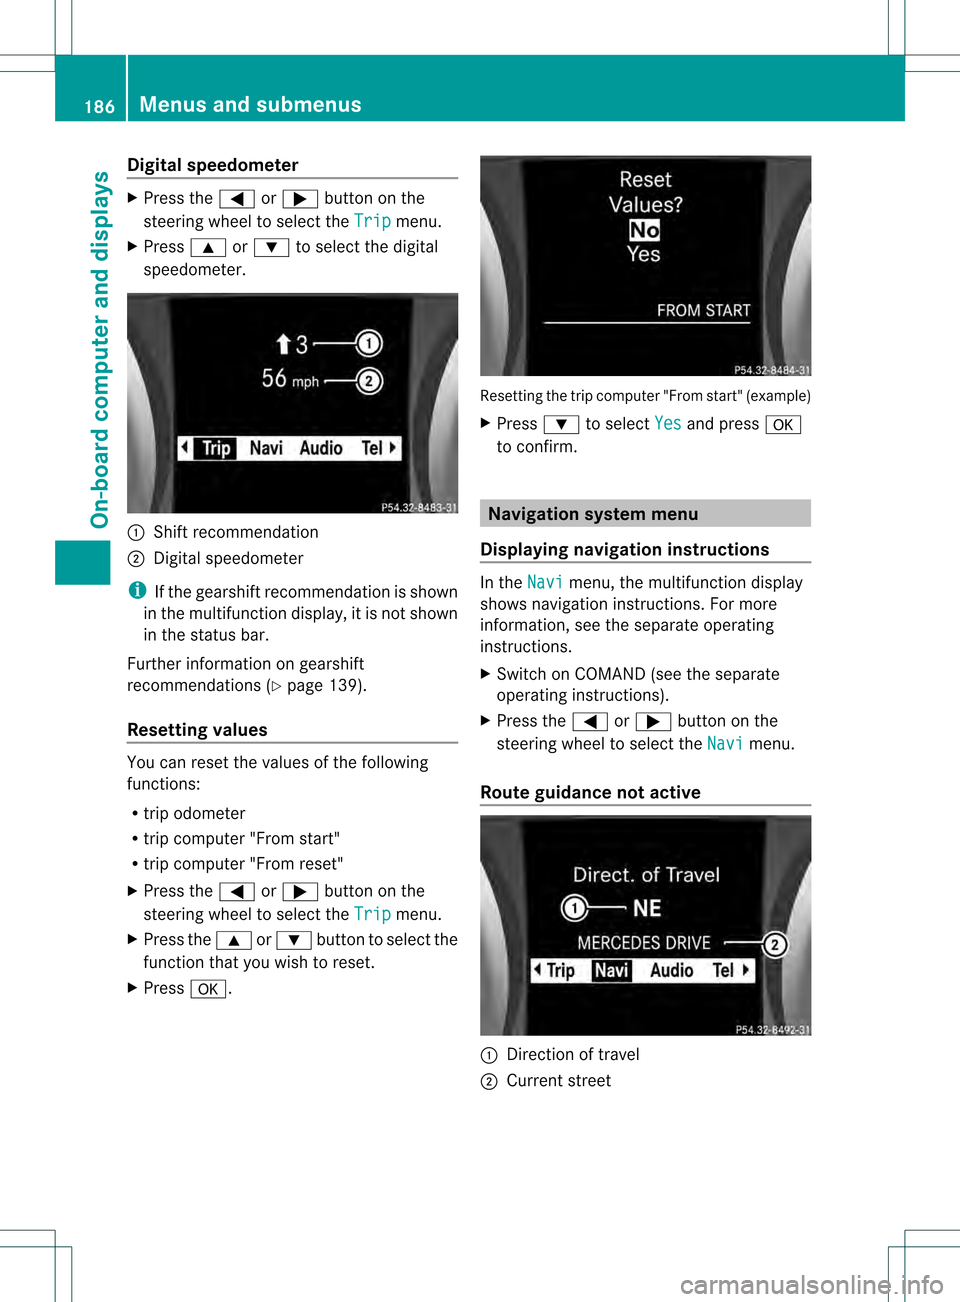
X Press 0003or0004 to select the digital
speedometer. 0002
Shift recommendation
0003 Digital speedometer
i If the gearshift recommendation is shown
in the multifunction display, it is not shown
in the status bar.
Further information on gearshift
recommendations (Y page 139).
Resetting values You can reset the values of the following
functions:
R
trip odometer
R trip computer "From start"
R trip computer "From reset"
X Press the 0002or0005 button on the
steering wheel to select the Trip menu.
X Press the 0003or0004 button to select the
function that you wish to reset.
X Press 000C. Resetting the trip computer "From start" (example)
X
Press 0004to select Yes and press
000C
to confirm. Navigation system menu
Displaying navigation instructions In the
Navi menu, the multifunction display
shows navigation instructions. For more
information, see the separate operating
instructions.
X Switch on COMAND (see the separate
operating instructions).
X Press the 0002or0005 button on the
steering wheel to select the Navi menu.
Route guidance not active 0002
Direction of travel
0003 Current street 186
Menus and submenusOn-board computer and displays
Page 197 of 334
X
Press the 0002or0005 button on the
steering wheel to select the Sett. menu.
X Press the 0004or0003 button to select the
Convenience submenu.
X Press 000Cto confirm.
X Press the 0004or0003 button to select the
Belt Adjustment function.
You will see the selected setting: on or
off .
X Press the 000Cbutton to save the setting.
Switching the fold-in mirrors when
locking feature is on/off
If you switch on the Fold Mirrors in when
Locking function, the exterior mirrors fold in
when you lock the vehicle. If you unlock the
vehicle and then open a door, the exterior
mirrors fold out again.
If you have switched the function on and you
fold the exterior mirrors in using the button
on the door (Y page 99), they will not fold out
automatically. The exterior mirrors can then
only be folded out using the button on the
door.
X Press the 0002or0005 button on the
steering wheel to select the Settingsmenu.
X Press the 0004or0003 button to select the
Convenience submenu.
X Press the 000Cbutton to confirm.
X Press the 0004or0003 button to select the
Fold mirrors in when locking: function.
You will see the selected setting:
Enabledor
Disabled .
X Press the 000Cbutton to save the setting.
Restoring the factory settings For safety reasons, the
Daytime RunningLights: function in the
Lights submenu is
only reset when the vehicle is stationary. X
Press the 0002or0005 button on the
steering wheel to select the Sett. menu.
X Press the 0004or0003 button to select the
Factory Setting submenu.
X Press the 000Cbutton to confirm.
The Reset All Settings? message
appears.
X Press the 0004or0003 button to select
No or
Yes .
X Press the 000Cbutton to confirm the
selection.
If you select Yes , the multifunction display
shows a confirmation message. AMG menu in AMG vehicles
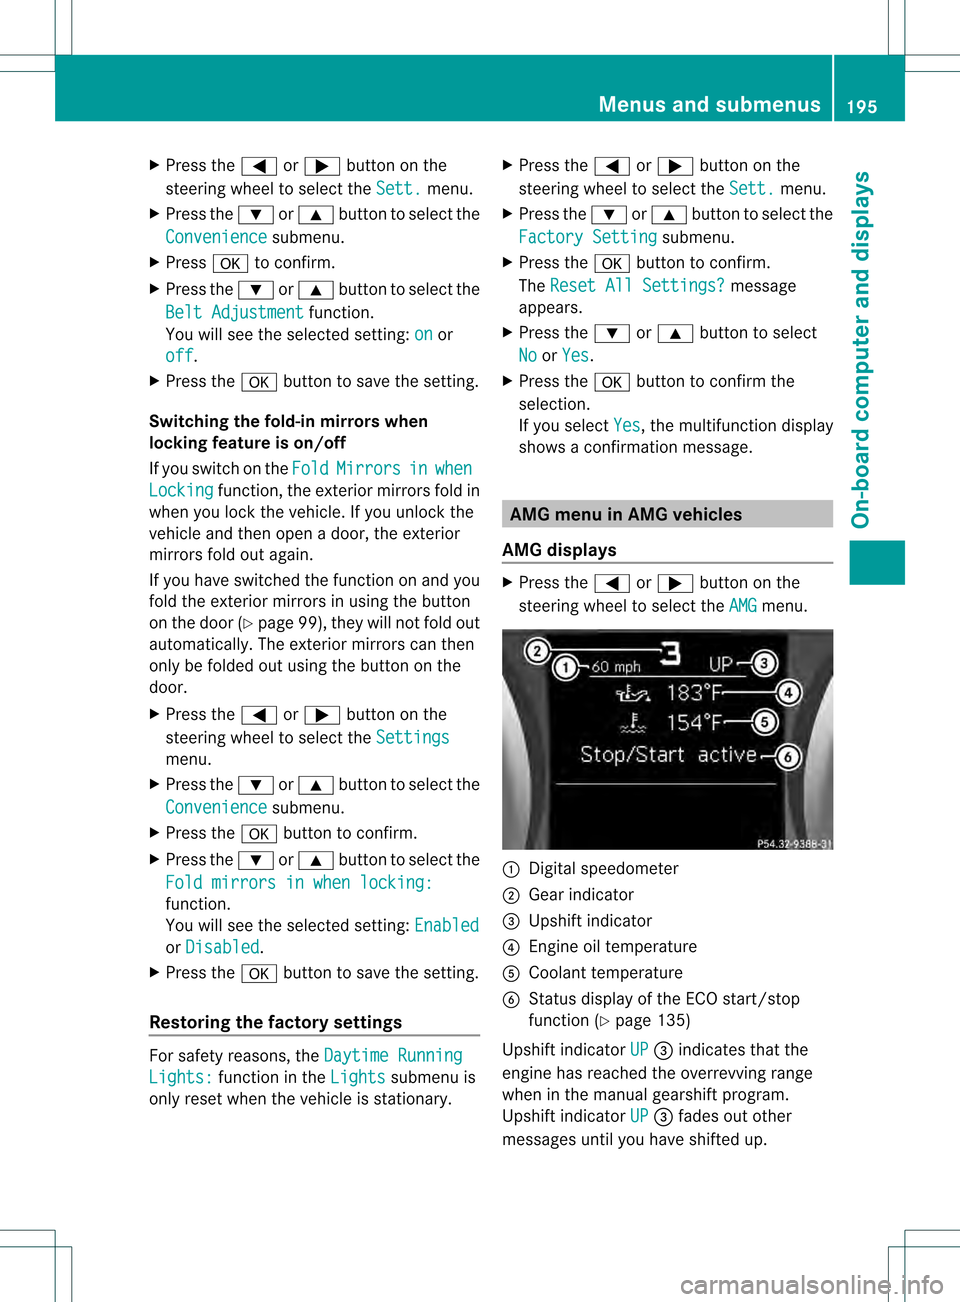
AMG displays X
Press the 0002or0005 button on the
steering wheel to select the AMG menu.
0002
Digital speedometer
0003 Gear indicator
0023 Upshift indicator
0022 Engine oil temperature
0020 Coolant temperature
0021 Status display of the ECO start/stop
function (Y page 135)
Upshift indicator UP 0023
indicates that the
engine has reached the overrevving range
when in the manual gearshift program.
Upshift indicator UP 0023
fades out other
messages until you have shifted up. Menus and submenus
195On-board computer and displays Z
Page 199 of 334
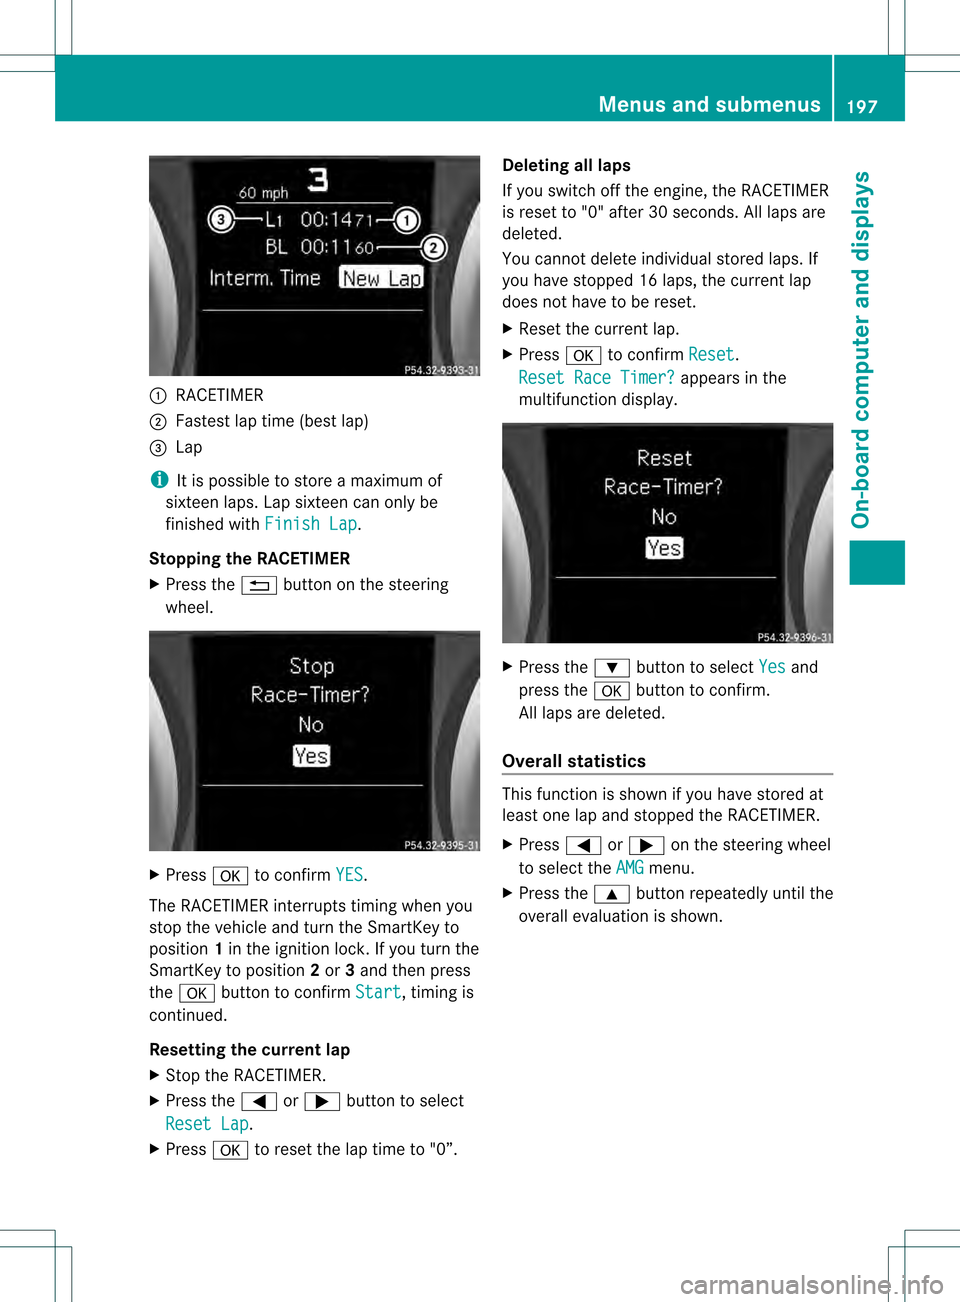
0002
RACETIMER
0003 Fastest lap time (bes tlap)
0023 Lap
i It is possible to store a maximum of
sixteen laps. Lap sixteen can only be
finished with Finish Lap .
Stopping the RACETIMER
X Press the 0001button on the steering
wheel. X
Press 000Cto confirm YES .
The RACETIMER interrupts timing when you
stop the vehicle and turn the SmartKey to
position 1in the ignition lock. If you turn the
SmartKey to position 2or 3and then press
the 000C button to confirm Start , timing is
continued.
Resetting the current lap
X Stop the RACETIMER.
X Press the 0002or0005 buttonto select
Reset Lap .
X Press 000Cto reset the lap time to "0”. Deleting all laps
If you switch off the engine, the RACETIMER
is reset to "0" after 30 seconds. All laps are
deleted.
You cannot delete individual stored laps. If
you have stopped 16 laps, the current lap
does not have to be reset.
X
Reset the current lap.
X Press 000Cto confirm Reset .
Reset Race Timer? appears in the
multifunction display. X
Press the 0004button to select Yes and
press the 000Cbutton to confirm.
All laps are deleted.
Overall statistics This function is shown if you have stored at
least one lap and stopped the RACETIMER.
X
Press 0002or0005 on the steering wheel
to select the AMG menu.
X Press the 0003button repeatedly until the
overall evaluation is shown. Menus and submenus
197On-board computer and displays Z
Page 266 of 334

immediately for leaks. Also chec
kthe
thickness of the brake linings. Visit a
qualified specialist workshop immediately.
Do not add brake fluid. This does not
correct the malfunction.
Only check the brake fluid level when the
vehicle is stationary and on a level surface. If the brake fluid level is between MIN
marking
0003and MAX marking 0002on the brake
fluid reservoir, it is correct. Maintenance
Service interval display
Service messages Information on the type of service and service
intervals (see separate Maintenance
Booklet).
You can obtain further information from an
authorized Mercedes-Ben
zCenter or at
http://www.mbusa.com (USA only).
The service interval display informs you of the
nexts ervice due date.
If a service due date has been exceeded, you
also hear an acoustic signal.
The multifunction display shows a service
message for a few seconds, e.g.
Next service A due in .. days Service A due
Service A overdue by ... days
The letter indicates which service is due.
Astands for a minor service and
B for a majorservice. A number or another letter may be
displayed after the letter. This figure indicates
any necessary additional maintenance work
to be performed.
You can obtain further information from an
authorized Mercedes-BenzC
enter.
The service interval display does not take into
accoun tany periods of time during which the
battery is disconnected.
Maintaining the time-dependent service
schedule:
X Note down the service due date displayed
in the multifunctio ndisplay before
disconnecting the battery.
or
X Subtract the battery disconnection periods
fro mt he service date shown on the display
after reconnecting the battery.
Hiding aservice message X
Press the 0001or000C button on the
steering wheel.
Displaying service messages X
Switch on the ignition.
X Press 0002or0005 on the steering wheel
to selec tthe Serv. menu.
X Press 0003or0004 to select the ASSYST PLUS submenu and press
000Cto confirm.
The service due date appears in the
multifunction display.
Please bear the following in mind Resetting service interval display
If the qualified specialist workshop, e.g. a
Mercedes-Ben
zCenter, carried out the
maintenance work, the service interval
display will be reset.
Further information, on maintenance for
example, can be obtained at an authorized
Mercedes-Benz Center or directly from
Mercedes-Benz. 264
MaintenanceMaintenance and care