2012 MERCEDES-BENZ SLK350 reset
[x] Cancel search: resetPage 84 of 334
X
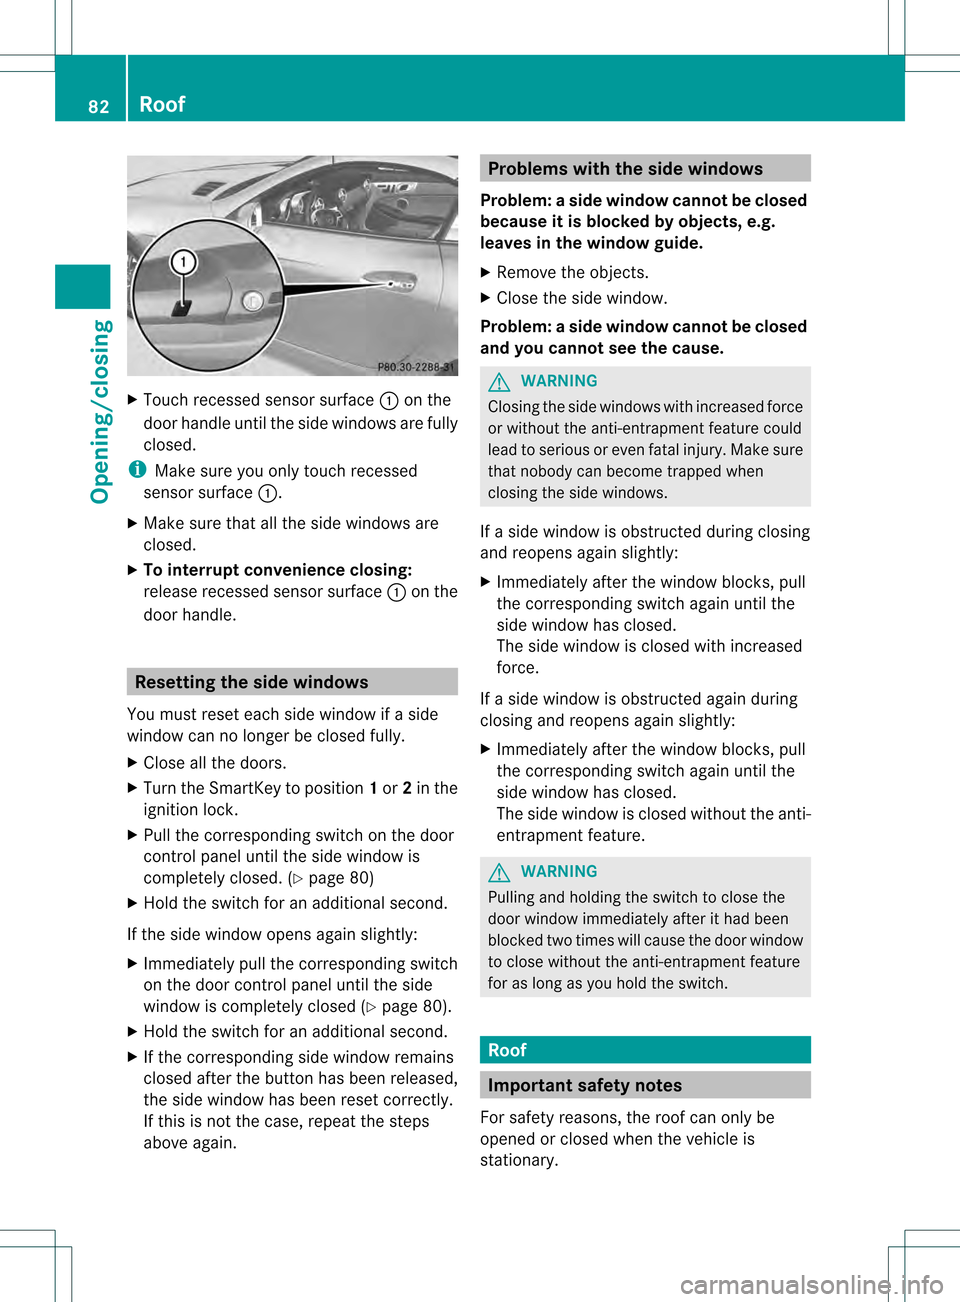
Touch recessed sensor surface 0002on the
door handle until the side windows are fully
closed.
i Make sure you only touch recessed
sensor surface 0002.
X Make sure that all the side windows are
closed.
X To interrupt convenience closing:
release recessed sensor surface 0002on the
door handle. Resetting the side windows
You must reset each side window if a side
window can no longer be closed fully.
X Close all the doors.
X Turn the SmartKey to position 1or 2in the
ignition lock.
X Pull the corresponding switch on the door
control panel until the side window is
completely closed. (Y page 80)
X Hold the switch for an additional second.
If the side window opens again slightly:
X Immediately pull the corresponding switch
on the door control panel until the side
window is completely closed (Y page 80).
X Hold the switch for an additional second.
X If the corresponding side window remains
closed after the button has been released,
the side window has been reset correctly.
If this is not the case, repeat the steps
above again. Problems with the side windows
Problem: aside window cannot be closed
because it is blocked by objects, e.g.
leaves in the window guide.
X Remove the objects.
X Close the side window.
Problem :aside window cannot be closed
and you cannot see the cause. G
WARNING
Closing the side windows with increased force
or without the anti-entrapment feature could
lead to serious or even fatal injury. Make sure
that nobody can become trapped when
closing the side windows.
If a side window is obstructed during closing
and reopens again slightly:
X Immediately afte rthe window blocks, pull
the corresponding switch again until the
side window has closed.
The side window is closed with increased
force.
If a side window is obstructed again during
closing and reopens again slightly:
X Immediately after the window blocks, pull
the corresponding switch again until the
side window has closed.
The side window is closed without the anti-
entrapment feature. G
WARNING
Pulling and holding the switch to close the
door window immediately after it had been
blocked two times will cause the door window
to close without the anti-entrapment feature
for as long as you hold the switch. Roof
Important safety notes
For safety reasons, the roof can only be
opened or closed when the vehicle is
stationary. 82
RoofOpening/closing
Page 96 of 334

!
To avoid damage to the seats and the seat
heating, observe the following information:
R do not spill any liquids on the seats. If
liquid is spilled on the seats, dry them as
soon as possible.
R if the seat covers are damp or wet, do not
switch on the seat heating. The seat
heating should also not to be used to dry
the seats.
R clean the seat covers as recommended;
see the "Interior care" section.
R do not transport heavy loads on the
seats. Do not place sharp objects on the
seat cushions, e.g. knives, nails or tools.
The seats should only be occupied by
passengers, if possible.
R when the seat heating is in operation, do
not cover the seats with insulating
materials, e.g. blankets, coats, bags,
seat covers, child seats or booster seats.
! Make sure that there are no objects in the
footwell or behind the seats when resetting
the seats. There is a risk that the seats
and/or the objects could be damaged.
i The head restraints are equipped with the
NECK-PRO system (Y page 47). For this
reason, it is not possible to remove the
head restraints from the seats.
For more information, contact a qualified
specialist workshop. Adjusting the seats manually Seat fore-and-aft adjustment
X
Lift handle 0002and slide the seat forwards
or backwards.
X Release lever 0002again.
Make sure that you hear the seat engage in
position.
Backrest angle X
Relieve the pressure on the backrest.
X Pull handle 0003and adjust the backrest to
the desired angle.
X Release handle 0003again.
The backrest must audibly engage.
Seat height X
Pull handle 0023upwards or push it down
repeatedly until the seat has reached the
desired height. Adjusting the seats electrically
0002
Backrest angle
0003 Seat fore-and-aft adjustment
0023 Seat cushion angle
0022 Seat height
i You can store the seat settings using the
memory function (Y page 100).94
SeatsSeats, steering wheel and mirrors
Page 102 of 334
incident light fro
mheadlamps strikes the
sensor in the rear-view mirror.
The mirrors do not go into anti-glare mode if
reverse gear is engaged or the interior lighting
is switched on. Parking position for the exterior
mirror on the front-passenger side
Setting and storing the parking position You can position the front-passenger side
exterior mirror in such a way that you can see
the rear wheel on that side as soon as you
engage reverse gear. You can store this
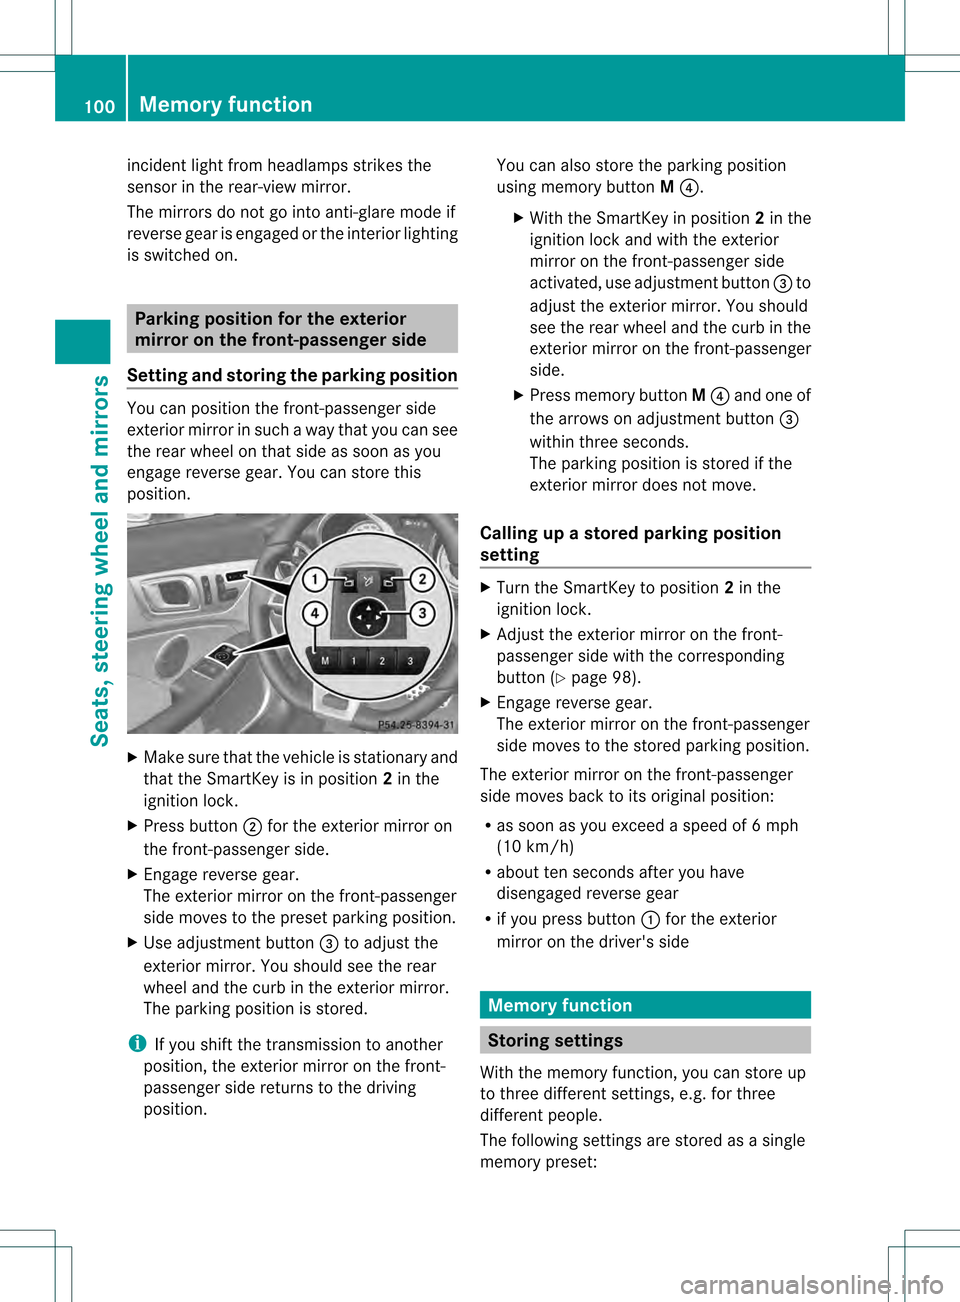
position. X
Make sure that the vehicle is stationary and
that the SmartKey is in position 2in the
ignition lock.
X Press button 0003for the exterior mirror on
the front-passenger side.
X Engage reverse gear.
The exterior mirror on the front-passenger
side moves to the preset parking position.
X Use adjustment button 0023to adjust the
exterior mirror .You should see the rear
wheel and the curb in the exterior mirror.
The parking position is stored.
i If you shift the transmission to another
position, the exterior mirror on the front-
passenger side returns to the driving
position. You can also store the parking position
using memory button
M0022.
X With the SmartKey in position 2in the
ignition lock and with the exterior
mirror on the front-passenger side
activated, use adjustmen tbutton 0023to
adjust the exterio rmirror. You should
see the rear wheel and the curb in the
exterior mirror on the front-passenger
side.
X Press memory button M0022 and one of
the arrows on adjustment button 0023
within three seconds.
The parking position is stored if the
exterior mirror does not move.
Calling up a stored parking position
setting X
Turn the SmartKey to position 2in the
ignition lock.
X Adjust the exterior mirror on the front-
passenger side with the corresponding
button (Y page 98).
X Engage reverse gear.
The exterior mirror on the front-passenger
side moves to the stored parking position.
The exterior mirror on the front-passenger
side moves back to its original position:
R as soon as you exceed a speed of 6mph
(10 km/h)
R about ten seconds after you have
disengaged reverse gear
R if you press button 0002for the exterior
mirror on the driver's side Memory function
Storing settings
With the memory function, you can store up
to three different settings, e.g. for three
differen tpeople.
The following settings are stored as a single
memory preset: 100
Memory functionSeats, steering wheel and mirrors
Page 103 of 334
R
seat and backrest position
R driver's side: steering wheel position
R driver's side: position of the exterior
mirrors on the driver's and front-passenger
sides G
WARNING
Do not activate the memory function while
driving. Activating the memory function while
driving could cause the driver to lose control
of the vehicle. X
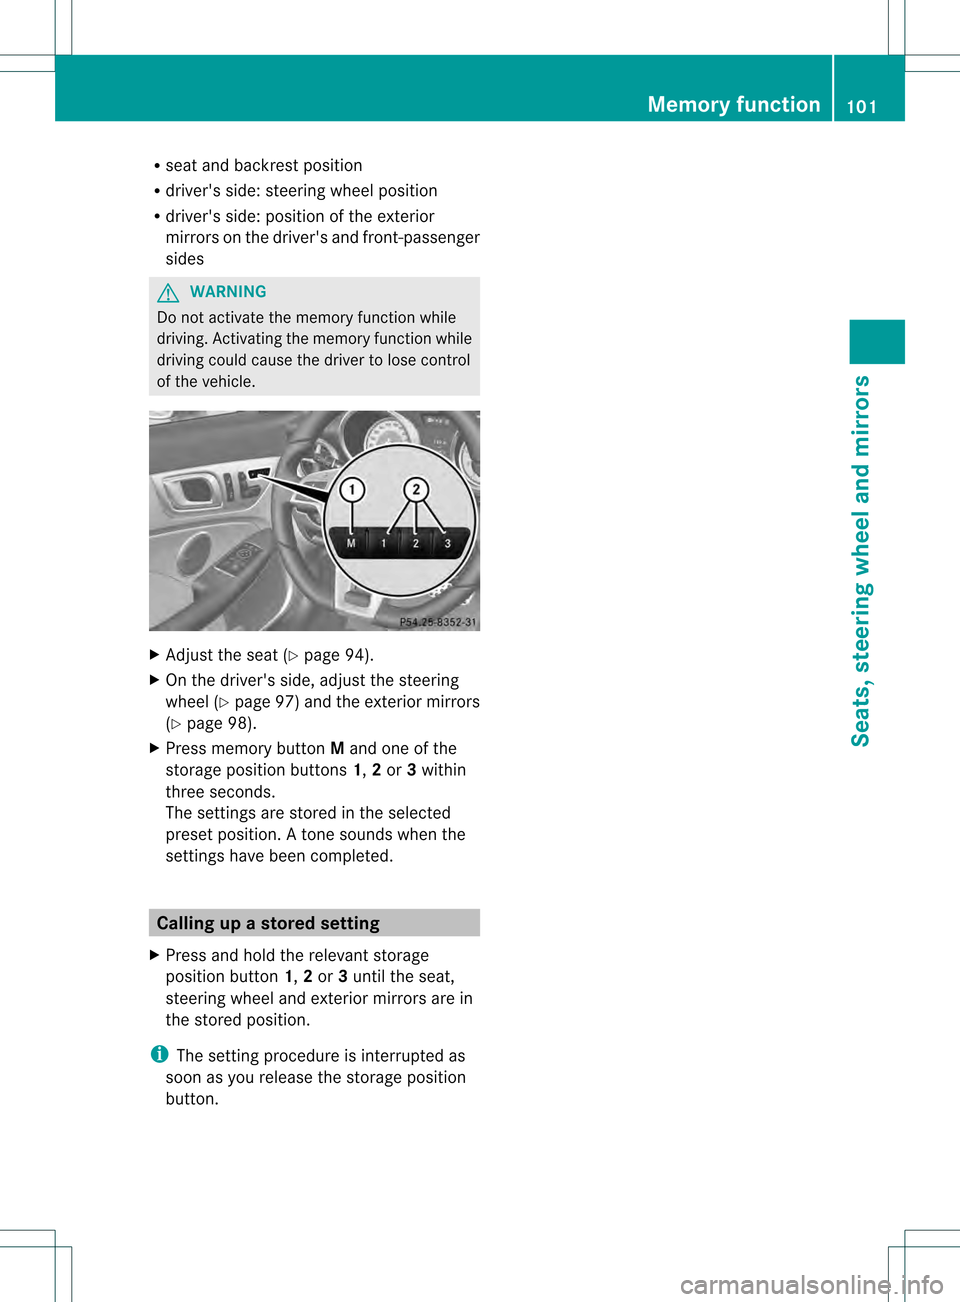
Adjust the seat (Y page 94).
X On the driver's side, adjust the steering
wheel (Y page 97) and the exterior mirrors
(Y page 98).
X Press memory button Mand one of the
storage position buttons 1,2or 3within
three seconds.
The settings are stored in the selected
preset position. Atone sounds when the
settings have been completed. Calling up
astore dsetting
X Press and hold the relevant storage
position button 1,2or 3until the seat,
steering wheel and exterio rmirrors are in
the stored position.
i The setting procedure is interrupted as
soon as you release the storage position
button. Memory function
101Seats, steering wheel and mirrors Z
Page 109 of 334

X
Press the 000Cbutton.
The yellow 000Cindicator lamp in the
instrument cluster lights up.
X To switch off the rear fog lamp: press the
000C button.
The yellow 000Cindicator lamp in the
instrument cluster goes out.
i If you switch the engine off (SmartKey in
position 1in the ignition lock) and then
restart it, the previous rear fog lamp
settings are restored.
Headlam pcleaning system If the "Wipe with washer fluid" function is
operated five times (Y
page 113) while the
lights are on and the engine is running, the
headlamps are cleaned automatically. When
you switch off the ignition, the automatic
headlamp cleaning syste mis reset and
counting is resumed from 0. Combination switch
Turn signals 0002
High-beam headlamps
0003 Right turn signal
0023 High-beam flasher
0022 Left turn signal X
To indicate briefly: press the combination
switch briefly to the pressure point in the
direction of arrow 0003or0022.
The corresponding turn signal flashes three
times.
X To indicate: press the combination switch
beyond the pressure point in the direction
of arrow 0003or0022.
High-beam headlamps X
To switch on the high-beam headlamps:
turn the SmartKey in the ignition lock to
position 2or start the engine.
X Turn the light switch to 0009or0008 or
0005.
X Press the combination switch beyond the
pressure point in the direction of
arrow 0002.
In the 0008or0005 position, the high-
beam headlamps are only switched on
when it is dark and the engine is running.
The 0008 indicator lamp in the instrument
cluster lights up when the high-beam
headlamps are switched on.
X To switch off the high-beam
headlamps: move the combination switch
back to its normal position.
The 0008 indicator lamp in the instrument
cluster goes out.
High-beam flasher X
To switch on: turn the SmartKey in the
ignition lock to position 1or 2or start the
engine.
X Pull the combination switch in the direction
of arrow 0023. Exterior lighting
107Lights and windshield wipers Z
Page 158 of 334

control. Your vehicle's ABS will not prevent
this type of loss of control.
Drive particularly carefully on slippery road
surfaces. Avoid sudde nacceleration, steering
and braking maneuvers. Do not use cruise
control.
If the vehicle threatens to skid or cannot be
stopped when moving at low speed:
X Vehicles with manual transmission:
shift to neutral.
X Vehicles with automatic transmission:
shift the transmissio nto position N.
i For more information on driving with
snow chains, see (Y page 297).G
WARNING
Make sure that you do not endanger other
road users when you apply the brakes. Driving systems
Cruise control
Important safety notes Cruise control maintains a constant road
speed for you. It brakes automatically in order
to avoid exceeding the set speed. You must
select a low gear in good time on long and
steep downhill gradients, especially if the
vehicle is laden. Select shift range 1,2or 3
on vehicles with automatic transmission in
order to use the engine's braking effect,
which relieves the load on the brake system
and prevents the brakes from overheating
and wearing too quickly.
Use cruise control only if road and traffic
conditions make it appropriate to maintain a
steady speed for a prolonged period. You can
store any road speed above 20 mph
(30 km/h). G
WARNING
The cruise control is a convenience system
designed to assist the driver during vehicle operation. The driver is and must always
remain responsible for the vehicle's speed
and for safe brake operation.
Only use the cruise control if the road, traffic,
and weather conditions make it advisable to
travel at a constant speed.
R
The use of the cruise control can be
dangerous on winding roads or in heavy
traffic because conditions do not allow safe
driving at a constant speed.
R The use of the cruise control can be
dangerous on slippery roads. Rapid
changes in tire traction can result in wheel
spin and loss of control.
R Deactivate the cruise control when driving
in fog.
The "Resume" function should only be
operated if the driver is fully aware of the
previously set speed and wishes to resume
this particular preset speed.
Cruise control lever 0002
To activate or increase speed
0003 To activate or reduce speed
0023 To deactivate cruise control
0022 To activate at the current speed/last
stored speed
When you activate cruise control, the stored
speed is shown in the multifunction display
for five seconds. After that, it is permanently
shown in the status indicator:
R USA only: e.g., CRUISE 55Miles R
Canada only: e.g. 001090 Km/h156
Driving systemsDriving and parking
Page 159 of 334
Storing and maintaining the current
speed
You can store the current speed if you are
driving faster than 20 mph (30 km/h).
X Accelerate the vehicle to the desired
speed.
X Briefly press the cruise control lever
up 0002 or down 0003.
X Remove your foot from the accelerator
pedal.
Cruise control is activated. The vehicle
automatically maintains the stored speed.
i Cruise control may be unable to maintain
the stored speed on uphill gradients. The
stored speed is resumed when the gradient
evens out. Cruise control maintains the
stored speed on downhill gradients by
automatically applying the brakes.
i Vehicles with manual transmission:
R Always drive at adequate, but not
excessive, engine speeds.
R Change gear in good time.
R If possible, do not shift down several
gears at a time.
Storing the current speed or calling up
the last stored speed G
WARNING
The set speed stored in memory should only
be set again if prevailing road conditions and
legal speed limits permit. Possible
acceleration or deceleration differences
arising from returning to the preset speed
could cause an accident and/or serious injury
to you and others.
X Briefly pull the cruise control lever towards
you 0022.
X Remove your foot from the accelerator
pedal.
The first time cruise control is activated, it
stores the current speed or regulates the speed of the vehicle to the previously
stored speed.
Setting aspeed G
WARNING
Keep in mind tha titmay take a brie fmoment
until the vehicle has made the necessary
adjustments.
Increase or decrease the set vehicle speed to
a value that the prevailing road conditions and
legal speed limits permit. Otherwise, sudden
and unexpected acceleration or deceleration
of the vehicle could cause an accident and/
or serious injury to you and others.
X Press the cruise control lever up 0002for a
higher speed or down 0003for a lower speed.
X To adjust the speed in 1 mph
increments (1 km/h increments): briefly
press the cruise control lever up 0002or
down 0003to the pressure point.
The last speed stored is increased or
decreased every time the cruise control
lever is pushed up 0002or down 0003.
X To adjust the speed in 5 mph
increments (10 km/h increments):
briefly press the cruise control lever
up 0002 or down 0003beyond the pressure
point.
The last speed stored is increased or
decreased every time the cruise control
lever is pushed up 0002or down 0003.
i Cruise control is not deactivated if you
depress the accelerator pedal. For
example, if you accelerate briefly to
overtake, cruise control adjusts the
vehicle's speed to the last speed stored
after you have finished overtaking. Driving systems
157Driving and parking Z
Page 160 of 334
Deactivating cruise control
There are several ways to deactivate cruise
control:
X
Briefly press the cruise control lever
forwards 0023.
or
X Brake.
Cruise control is automatically deactivated if:
R you engage the electric parking brake.
R you are driving at less than 20 mph
(30 km/h)
R ESP ®
intervenes or you deactivate ESP ®
.
R you shift into neutral in a vehicle with
manual transmissio nwhile driving or
depress the clutch pedal for longer than six
seconds.
R on vehicles with manual transmission, you
shift to a gear that is too high, and as a
result the engine speed is too low.
R on vehicles with automatic transmission,
you shift into position Nwhile driving.
If cruise control is deactivated, you will hear
a warning tone. You will see the CruiseControl Off message in the multifunction
display for approximately five seconds.
i When you switch off the engine, the last
speed stored is cleared. DISTRONIC PLUS
Important safety notes i
DISTRONIC PLUS is not available on AMG
vehicles.
DISTRONIC PLUS regulates the speed and
automatically helps you maintain the
distance to the vehicle detected in front.
DISTRONIC PLUS brakes automatically so
that the set speed is not exceeded.
On long and steep downhill gradients,
especially if the vehicle is laden, you must
select shift range 1,2or 3in good time. By
doing so, you will make use of the braking effect of the engine, which relieves the load
on the brake system and prevents the brakes
from overheating and wearing too quickly.
If DISTRONIC PLUS detects a slower-moving
vehicle in front, your vehicle is braked in order
to maintain the preset distance to the vehicle
in front.
G
WARNING
The DISTRONIC PLUS requires familiarity with
its operational characteristics. We strongly
recommend that you review the following
information carefully before operating the
system. G
WARNING
The DISTRONIC PLUS is a convenience
system. Its speed adjustment reduction
capability is intended to make cruise control
more effective and usable when traffic speeds
vary. It is not however, intended to, nor does
it, replace the need for extreme care.
The responsibility for the vehicle's speed,
distance to the preceding vehicle and, most
importantly, brake operation to ensure a safe
stopping distance, always remains with the
driver.
The DISTRONIC PLUS cannot take street and
traffic conditions into account.
Complex driving situations are not always
fully recognized by the DISTRONIC PLUS. This
could result in wrong or missing distance
warnings.
If you want DISTRONIC PLUS to assist you,
the radar sensor system must be activated
(Y page 194) and operational.
If there is no vehicle in front, DISTRONIC
PLUS operates in the same way as cruise
control in the speed range between 20 mph
(Canada: 30 km/h) and 120 mph (Canada:
200 km/h). If a vehicle is driving in front of
you, it operates in the speed range between
0 mph (0 km/h) and 120 mph (Canada:
200 km/h).
Do not use DISTRONIC PLUS while driving on
roads with steep gradients. 158
Driving systemsDriving and parking