2012 MERCEDES-BENZ SLK350 mirror
[x] Cancel search: mirrorPage 101 of 334

The exterior mirrors are automatically heated
if the rear window defroster is switched on
and the outside temperature is low. X
Make sure that the SmartKey is in position
1 or 2in the ignition lock.
X Press button 0003for the right-hand exterior
mirror or button 0002for the left-hand
exterior mirror.
X Press adjustmen tbutton 0023up, down, or
to the left or right until you have adjusted
the exterior mirror to the correct position.
You should have a good overview of traffic
conditions.
Folding the exterior mirrors in or out
electrically X
Make sure that the SmartKey is in position
1 or 2in the ignition lock.
X Briefly press button 0002.
Both exterior mirrors fold in or out.
i Make sure that the exterior mirrors are
always folded out fully while driving .They
could otherwise vibrate. Folding the exterior mirrors in or out
automatically If the "Fold in mirrors when locking" function
is activated in the on-board computer
(Y
page 195):
R the exterior mirrors fold in automatically as
soon as you lock the vehicle from the
outside.
R the exterior mirrors fold out again
automatically as soon as you unlock the
vehicle and then open the driver's or front-
passenger door.
i If the exterior mirrors have been folded in
manually, they do not fold out.
Exterior mirror out of position If an exterior mirror has been pushed out of
position, proceed as follows:
X
Vehicles without electrically folding
exterior mirrors: move the exterior mirror
into the correct position manually.
X Vehicles with electrically folding
exterior mirrors: press the mirror-folding
button (Y page 99) repeatedly until you
hear the mirror engage in position.
The mirror housing is engaged again and
you can adjust the exterior mirrors as usual
(Y page 98). Automatic anti-glare mirrors
G
WARNING
If incident light from headlamps is prevented
from striking the sensor in the rear-view
mirror, for instance, by luggage piled too high
in the vehicle, the mirror's automatic anti-
glare function will not operate.
Incident light could then blind you. This may
distract you from the traffic conditions and,
as a result, you may cause an accident.
The rear-view mirror and the exterior mirror
on the driver's side automatically go into anti-
glare mode if the ignition is switched on and Mirrors
99Seats, steering wheel and mirrors Z
Page 102 of 334
incident light fro
mheadlamps strikes the
sensor in the rear-view mirror.
The mirrors do not go into anti-glare mode if
reverse gear is engaged or the interior lighting
is switched on. Parking position for the exterior
mirror on the front-passenger side
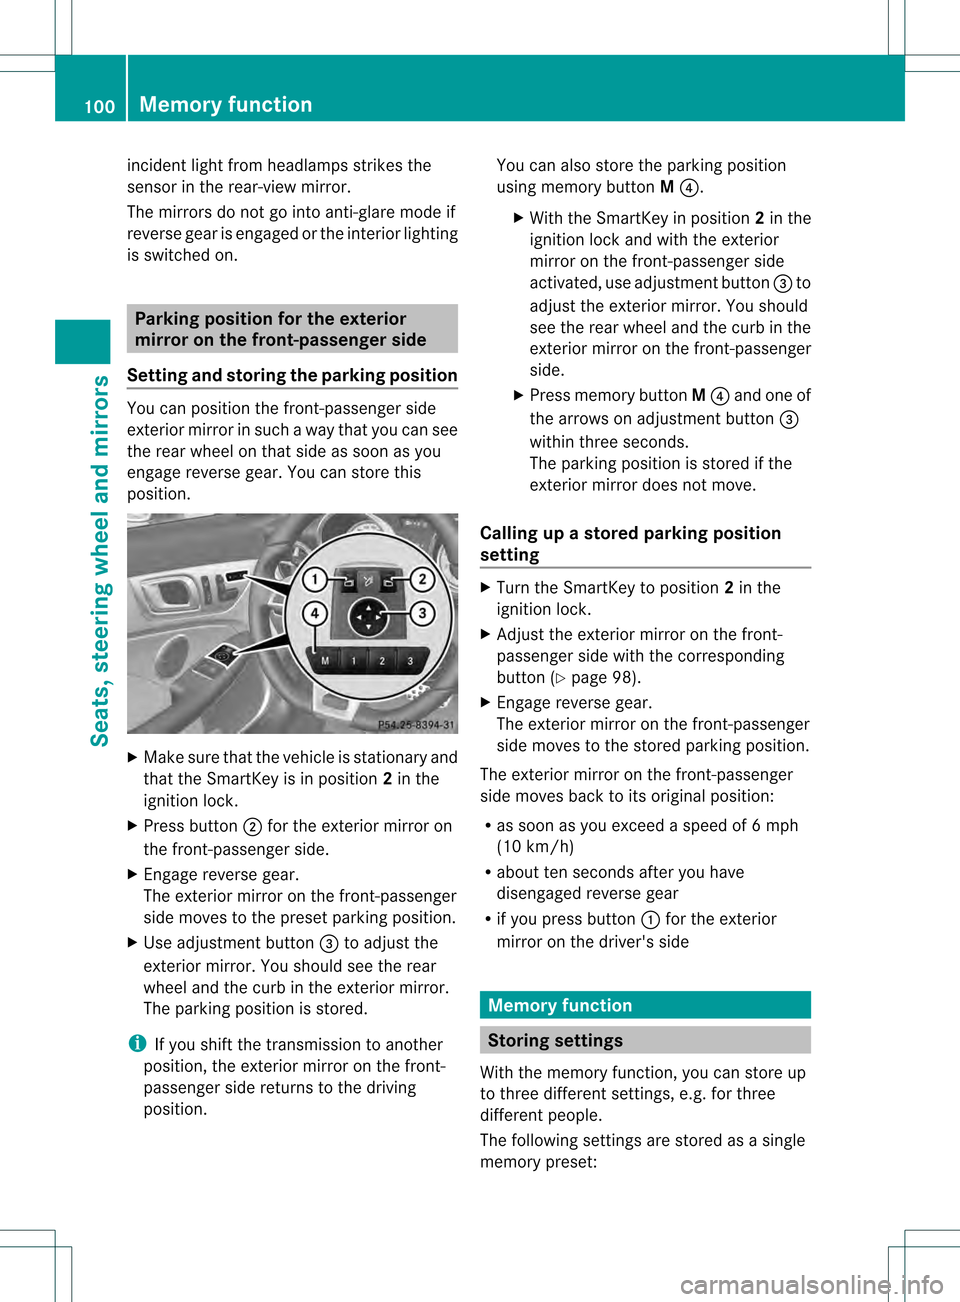
Setting and storing the parking position You can position the front-passenger side
exterior mirror in such a way that you can see
the rear wheel on that side as soon as you
engage reverse gear. You can store this
position. X
Make sure that the vehicle is stationary and
that the SmartKey is in position 2in the
ignition lock.
X Press button 0003for the exterior mirror on
the front-passenger side.
X Engage reverse gear.
The exterior mirror on the front-passenger
side moves to the preset parking position.
X Use adjustment button 0023to adjust the
exterior mirror .You should see the rear
wheel and the curb in the exterior mirror.
The parking position is stored.
i If you shift the transmission to another
position, the exterior mirror on the front-
passenger side returns to the driving
position. You can also store the parking position
using memory button
M0022.
X With the SmartKey in position 2in the
ignition lock and with the exterior
mirror on the front-passenger side
activated, use adjustmen tbutton 0023to
adjust the exterio rmirror. You should
see the rear wheel and the curb in the
exterior mirror on the front-passenger
side.
X Press memory button M0022 and one of
the arrows on adjustment button 0023
within three seconds.
The parking position is stored if the
exterior mirror does not move.
Calling up a stored parking position
setting X
Turn the SmartKey to position 2in the
ignition lock.
X Adjust the exterior mirror on the front-
passenger side with the corresponding
button (Y page 98).
X Engage reverse gear.
The exterior mirror on the front-passenger
side moves to the stored parking position.
The exterior mirror on the front-passenger
side moves back to its original position:
R as soon as you exceed a speed of 6mph
(10 km/h)
R about ten seconds after you have
disengaged reverse gear
R if you press button 0002for the exterior
mirror on the driver's side Memory function
Storing settings
With the memory function, you can store up
to three different settings, e.g. for three
differen tpeople.
The following settings are stored as a single
memory preset: 100
Memory functionSeats, steering wheel and mirrors
Page 103 of 334
R
seat and backrest position
R driver's side: steering wheel position
R driver's side: position of the exterior
mirrors on the driver's and front-passenger
sides G
WARNING
Do not activate the memory function while
driving. Activating the memory function while
driving could cause the driver to lose control
of the vehicle. X
Adjust the seat (Y page 94).
X On the driver's side, adjust the steering
wheel (Y page 97) and the exterior mirrors
(Y page 98).
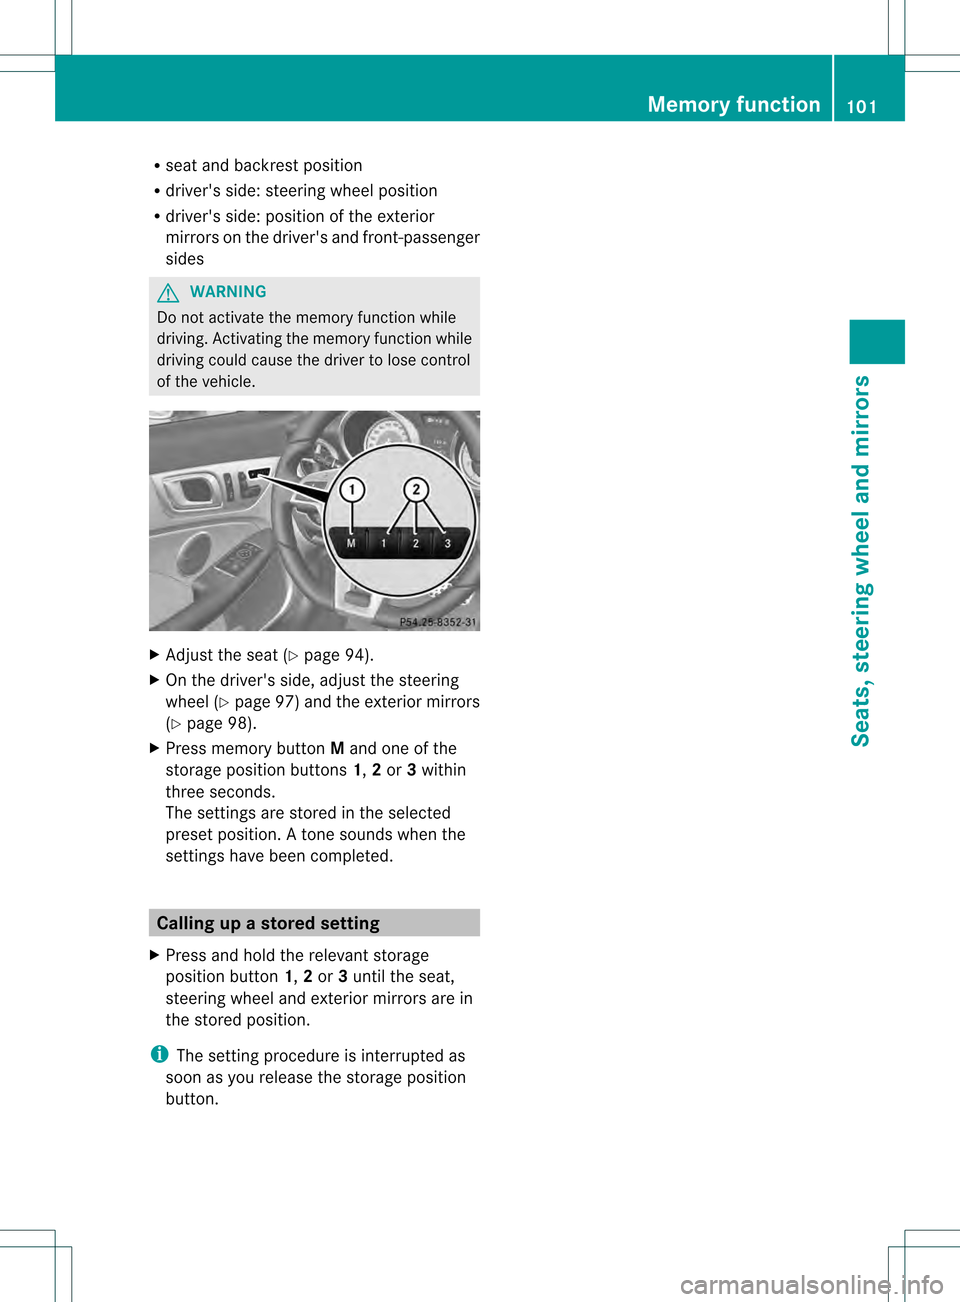
X Press memory button Mand one of the
storage position buttons 1,2or 3within
three seconds.
The settings are stored in the selected
preset position. Atone sounds when the
settings have been completed. Calling up
astore dsetting
X Press and hold the relevant storage
position button 1,2or 3until the seat,
steering wheel and exterio rmirrors are in
the stored position.
i The setting procedure is interrupted as
soon as you release the storage position
button. Memory function
101Seats, steering wheel and mirrors Z
Page 197 of 334
X
Press the 0002or0005 button on the
steering wheel to select the Sett. menu.
X Press the 0004or0003 button to select the
Convenience submenu.
X Press 000Cto confirm.
X Press the 0004or0003 button to select the
Belt Adjustment function.
You will see the selected setting: on or
off .
X Press the 000Cbutton to save the setting.
Switching the fold-in mirrors when
locking feature is on/off
If you switch on the Fold Mirrors in when
Locking function, the exterior mirrors fold in
when you lock the vehicle. If you unlock the
vehicle and then open a door, the exterior
mirrors fold out again.
If you have switched the function on and you
fold the exterior mirrors in using the button
on the door (Y page 99), they will not fold out
automatically. The exterior mirrors can then
only be folded out using the button on the
door.
X Press the 0002or0005 button on the
steering wheel to select the Settingsmenu.
X Press the 0004or0003 button to select the
Convenience submenu.
X Press the 000Cbutton to confirm.
X Press the 0004or0003 button to select the
Fold mirrors in when locking: function.
You will see the selected setting:
Enabledor
Disabled .
X Press the 000Cbutton to save the setting.
Restoring the factory settings For safety reasons, the
Daytime RunningLights: function in the
Lights submenu is
only reset when the vehicle is stationary. X
Press the 0002or0005 button on the
steering wheel to select the Sett. menu.
X Press the 0004or0003 button to select the
Factory Setting submenu.
X Press the 000Cbutton to confirm.
The Reset All Settings? message
appears.
X Press the 0004or0003 button to select
No or
Yes .
X Press the 000Cbutton to confirm the
selection.
If you select Yes , the multifunction display
shows a confirmation message. AMG menu in AMG vehicles
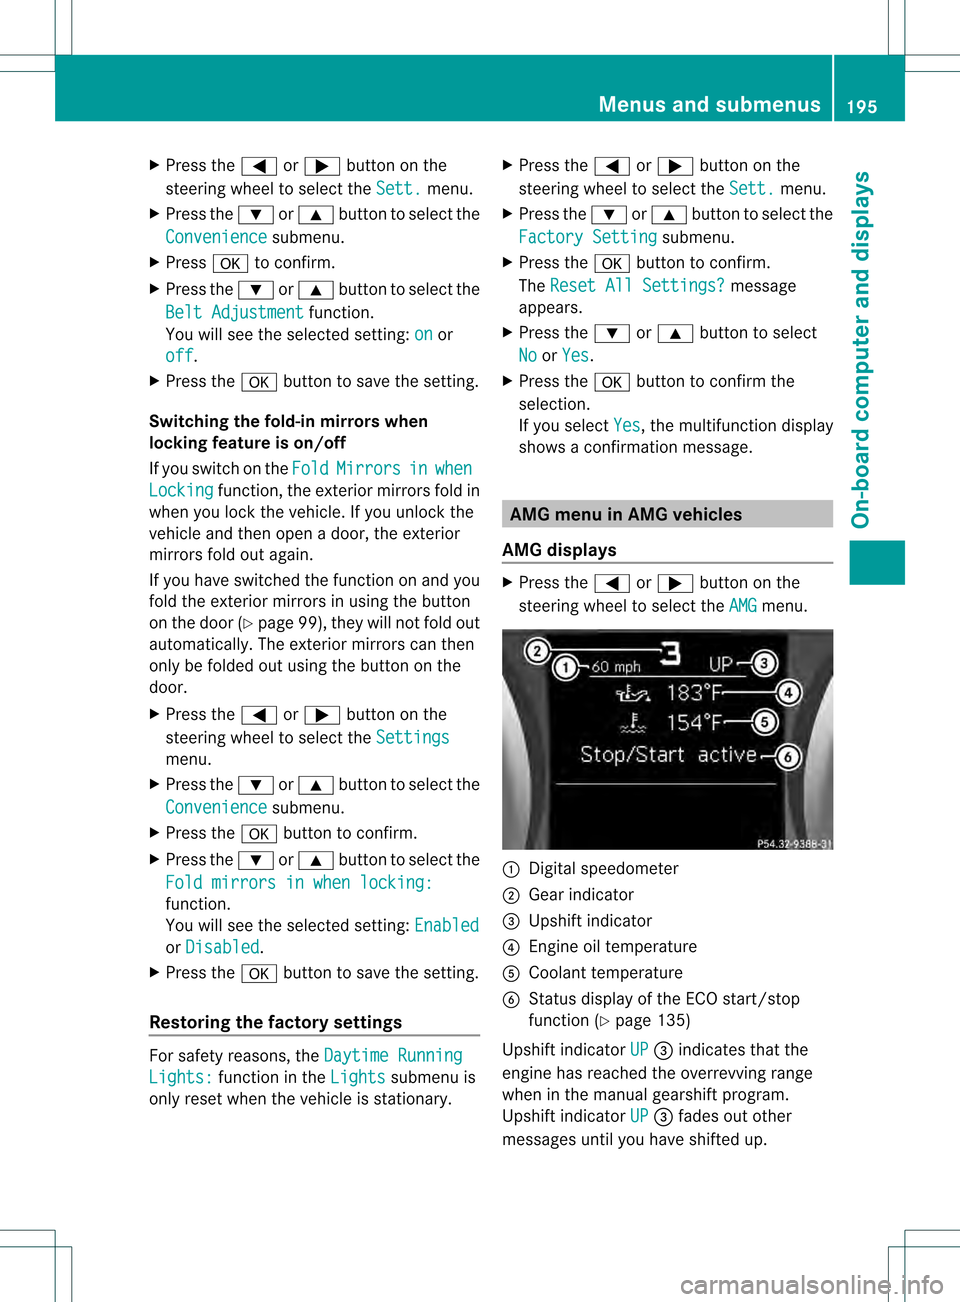
AMG displays X
Press the 0002or0005 button on the
steering wheel to select the AMG menu.
0002
Digital speedometer
0003 Gear indicator
0023 Upshift indicator
0022 Engine oil temperature
0020 Coolant temperature
0021 Status display of the ECO start/stop
function (Y page 135)
Upshift indicator UP 0023
indicates that the
engine has reached the overrevving range
when in the manual gearshift program.
Upshift indicator UP 0023
fades out other
messages until you have shifted up. Menus and submenus
195On-board computer and displays Z
Page 215 of 334
Lights
i Display messages about LEDs:
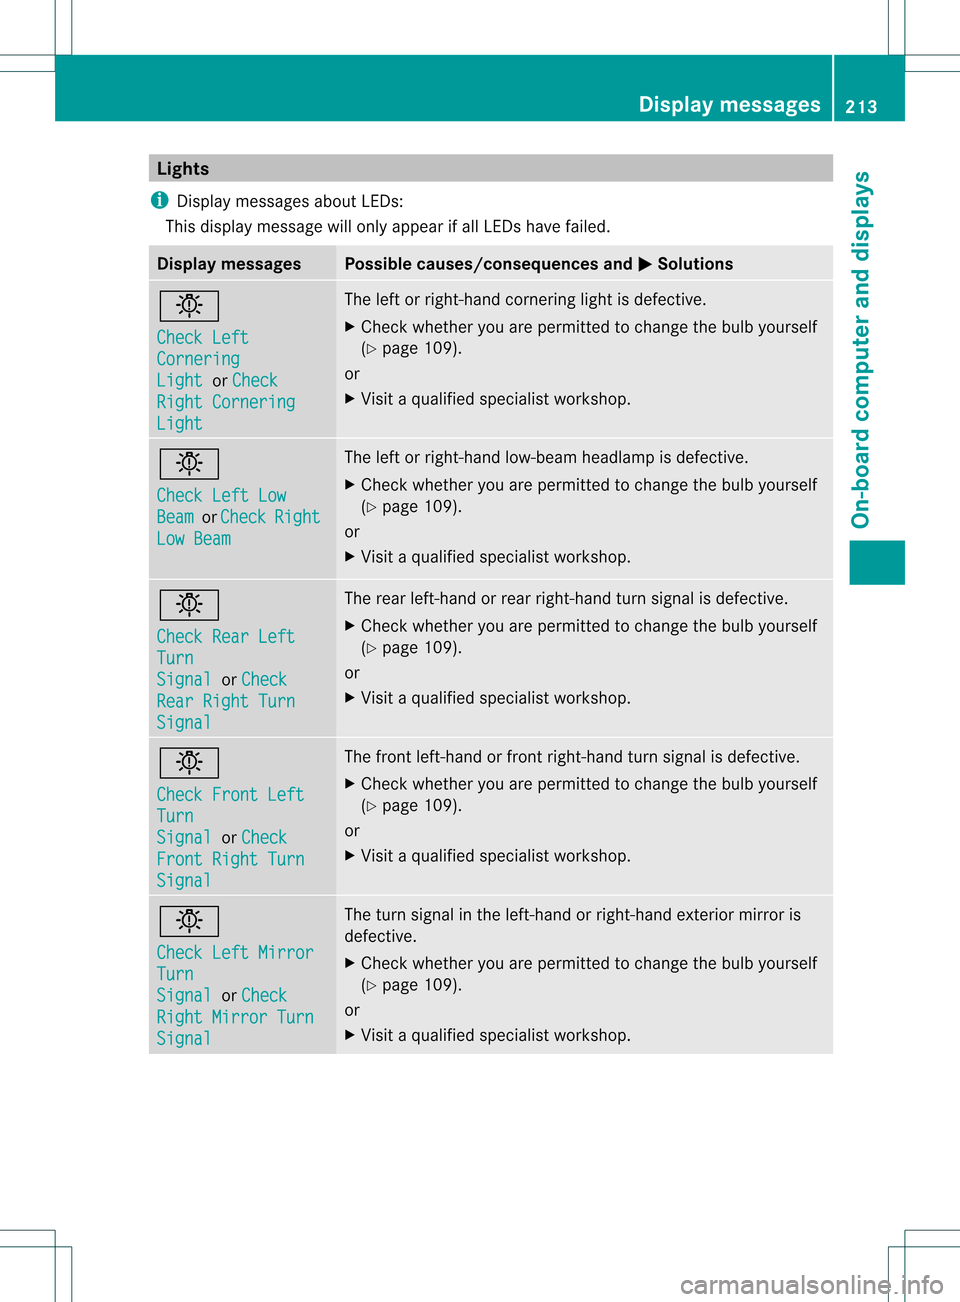
This display message will only appear if all LEDs have failed. Displa
ymessages Possible causes/consequences and
0001 Solutions
0001
Check Left
Cornering
Light or
Check Right Cornering
Light The left or right-hand cornering light is defective.
X
Chec kwhether you are permitted to change the bulb yourself
(Y page 109).
or
X Visit a qualified specialist workshop. 0001
Check Left Low
Beam or
Check Right
Low Beam The left or right-hand low-beam headlamp is defective.
X
Check whether you are permitted to change the bulb yourself
(Y page 109).
or
X Visit a qualified specialist workshop. 0001
Check Rear Left
Turn
Signal or
Check Rear Right Turn
Signal The rear left-hand or rear right-hand turn signal is defective.
X
Check whether you are permitted to change the bulb yourself
(Y page 109).
or
X Visit a qualified specialist workshop. 0001
Check Front Left
Turn
Signal or
Check Front Right Turn
Signal The front left-hand or front right-hand turn signal is defective.
X
Check whether you are permitted to change the bulb yourself
(Y page 109).
or
X Visit a qualified specialist workshop. 0001
Check Left Mirror
Turn
Signal or
Check Right Mirror Turn
Signal The turn signal in the left-hand or right-hand exterior mirror is
defective.
X
Check whether you are permitted to change the bulb yourself
(Y page 109).
or
X Visit a qualified specialist workshop. Display messages
213On-board computer and displays Z
Page 248 of 334

X
To open: slide cover 0003back.
X To remove the insert: slide catch0002
inwards on both sides in the direction of the
arrow.
X Remove the cup holde rinser tupwards.
X To re-install the insert: place the insert in
the stowage space.
X Slide catch 0002outwards in the direction of
the arrow until it engages. Bottle holder
G
WARNING
Do not transport heavy, sharp-edged, or
fragile bottles in the bottle holder.
In the event of an accident, the bottle holder
cannot secure a bottle sufficiently. You and/
or vehicle occupants could be injured.
! Make sure that any bottles weighing more
than 0.5 kg that are stored in the bottle
holder rest on the vehicle floor. The bottle
holder could otherwise be damaged.
The bottle holder is designed for bottles with
a capacity of 25 fl. oz. (0.7 l) up to 54 fl. oz.
(1.5 l).
The bottle holder does not secure the bottles;
it merely prevents them from tipping over. X
Press the outer edge of button 0002and slide
in the direction of the arrow until the bottle
fits into the opening.
X Insert the bottle into the bottle holder. Sun visors
Overview of sun visors G
WARNING
Do not use the vanity mirror while driving.
Keep the vanity mirrors in the sun visors
closed while the vehicle is in motion.
Reflected glare can endanger you and others. 0002
Mirror light
0003 Bracket
0023 Retaining strip, e.g. for a car park ticket
0022 Vanity mirror
0020 Mirror cover
i When driving at high speeds with the side
window or roof open:
If you have inserted a car park ticket into
retaining strip 0023, make sure that it is not
blown away by the wind.
Vanity mirror in the sun visor Mirror light
0002only functions if the sun visor
is clipped into retainer 0003and mirror cover
0020 has been folded up.
Glare from the side X
Fold down the sun visor.
X Pull the sun visor out of retainer 0003.
X Swing the sun visor to the side.
X Slide the sun visor forwards and back as
required. 246
FeaturesStowage and features
Page 256 of 334
If you pull on the trunk handle for more than
20 seconds before receiving authorization
for remote unlocking, you must wait
15 minutes before you can pull on the trunk
lid handle again.
Vehicle remote closing If you forget to lock your vehicle but are no
longer in the vicinity of the vehicle, it can be
locked for you by the Mercedes-Benz
Customer Assistance Center.
The vehicle can be locked remotely up to four
days after the ignition was last switched off.
X
Contact the following service hotlines:
R
USA: Mercedes-Benz Customer
Assistance Center under 1-800-FOR-
MERCedes(1-800-367-6372 )or
1-888-990-9007
R Canada: Customer Service at
1-888-923-8367
You will be asked for your PIN.
The next time you are in your vehicle and
switch on the ignition, the Tele Aid: Doors
Locked by Remote message appears in the
multifunction display.
Alternatively, the vehicle can also be locked
via the Internet or an iPhone in the "Owners
Online" section using your ID number and
password.
i The vehicle valet locking feature is
available when the relevant mobile phone
network is available and data connection is
possible.
Stolen vehicle recovery service If your vehicle has been stolen:
X Notify the police.
The police will issue a numbered incident
report.
X This number will be forwarded to the
Mercedes-Benz Customer Assistance
Center together with your PIN.
The Mercedes-Benz Customer Assistance
Center then attempts to locate the mbrace system. The Mercedes-Benz Customer
Assistance Center contacts you and the
local law enforcement agency if the vehicle
is located. However, only the law
enforcement agency is informed of the
location of the vehicle.
i If the anti-theft alarm system is active for
longer than 30 seconds, mbrace
automatically informs the Mercedes-Benz
Customer Assistance Center. Garage door opener
Important safety notes The HomeLink
®
garage door opener
integrated in the rear-view mirror allows you
to operate up to three different door and gate
systems.
i Certain garage door drives are
incompatible with the integrated garage
door opener. If you have difficulty
programming the integrated garage door
opener, contact an authorized Mercedes-
Benz Center or call one of the following
telephone hotlines:
R USA: Mercedes-Benz Customer
Assistance Center at
1-800-FOR-MERCedes
R Canada: Customer Service at
1-800-387-0100 G
WARNING
Before programming the integrated remote
control to a garage door opener or gate
operator, make sure people and objects are
out of the way of the device to prevent
potential harm or damage. When
programming a garage door opener, the door
moves up or down. When programming a gate
operator, the gate opens or closes.
Do not use the integrated remote control with
any garage door opener that lacks safety stop
and reverse features as required by U.S.
federal safety standards (this includes any
garage door opener model manufactured 254
FeaturesStowage and features
Page 257 of 334
before April 1, 1982). A garage door that
cannot detect an object - signaling the door
to stop and revers e-does not meet current
U.S .federal safety standards.
When programming a garage door opener,
park vehicle outside the garage.
Do not run the engine while programming the
integrated remote control. Inhalation of
exhaust gas is hazardous to your health. All
exhaust gas contains carbon monoxide (CO),
and inhaling it can cause unconsciousness
and possible death. All exhaust gas contains
carbon monoxide (CO), and inhaling it can
cause unconsciousness and possible death.
i USA only:
This device complies with Part 15 of the
FCC Rules. Operation is subject to the
following two conditions:
1. This device may not cause harmful
interference, and
2. this device must accept any interference
received, including interference that may
cause undesired operation.
Any unauthorized modification to this
device could void the user's authority to
operate the equipment.
FCC ID: CB2HMIHL4
i Canada only:
This device complies with RSS-210 of
Industry Canada. Operation is subject to
the following two conditions:
1. This device may not cause interference,
and
2. this device must accept any interference
received, including interference that may
cause undesired operation of the device.
Any unauthorized modification to this
device could void the user's authority to
operate the equipment.
IC: 279B-HMIHL4 Programming the integrated garage
door opener on the rear-view mirror Programming
G
WARNING
Only press the button on the integrated
garage door opener if there are no persons or
objects present within the sweep of the
garage door. Persons could otherwise be
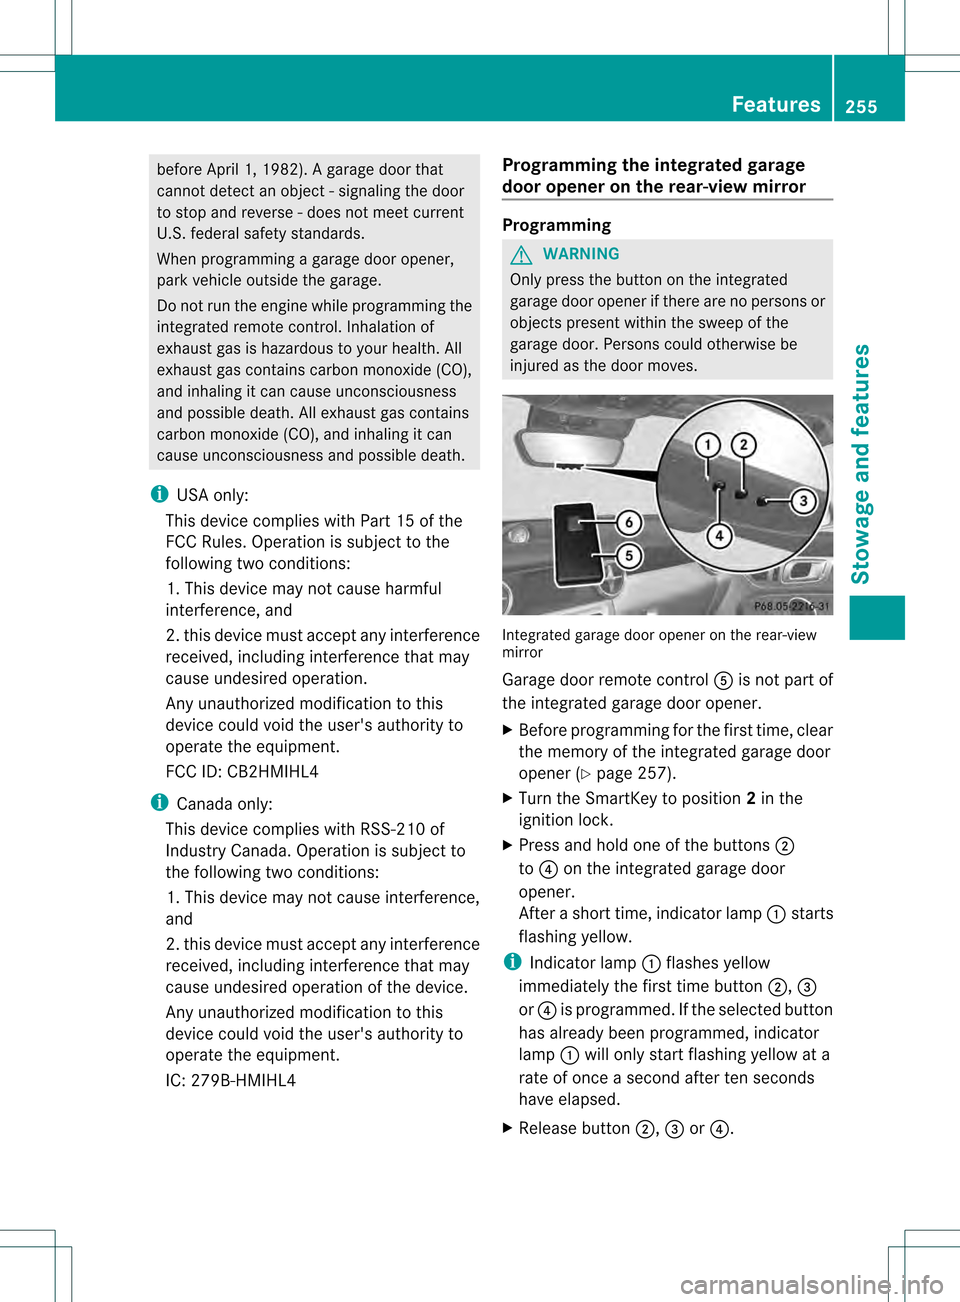
injured as the door moves. Integrated garage door opener on the rear-view
mirror
Garage door remote control
0020is not part of
the integrated garage door opener.
X Before programming for the first time, clear
the memory of the integrated garage door
opener (Y page 257).
X Turn the SmartKey to position 2in the
ignition lock.
X Press and hold one of the buttons 0003
to 0022 on the integrated garage door
opener.
After a short time, indicator lamp 0002starts
flashing yellow.
i Indicator lamp 0002flashes yellow
immediately the first time button 0003,0023
or 0022 is programmed. If the selected button
has already been programmed, indicator
lamp 0002will only start flashing yellow at a
rate of once a second after ten seconds
have elapsed.
X Release button 0003,0023or0022. Features
255Stowage and features Z