2012 MERCEDES-BENZ SLK350 computer
[x] Cancel search: computerPage 71 of 334

0002
000F Locks the vehicle
0003 0006 Unlocks the trunk lid
0023 0010 Unlocks the vehicle
When unlocking, the turn signals flash once.
When locking, they flash three times.
When it is dark, the surround lighting also
comes on if it is activated in the on-board
computer (Y page 193).
You can also set an audible signal to confirm
that the vehicle has been locked. The audible
signal can be activated and deactivated using
the on-board computer (Y page 194).
X To unlockc entrally:press the0010
button.
If you do not open th evehicle within
approximately 40 seconds of unlocking:
R the vehicle is locked again.
R the thef tdeterrent locking system is armed
again.
X To lock centrally: press the000Fbutton. KEYLESS-GO
Important notes on the use of KEYLESS-
GO R
Do not keep the KEYLESS-GO key together
with:
- electronic devices, e.g. a mobile phone
or another key
- metallic objects, e.g. coins or metal foil. This can affect the functionality of
KEYLESS-GO.
R Bear in mind that the engine can be started
by any of the vehicle occupants if there is
a KEYLESS-GO key in the vehicle.
Locking and unlocking centrally You can start, lock or unlock the vehicle using
KEYLESS-GO. To do this, you only need carry
the SmartKey with you. You can combine the
KEYLESS-GO functions with those of a
conventional key, e.g. using KEYLESS-GO to
unlock and pressing the
000Fbutton to lock.
When locking and unlocking using KEYLESS-
GO, the distance between the SmartKey and
the corresponding door handle must not
exceed 3 ft (1 m).
KEYLESS-GO checks whether a valid key is in
the vehicle by periodically establishing a radio
connection between the vehicle and the key.
This happens:
R when the external door handles are
touched
R when starting the engine
R while the vehicle is in motion X
To unlock the vehicle: touch the inner
surface of the door handle.
X To lock the vehicle: touch sensor
surface 0002.
X Convenience closing feature: touch
recessed sensor surface 0003for an
extended period (Y page 81). SmartKey
69Opening/closing Z
Page 78 of 334

X
To deactivate: press and hold button 0002
for abou tfive seconds until a tone sounds.
X To activate: press and hold button 0003for
about five seconds until a tone sounds.
i If you press one of the two buttons and
do not hear a tone, the relevant setting has
already been selected.
You can also switch the automatic locking
function on and off using the on-board
computer (Y page 193). Unlocking the driver's door
(mechanical key)
If the vehicle can no longer be unlocked with
the SmartKey, use the mechanical key.
If you use the mechanical key to unloc kand
open the driver's door, the anti-thef talarm
system will be triggered ( Ypage 65).
X Take the mechanical key out of the
SmartKey (Y page 70).
X Insert the mechanical key into the lock of
the driver's door as far as it will go. X
Turn the mechanical key counter-clockwise
to position 0005.
The door is unlocked.
X Turn the mechanical key back and remove
it.
X Insert the mechanical key into the
SmartKey. Locking the vehicle (mechanical key)
If the vehicle can no longer be locked with the
SmartKey, use the mechanical key.
X Open the driver's door.
X Close the front-passenger door and the
trunk lid.
X Press the locking button (Y page 75).
X Check whether the locking knob on the
front-passenger door is still visible. Press
down the locking knob by hand, if
necessary.
X Close the driver's door.
X Take the mechanical key out of the
SmartKey (Y page 70).
X Insert the mechanical key into the lock of
the driver's door as far as it will go. X
Turn the mechanical key clockwise as far
as it will go to position 0005.
X Turn the mechanical key back and remove
it.
X Make sure that the doors and the trunk lid
are locked.
X Insert the mechanical key into the
SmartKey. 76
DoorsOpening/closing
Page 99 of 334

Adjusting the steering wheel
manually
0002
Release lever
0003 To adjust the steering wheel height
0023 To adjust the steering wheel position
(fore-and-aft adjustment)
X Fold release lever 0002down completely in
the direction of the arrow.
The steering column is unlocked.
X Adjus tthe steering wheel to the desired
position.
X Push release lever 0002up completely.
The steering column is locked.
X Check if the steering column is locked.
When doing so, try to push the steering
wheel up or down or try to move it in the
fore-and-aft direction. Adjusting the steering wheel
electrically
0002
To adjust the steering wheel height
0003 To adjust the steering wheel position
(fore-and-aft adjustment)
i Related topics:
R EASY-ENTRY/EXIT feature
(Y page 97)
R Storing settings (Y page 100) EASY-ENTRY/EXIT feature
Important safety notes The EASY-ENTRY/EXIT feature makes getting
in and out of your vehicle easier.
You can activate and deactivate the EASY-
ENTRY/EXIT feature in the on-board
computer (Y page 194). G
WARNING
You must make sure no one can become
trapped or injured by the moving steering
wheel when the easy-entry/exit feature is
activated.
To stop steering wheel movement, move
steering wheel adjustment stalk or press the
memory position switch.
Do not leave children unattended in the
vehicle, or with access to an unlocked vehicle.
Children could open the driver's door and
unintentionally activate the easy-entry/exit
feature, which could result in an accident
and/or serious personal injury. Steering wheel
97Seats, steering wheel and mirrors Z
Page 100 of 334

G
WARNING
Let the system complete the adjustment
procedure before setting the vehicle in
motion. All steering wheel adjustment must
be completed before setting the vehicle in
motion. Driving off with the steering wheel
still adjusting could cause the drive rto lose
control of the vehicle.
Position of the steering wheel when the
EASY-ENTRY/EXIT featur eis active The steering wheel swings upwards when
you:
R
remove the SmartKey from the ignition lock
R open the driver's door and KEYLESS-GO is
in position 1
R open the driver's door and the SmartKey is
in position 0or 1in the ignition lock
i The steering wheel only moves upwards if
it has not already reached the upper end
stop.
Position of the steering wheel for
driving The steering wheel is moved to the last
selected position when:
R
the driver's door is closed.
R you insert the SmartKey into the ignition
lock.
or
R you press the Start/Stop button once on
vehicles with KEYLESS-GO.
When you close the driver's door with the
ignition switched on, the steering wheel is
also automatically moved to the previously
set position.
The last position of the steering wheel is
stored after each manual setting or when you
store the setting with the memory function
(Y page 100). Crash-responsive EASY-EXIT feature If the crash-responsive EASY-EXIT feature is
triggered in an accident, the steering column
will move upwards when the driver's door is
opened. This occurs irrespective of the
position of the SmartKey in the ignition lock.
This makes it easier to exit the vehicle and
rescue the occupants.
The crash-responsive EASY-EXIT feature is
only operational after an accident if the EASY-
EXIT/ENTRY feature is activated in the on-
board computer. Mirrors
Rear-view mirror
Rear-view mirror (manual anti-glare) X
Anti-glare mode: flick anti-glare lever 0002
forwards or back. Exterior mirrors
Adjusting the exterior mirrors G
WARNING
Exercise care when using the passenger-side
exterior rear view mirror. The mirror surface
is convex (outwardly curved surface for a
wider field of view). Objects in mirror are
closer than they appear. Check your interior
rear view mirror and glance over your
shoulder before changing lanes. 98
MirrorsSeats, steering wheel and mirrors
Page 101 of 334

The exterior mirrors are automatically heated
if the rear window defroster is switched on
and the outside temperature is low. X
Make sure that the SmartKey is in position
1 or 2in the ignition lock.
X Press button 0003for the right-hand exterior
mirror or button 0002for the left-hand
exterior mirror.
X Press adjustmen tbutton 0023up, down, or
to the left or right until you have adjusted
the exterior mirror to the correct position.
You should have a good overview of traffic
conditions.
Folding the exterior mirrors in or out
electrically X
Make sure that the SmartKey is in position
1 or 2in the ignition lock.
X Briefly press button 0002.
Both exterior mirrors fold in or out.
i Make sure that the exterior mirrors are
always folded out fully while driving .They
could otherwise vibrate. Folding the exterior mirrors in or out
automatically If the "Fold in mirrors when locking" function
is activated in the on-board computer
(Y
page 195):
R the exterior mirrors fold in automatically as
soon as you lock the vehicle from the
outside.
R the exterior mirrors fold out again
automatically as soon as you unlock the
vehicle and then open the driver's or front-
passenger door.
i If the exterior mirrors have been folded in
manually, they do not fold out.
Exterior mirror out of position If an exterior mirror has been pushed out of
position, proceed as follows:
X
Vehicles without electrically folding
exterior mirrors: move the exterior mirror
into the correct position manually.
X Vehicles with electrically folding
exterior mirrors: press the mirror-folding
button (Y page 99) repeatedly until you
hear the mirror engage in position.
The mirror housing is engaged again and
you can adjust the exterior mirrors as usual
(Y page 98). Automatic anti-glare mirrors
G
WARNING
If incident light from headlamps is prevented
from striking the sensor in the rear-view
mirror, for instance, by luggage piled too high
in the vehicle, the mirror's automatic anti-
glare function will not operate.
Incident light could then blind you. This may
distract you from the traffic conditions and,
as a result, you may cause an accident.
The rear-view mirror and the exterior mirror
on the driver's side automatically go into anti-
glare mode if the ignition is switched on and Mirrors
99Seats, steering wheel and mirrors Z
Page 108 of 334

X
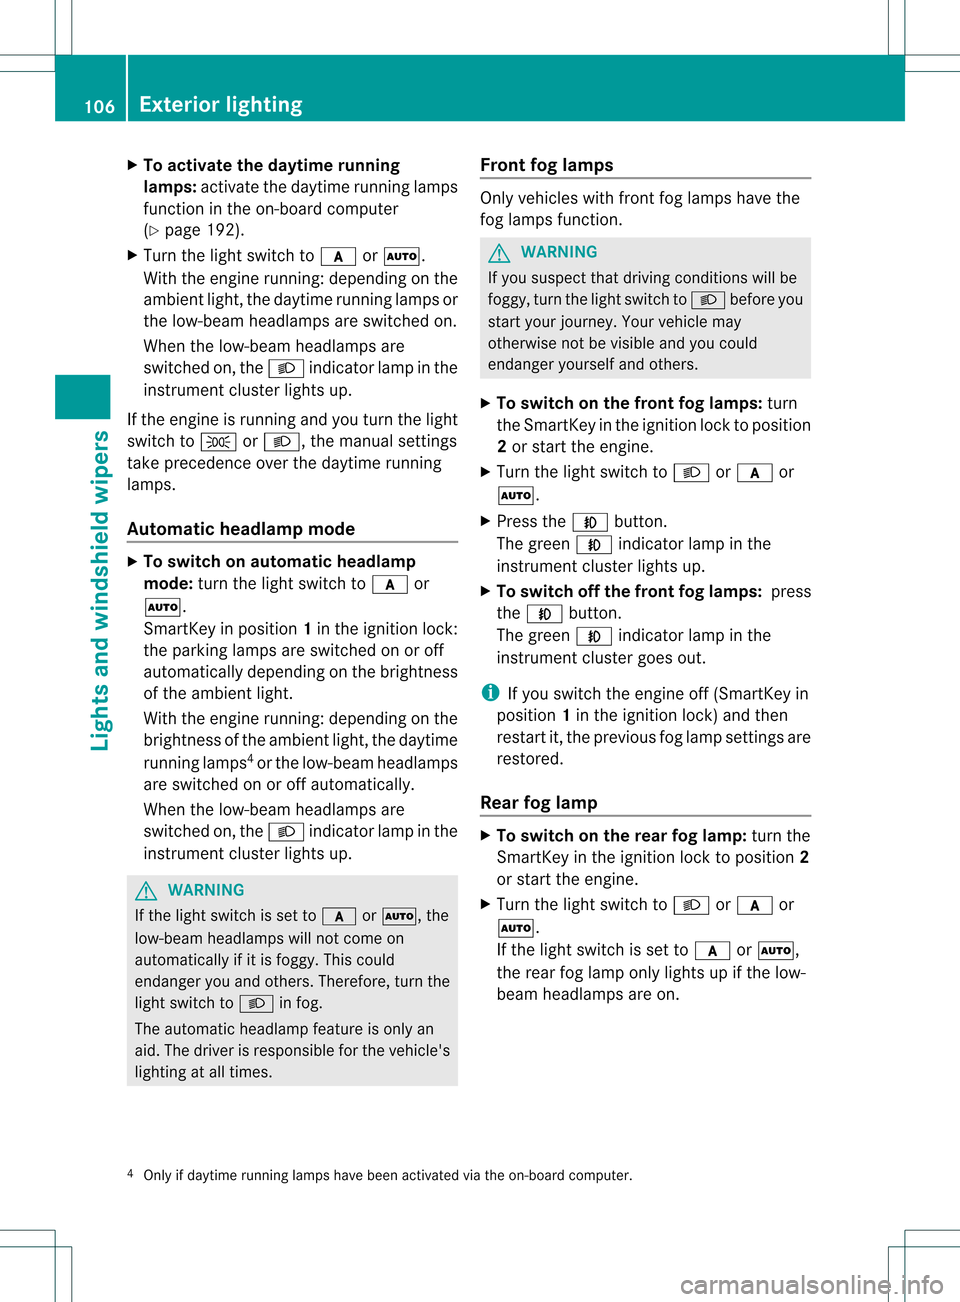
To activate the daytime running
lamps: activate the daytime running lamps
function in the on-board computer
(Y page 192).
X Turn the light switch to 0008or0005.
With the engine running :depending on the
ambient light, the daytime running lamps or
the low-beam headlamps are switched on.
When the low-beam headlamps are
switched on, the 0009indicator lamp in the
instrument cluster lights up.
If the engine is running and you turn the light
switch to 0011or0009, the manual settings
take precedence over the daytime running
lamps.
Automatic headlamp mode X
To switch on automatic headlamp
mode: turn the light switch to 0008or
0005.
SmartKey in position 1in the ignition lock:
the parking lamps are switched on or off
automatically depending on the brightness
of the ambient light.
With the engine running: depending on the
brightness of the ambient light, the daytime
running lamps 4
or the low-beam headlamps
are switched on or off automatically.
When the low-beam headlamps are
switched on, the 0009indicator lamp in the
instrument cluster lights up. G
WARNING
If the light switch is set to 0008or0005, the
low-beam headlamps will not come on
automatically if it is foggy. This could
endanger you and others. Therefore, turn the
light switch to 0009in fog.
The automatic headlamp feature is only an
aid. The driver is responsible for the vehicle's
lighting at all times. Front fog lamps Only vehicles with fron
tfog lamps have the
fog lamps function. G
WARNING
If you suspect that driving conditions will be
foggy, turn the light switch to 0009before you
start your journey. Your vehicle may
otherwise not be visible and you could
endanger yourself and others.
X To switch on the front fog lamps: turn
the SmartKey in the ignition lock to position
2 or start the engine.
X Turn the light switch to 0009or0008 or
0005.
X Press the 000Abutton.
The green 000Aindicator lamp in the
instrument cluster lights up.
X To switch off the front fog lamps: press
the 000A button.
The green 000Aindicator lamp in the
instrument cluster goes out.
i If you switch the engine off (SmartKey in
position 1in the ignition lock) and then
restart it, the previous fog lamp settings are
restored.
Rear fog lamp X
To switch on the rear fog lamp: turn the
SmartKey in the ignition lock to position 2
or start the engine.
X Turn the light switch to 0009or0008 or
0005.
If the light switch is set to 0008or0005,
the rear fog lamp only lights up if the low-
beam headlamps are on.
4 Only if daytime running lamps have been activated via the on-board computer. 106
Exterior lightingLights and windshiel
dwipers
Page 111 of 334

X
Have the headlamps checked at a qualified
specialist workshop. Interio
rlighting Overview of interior lighting
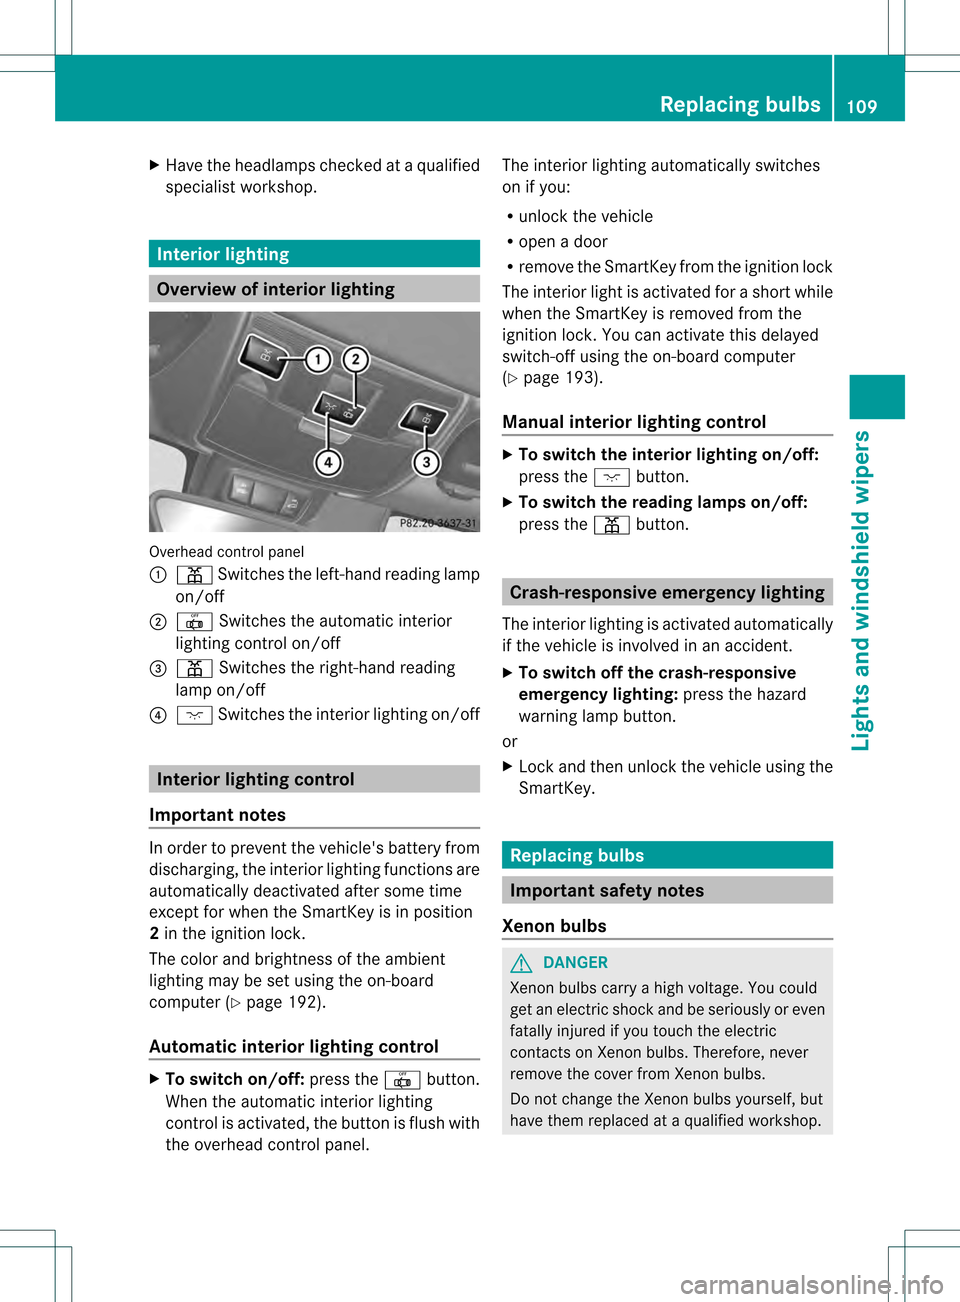
Overhead control panel
0002
0010 Switches the left-hand reading lamp
on/off
0003 0017 Switches the automatic interior
lighting control on/off
0023 0010 Switches the right-hand reading
lamp on/off
0022 0002 Switches the interior lighting on/off Interior lighting control
Important notes In order to prevent the vehicle's battery from
discharging, the interior lighting functions are
automatically deactivated after some time
except for when the SmartKey is in position
2 in the ignition lock.
The color and brightness of the ambient
lighting may be set using the on-board
computer (Y page 192).
Automatic interior lighting control X
To switch on/off: press the0017button.
When the automatic interior lighting
control is activated, the button is flush with
the overhead control panel. The interior lighting automatically switches
on if you:
R unloc kthe vehicle
R open a door
R remove the SmartKey from the ignition lock
The interior light is activated for a short while
when the SmartKey is removed from the
ignition lock. You can activate this delayed
switch-off using the on-board computer
(Y page 193).
Manual interior lighting control X
To switch the interior lighting on/off:
press the 0002button.
X To switch the reading lamps on/off:
press the 0010button. Crash-responsive emergency lighting
The interior lighting is activated automatically
if the vehicle is involved in an accident.
X To switch off the crash-responsive
emergency lighting: press the hazard
warning lamp button.
or
X Lock and then unlock the vehicle using the
SmartKey. Replacing bulbs
Important safety notes
Xenon bulbs G
DANGER
Xenon bulbs carry a high voltage. You could
get an electric shock and be seriously or even
fatally injured if you touch the electric
contacts on Xenon bulbs. Therefore, never
remove the cover from Xenon bulbs.
Do not change the Xenon bulbs yourself, but
have them replaced at a qualified workshop. Replacing bulbs
109Lights and windshield wipers Z
Page 167 of 334

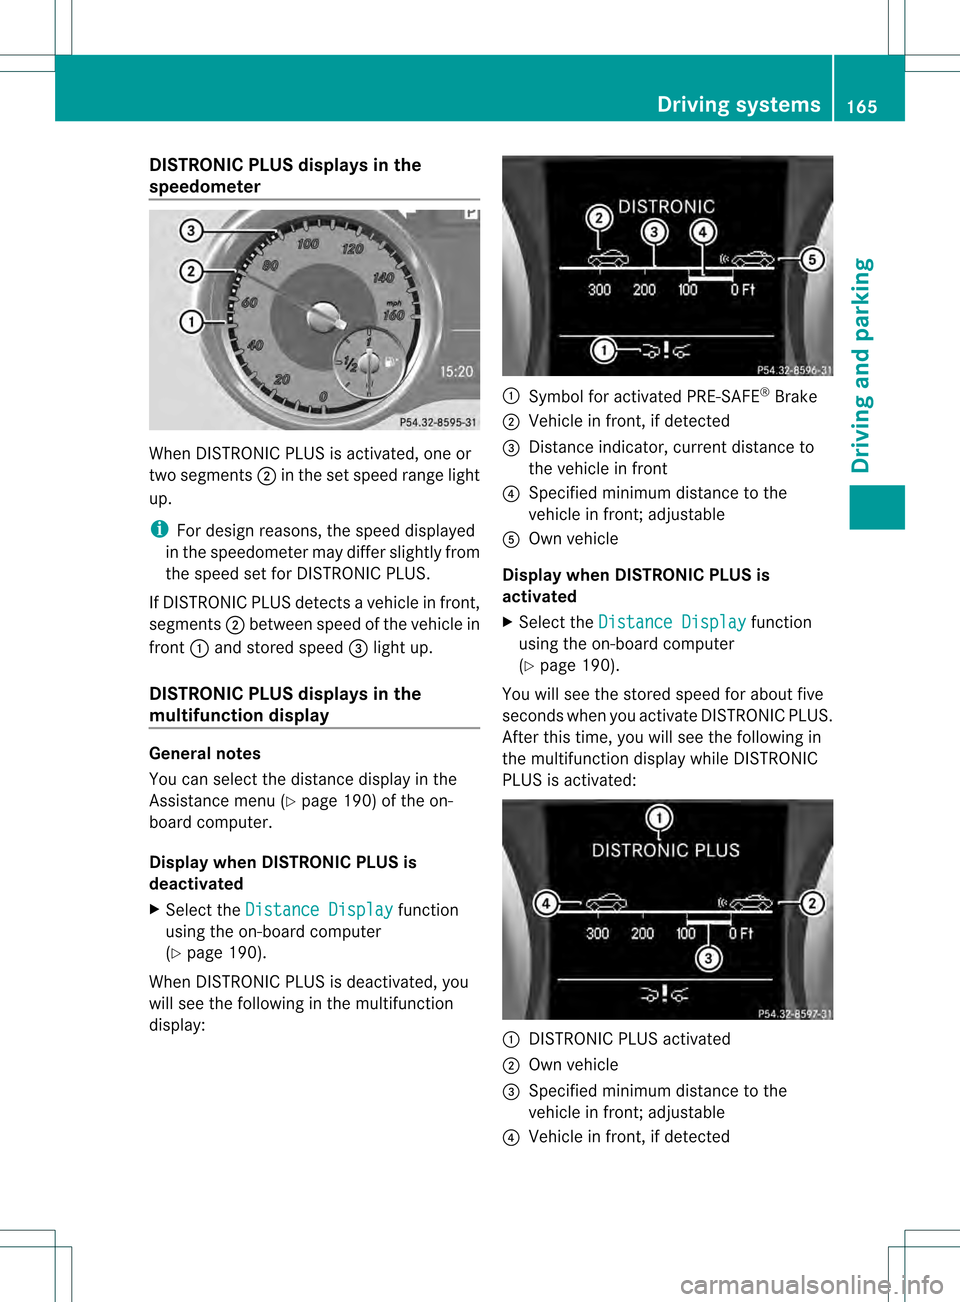
DISTRONIC PLUS displays in the
speedometer When DISTRONIC PLUS is activated, one or
two segments 0003in the set speed range light
up.
i Ford esign reasons, the speed displayed
in the speedometer may differ slightly from
the speed set for DISTRONIC PLUS.
If DISTRONIC PLUS detects avehicle in front,
segments 0003between speed of the vehicle in
front 0002and stored speed 0023light up.
DISTRONIC PLUS displays in the
multifunction display General notes
You can select the distanc
edisplay in the
Assistance menu (Y page 190) of the on-
board computer.
Displa ywhen DISTRONIC PLUS is
deactivated
X Select the Distance Display function
using the on-board computer
(Y page 190).
When DISTRONIC PLUS is deactivated, you
will see the following in the multifunction
display: 0002
Symbol for activated PRE-SAFE ®
Brake
0003 Vehicle in front, if detected
0023 Distance indicator, current distance to
the vehicle in front
0022 Specified minimu mdistance to the
vehicle in front; adjustable
0020 Own vehicle
Displa ywhen DISTRONIC PLUS is
activated
X Select the Distance Display function
using the on-board computer
(Y page 190).
You will see the stored speed for about five
seconds whe nyou activate DISTRONIC PLUS.
After this time, you will see the following in
the multifunction display while DISTRONIC
PLUS is activated: 0002
DISTRONIC PLUS activated
0003 Own vehicle
0023 Specified minimum distance to the
vehicle in front; adjustable
0022 Vehicle in front, if detected Driving systems
165Driving and parking Z