2012 MERCEDES-BENZ SLK350 oil
[x] Cancel search: oilPage 148 of 334

Problems with the transmission
Problem Possible causes/consequences and
0001 Solutions
The transmission has
problems shifting gear. The transmission is losing oil.
X
Have the transmission checked at a qualified specialist
workshop immediately. The acceleration ability
is deteriorating.
The transmission no
longer changes gear. The transmission is in emergency mode.
It is only possible to shift into
secondgear and reverse gear.
X Stop the vehicle.
X Shift the transmission to position P.
X Switch off the engine.
X Wait at least 10seconds before restarting the engine.
X Shift the transmission to position Dor R.
If D is selected, the transmission shifts into secondgear; ifRis
selected, the transmission shifts into reverse gear.
X Have the transmission checked at a qualified specialist
workshop immediately. Releasing the parking lock manually
In the event of an electrical malfunction, it is
possible to release the selector lever lock
manually to move it out of position P, e.g. if
you wish to tow the vehicle away. !
Do not use any sharp-edged objects to
remove the selector lever gaiter from the
center console. This could damage the
selector lever gaiter. X
Apply the electric parking brake.
X Press the frame of selector level gaiter 0002
together somewhat on the side edge at the
back and hold with one hand 0003.
X With the other hand, pry off the frame of
selector level gaiter 0002with a flat, blunt
object (e.g. a screwdriver wrapped in cloth)
at rear edge 0023, pulling it up and out at the
same time.
X Press release buttons 0022down and
simultaneously move the selector lever out
of position P.
The selector lever can now be moved freely
until it is returned to position P. Refueling
Important safety notes
G
WARNING
Gasoline is highly flammable and poisonous.
It burns violently and can cause serious
personal injury. 146
RefuelingDriving and parking
Page 197 of 334
X
Press the 0002or0005 button on the
steering wheel to select the Sett. menu.
X Press the 0004or0003 button to select the
Convenience submenu.
X Press 000Cto confirm.
X Press the 0004or0003 button to select the
Belt Adjustment function.
You will see the selected setting: on or
off .
X Press the 000Cbutton to save the setting.
Switching the fold-in mirrors when
locking feature is on/off
If you switch on the Fold Mirrors in when
Locking function, the exterior mirrors fold in
when you lock the vehicle. If you unlock the
vehicle and then open a door, the exterior
mirrors fold out again.
If you have switched the function on and you
fold the exterior mirrors in using the button
on the door (Y page 99), they will not fold out
automatically. The exterior mirrors can then
only be folded out using the button on the
door.
X Press the 0002or0005 button on the
steering wheel to select the Settingsmenu.
X Press the 0004or0003 button to select the
Convenience submenu.
X Press the 000Cbutton to confirm.
X Press the 0004or0003 button to select the
Fold mirrors in when locking: function.
You will see the selected setting:
Enabledor
Disabled .
X Press the 000Cbutton to save the setting.
Restoring the factory settings For safety reasons, the
Daytime RunningLights: function in the
Lights submenu is
only reset when the vehicle is stationary. X
Press the 0002or0005 button on the
steering wheel to select the Sett. menu.
X Press the 0004or0003 button to select the
Factory Setting submenu.
X Press the 000Cbutton to confirm.
The Reset All Settings? message
appears.
X Press the 0004or0003 button to select
No or
Yes .
X Press the 000Cbutton to confirm the
selection.
If you select Yes , the multifunction display
shows a confirmation message. AMG menu in AMG vehicles
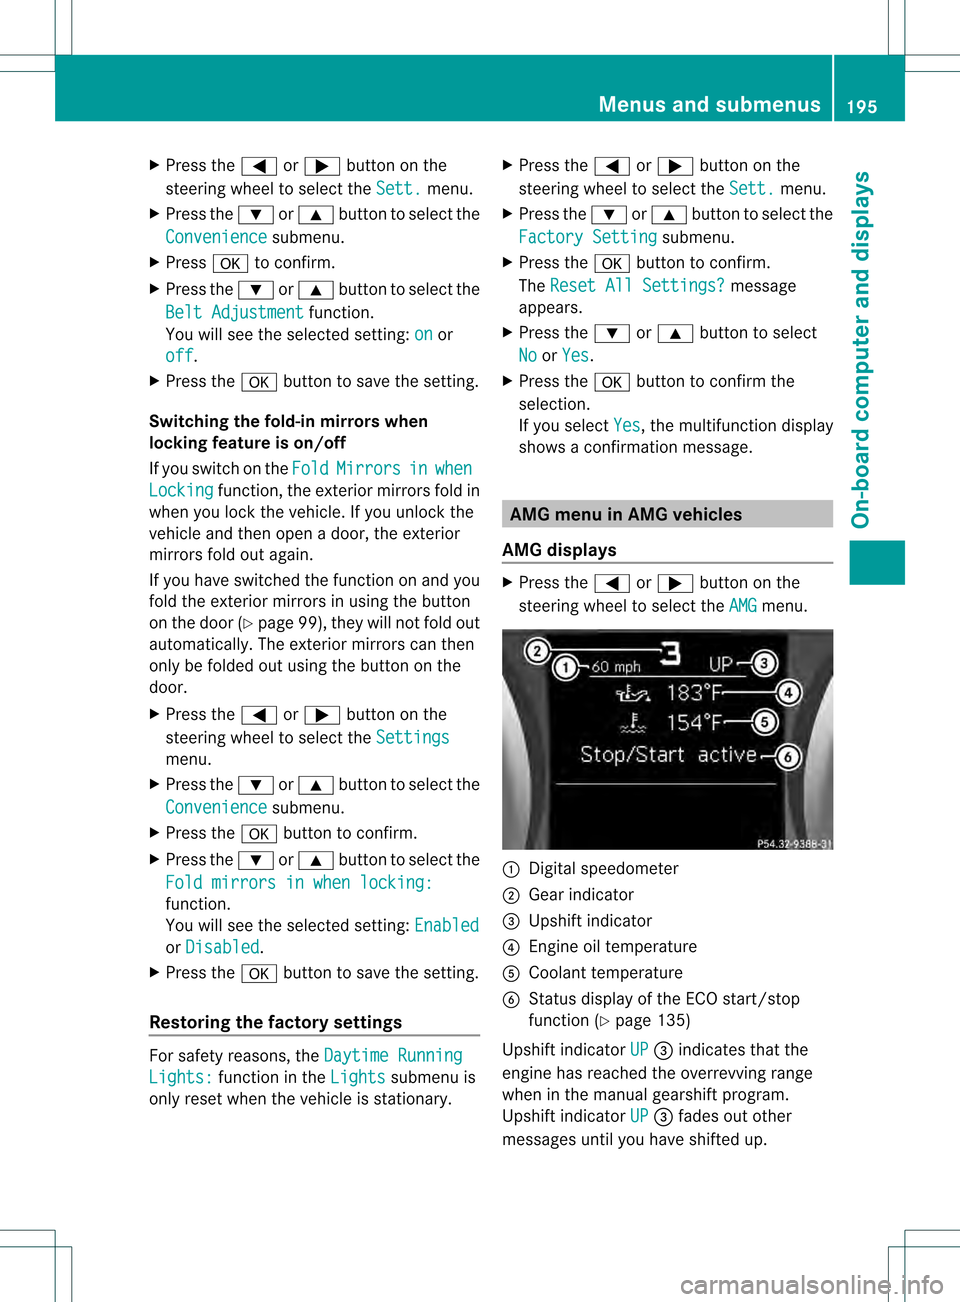
AMG displays X
Press the 0002or0005 button on the
steering wheel to select the AMG menu.
0002
Digital speedometer
0003 Gear indicator
0023 Upshift indicator
0022 Engine oil temperature
0020 Coolant temperature
0021 Status display of the ECO start/stop
function (Y page 135)
Upshift indicator UP 0023
indicates that the
engine has reached the overrevving range
when in the manual gearshift program.
Upshift indicator UP 0023
fades out other
messages until you have shifted up. Menus and submenus
195On-board computer and displays Z
Page 198 of 334
When the engine temperature is below
80 †, the oil temperature gauge flashes.
Avoid driving at full engine output during this
time.
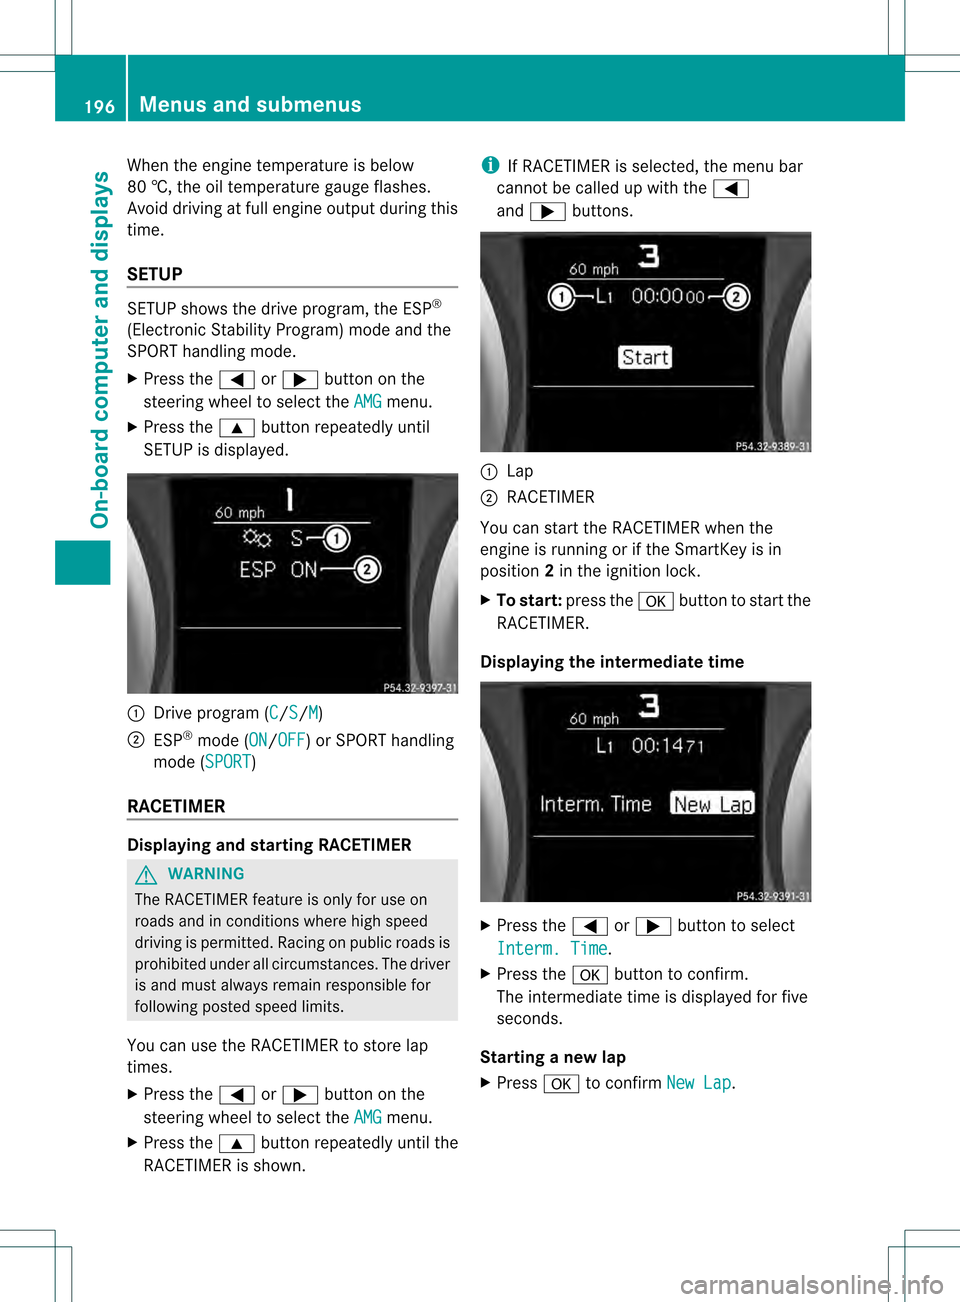
SETUP SETUP shows the drive program, the ESP
®
(Electronic Stability Program) mode and the
SPORT handling mode.
X Press the 0002or0005 button on the
steering wheel to select the AMG menu.
X Press the 0003button repeatedly until
SETUP is displayed. 0002
Drive program (C /S /M )
0003 ESP ®
mode (ON /OFF ) or SPORT handling
mode (SPORT )
RACETIMER Displaying and starting RACETIMER
G
WARNING
The RACETIMER feature is only for use on
roads and in conditions where high speed
driving is permitted. Racing on public roads is
prohibited under all circumstances. The driver
is and must always remain responsible for
following posted speed limits.
You can use the RACETIMER to store lap
times.
X Press the 0002or0005 button on the
steering wheel to select the AMG menu.
X Press the 0003button repeatedly until the
RACETIMER is shown. i
If RACETIMER is selected, the menu bar
cannot be called up with the 0002
and 0005 buttons. 0002
Lap
0003 RACETIMER
You can start the RACETIMER when the
engine is running or if the SmartKey is in
position 2in the ignition lock.
X To start: press the 000Cbutton to start the
RACETIMER.
Displaying the intermediate time X
Press the 0002or0005 button to select
Interm. Time .
X Press the 000Cbutton to confirm.
The intermediate time is displayed for five
seconds.
Starting a new lap
X Press 000Cto confirm New Lap .196
Menus and submenusOn-board computer and displays
Page 220 of 334
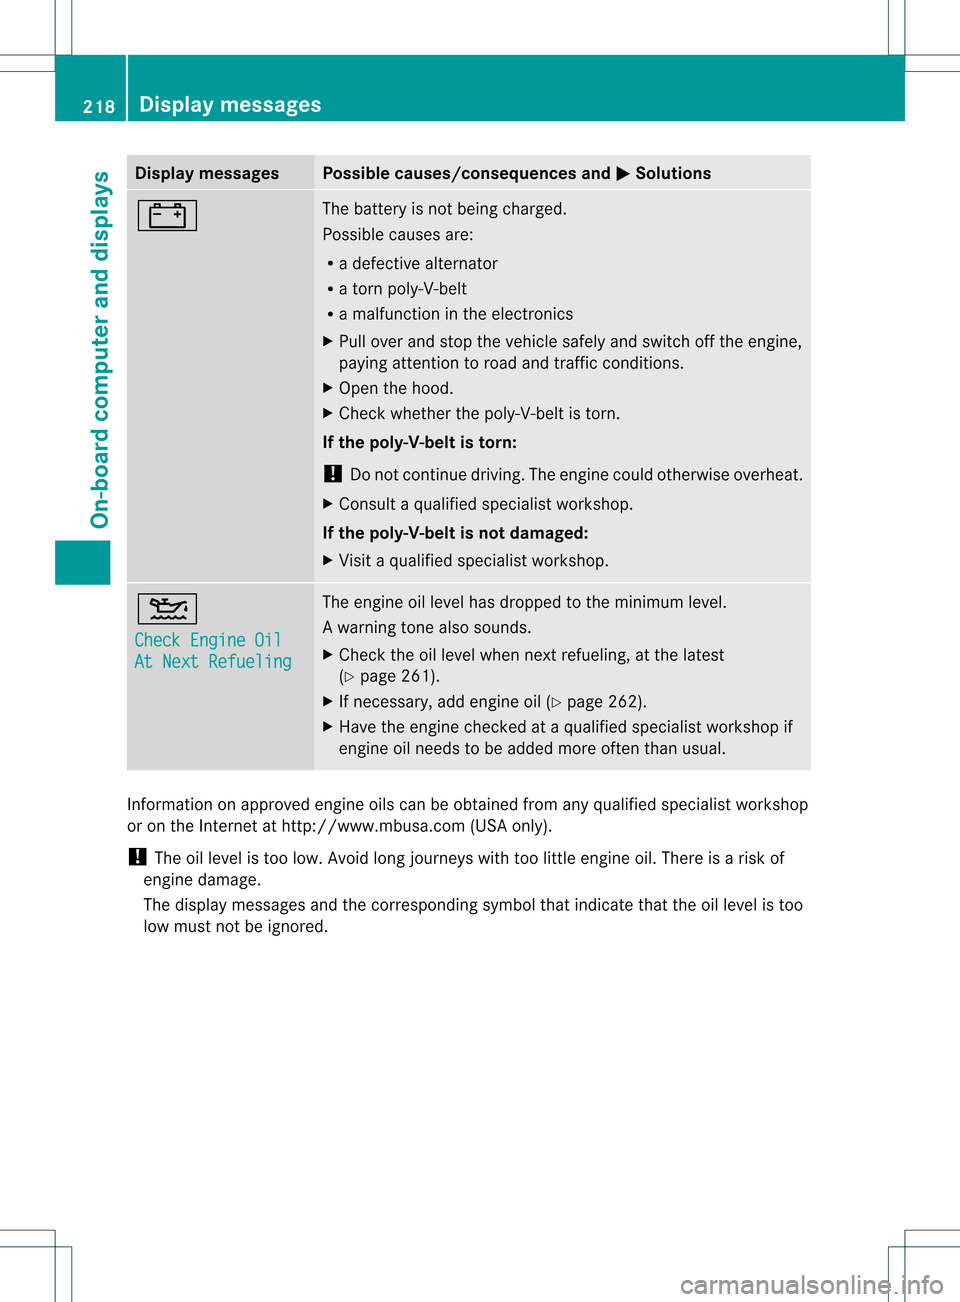
Display messages Possible causes/consequences and
0001 Solutions
000A The battery is no
tbeing charged.
Possible causes are:
R a defective alternator
R a torn poly-V-belt
R a malfunction in the electronics
X Pull over and stop the vehicle safely and switch off the engine,
paying attention to road and traffic conditions.
X Open the hood.
X Check whether the poly-V-belt is torn.
If the poly-V-belt is torn:
! Do not continue driving. The engine could otherwise overheat.
X Consult a qualified specialist workshop.
If the poly-V-belt is not damaged:
X Visit a qualified specialist workshop. 0012
Check Engine Oil
At Next Refueling The engine oil level has dropped to the minimum level.
Aw
arning tone also sounds.
X Chec kthe oil level when next refueling, at the latest
(Y page 261).
X If necessary, add engine oil (Y page 262).
X Have the engine checked at a qualified specialist workshop if
engine oil needs to be added more often than usual. Information on approved engine oils can be obtained from any qualified specialist workshop
or on the Internet at http://www.mbusa.com (USA only).
! The oil level is too low. Avoid long journeys with too little engine oil. There is a risk of
engine damage.
The display messages and the corresponding symbol that indicate that the oil level is too
low must not be ignored. 218
Display messagesOn-board computer and displays
Page 262 of 334

Useful information
i This Operator's Manual describes all
models and all standard and optional
equipment of your vehicle available at the
time of publication of the Operator's
Manual. Country-specific differences are
possible. Please note that your vehicle may
not be equipped with all features
described. This also applies to safety-
related systems and functions.
i Please read the information on qualified
specialist workshops (Y page 23).Engine compartment
Hood
Opening the hood G
WARNING
Do not pull the release lever while the vehicle
is in motion. Otherwise, the hood could be
forced open by passing air flow.
This could cause the hood to come loose and
injure you and/o rothers. G
WARNING
There is a ris kofinjury if the hood is open,
even if the engine is not running.
Some engine components can become very
hot.
To avoid the ris kofburns, only touch those
components described in th eOperator's
Manual and observe the relevant safety notes. G
WARNING
To avoid injury, stay clear of moving parts
when the hood is open and the engine is
running.
The radiator fan may continue to run for
approximately 30seconds or may even restart
after the engine has been switched off. For
this reason, you must not reach into the fan
rotation area. G
WARNING
The engine is equipped with a transistorized
ignition system. Because of the high voltage,
it is dangerous to touch any components
(ignition coils, spark plug sockets, diagnostic
socket) of the ignition system:
R with the engine running
R while starting the engine
R when the ignition is switched on and the
engine is turned manually
X Make sure that the windshield wipers are
switched off. G
WARNING
The windshield wipers and wiper linkage
could be set in motion.
When the hood is open, you or others could
be injured by the wiper linkage.
Make sure that the windshield wipers are
switched off. Remove the SmartKey or make
sure that no ignition position has been
selected with KEYLESS-GO. All indicator
lamps must be off in the instrument panel. X
Pull release lever 0002for the hood.
The hood is released.
! Make sure that the windshield wipers are
not folded away from the windshield. You
could otherwise damage the windshield
wipers or the hood. 260
Engine compartmentMaintenance and care
Page 263 of 334

X
Reach into the gap, pull hoo dcatch
handle 0003up and lift the hood.
Once you have lifted the hood about
15 inches (40cm), it is automatically
opened the res tofthe way and held open
by the gas-filled struts.
Closing the hood G
WARNING
When closing the hood, use extreme caution
not to catch hands or fingers. Be careful that
you do not close the hood on anyone.
Make sure the hood is securely engaged
before driving off. Do not continue driving if
the hood can no longer engage after an
accident, for example. The hood could
otherwise come loose while the vehicle is in
motion and injure you and/or others.
X Lower the hood and let it fall from a height
of approximately 8inche s(20cm).
X Check that the hood has engaged properly.
If the hood can be raised slightly, it is not
properly engaged. Open it again and close
it with a little more force. Engine oil
Notes on the oil level Depending on the driving style, the vehicle
consumes up to 0.9 US qts
(0.8 l) of oil over
a distance of 600 miles (1,000 km). The oil
consumption may be highe rthan this when the vehicle is new or if you frequently drive at
high engine speeds.
AMG vehicles: before operation on race
tracks, check the oil level and (Y page 261)
add oil if necessary (Y page 262). Race track
operation is only permitted with a maximum
engine oil level.
Depending on the engine, the oil dipstick may
be in a different location.
When checking the oil level:
R park the vehicle on a level surface.
R the engine should be switched off for
approximately five minutes if the engine is
at normal operating temperature.
R if the engine is not at normal operating
temperature, e.g. if the engine was only
started briefly: wait about 30 minutes
before carrying out the measurement.
Checking the oil level using the oil
dipstick X
Pull oil dipstick 0002out of the dipstick guide
tube.
X Wipe off oil dipstick 0002.
X Slowly slide oil dipstick 0002into the guide
tube to the stop, and take it out again.
If the level is between MIN mark 0023and
MAX mark 0003, the oil level is correct.
X If the oil level is at or below MIN mark 0023,
add 0.55 US qt to 1.1 US qt (0.5 to 1.0 l) of
engine oil. Engine compartment
261Maintenance and care Z
Page 264 of 334
Adding engine oil
G
WARNING
If engine oil comes into contact with hot
engine parts, it may ignite and you could burn
yourself .Do not spill any engine oil on hot
engine parts. H
Environmental note
When adding oil, take care not to spill any. If
oil enters the soil or waterways, it is harmful
to the environment.
! Only use engine oils and oil filters that
have been approved for vehicles with a
service system. You can obtain a list of the
engine oils and oil filters tested and
approved in accordance with the
Mercedes-Benz Specifications for Service
Products at any Mercedes-Benz Service
center.
Damage to the engine or exhaust system is
caused by the following:
R using engine oils and oil filters that have
not been specifically approved for the
service system
R replacing engine oil and oil filters after
the interval for replacement specified by
the service system has been exceeded
R using engine oil additives.
! Do not add too much oil. adding too much
engine oil can result in damage to the
engine or to the catalytic converter. Have
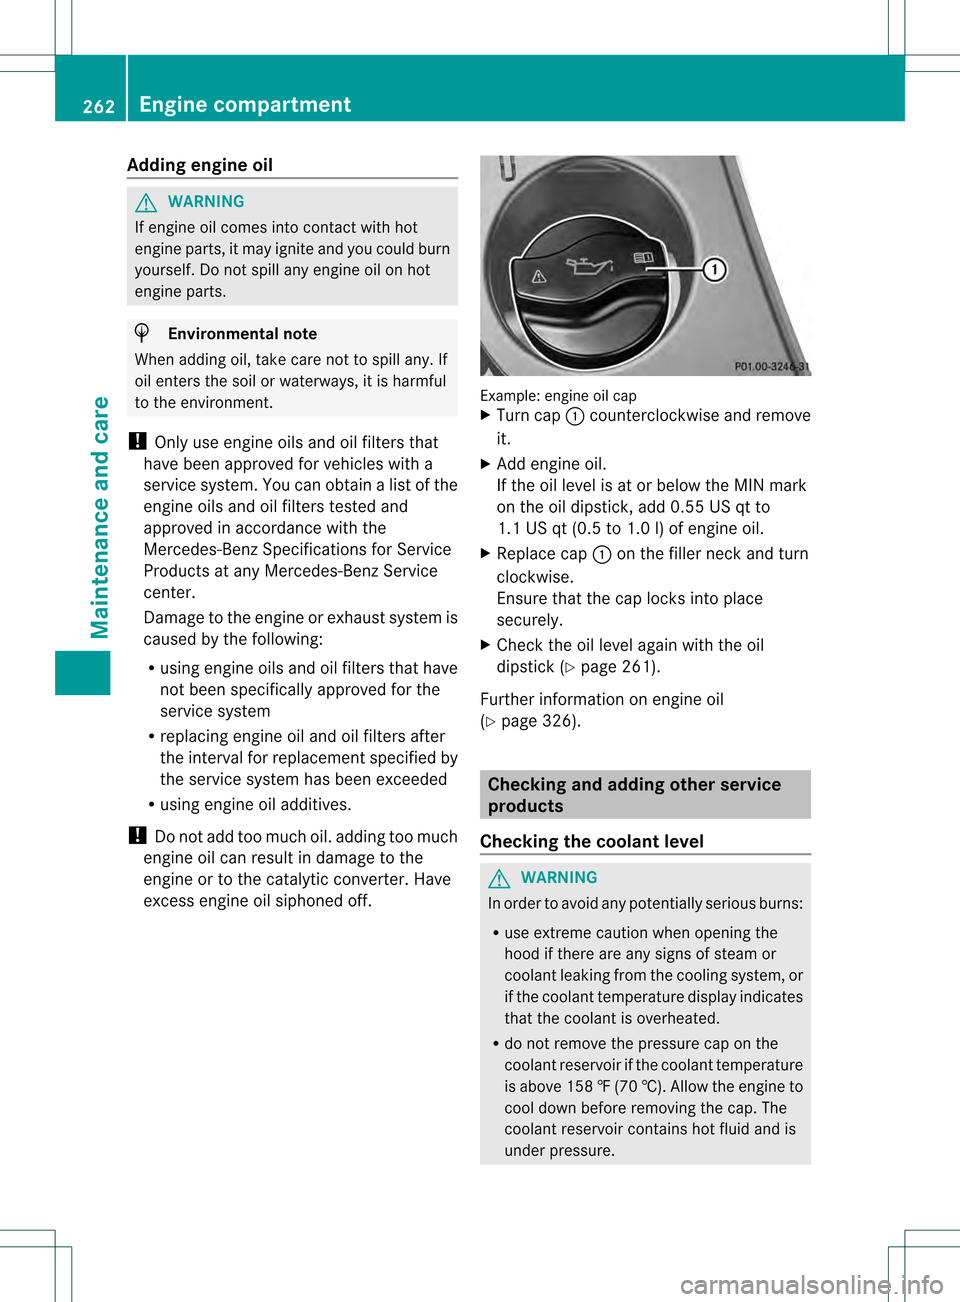
excess engine oil siphoned off. Example: engine oil cap
X
Turn cap 0002counterclockwise and remove
it.
X Add engine oil.
If the oil level is at or below the MIN mark
on the oil dipstick, add 0.55 US qt to
1.1 US qt (0.5 to 1.0 l)of engine oil.
X Replace cap 0002on the filler neck and turn
clockwise.
Ensure that the cap locks into place
securely.
X Check the oil level again with the oil
dipstick (Y page 261).
Further information on engine oil
(Y page 326). Checking and adding other service
products
Checking the coolant level G
WARNING
In order to avoid any potentially serious burns:
R use extreme caution when opening the
hood if there are any signs of steam or
coolant leaking from the cooling system, or
if the coolant temperature display indicates
that the coolant is overheated.
R do not remove the pressure cap on the
coolant reservoir if the coolant temperature
is above 158 ‡(70 †). Allow the engine to
cool dow nbefore removing the cap. The
coolant reservoir contains hot fluid and is
under pressure. 262
Engine compartmentMaintenance and care
Page 269 of 334
!
Do not park the vehicle for an extended
period straight after cleaning it, particularly
after having cleaned the wheels with wheel
cleaner. Wheel cleaners could cause
increased corrosion of the brake discs and
brake pads/linings. For this reason, you
should drive for a few minutes after
cleaning. Braking heats the brake discs and
the brake pads/linings, thus drying them.
The vehicle can then be parked.
Cleaning the paintwork Scratches, corrosive deposits, areas affected
by corrosion and damage caused by
inadequate care cannot always be completely
repaired.Ins uch cases, visit a qualified
specialist workshop.
X Remove dirt immediately, where possible,
while avoiding rubbing too hard.
X Soak insect remains with insect remover
and rinse off the treated areas afterwards.
X Soak bird droppings with wate rand rinse
off the treated areas afterwards.
X Remove coolant, brake fluid, tree resin,
oils, fuels and greases by rubbing gently
with a cloth soaked in petroleu metheror
lighter fluid.
X Use tar remover to remove tar stains.
X Use silicone remover to remove wax.
! Do not affix:
R stickers
R films
R magnetic plates or similar items
to painted surfaces. You could otherwise
damage the paintwork.
If water no longer forms "beads" on the paint
surface, use the paint care products
recommended and approved by Mercedes-
Benz. This is the case approximately every
three to five months, depending on the
climate conditions and the care produc tused.
If the dirt has penetrated the paint surface or
if the paintwork has become dull, then the
paintwork should be cleaned. For cleaning, please use the paint cleaner recommend and
approved by Mercedes Benz.
Do not use these care products in the sun or
on the hood while the hood is hot.
X
Use a suitable touch-up stick, e.g. MB
Touch-Up Stick, to repair slight damage to
the paintwork quickly and provisionally.
Matte finish care If your vehicle has a clear matte finish,
observe the following instructions in order to
avoid damage to the paintwork due to
incorrect care.
These notes also apply to light alloy wheels
with a clear matte finish.
!
Never polish the vehicle or the light alloy
wheels. Polishing causes the finish to
shine.
! The following may cause the paint to
become shiny and thus reduce the matte
effect:
R Vigorous rubbing with unsuitable
materials.
R Frequent use of car washes.
R Washing the vehicle in direct sunlight.
! Never use paint cleaner, buffing or
polishing products, or gloss preserver, e.g.
wax. These products are only suitable for
high-gloss surfaces. Their use on vehicles
with matte finish leads to considerable
surface damage (shiny, spotted areas).
Always have paintwork repairs carried out
at a qualified specialist workshop.
! Do not use wash programs with a hot wax
treatment under any circumstances.
i The vehicle should preferably be washed
by hand using a soft sponge, car shampoo
and plenty of water.
i Use only insect remover and car shampoo
from the range of recommended and
approved Mercedes-Benz care products. Care
267Maintenance and care Z