2012 MERCEDES-BENZ SLK ROADSTER mirror
[x] Cancel search: mirrorPage 259 of 321
Always have paintwork repairs carried out
at a qualified specialis
tworkshop.
! Do not use wash programs with a hot wax
treatment under any circumstances.
i The vehicle should preferably be washed
by hand using a soft sponge, car shampoo
and plenty of water.
i Use only insect remover and car shampoo
from the range of recommended and
approved Mercedes-Benz care products.
Cleaning the windows G
WARNING
Switch off the windscreen wipers and remove
the key from the ignition lock before cleaning
the windscreen or the wiper blades. On vehi-
cles with KEYLESS-GO, press the Start/Stop
button repeatedly until all indicator lamps in
the instrument cluster have gone off. The
windscreen wipers could otherwise move and
injure you.
X Clean the inside and outside of the win-
dows with a damp cloth and a cleaning
agent that is recommended and approved
by Mercedes-Benz.
! Do not use dry cloths, abrasive products,
solvents or cleaning agents containing sol-
vents to clean the inside of the windows.
Do not touch the insides of the windows
with hard objects, e.g. an ice scraper or
ring. There is otherwise a risk of damaging
the windows.
! Clean the water drainage channels of the
windscreen and the rear window at regular
intervals. Deposits such as leaves, petals
and pollen may under certain circumstan-
ces prevent water from draining away.T his
can lead to corrosion damage and damage
to electronic components. Cleaning the wiper blades G
WARNING
Switch off the windscreen wipers and remove
the key from the ignition lock before cleaning
the windscreen or the wiper blades. On vehi-
cles with KEYLESS-GO, press the Start/Stop
button repeatedly until all indicator lamps in
the instrument cluster have gone off. The
windscreen wipers could otherwise move and
injure you.
! Do not pull on the wiper blade. Otherwise,
the wiper blade could be damaged.
! Do not clean wiper blades too often and
do not rub them too hard. Otherwise, the
graphite coating could be damaged. This
could cause wiper noise.
X Fold the wiper arms away from the wind-
screen.
X Cleant he wiper blades carefully using a
damp cloth.
X Fold the windscreen wipers back again
before switching on the ignition.
! Hold the wiper arm securely when folding
back. The windscreen could be damaged if
the wiper arm hits against it suddenly.
Cleaning the exterior lighting !
Only use cleaning agents or cleaning
cloths that are suitable for plastic lenses.
Unsuitable cleaning agents or cleaning
cloths could scratch or damage the plastic
lenses of the exterior lighting.
X Cleant he plastic lenses of the exterior
lighting using a wet sponge and a mild
cleaning agent, e.g. Mercedes-Ben zcar
shampoo. Or clean the exterior lighting
with cleaning cloths.
Cleaning the mirror turn signal !
Only use cleaning agents or cleaning
cloths that are suitable for plastic lenses.
Unsuitable cleaning agents or cleaning 256
CareMaintenance and care
Page 260 of 321
cloths could scratch or damage the plastic
lenses of the mirror turn signals.
X Clea nthe plastic lenses of the mirror turn
signals using a wet sponge and a mild
cleaning agent, e.g. Mercedes-Ben zcar
shampoo. Cleaning cloths may be used as
well.
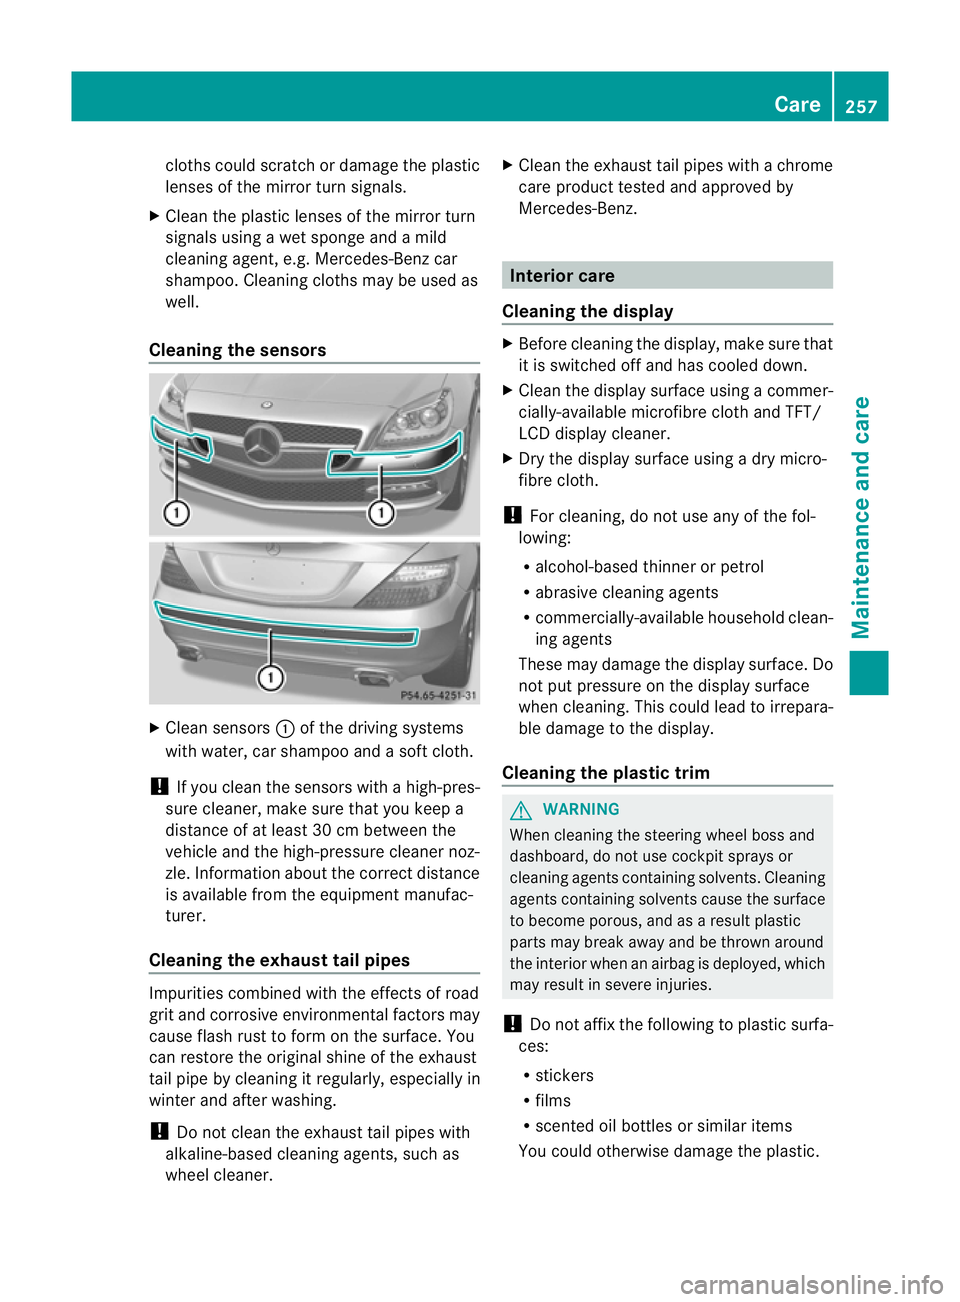
Cleaning the sensors X
Clean sensors :of the driving systems
with water, car shampoo and a sof tcloth.
! If you clean the sensors with a high-pres-
sure cleaner, make sure that you keep a
distance of at least 30 cm between the
vehicle and the high-pressure cleaner noz-
zle. Information about the correct distance
is available fro mthe equipment manufac-
turer.
Cleaning the exhaust tail pipes Impurities combined with the effects of road
grit and corrosive environmental factors may
cause flash rust to form on the surface. You
can restore the original shine of the exhaust
tail pipe by cleaning it regularly, especially in
winter and after washing.
! Do not clean the exhaust tail pipes with
alkaline-based cleaning agents, such as
wheel cleaner. X
Cleant he exhaust tail pipes with a chrome
care product tested and approved by
Mercedes-Benz. Interior care
Cleaning the display X
Before cleaning the display, make sure that
it is switched off and has cooled down.
X Cleant he display surface using a commer-
cially-available microfibre cloth and TFT/
LCD display cleaner.
X Dry the display surface using a dry micro-
fibre cloth.
! For cleaning, do not use any of the fol-
lowing:
R alcohol-based thinner or petrol
R abrasive cleaning agents
R commercially-available household clean-
ing agents
These may damage the display surface. Do
not put pressure on the display surface
when cleaning. This could lead to irrepara-
ble damage to the display.
Cleaning the plastic trim G
WARNING
When cleaning the steering wheel boss and
dashboard, do not use cockpit sprays or
cleaning agents containing solvents. Cleaning
agents containing solvents cause the surface
to become porous, and as aresult plastic
parts may break away and be thrown around
the interior when an airbag is deployed, which
may result in severe injuries.
! Do not affix the following to plastic surfa-
ces:
R stickers
R films
R scented oil bottles or similar items
You could otherwise damage the plastic. Care
257Maintenance and care Z
Page 278 of 321
:
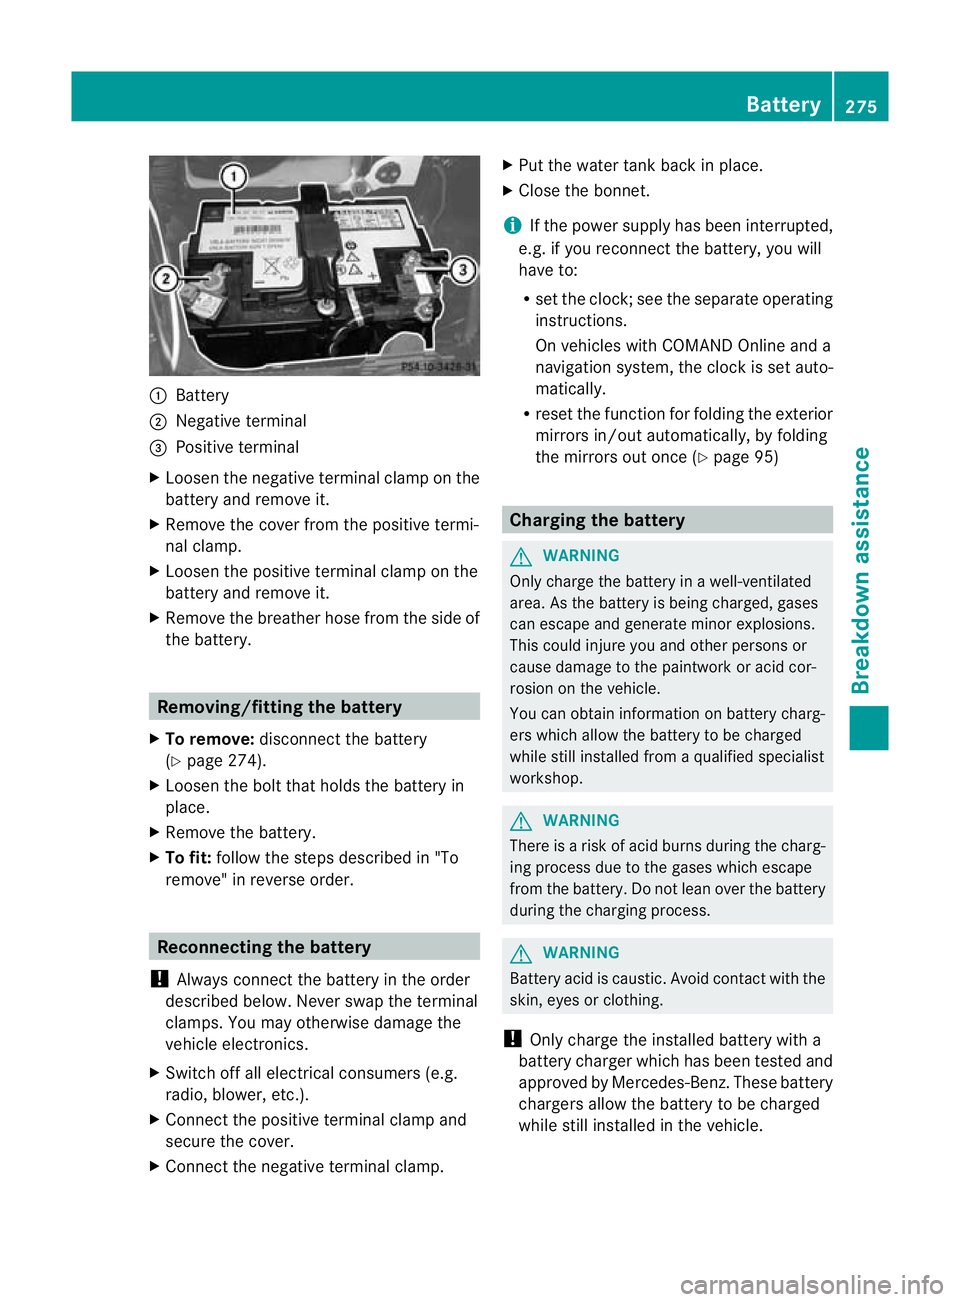
Battery
; Negative terminal
= Positive terminal
X Loosen the negative terminal clamp on the
battery and remove it.
X Remove the cover from the positive termi-
nal clamp.
X Loosen the positive terminal clamp on the
battery and remove it.
X Remove the breathe rhose from the side of
the battery. Removing/fitting the battery
X To remove: disconnect the battery
(Y page 274).
X Loosen the bolt that holds the battery in
place.
X Remove the battery.
X To fit: follow the steps described in "To
remove" in reverse order. Reconnecting the battery
! Always connect the battery in the order
described below. Never swap the terminal
clamps. You may otherwise damage the
vehicle electronics.
X Switch off all electrical consumers (e.g.
radio, blower, etc.).
X Connect the positive terminal clamp and
secure the cover.
X Connect the negative terminal clamp. X
Put the water tank back in place.
X Close the bonnet.
i If the power supply has been interrupted,
e.g. if you reconnect the battery, you will
have to:
R set the clock; see the separate operating
instructions.
On vehicles with COMAND Online and a
navigation system, the clock is set auto-
matically.
R reset the function for folding the exterior
mirrors in/out automatically, by folding
the mirrors out once (Y page 95) Charging the battery
G
WARNING
Only charge the battery in a well-ventilated
area. As the battery is being charged, gases
can escape and generate minor explosions.
This could injure you and other persons or
cause damage to the paintwork or acid cor-
rosion on the vehicle.
You can obtain information on battery charg-
ers which allow the battery to be charged
while still installed from a qualified specialist
workshop. G
WARNING
There is a risk of acid burns during the charg-
ing process due to the gases which escape
from the battery. Do not lean over the battery
during the charging process. G
WARNING
Battery acid is caustic. Avoid contact with the
skin, eyes or clothing.
! Only charge the installed battery with a
battery charger which has been tested and
approved by Mercedes-Benz. These battery
chargers allow the battery to be charged
while still installed in the vehicle. Battery
275Breakdown assistance Z
Page 313 of 321
Vehicle data
Please note tha tfor the specified vehicle
data:
R the heights specified may vary as a result
of:
-tyres
- load
- condition of the suspension
- optional equipment
R items of optional equipment increase the
unladen weight and reduce the maximum
payload. The unladen weight is specified in
accordance with EC directive and includes:
-driver (68 kg)
- luggage (7 kg)
- all fluids (fuel tank 90% full)
R vehicle-specific weight information can be
found on the vehicle identification plate
(Y page 302).
R only for certain countries: you can find vehi-
cle-specific vehicle data in the COC docu-
ments (CERTIFICATE OF CONFORMITY).
These documents are delivered with your
vehicle.
Missing values were not available at the time
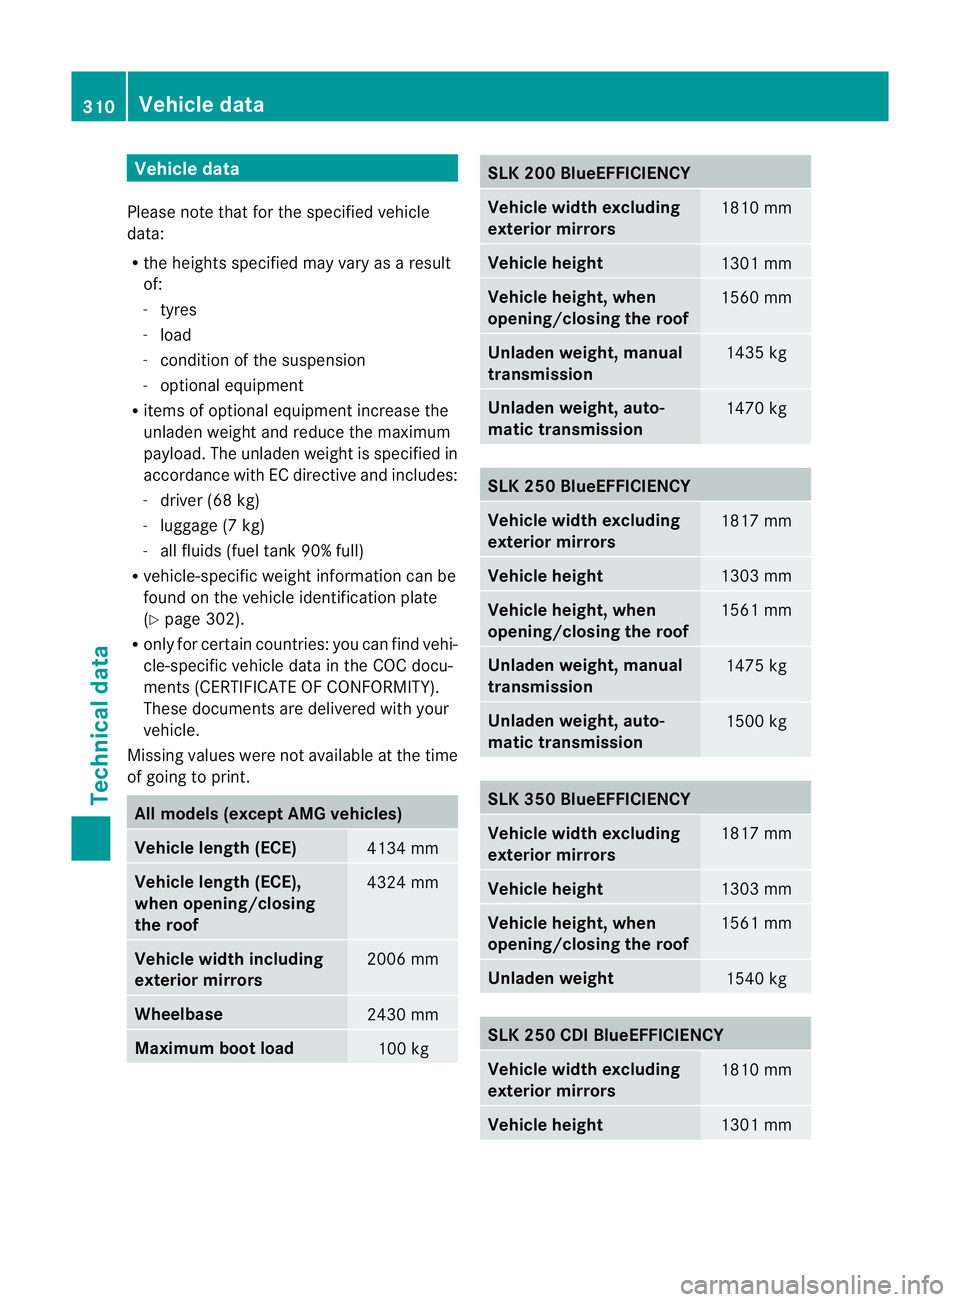
of going to print. All models (except AMG vehicles)
Vehicle length (ECE)
4134 mm
Vehicle length (ECE),
when opening/closing
the roof 4324 mm
Vehicle width including
exterior mirrors
2006 mm
Wheelbase
2430 mm
Maximum boot load
100 kg SLK 200 BlueEFFICIENCY
Vehicle width excluding
exterior mirrors
1810 mm
Vehicle height
1301 mm
Vehicle height, when
opening/closing the roof
1560 mm
Unladen weight, manual
transmission 1435 kg
Unladen weight, auto-
matic transmission
1470 kg
SLK 250 BlueEFFICIENCY
Vehicle width excluding
exterior mirrors
1817 mm
Vehicle height
1303 mm
Vehicle height, when
opening/closing the roof
1561 mm
Unladen weight, manual
transmission 1475 kg
Unladen weight, auto-
matic transmission
1500 kg
SLK 350 BlueEFFICIENCY
Vehicle width excluding
exterior mirrors
1817 mm
Vehicle height
1303 mm
Vehicle height, when
opening/closing the roof
1561 mm
Unladen weight
1540 kg
SLK 250 CDI BlueEFFICIENCY
Vehicle width excluding
exterior mirrors
1810 mm
Vehicle height
1301 mm310
Vehicle dataTechnical data
Page 314 of 321
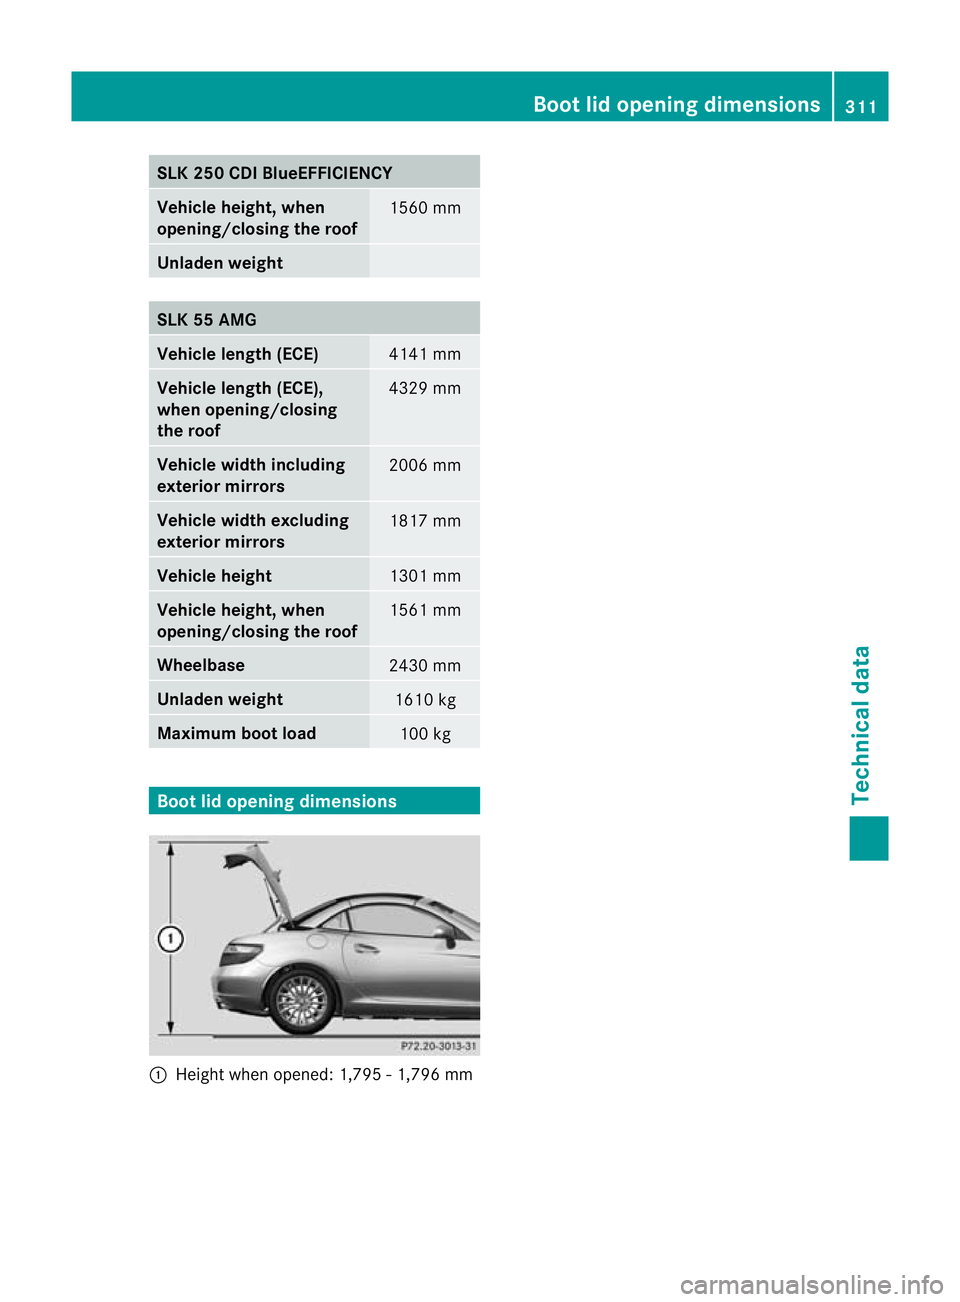
SLK 250 CDI BlueEFFICIENCY
Vehicle height, when
opening/closing the roof
1560 mm
Unladen weight
SLK 55 AMG
Vehicle length (ECE)
4141 mm
Vehicle length (ECE),
when opening/closing
the roof
4329 mm
Vehicle width including
exterior mirrors
2006 mm
Vehicle width excluding
exterior mirrors
1817 mm
Vehicle height
1301 mm
Vehicle height, when
opening/closing the roof
1561 mm
Wheelbase
2430 mm
Unladen weight
1610 kg
Maximum boot load
100 kg
Boot lid opening dimensions
:
Height when opened: 1,795 - 1,796 mm Boot lid opening dimensions
311Technical data Z