2012 MERCEDES-BENZ SLK ROADSTER tyre pressure
[x] Cancel search: tyre pressurePage 258 of 321
the correct distance is available fro
mthe
equipment manufacturer.
Move the high-pressure cleaner nozzle
around when cleaning your vehicle.
Do not aim directly at any of the following:
R tyres
R door gaps, roof gaps, joints etc.
R electrical components
R battery
R connectors
R lights
R seals
R trim elements
R ventilation slots
Damaged seals or electrical components
can lead to leaks or failures.
! Do not use high-pressure cleaning equip-
ment to clean the tank recess when it is
open. This can damage the seals or other
components.
Cleaning the wheels !
Do not use acidic wheel cleaning products
to remove brake dust. This could damage
wheel bolts and brake components.
! Do not park up the vehicle for an extended
period straight after cleaning it, particularly
after having cleaned the wheels with wheel
cleaner. Wheel cleaners could cause
increased corrosion of the brake discs and
brake pads/linings. For this reason, you
should drive for a few minutes after clean-
ing. Braking heats the brake discs and the
brake pads/linings, thus drying them. The
vehicle can then be parked up.
Cleaning the paintwork Scratches, corrosive deposits, areas affected
by corrosion and damage caused by inade-
quate care cannot always be completely
repaired. In such cases, visit a qualified spe-
cialist workshop. X
Remove impurities immediately, where
possible, whilst avoiding rubbing too hard.
X Soak insect remains with insect remover
and rinse off the treated areas afterwards.
X Soak bird droppings with water and rinse
off the treated areas afterwards.
X Remove coolant, brake fluid, tree resin,
oils, fuels and greases by rubbing gently
with a cloth soaked in petroleum ether or
lighter fluid.
X Use tar remover to remove tar stains.
X Use silicone remover to remove wax.
! Do not affix:
R stickers
R films
R magnetic plates or similar items
to painted surfaces. You could otherwise
damage the paintwork.
Care and treatment of matt paintwork If your vehicle has a clear matt finish, observe
the following instructions in order to avoid
damage to the paintwork due to incorrect
care.
These notes also apply to light-alloy wheels
with a clear matt finish.
!
Never polish the vehicle or the light alloy
wheels. Polishing makes the paintwork
shiny.
! The following may cause the paint to
become shiny and thus reduce the matt
effect:
R Vigorous rubbing with unsuitable mate-
rials.
R Frequent use of car washes.
R Washing the vehicle in direct sunlight.
! Never use paint cleaner, buffing or pol-
ishing products, or gloss preserver, e.g.
wax. These products are only suitable for
high-gloss surfaces. Their use on vehicles
with matt finish leads to considerable sur-
face damage (shiny, spotted areas). Care
255Maintenance and care Z
Page 266 of 321
X
Place the bag with the collapsible emer-
gency spare wheel in the boot.
X Hook in the retaining strap carabiners and
lash the collapsible emergenc yspare wheel
to the bracket. Flat tyre
Preparing the vehicle
Your vehicle may be equipped with:
R a TIREFIT kit
R an emergency spare wheel
R MOExtended tyres (tyres with run-flat char-
acteristics) (Y page 272)
i Vehicle preparation is not necessary on
vehicles with MOExtended tyres.
i Vehicles with MOExtended tyres are not
equipped with a TIREFIT kit at the factory.
It is therefore recommended that you addi-
tionally equip your vehicle with a TIREFIT kit
if you fit tyres that do not feature run-flat
characteristics, e.g. winter tyres. A TIREFIT
kit can be obtained from a Mercedes-Benz
Service Centre.
X Stop the vehicle as far away as possible
from traffic on solid, non-slippery and level
ground.
X Switch on the hazard warning lamps.
X Apply the electric parkin gbrake manually
(Y page 147).
X Bring the front wheels into the straight-
ahead position.
X Vehicles with manual transmission:
engage first or reverse gear.
X Vehicles with automatic transmission:
move the selector leve rtoP.
X Switch off the engine. X
Vehicles without KEYLESS-GO: remove
the key from the ignition lock.
X Vehicles with KEYLESS-GO: open the
driver's door.
The on-board electronics have status 0,
which is the same as the key having been
removed.
X Vehicles with KEYLESS-GO: remove the
Start/Stop button from the ignition lock
(Y page 127).
X All occupants must get out of the vehicle.
Make sure that they are not endangered as
they do so.
X Make sure that no one is near the danger
area whilst a wheel is being changed. Any-
one who is not directly assisting in the
wheel change should, for example, stand
behind the barrier.
X Get out of the vehicle. Pay attention to traf-
fic conditions when doing so.
X Close the driver's door.
X Place the warning triangle (Y page 260) a
suitable distance away.O bserve legal
requirements. TIREFIT kit
Using the TIREFIT kit TIREFIT is a tyre sealant.
You can use TIREFIT to seal punctures of up
to 4 mm, particularly those in the tyre tread.
You can use TIREFIT at outside temperatures
down to
Ò20 †. G
WARNING
In the following situations, the tyre sealant is
unable to provide sufficient breakdown assis-
tance, as it is unable to seal the tyre properly:
R there are cuts or punctures in the tyre
larger than those mentioned above.
R the wheel rim is damaged.
R you have driven at very low tyre pressures
or on a flat tyre. Flat tyre
263Breakdown assistance
Z
Page 268 of 321
X
Remove the cap from valve Con the faulty
tyre.
X Screw filler hose Donto valve C.
X Inser tplug =into the socket of the ciga-
rette lighter (Y page 240) or into a 12 V
power socket in your vehicle (Y page 241).
X Turn the key to position 1(Ypage 127) in
the ignition lock.
X Press on/off switch ?on the tyre inflation
compressor to ON.
The tyre inflation compressor is switched
on. The tyre is inflated.
i First, tyre sealant is pumped into the tyre.
The pressure can briefly rise to approx-
imately 500 kPa (5 bar, 73 psi).
Do not switch off the tyre inflation com-
pressor during this phase.
X Let the tyre inflation compressor run for a
maximum of ten minutes. The tyre should
the nhave attained a pressure of at least
200 kPa (2.0 bar, 29 psi).
! Do not operate the tyre inflation com-
pressor for longer than ten minutes at a
time without a break .Itmay otherwise
overheat.
The tyre inflation compressor can be oper-
ated again once it has cooled down.
If a pressure of 200 kP a(2 .0 ba r,29 psi) has
bee nachieved afte rten minutes, see
(Y page 265).
If a pressure of 200 kPa (2.0 ba r,29 psi) has
not bee nachieved afte rten minutes, see
(Y page 265).
Tyre pressure of 200 kPa (2.0 bar/
29 psi) not reached If a pressure of 200 kPa
(2.0 ba r,29 psi) has
not been achieved after ten minutes:
X Switch off the tyre inflation compressor.
X Unscrew the filler hose from the valve of
the faulty tyre. X
Very slowly drive forwards or reverse
approximately 10 m.
X Pump up the tyre again.
After a maximum of ten minutes, the tyre
pressure must be at least 200 kPa (2.0 bar,
29 psi). G
WARNING
If the required tyre pressure is not reached
after the specified time, the tyre is too badly
damaged. The tyre sealant cannot repair the
tyre in this instance. Damaged tyres and a tyre
pressure that is too low can significantly
impair the vehicle's braking and driving char-
acteristics. There is a risk of accident.
Do not continue driving. Contact a qualified
specialist workshop.
Tyre pressure of 200 kPa (2.0 bar/
29 psi) reached X
Switch off the tyre inflation compressor.
X Unscrew the filler hose from the valve of
the faulty tyre.
! After use, excess tyre sealant may run out
of the filler hose .This could cause stains.
Therefore, place the filler hose in the plastic
bag that contained the TIREFIT kit.
X Stow the tyre sealant bottle, the tyre infla-
tion compressor and the warning triangle.
X Pull away immediately. G
WARNING
At yre temporarily sealed with tyre sealant
impairs the driving characteristics and is not
suitable for higher speeds .There is a risk of
accident.
You should therefore adapt your driving style
accordingly and drive carefully. Do not exceed
the specified maximum speed with a tyre that
has been repaired using tyre sealant.
The maximum speed for a tyre sealed with
tyre sealant is 80 km/h. The "max. 80 km/h"
sticker must be affixed to the instrumentc lus-
ter within the driver's field of vision. Flat tyre
265Breakdown assistance Z
Page 269 of 321
X
Stop after driving for approximately ten
minutes and check the tyre pressure with
the tyre inflation compressor.
The tyre pressure mus tnow be at least
130 kPa (1.3 bar, 19 psi). G
WARNING
If the required tyre pressure is not reached
after driving for a short period, the tyre is too
badly damaged. The tyre sealant cannot
repair the tyre in this instance. Damaged tyres
and a tyre pressure that is too low can signif-
icantly impair the vehicle's braking and driv-
ing characteristics. There is a risk of accident.
Do not continue driving. Contact a qualified
specialist workshop.
i In your vehicle, you will find a sticker with
the Mercedes-Benz Service24h telephone
number, e.g. on the B-pillar on the driver's
side.
X Correct the tyre pressure if it is still at least
130 kPa (1.3 bar, 19 psi) (for the values,
see the fuel filler flap).
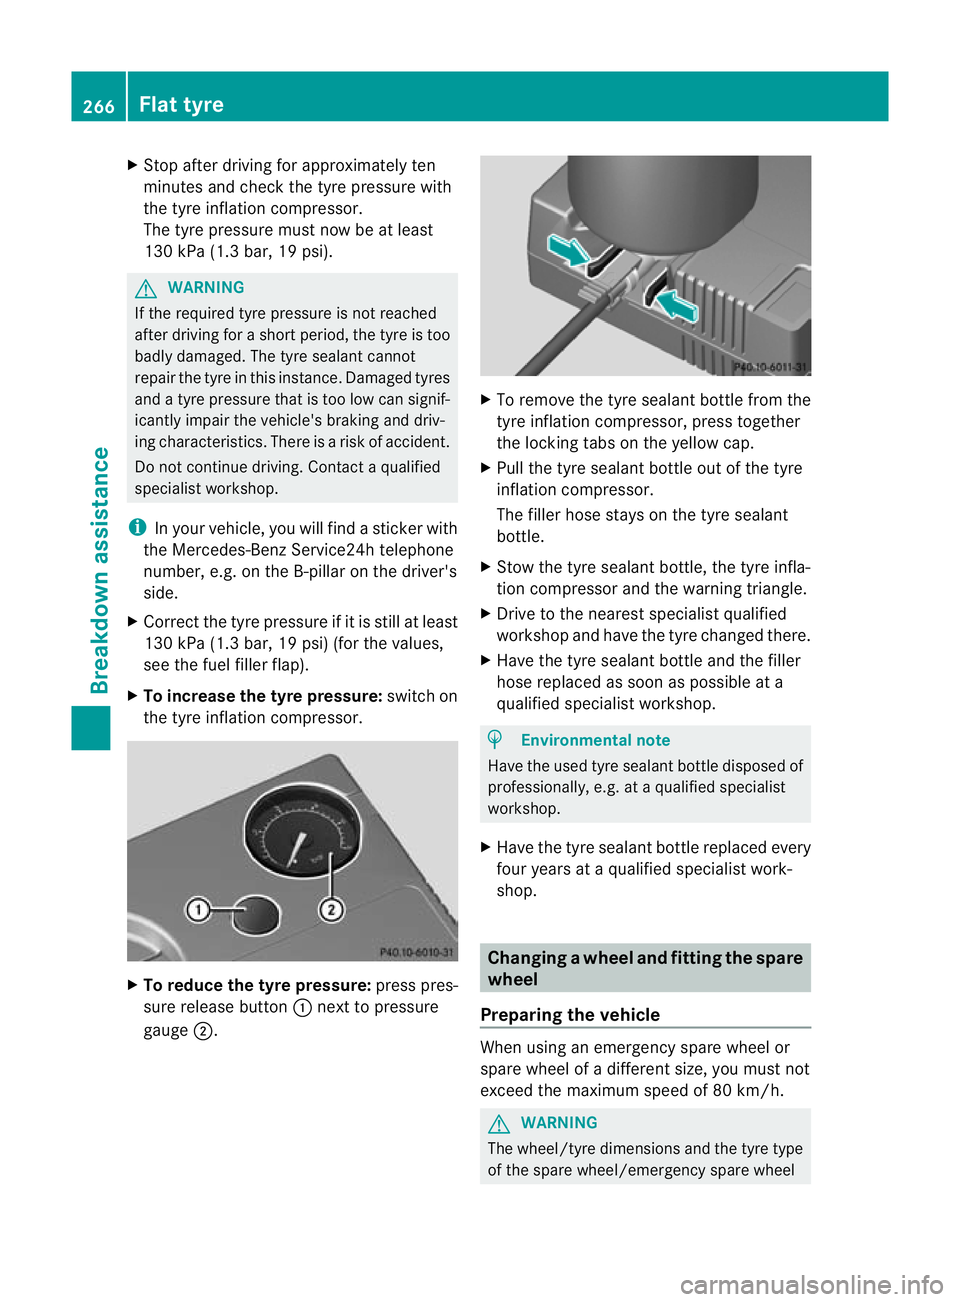
X To increase the tyre pressure: switch on
the tyre inflation compressor. X
To reduce the tyre pressure: press pres-
sure release button :next to pressure
gauge ;. X
To remove the tyre sealant bottle from the
tyre inflation compressor ,press together
the locking tabs on the yellow cap.
X Pull the tyre sealant bottle out of the tyre
inflation compressor.
The filler hose stays on the tyre sealant
bottle.
X Stow the tyre sealant bottle, the tyre infla-
tion compresso rand the warning triangle.
X Drive to the neares tspecialist qualified
workshop and have the tyre changed there.
X Have the tyre sealant bottle and the filler
hose replaced as soon as possible at a
qualified specialist workshop. H
Environmental note
Have the used tyre sealant bottle disposed of
professionally, e.g. at aqualified specialist
workshop.
X Have the tyre sealan tbottle replaced every
four years at a qualified specialist work-
shop. Changing
awheel and fitting the spare
wheel
Preparing the vehicle When using an emergency spare wheel or
spare wheel of a different size, you must not
exceed the maximum speed of 80 km/h.
G
WARNING
The wheel/tyre dimensions and the tyre type
of the spare wheel/emergency spare wheel 266
Flat tyreBreakdown assistance
Page 274 of 321
X
Make sure that the key is in position
1(Y page 127) in the ignition lock.
X Press on/off switch Aon the tyre inflation
compressor to ON.
The tyre inflation compressor is switched
on. The tyre is inflated. The tyre pressure is
read at pressure gauge =.
! Do not operate the tyre inflation com-
pressor for longer than ten minutes at a
time without a break. It may otherwise
overheat.
The tyre inflation compressor can be oper-
ated again once it has cooled down.
X Pump the tyre to the specified tyre pres-
sure.
The specified tyre pressure is printed on
the yellow label of the emergency spare
wheel.
X When the specified tyre pressure has been
reached, press on/off switch AtoOFF, on
the tyre inflation compressor.
The tyre inflation compressor is switched
off.
X Turn the key to position 0in the ignition
lock.
X If the tyre pressure is higher than the speci-
fied pressure, press pressure release but-
ton ;until the correct tyre pressure has
been reached.
X Unscrew air hose union nut :from the
valve.
X Screw the valve cap onto the collapsible
emergency spare wheel valve again. Removing an air hose
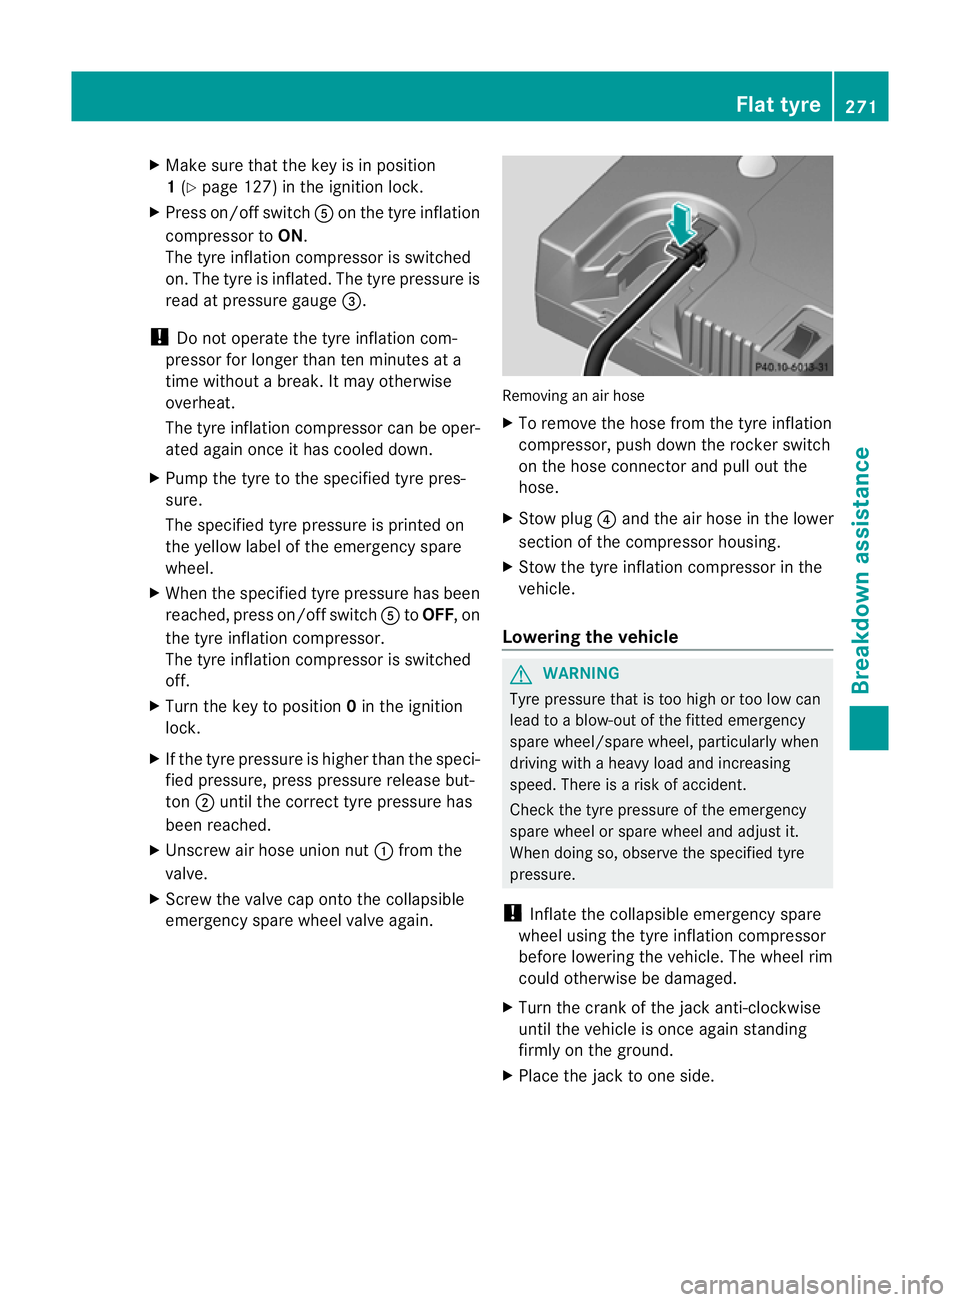
X
To remove the hose from the tyre inflation
compressor, push down the rocker switch
on the hose connector and pull out the
hose.
X Stow plug ?and the air hose in the lower
section of the compressor housing.
X Stow the tyre inflation compressor in the
vehicle.
Lowering the vehicle G
WARNING
Tyre pressure that is too high or too low can
lead to a blow-out of the fitted emergency
spare wheel/spare wheel, particularly when
driving with a heavy load and increasing
speed. There is a risk of accident.
Check the tyre pressure of the emergency
spare wheel or spare wheel and adjust it.
When doing so, observe the specified tyre
pressure.
! Inflate the collapsible emergency spare
wheel using the tyre inflation compressor
before lowering the vehicle. The wheel rim
could otherwise be damaged.
X Turn the crank of the jack anti-clockwise
until the vehicle is once again standing
firmly on the ground.
X Place the jack to one side. Flat tyre
271Breakdown assistance Z
Page 275 of 321
G
WARNING
The wheels could work loose if the wheel nuts
and bolts are not tightened to the specified
tightening torque .There is a risk of accident.
Have the tightening torque immediately
checked at a qualified specialist workshop
after a wheel is changed.
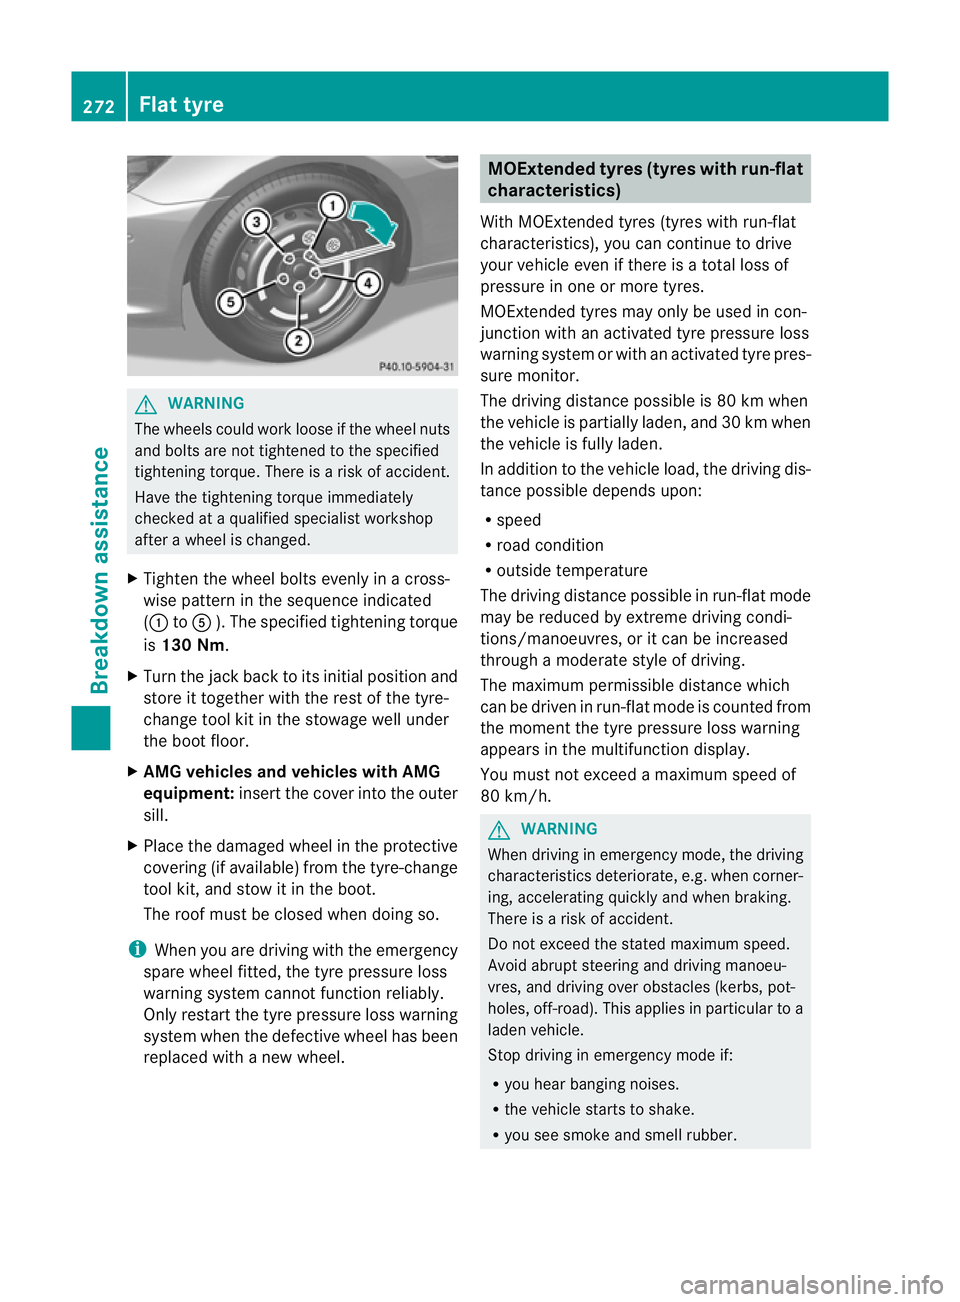
X Tighten the wheel bolts evenly in a cross-
wise pattern in the sequence indicated
(: toA ). The specified tightening torque
is 130 Nm.
X Turn the jack back to its initial position and
store it together with the rest of the tyre-
change tool kit in the stowage well under
the boot floor.
X AMG vehicles and vehicles with AMG
equipment: insert the cover into the outer
sill.
X Place the damaged wheel in the protective
covering (if available) from the tyre-change
tool kit, and stow it in the boot.
The roof must be closed when doing so.
i When you are driving with the emergency
spare wheel fitted, the tyre pressure loss
warning system cannot function reliably.
Only restart the tyre pressure loss warning
system when the defective wheel has been
replaced with a new wheel. MOExtended tyres (tyres with run-flat
characteristics)
With MOExtended tyres (tyres with run-flat
characteristics), you can continue to drive
your vehicle even if there is a total loss of
pressure in one or more tyres.
MOExtended tyres may only be used in con-
junction with an activated tyre pressure loss
warning system or with an activated tyre pres-
sure monitor.
The driving distance possible is 80 km when
the vehicle is partially laden, and 30 km when
the vehicle is fully laden.
In addition to the vehicle load, the driving dis-
tance possible depends upon:
R speed
R road condition
R outside temperature
The driving distance possible in run-flat mode
may be reduced by extreme driving condi-
tions/manoeuvres, or it can be increased
through a moderate style of driving.
The maximum permissible distance which
can be driven in run-flat mode is counted from
the moment the tyre pressure loss warning
appears in the multifunction display.
You must not exceed a maximum speed of
80 km/h. G
WARNING
When driving in emergency mode, the driving
characteristics deteriorate, e.g. when corner-
ing, accelerating quickly and when braking.
There is a risk of accident.
Do not exceed the stated maximum speed.
Avoid abrupt steering and driving manoeu-
vres, and driving over obstacles (kerbs, pot-
holes, off-road). This applies in particular to a
laden vehicle.
Stop driving in emergency mode if:
R you hear banging noises.
R the vehicle starts to shake.
R you see smoke and smell rubber. 272
Flat tyreBreakdown assistance
Page 288 of 321
Useful information
............................286
Important safety notes ....................286
Operation ........................................... 286
Winter operation ............................... 288
Tyre pressure .................................... 289
Changing awheel ............................. 294
Wheel and tyre combinations ..........295 285Wheels and tyres
Page 289 of 321
Useful information
i This Owner's Manual describes all models
and all standard and optional equipment
available to your vehicle at the time of pub-
lication of the Owner's Manual. Country-
specific deviations are possible. Please
note that your vehicle may not be equipped
with all features described. This also
applies to safety-relevan tsystems and
functions.
i Please read the information on qualified
specialist workshops (Y page 22).Important safety notes
G
WARNING
If wheels and tyres of the wrong size are used,
the wheel brakes or suspensio ncomponents
may be damaged. There is arisk of accident.
Always replace wheels and tyres with those
that fulfil the specifications of the original part
(designation, manufacturer, model). G
WARNING
Af lat tyre severely impairs the driving, steer-
ing and braking characteristics of the vehicle.
There is a risk of accident.
Tyres without run-flat characteristics:
R do not drive with aflat tyre.
R immediately replace the flat tyre with your
emergency spare wheel or spare wheel, or
consult a qualified specialist workshop.
Tyres with run-flat characteristics:
R pay attention to the information and warn-
ing notices on MOExtended tyres (tyres
with run-flat characteristics).
Accessories that are not approved for your
vehicle by Mercedes-Ben zorare not being
used correctly can impair the operating
safety. Before purchasing and using non-approved
accessories, visit a qualified specialist work-
shop and enquire about:
R suitability
R legal stipulations
R factory recommendations
Information on the dimensions and types of
wheels and tyres for yourv ehicle can be
found in the "Wheel/tyre combinations" sec-
tion (Y page 295).
Information on air pressure for the tyres on
your vehicle can be found:
R on the tyre pressure label on the fuel filler
flap
R in the "Tyre pressure" section
Modification work on the brake system and
wheels is not permitted, nor is the use of
spacer plates or brake dust shields. This inva-
lidates the general operating permit for the
vehicle.
Pay special attention to the country-specific
requirements for tyre approval. These
requirements can stipulate aspecific tyre
type for your vehicle. Furthermore, the use of
certain tyre types in certain regions and areas
of operation can be highly beneficial. You can
find further information regarding tyres at
specialist tyre retailers, at qualified specialist
workshops or at every Mercedes-Benz
Service Centre.
i Further information on wheels and tyres
can be obtained at any qualified specialist
workshop. Operation
Notes on driving
R While driving, pay attention to vibrations,
noises and unusual handling characteris-
tics, e.g. pulling to one side. This may indi-
cate that the wheels or tyres are damaged.
If you suspect that a tyre is defective,
reduce your speed immediately. Stop the
vehicle as soon as possible to chec kthe 286
OperationWheels and tyres